
These 30 backyard project ideas cover places to sit, grow plants, organize equipment, move through the garden, and play. Some resolve a small everyday inconvenience; others introduce structures that need a detailed design. Three short videos illustrate a fire-area layout, a timber flower-bed border, and an A-frame reading nook. Use the collection to choose a project, then measure its location and plan the required foundations, connections, and clearances.
Table of Contents
- Choose a Project That Fits the Job
- 1. Gravel Fire Pit Corner for Outdoor Gatherings
- Video Example: Defining a Circular Fire Area
- 2. Tiered Herb Garden for Easier Harvesting
- 3. Pallet Lounge Bench with Flexible Cushions
- 4. Wall-Mounted Station for Garden Tools
- 5. Privacy Screen with an Integrated Planter
- 6. Curved Gravel Path with Stepping Stones
- 7. Garden Arch for Climbing Plants
- 8. Gravel Seating Circle with a Corner Bench, Table, and Stools
- 9. Vertical Strawberry Planter for a Small Garden
- 10. Garden Bench with Planters at Each End
- 11. Corner Pergola Bench for an Underused Area
- 12. Low Timber Border for a Flower Bed
- Video Example: Outlining and Planting a Small Bed
- 13. Open Pergola Reading Corner with Built-In Seating
- 14. Outdoor Chalkboard Zone for Creative Play
- 15. Circular Conversation Area with Wooden Benches
- 16. Defined Picnic Area with a Wooden Table and Benches
- 17. Organized Storage for Backyard Sports Gear
- 18. Covered Bench with Storage Beneath the Seat
- 19. Pergola with Hanging Chairs for a Garden Rest Area
- 20. A-Frame Reading Nook with Built-In Book Shelves
- Video Example: Arranging an A-Frame Reading Corner
- 21. Sensory Garden Corner with Raised Beds
- 22. Water Play Station with Removable Containers
- 23. Low Obstacle Course for Active Play
- 24. Sand and Digging Station
- 25. Low Balance Trail with Log Posts and a Small Bridge
- 26. Small Outdoor Track for Toy Cars
- 27. Rose Trellis Seating Nook
- 28. Circular Garden Nook with a Barrel Planter and Flower Border
- 29. Low Garden Bridge over a Decorative Stream
- 30. Tiered Barrel Planters for a Layered Garden Corner
- Keep the Project Useful After Installation
Choose a Project That Fits the Job
For storage, go to the tool station or sports equipment organizer. For growing space, compare tiered herbs, strawberries, and barrel planters. For seating, consider the pallet bench, corner seating circle, planter bench, and fixed conversation benches.
Mark the available footprint and the routes that must remain open. Check sun and shade at the intended use time, look for standing water after rain, and account for maintenance access. Locate buried services and assess nearby roots before ground work. Then choose materials for their exposure and care requirements, not appearance alone.
Plan load-bearing structures, foundations, clearances and local requirements before buying pergola parts, hanging chairs, bridges, fire features or elevated play equipment. Check ground conditions and anchoring early; they can determine whether the project belongs in that location.
1. Gravel Fire Pit Corner for Outdoor Gatherings
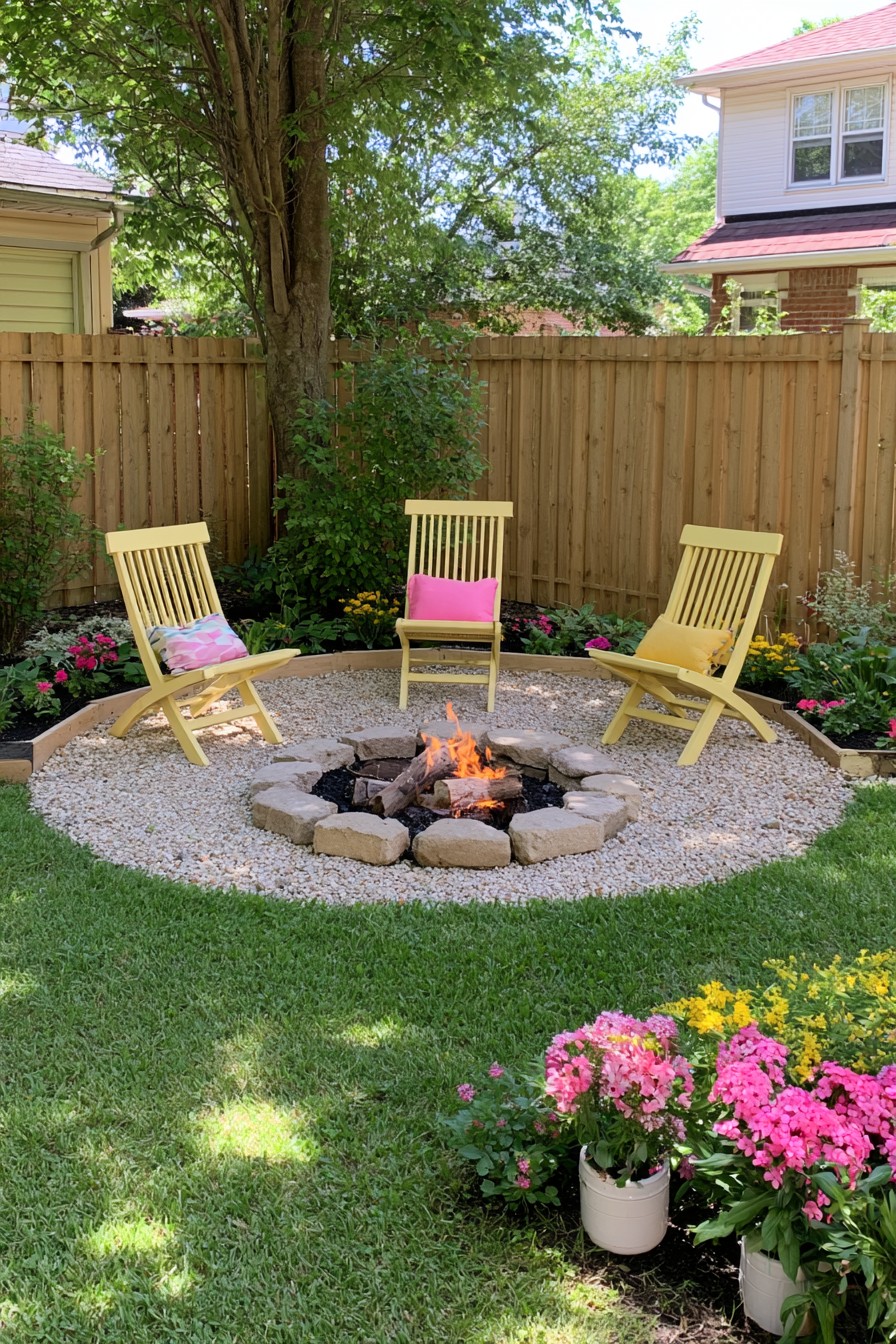
A gravel circle gives the fire feature and chairs a defined gathering place, separating the activity from the surrounding lawn. Start by choosing an outdoor fire product intended for its fuel and installation type, then assess whether the yard can accommodate its required clearances. Position the tree, fence, and timber chairs outside the clearances required by the fire feature and local rules.
Keep planting, furniture, and overhead branches outside the clearances required by the product and local fire rules. Arrange an approach that avoids passing beside the flame, and closely supervise children during use. Extinguish or turn off the fire before leaving the backyard. If adequate separation is unavailable, use the circular area for conversation without a fire feature.
Video Example: Defining a Circular Fire Area
The clip progresses from a marked circle to ground preparation, perimeter edging, spread gravel, a central stone ring, and chairs. It is useful for seeing how one shape organizes the area. Use materials specified for the fire feature and check the required clearance from trees, fences, seating, and other combustibles.
For your own planning, select the intended fire product and confirm its siting rules first, then mark the circle and test the seating and access positions. Resolve the base and edging for that product and ground conditions before installation. Treat the stone-ring sequence as a visual example, not instructions to improvise a fire chamber from ordinary landscaping materials.
2. Tiered Herb Garden for Easier Harvesting
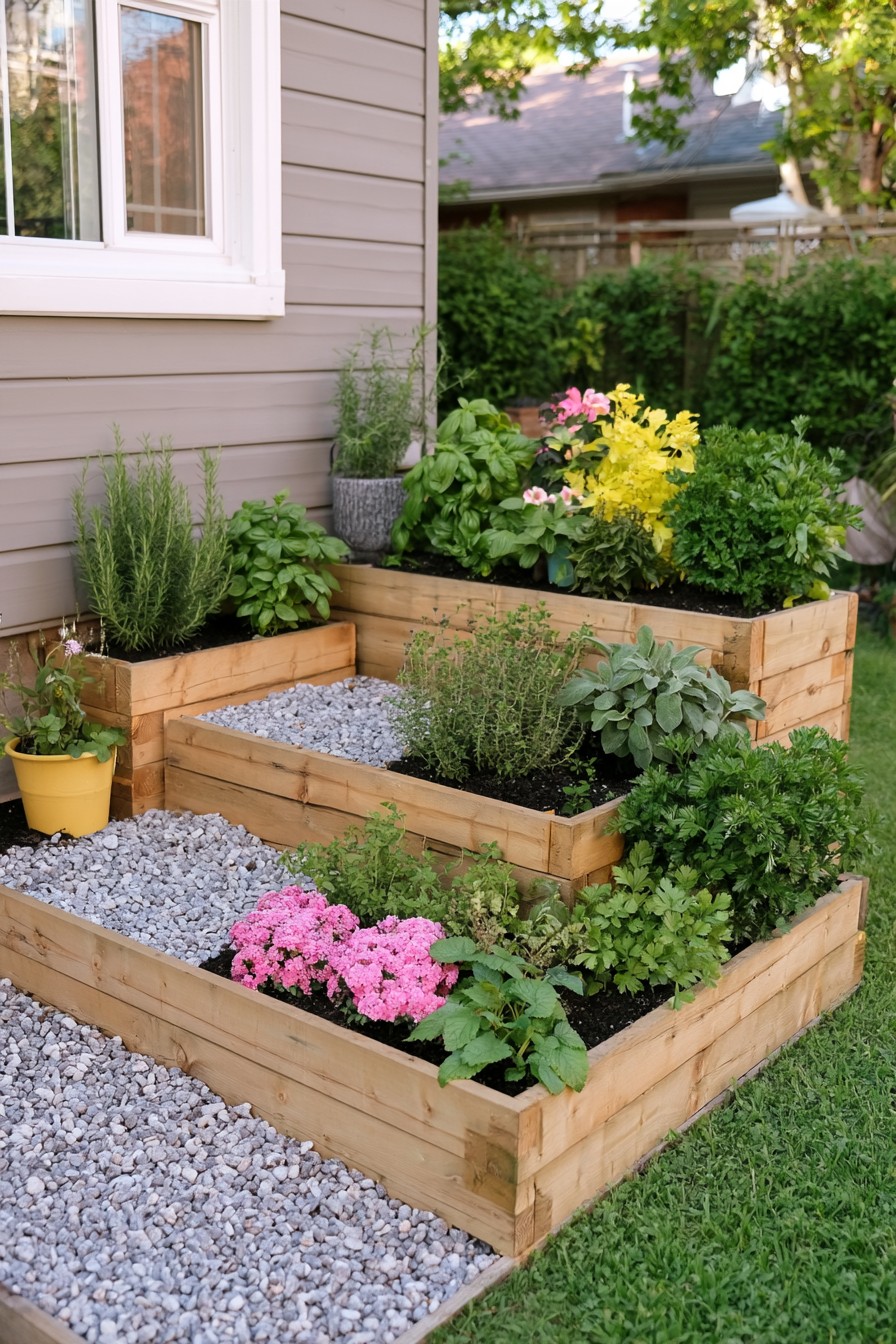
Stepped planting boxes make harvesting convenient while giving a garden edge more depth. Place frequently picked herbs on levels that can be reached without leaning over another bed. Select plants for the actual sun exposure and divide the planting by watering needs: thyme and culinary sage favor freely draining, relatively dry conditions, while mint needs a more consistently moist root environment.
Grow mint in a separate container to contain its spreading growth and water it independently. Each planting level needs drainage, access for harvesting, and enough room for mature growth; the frame must carry the boxes when their contents are wet. Check lower tiers as well as the top, since runoff and shading can create different conditions. The tiered form saves ground space only when every level remains practical to maintain.
3. Pallet Lounge Bench with Flexible Cushions
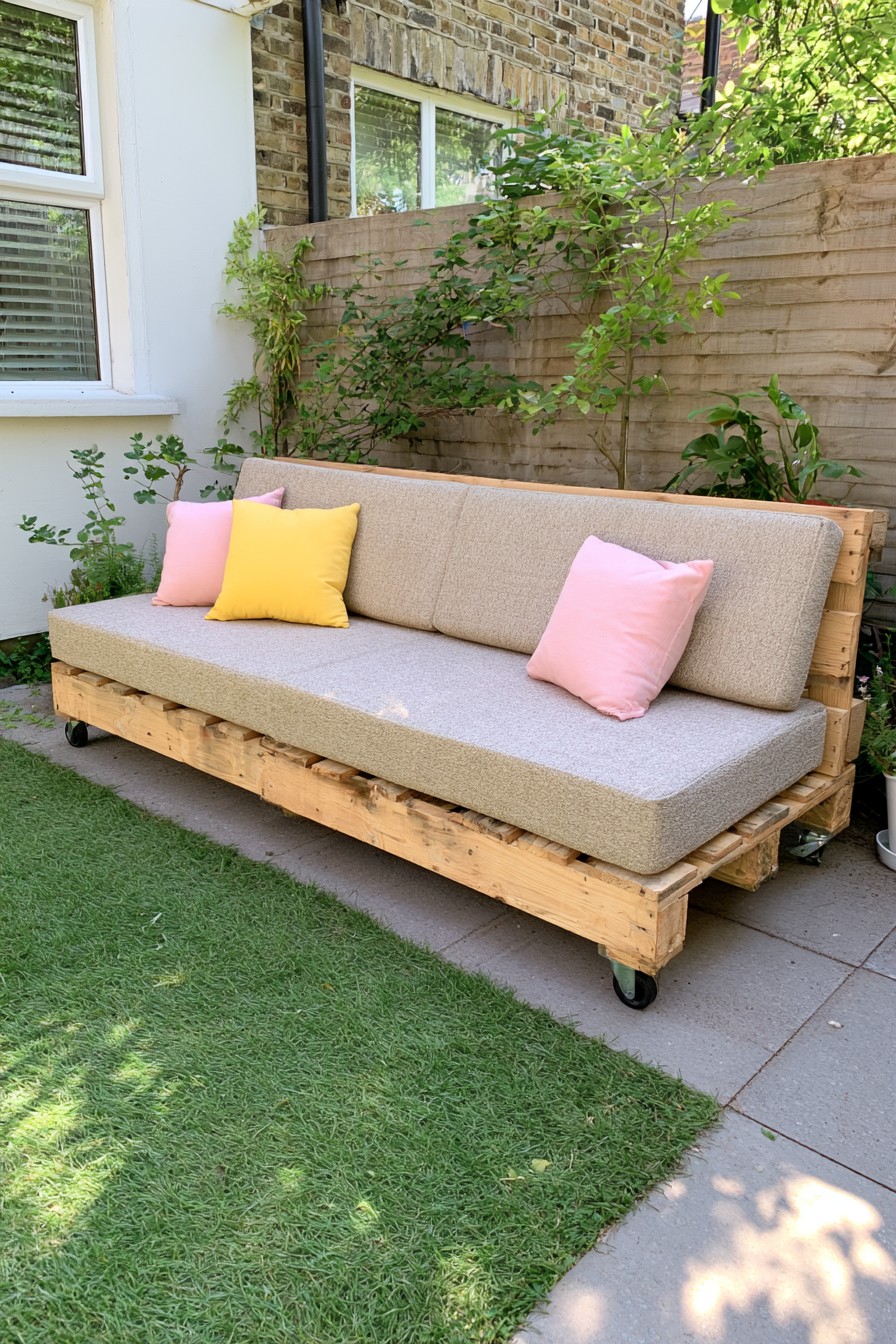
A broad pallet bench with fitted removable cushions makes a useful lounge along a patio boundary. Decide whether you want upright sitting or room to stretch out before selecting the seat depth; adding thicker cushions changes both the sitting height and available back support. Shortening the bench can preserve the open center of a narrow patio. Compare compact pallet seating layouts for different corner and straight arrangements.
Use pallets with a known history and sound timber, rejecting contamination, decay, and exposed fasteners. The seat layers and backrest need reliable connections. This bench includes wheels; a mobile version also requires castors rated for the completed furniture and its occupants, secure mounting, and brakes or another appropriate restraint during use. Store cushions dry, following their care instructions.
4. Wall-Mounted Station for Garden Tools
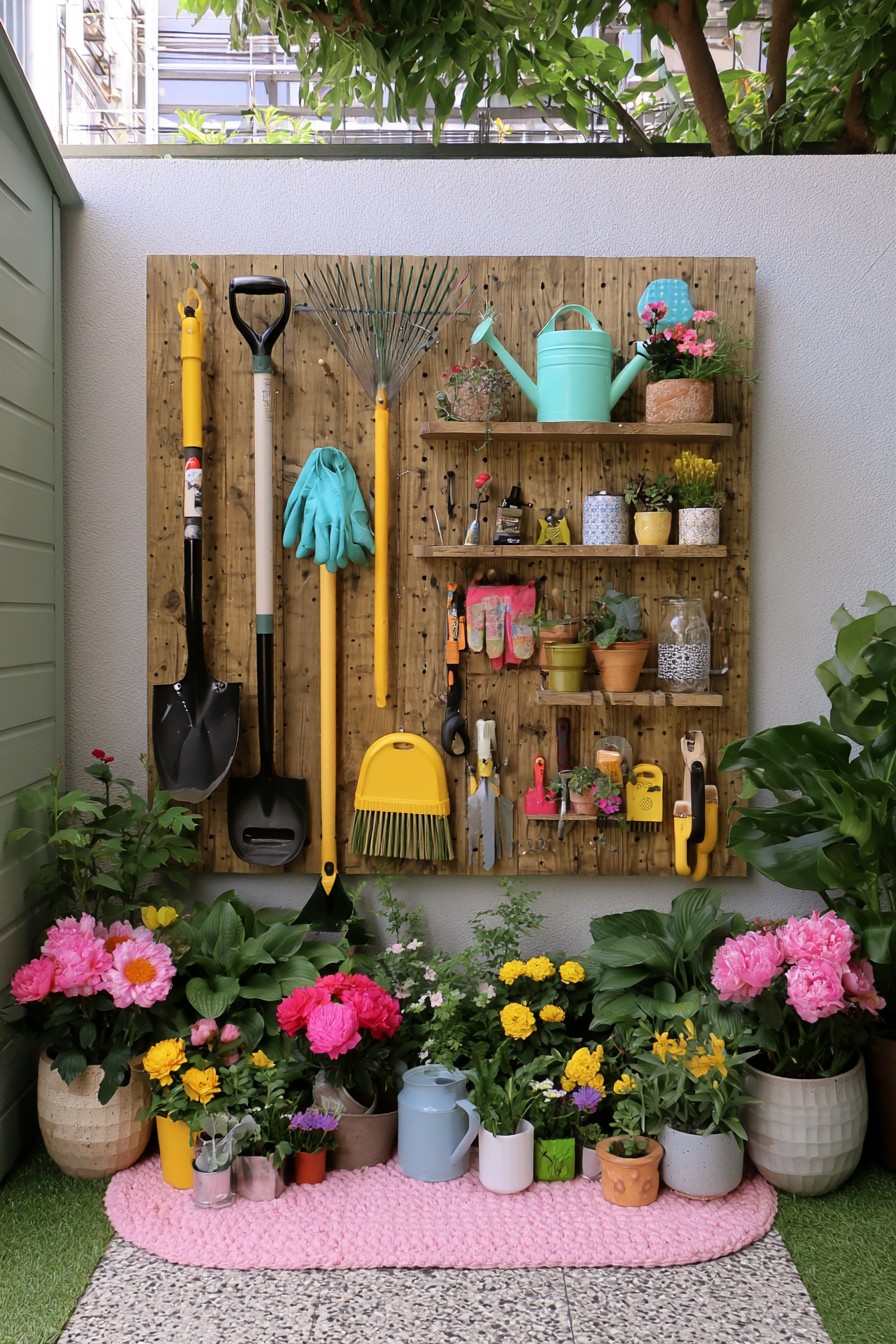
A wall tool station is most useful when its arrangement follows the gardening routine. Give the tools used every few days the easiest positions to remove and return, keeping seasonal items farther from the center. Space rake and shovel heads so they do not overlap, and place gloves and hand tools in separate, clearly visible holders. Test the removal movement with the actual tools before fixing the final hook positions.
Attach the backing to a structural surface with fixings selected for the wall and the loaded station. Sharp tools should remain inaccessible to children and away from play routes. The flower pots can sit beside the station, but leave the standing area clear so nothing has to be stepped over. Brush off soil and let wet equipment dry before returning it to storage.
5. Privacy Screen with an Integrated Planter
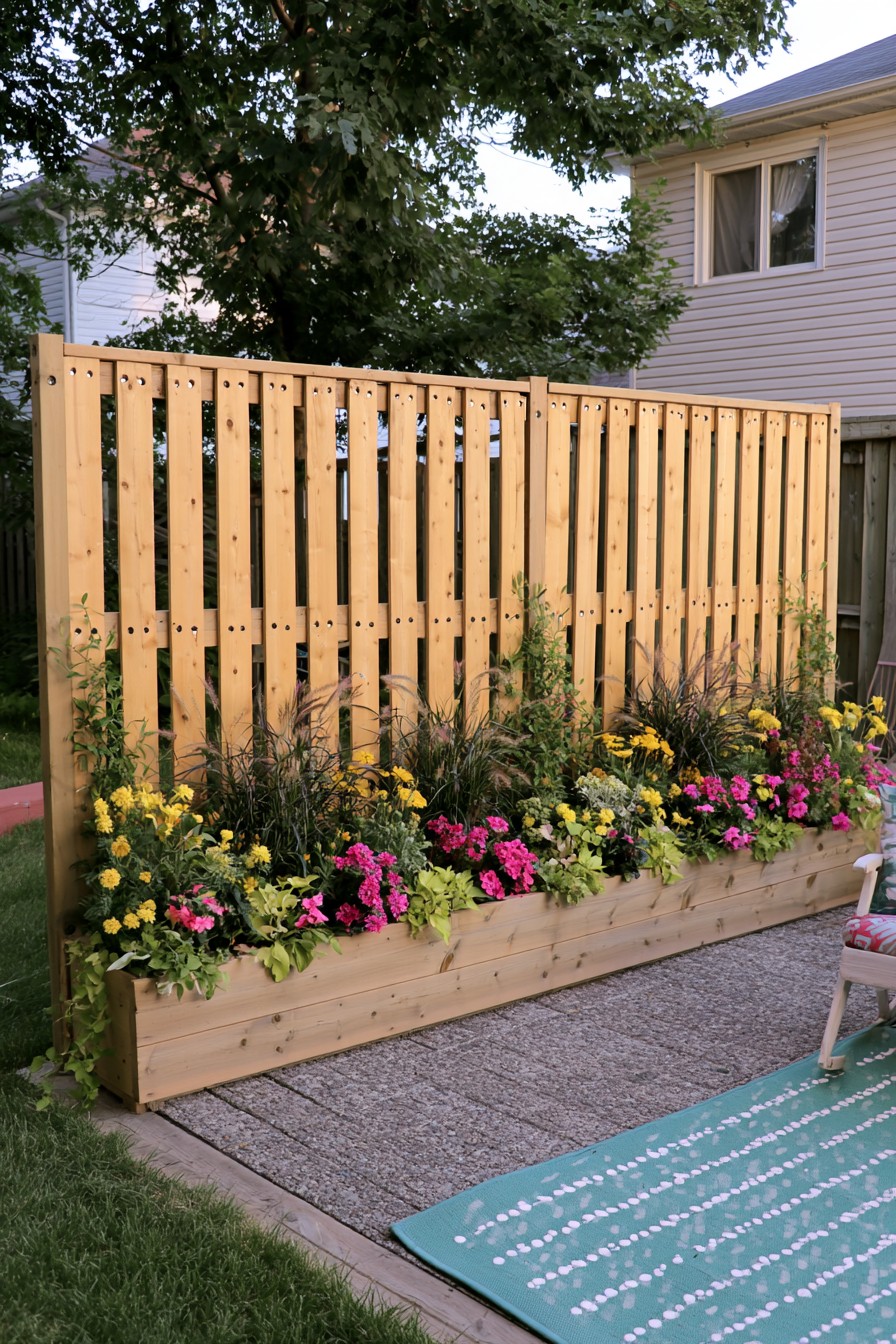
A slatted screen beside a planter offers visual privacy while keeping the garden connected to its surroundings. First identify the view you want to interrupt from the actual seated position. Then choose the screen height and slat spacing around that sightline; a dense panel provides more immediate screening than a plant-covered arch, but also changes airflow and wind exposure.
The planting box softens the base without replacing structural anchoring. Design the posts and foundations for the site, and keep drainage water from sitting against the timber. Leave enough space to reach the plants without moving the furniture. A shorter panel may resolve one exposed seating position more effectively than screening the whole boundary. This feature defines a view; it does not provide overhead shade or rain protection.
6. Curved Gravel Path with Stepping Stones
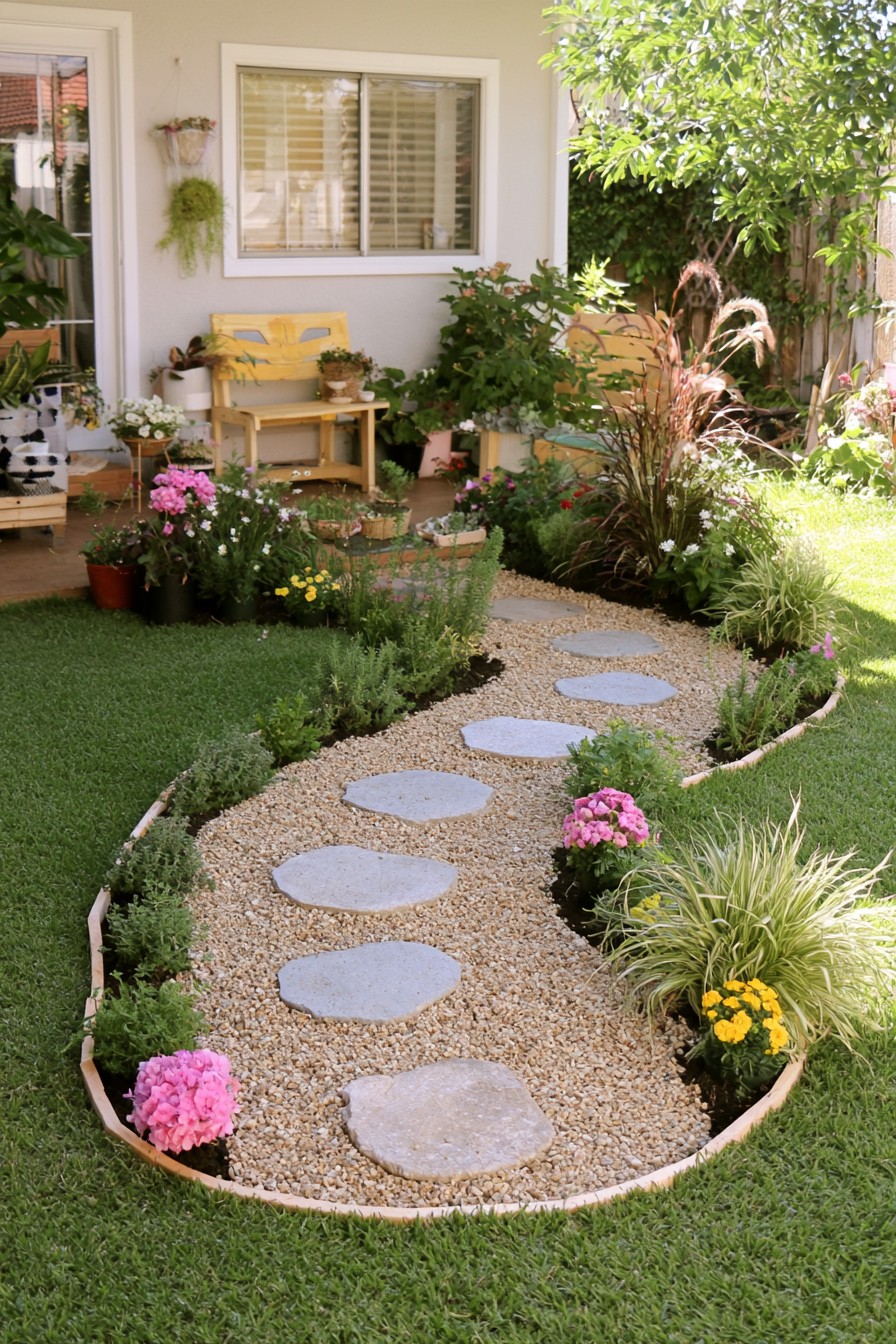
Curved edging and repeated stepping stones guide the eye through planting, making this a decorative connection between garden areas. Mark the route before removing lawn, then walk it while carrying the items normally moved along it. A curve that sends people across the planting is a sign that the route needs adjustment. Resolve the base and drainage for the local ground conditions.
Loose gravel and gaps between stones can hinder small wheels, strollers, and mobility aids. For the main daily route, a continuous, firm, stable surface with traction in wet weather will often be more useful. Retain the curved outline while changing the surface specification around the household’s needs. Applicable accessibility requirements depend on the project and location.
7. Garden Arch for Climbing Plants
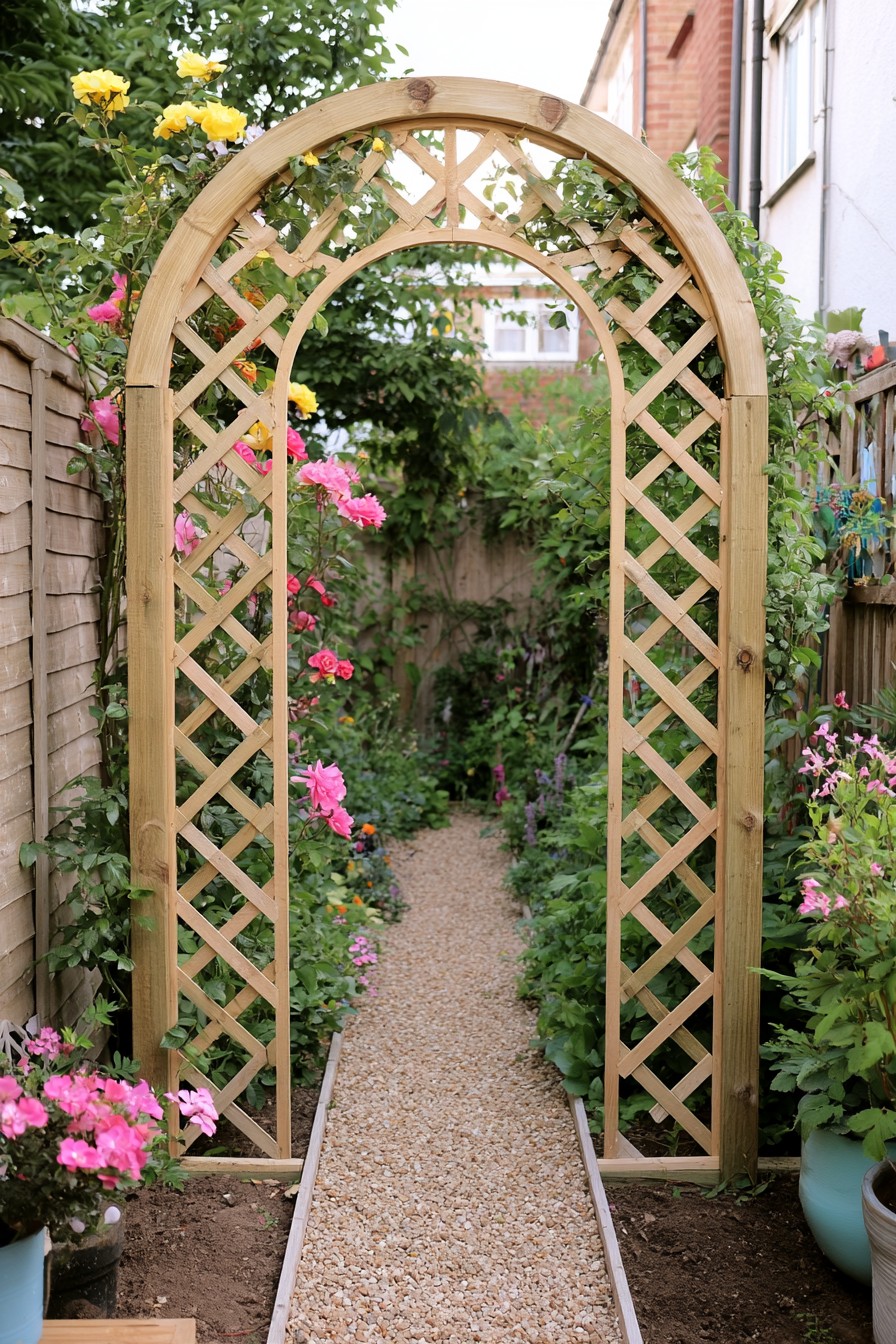
A lattice arch marks the beginning of a path and gives climbers a visible route upward. Size its opening for both people and the equipment that must pass through, then allow for plants narrowing that opening as they mature. The bare frame creates a garden threshold immediately; dense foliage or a stronger sense of enclosure develops only as the selected plants grow.
Choose a climber whose mature size suits the support, and keep its base accessible for watering and pruning. Guide growth along the frame without letting shoots cross the walking opening. Posts, connections, and anchoring must accommodate wind and the weight of established growth. Inspect the arch during pruning, when its structure is easier to see. Unlike a solid privacy panel, the open lattice retains views through the garden.
8. Gravel Seating Circle with a Corner Bench, Table, and Stools
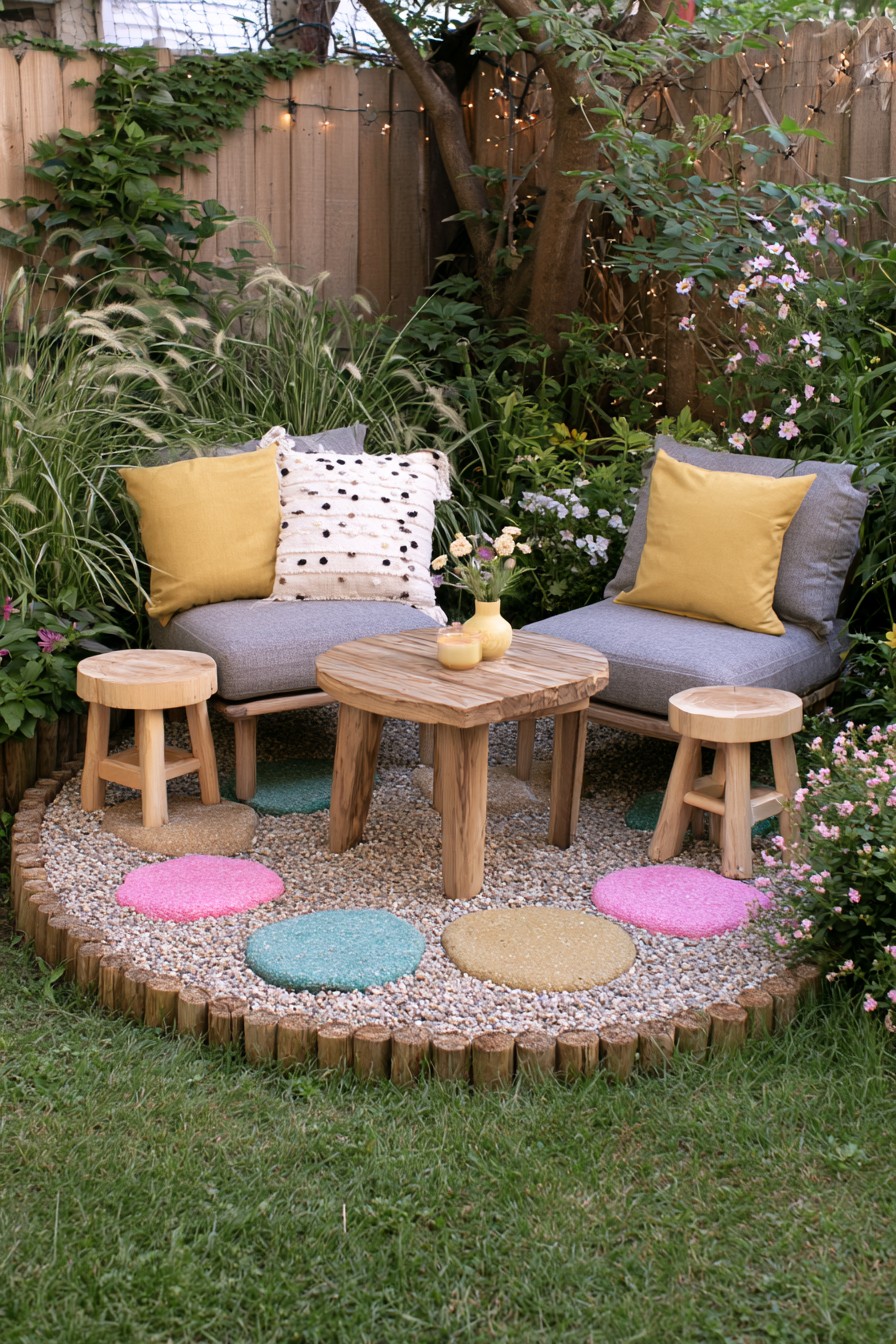
The corner bench occupies the rear of this gravel circle, while a central table and small stools complete the conversation area. Begin with the bench footprint, including space for knees and getting up, before sizing the circular border. Move the stools through the likely sitting positions to check that the entrance remains open; a corner bench takes more committed space than a few separate chairs.
Contain the gravel and prepare its base for the furniture and site. Narrow stool legs can sink or rock in loose material, so assess the actual contact points. Provide a dependable approach from the house, particularly where wheeled access is needed. If gravel makes daily movement difficult, keep the circular shape with a continuous paved surface. Remove cushions for drying and storage rather than treating the planted corner as protected from weather.
9. Vertical Strawberry Planter for a Small Garden
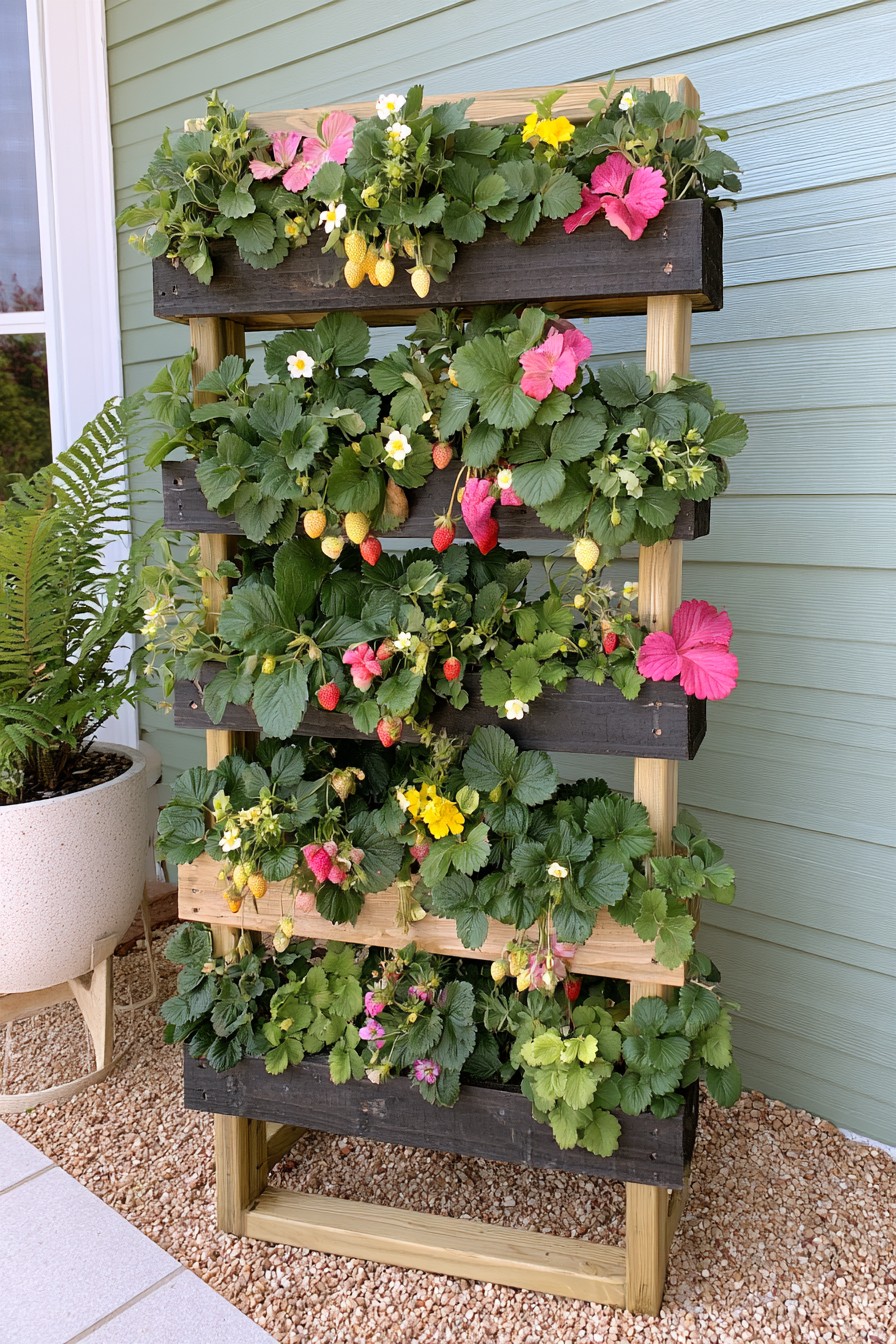
A strawberry tower places several growing boxes on a narrow footprint, keeping fruit visible for harvesting. Position it in a sunny location and stagger the tiers so upper growth does not continually shade the lower plants. Use a container growing medium, planting each strawberry with its crown, where leaves meet roots, level with the surface rather than buried beneath it.
Check moisture in each box and water as needed; containers can dry quickly, and an upper tier may behave differently from a shaded lower one. The space saved comes with more individual watering checks. Give every box its own drainage route, avoiding repeated runoff into the tier below. A stable frame must support wet growing medium, and the highest plants should remain reachable for picking, inspecting leaves, and removing unwanted runners.
10. Garden Bench with Planters at Each End
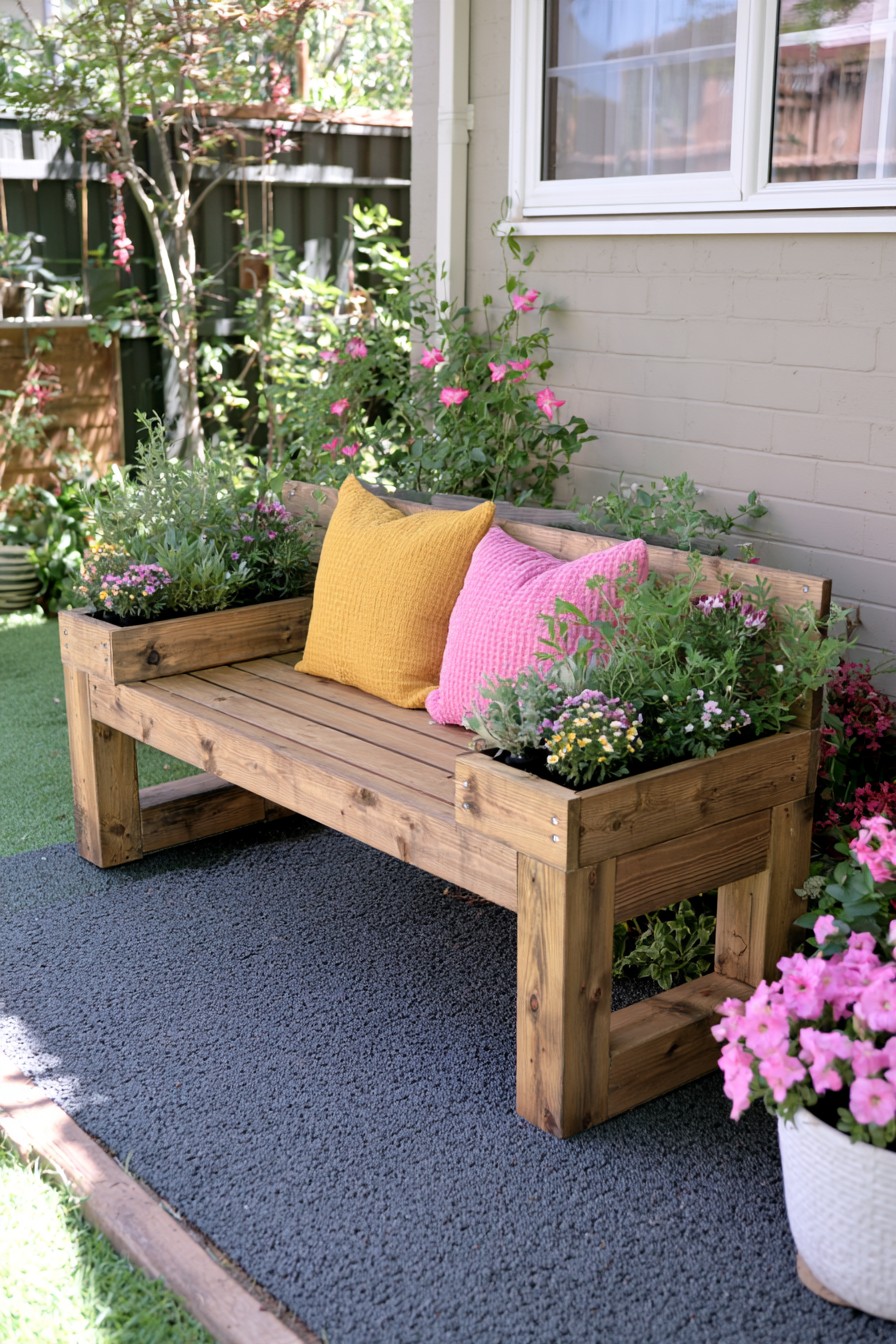
Planters at both ends turn a straight bench into a small garden destination. Choose plants that frame the seat without extending across the backrest or into the place where a person stands up. The bench should still feel comfortable when the planting reaches mature size, so allow room for that growth before deciding how wide each end box should be.
Support the seat with a properly designed frame rather than thin planter walls. Keep the growing compartments separate from the seating structure and direct drainage away from joints and surfaces beneath the sitter. Water at the planting surface to reduce splashing onto the bench. Preserve access to replace the growing medium, and inspect the timber beside the boxes for persistent dampness. This maintenance point distinguishes an integrated planter bench from an ordinary outdoor seat.
11. Corner Pergola Bench for an Underused Area
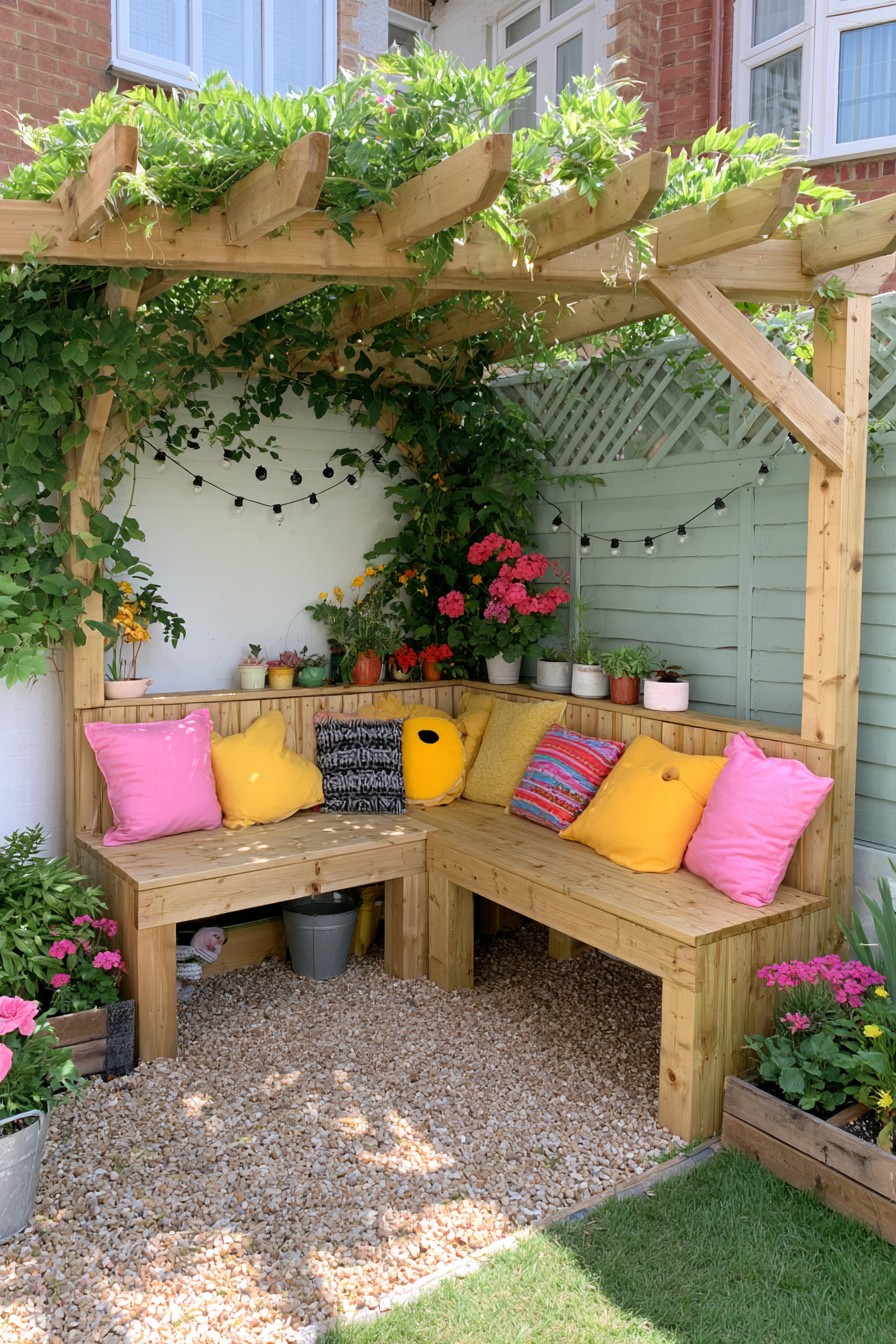
A corner pergola turns two boundaries into a destination, with built-in seating usable before climbers fill the overhead frame. Its important planning question is the actual shade at the hours you want to sit there. Observe the corner during that period: open beams and young vines may cast only narrow shadows, even when the arrangement looks sheltered.
Plan posts, footings, connections, and future plant loads for the site rather than selecting them by appearance. Keep the entry open and leave cleaning access under the bench. If deeper shade is needed, assess a shade system designed for the structure, including its fixing and wind requirements. A separate bench can be a smaller alternative where a substantial frame cannot be accommodated. Neither the beams nor climbing foliage establish a rainproof roof.
12. Low Timber Border for a Flower Bed
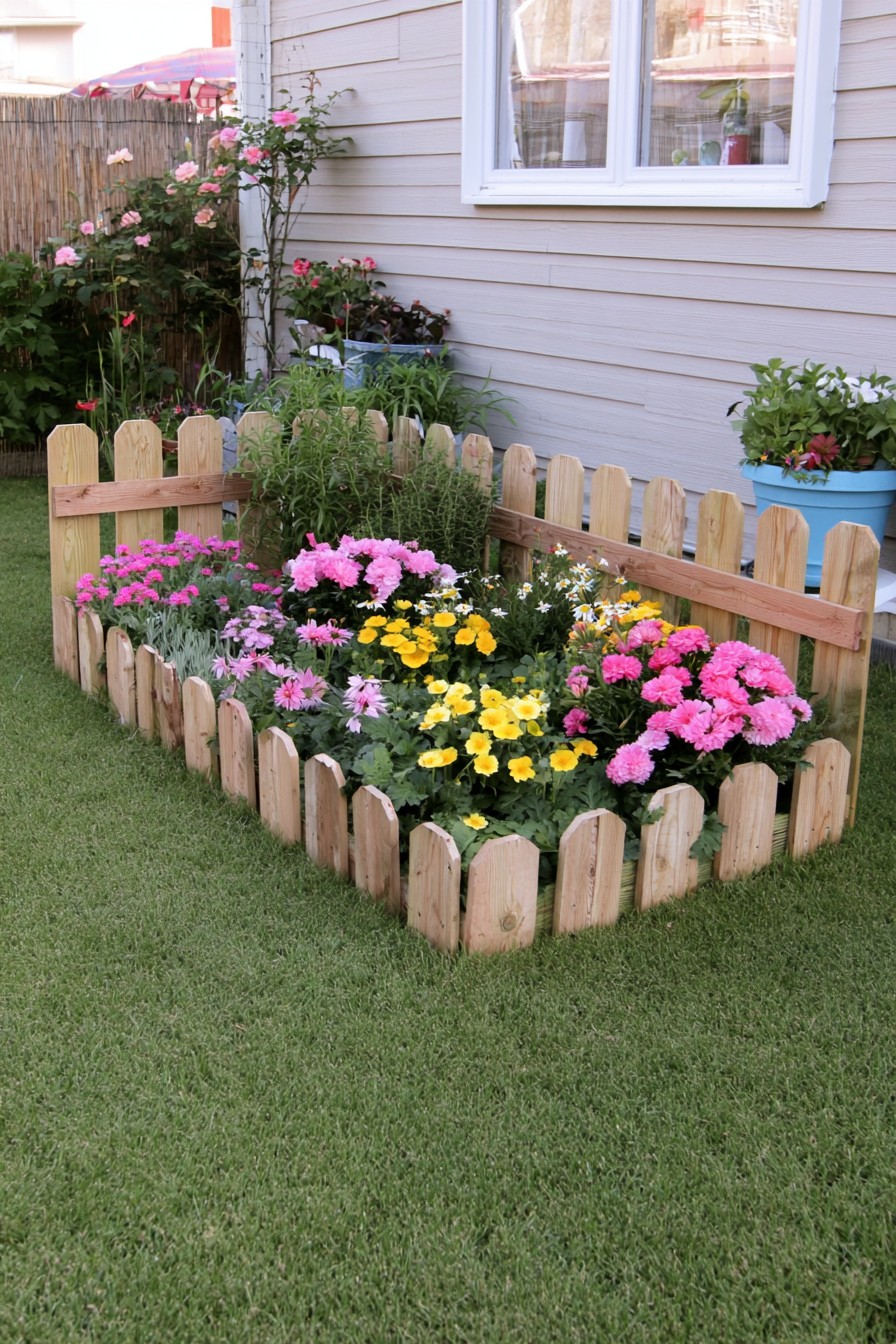
A low picket-style timber border makes the flower bed legible from the lawn and creates a tidy distinction between planting and mowing. Its value is containment and definition, not adding height for its own sake. Mark the outline first, allowing access to the back of the bed and enough room for mature plants to remain inside the boundary.
Select timber and fixings intended for the exposure, including ground contact where relevant. Keep the border clear of the main walking route and plan mowing access around its corners. It is a decorative bed edge, not a retaining wall or a seat. Inspect joints and the lower ends of the timber during seasonal cleanup, replacing deteriorated pieces before they loosen. Plants near the edge should leave room for that work without being repeatedly crushed.
Video Example: Outlining and Planting a Small Bed
The video shows a rectangle marked on the lawn, turf removed, a low picket border added, planting material spread, and flowers arranged inside. Use that order to plan the footprint before filling it. Check the mature sizes and growing conditions of the plants before copying the finished density.
Mark the border and leave mowing and planting access. Prepare soil and drainage for the chosen plants, secure the timber edging, then set out and water the planting. Keep the bed narrow enough to tend comfortably from its edges.
13. Open Pergola Reading Corner with Built-In Seating
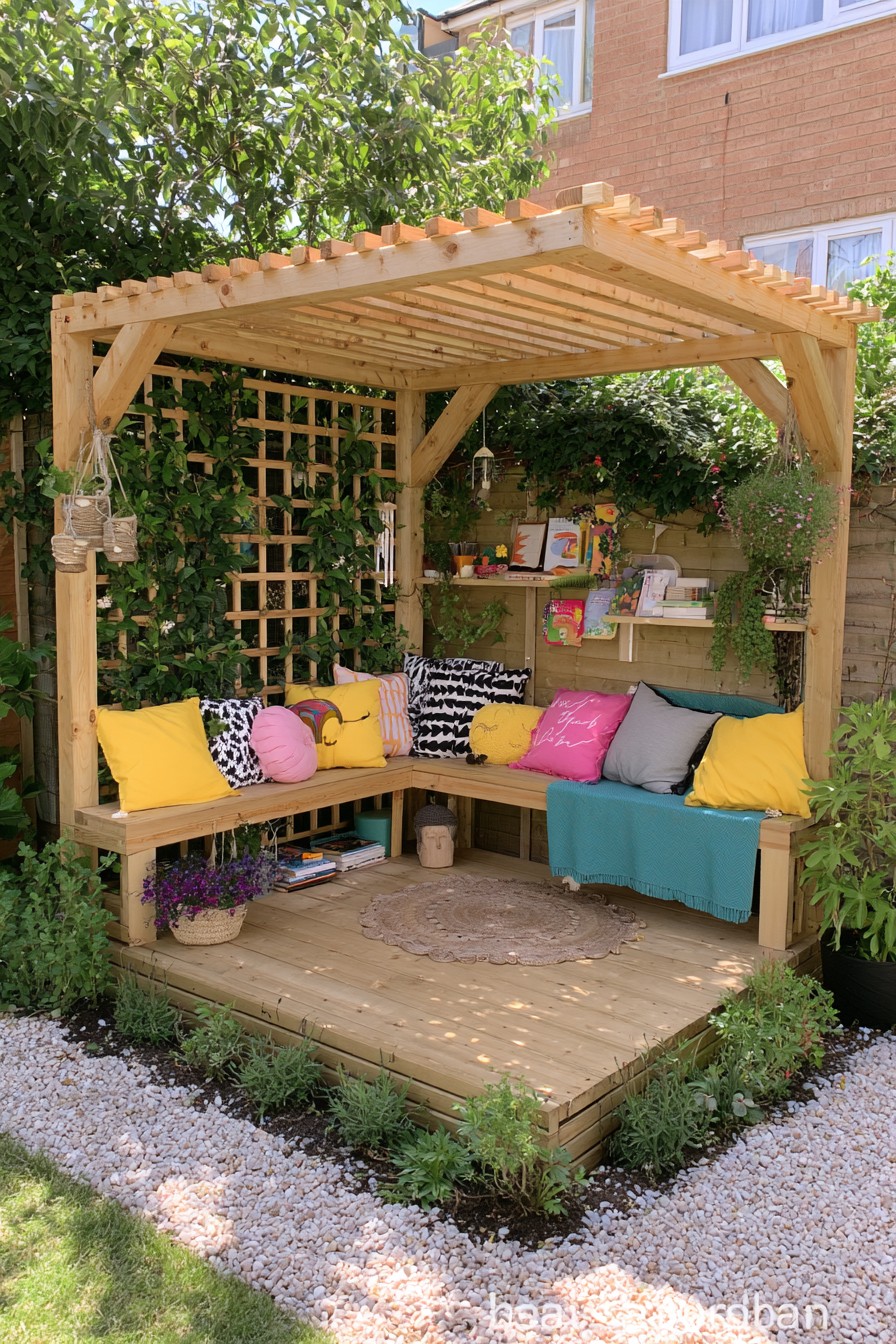
An open-beam pergola, corner seating, and nearby shelves give reading a dedicated outdoor setting. The beams frame the space but do not form a rainproof roof. Plan this as a fair-weather reading corner, with books and absorbent cushions brought indoors after use. A portable book basket can simplify the routine even when shelves are part of the design.
The raised timber floor is visible here and needs its own structural and drainage plan, unlike the green-surfaced picnic area below. Keep the entry level change easy to recognize and maintain ventilation beneath the floor. Resolve posts, connections, and local requirements before construction. Choose the seat position for comfort and the light available at reading time; the presence of a pergola alone does not guarantee shade over the whole bench.
14. Outdoor Chalkboard Zone for Creative Play
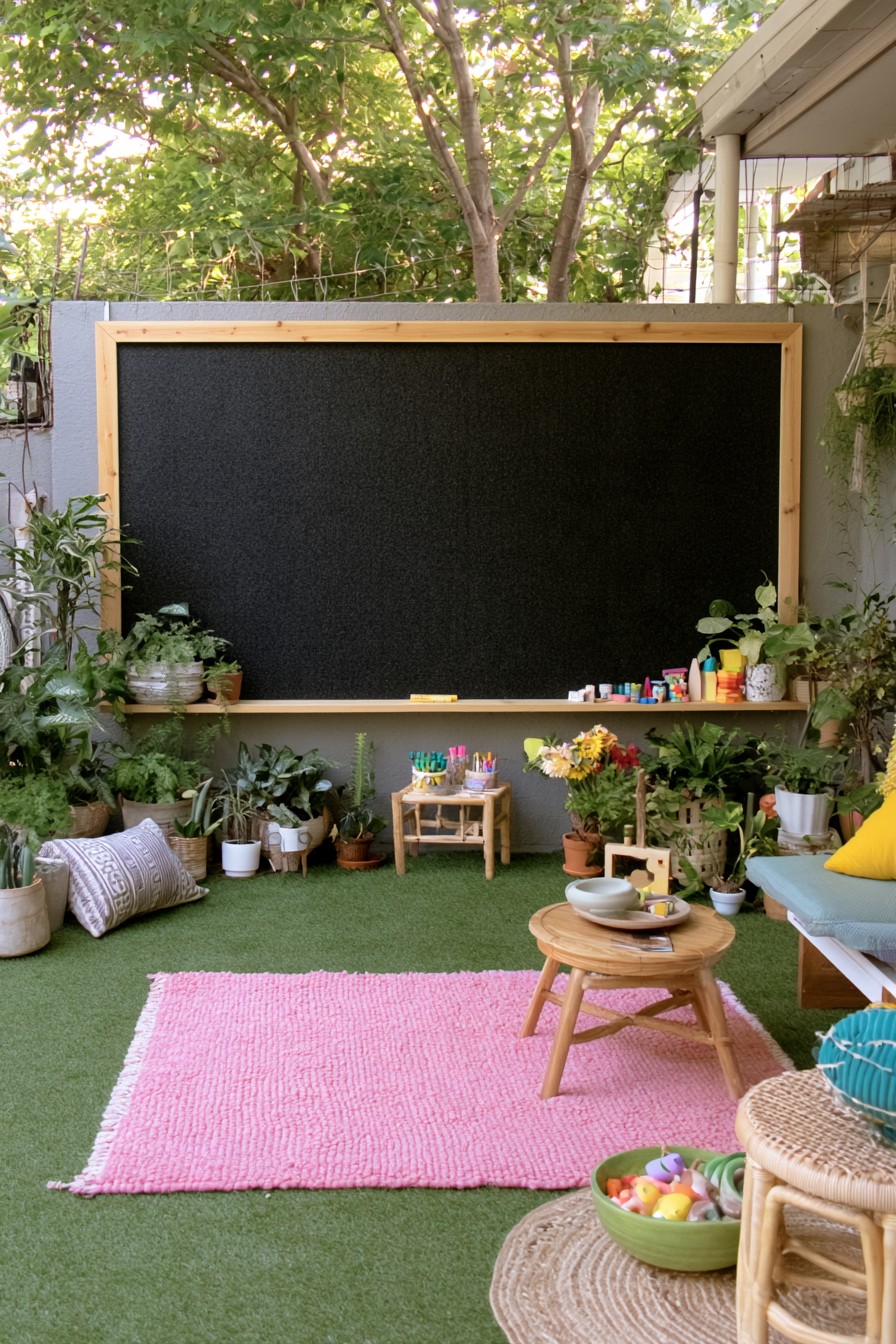
A large chalkboard creates a drawing destination without occupying the garden table. Mount it so the children using it can reach a useful drawing area from the ground, and leave the lower section open. The pots grouped beneath the board can move to either side; packing them across its base would make the surface harder to reach.
Provide a small container for age-appropriate chalk and a cloth, with a dry storage place after the session. Choose a board and coating intended for the site’s weather exposure and fix the framed panel to a sound backing. Leave the working space free of furniture that children might climb to reach higher. Plan where washing water and chalk residue will go, keeping them away from nearby seats and sensitive planting.
15. Circular Conversation Area with Wooden Benches
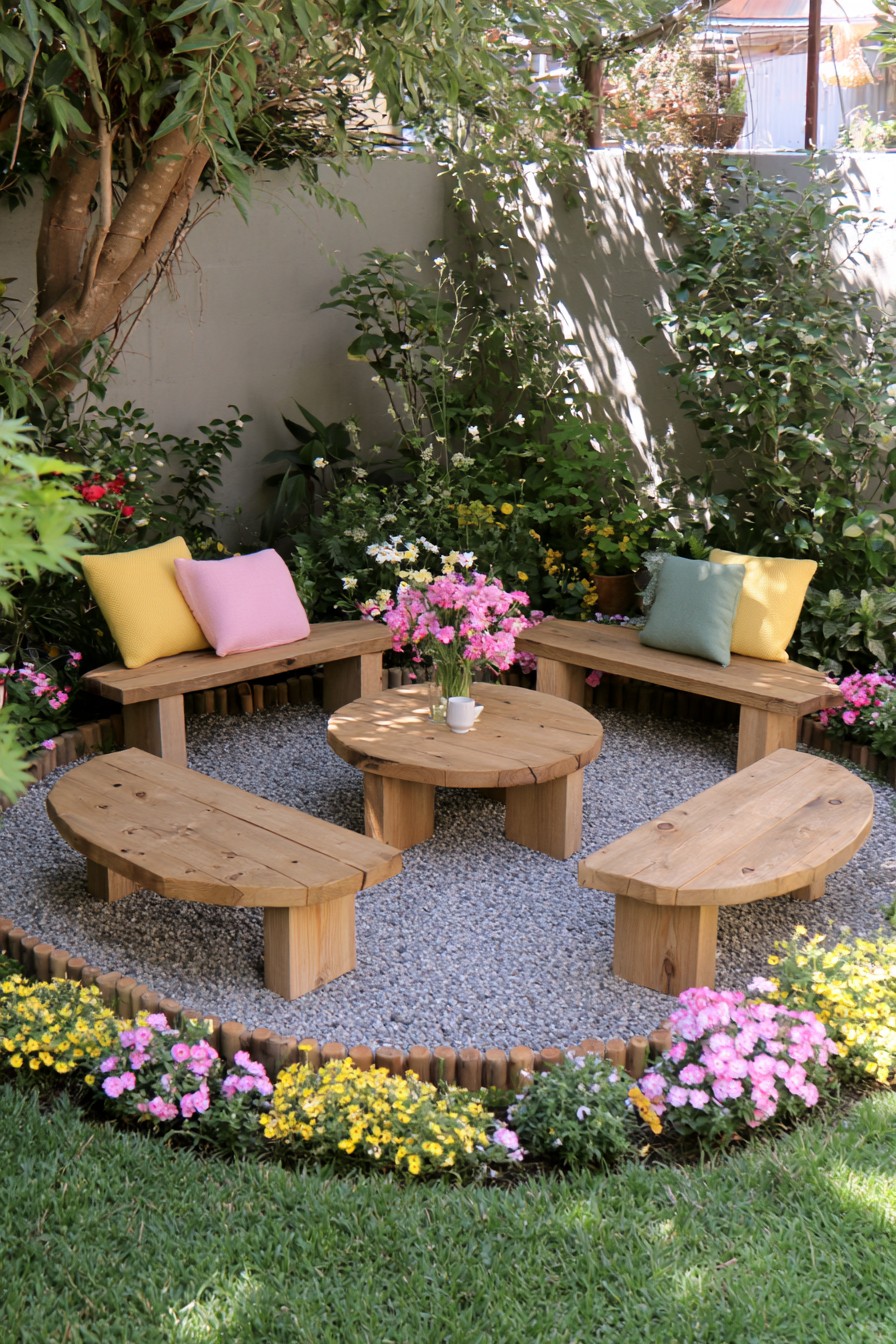
Curved wooden benches turn the circle into a permanent conversation area, leaving a shared table at its center. Unlike the corner bench and stools in the gravel setting, this arrangement depends on getting the entrances right from the outset. Leave breaks in the seating so people can enter without stepping over a bench, and check legroom between the table and every sitting position.
Use a structural seating plan with stable supports, then retain access beneath and behind the benches for clearing leaves and inspecting joints. A continuous flower ring looks attractive but can make that work awkward; leave discreet access points. Check where rainwater collects along the bases and follow the timber finish’s care instructions. Fixed seating earns its place when the gathering area will stay useful through changing garden layouts.
16. Defined Picnic Area with a Wooden Table and Benches
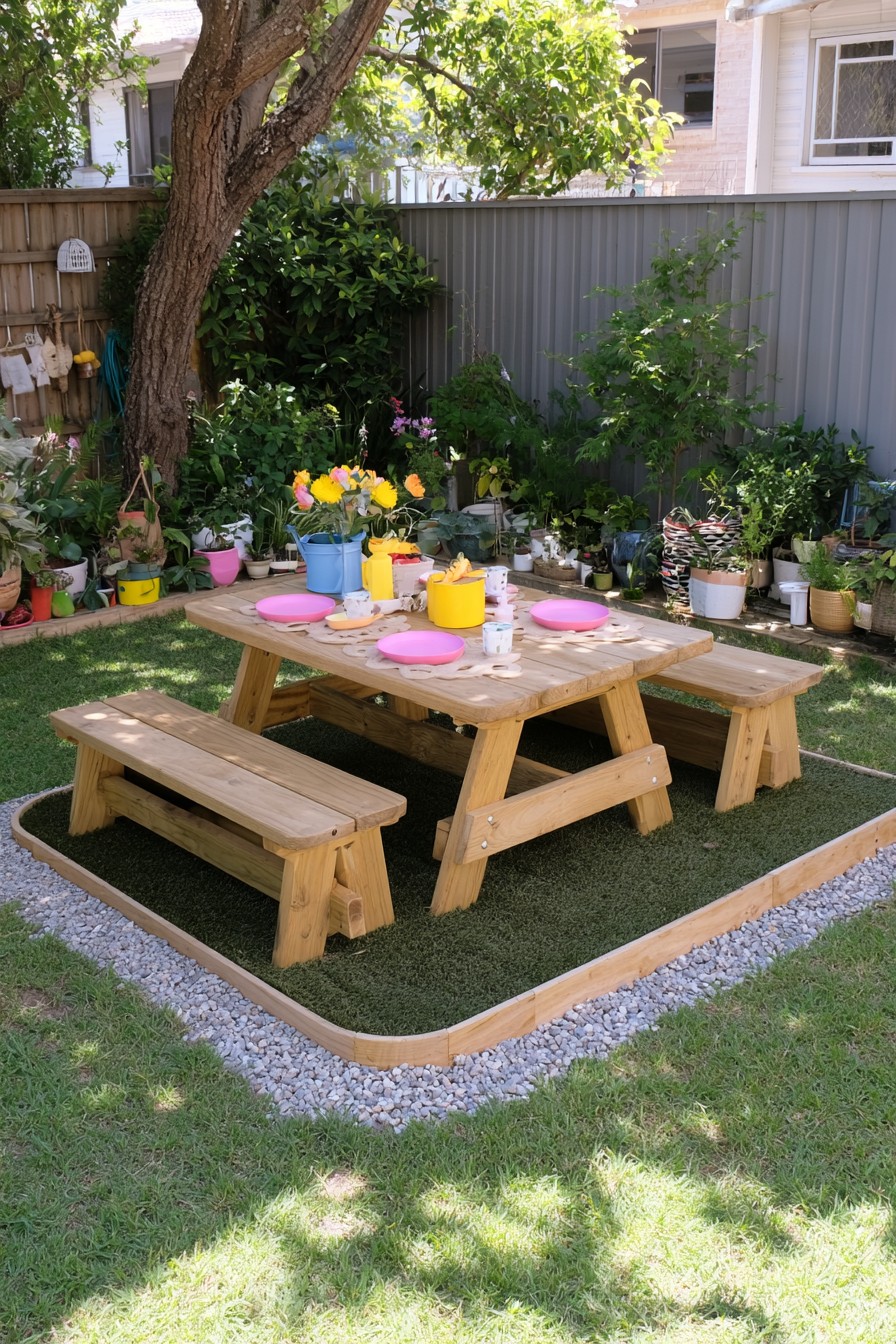
Timber edging outlines a green surface beneath the picnic table and benches, with gravel marking the outside boundary. The arrangement defines an eating area without showing a timber deck. Plan its footprint around the table, access to both benches, and the route used to carry food from the kitchen. The shortest convenient serving route may matter more than placing the table at the far end of the yard.
Check that the table and benches stand evenly without rocking, and assess the surface after rain before deciding on ground preparation. Keep entry gaps clear and the border out of the direct walking line. Leave room to clean under the table and move around occupied benches. A defined green patch can organize outdoor meals without introducing an unnecessary platform frame or deck-board maintenance.
17. Organized Storage for Backyard Sports Gear
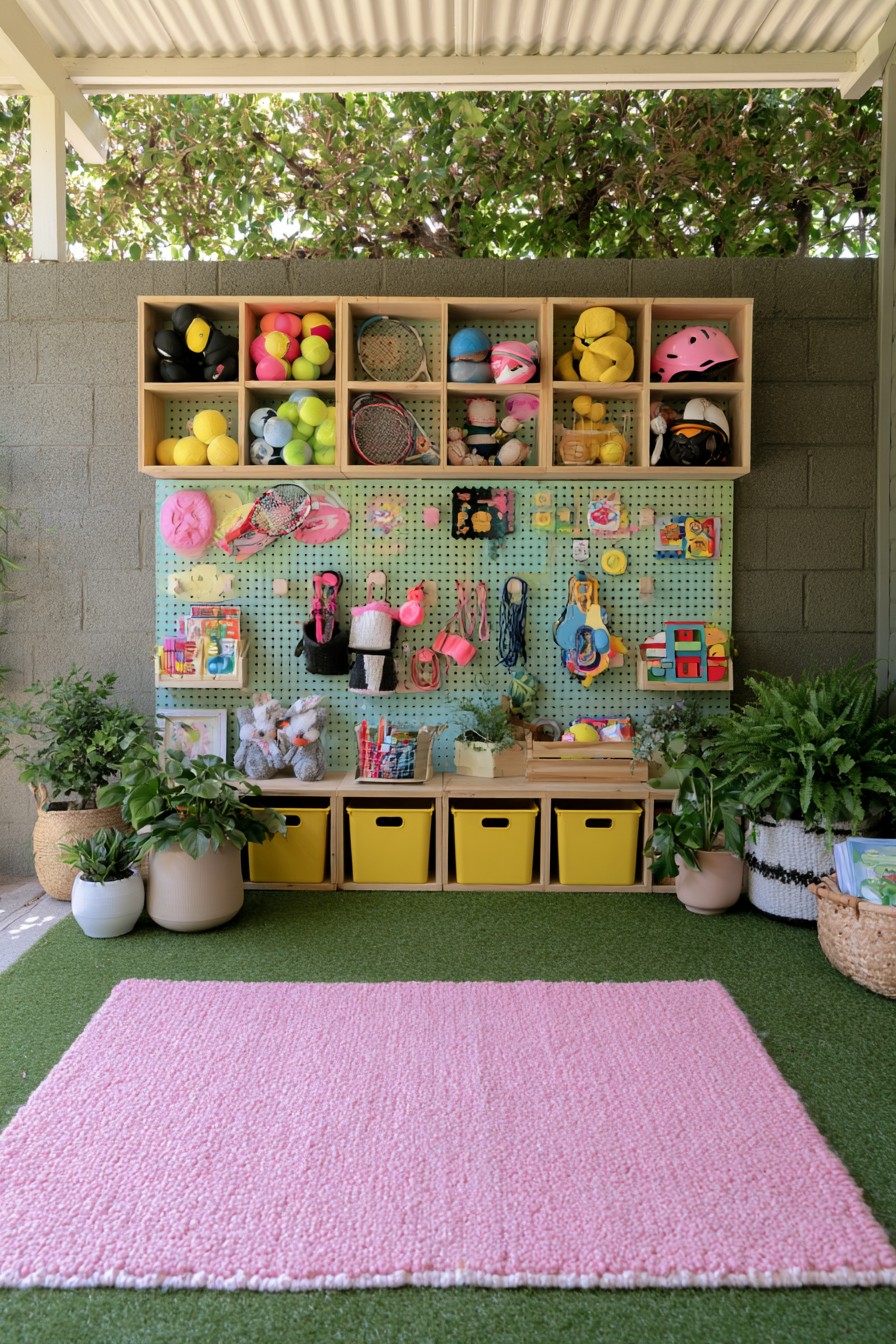
A sports station works best when storage matches the shape of the equipment. Give balls contained compartments so they cannot roll across the floor, use dedicated holders for rackets and longer pieces, and reserve smaller bins for items that disappear easily. Keep frequently chosen equipment at a practical height, with heavy items placed where they can be handled without reaching overhead.
Set the station beside the activity area, outside running routes. Assess shelf supports and wall fixings for the fully loaded organizer, and keep long equipment from projecting into circulation. Let damp items dry before storing them and keep textiles in conditions that suit their care instructions. A simple return routine, balls to compartments, rackets to holders, accessories to bins, makes the organizer useful after each game rather than merely attractive when arranged.
18. Covered Bench with Storage Beneath the Seat
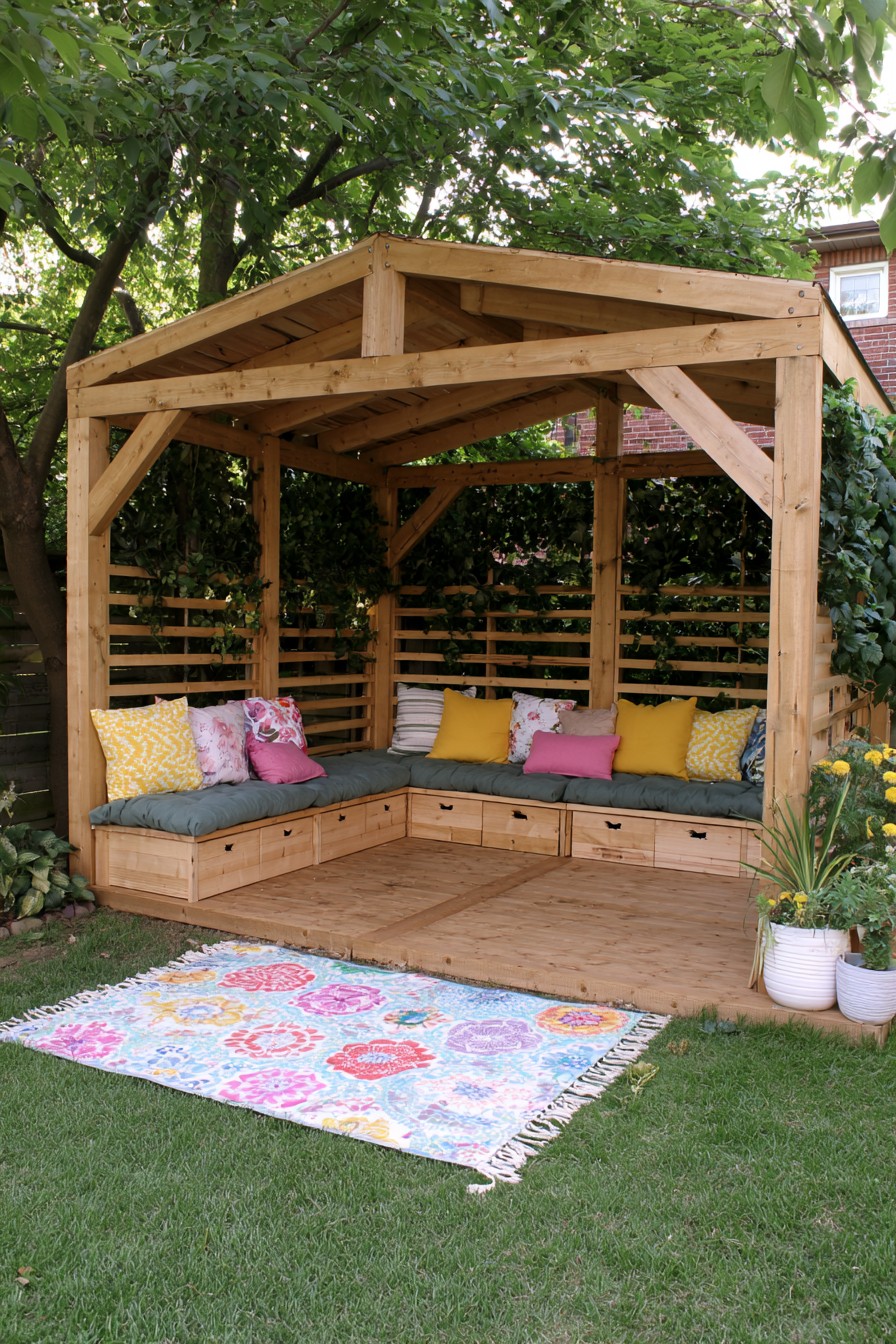
A covered corner bench with storage below the seat combines a place to sit with a home for nearby supplies. Decide how the storage opens before setting its position: drawers need space in front, while lifting seats need controlled movement and a clear opening path. Access should remain possible without moving a table across the main garden route.
The overhead cover does not automatically make the compartments weatherproof. Dry cushions, cloths, and equipment before storing them, and choose ventilation and water protection appropriate to their contents. Use lid or drawer hardware designed to control closing and reduce finger-trap risks. The seating frame and overhead structure still require a suitable structural design. Inspect the compartments during wet weather for leaks or trapped dampness rather than assuming that a closed front keeps everything dry.
19. Pergola with Hanging Chairs for a Garden Rest Area
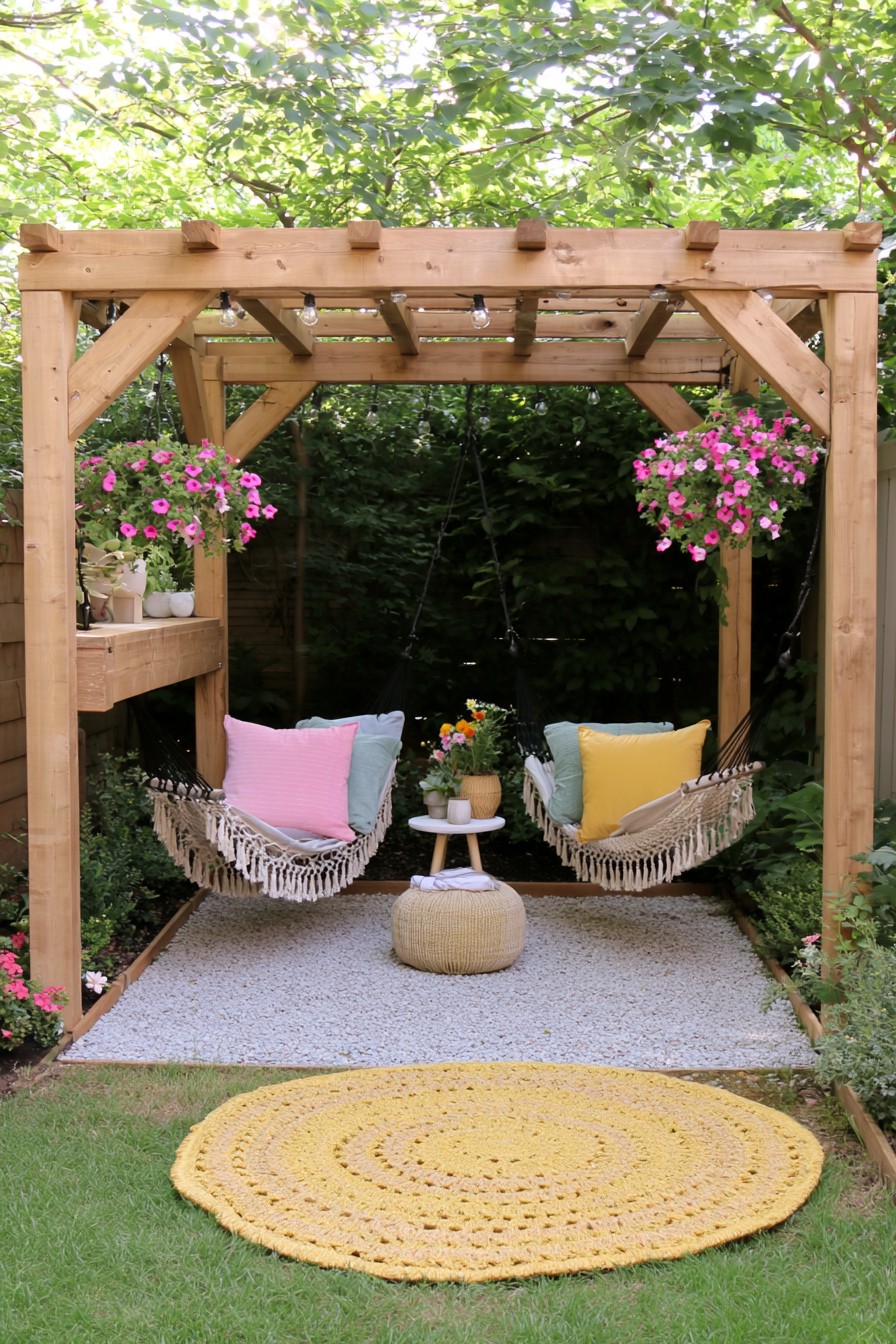
Two hammock-style hanging chairs create a seated retreat beneath the pergola, with a small table between them. Plan around the full movement of each occupied chair, not its resting position. The table, planters, and entrance must stay clear as the chairs swing, including when someone reaches for a drink or gets in and out.
A decorative pergola is not automatically a support for people. Its foundations, frame, anchors, and suspension hardware need to be designed and rated for the intended moving loads, with professional assessment where needed. Follow the chair manufacturer’s installation and inspection guidance. Choose a smaller freestanding seated arrangement if the structure cannot be verified. The open overhead beams frame the rest area, while any shade or weather protection needs a separate assessment.
20. A-Frame Reading Nook with Built-In Book Shelves
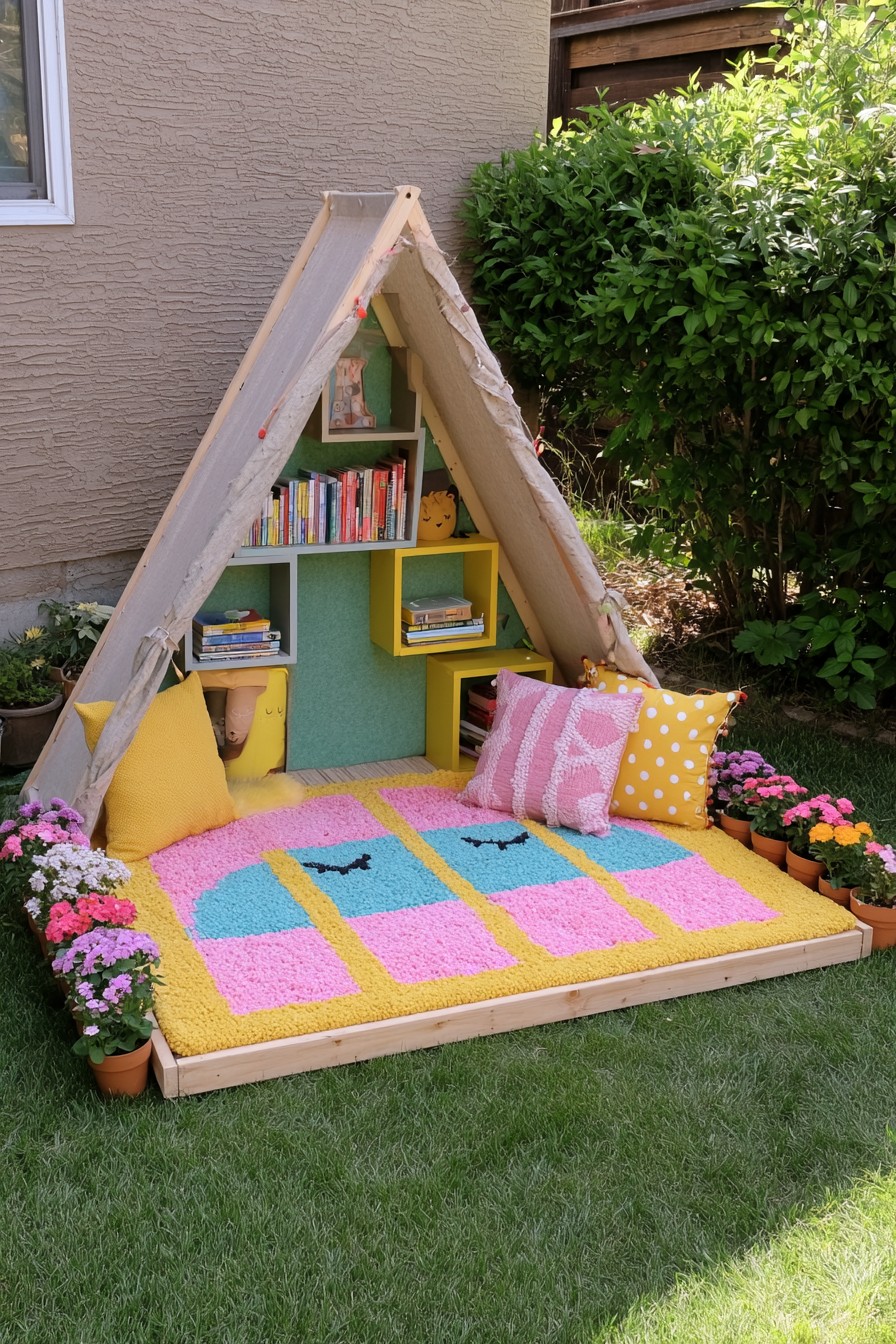
The timber A-frame, fabric cover, and rear bookshelves form a dedicated reading nook, not a portable camping tent. Its appeal comes from having the books close to a low, comfortable sitting area while the front remains open. Choose the location around access, ground moisture, and room to enter without stepping over cushions or surrounding flower pots.
Bring books indoors after use and dry the cover and cushions before storing them according to their care instructions. Secure the shelves within a properly designed frame, and keep fabric ties short and out of reach. Plan a stable supporting base and secure fabric attachments for the canopy size and expected weather. Avoid treating the cover as a rainproof enclosure unless its product specification and installation support that use.
Video Example: Arranging an A-Frame Reading Corner
The clip adds an A-frame to a rectangular base, then a fabric cover, rear shelves, and a cushioned reading surface. It shows the sequence of arranging the space, but not the joint design, shelf anchoring, or preparation beneath the sitting area. The transition from open grass to soft furnishings should not be treated as a finished floor specification.
Plan a dry supporting base and the frame first, obtain an appropriate construction design, and fix the book storage before adding the cover and cushions. Keep the front accessible and follow the fabric’s attachment and care instructions. Bring books inside after reading and check for moisture beneath the cushions before storing them.
21. Sensory Garden Corner with Raised Beds
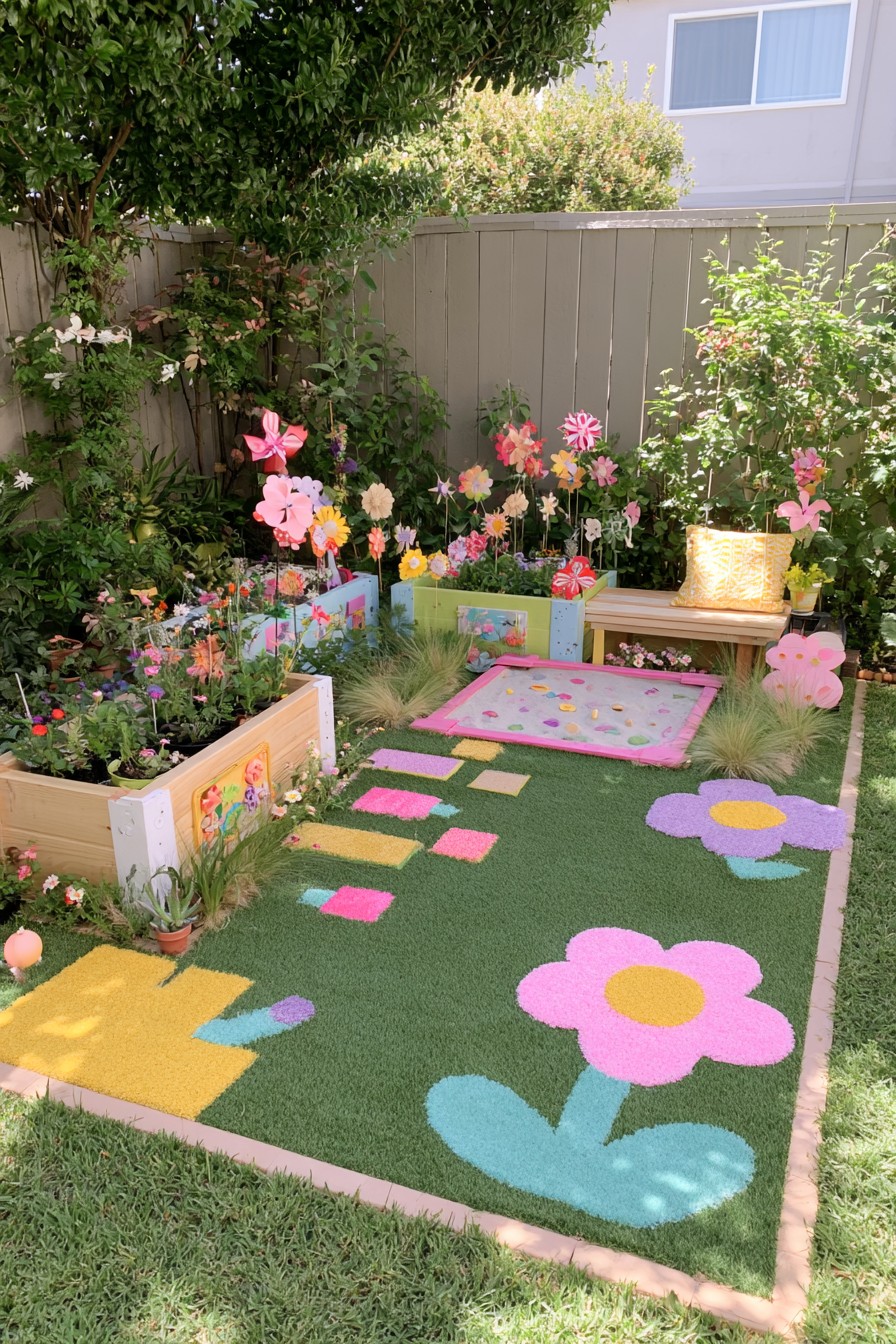
Raised planting beds and a defined path organize this sensory corner into activities children can explore with an adult. Separate the prompts: touch an approved leaf texture, smell an identified aromatic plant, and observe changes in flowers or visiting insects. Plant choices must suit both the local growing conditions and the children using the space, including possible toxicity, irritation, and thorns.
An edible plant label is not permission for unrestricted tasting. Keep any supervised food-growing activity clearly identified and separate from general sensory exploration. Position the beds so their centers can be reached without standing in the soil, and preserve the approach as plants grow. Store tools after the session, inspect the paths, and plan watering within easy reach. The useful feature is accessible exploration, not simply a collection of colorful flowers.
22. Water Play Station with Removable Containers
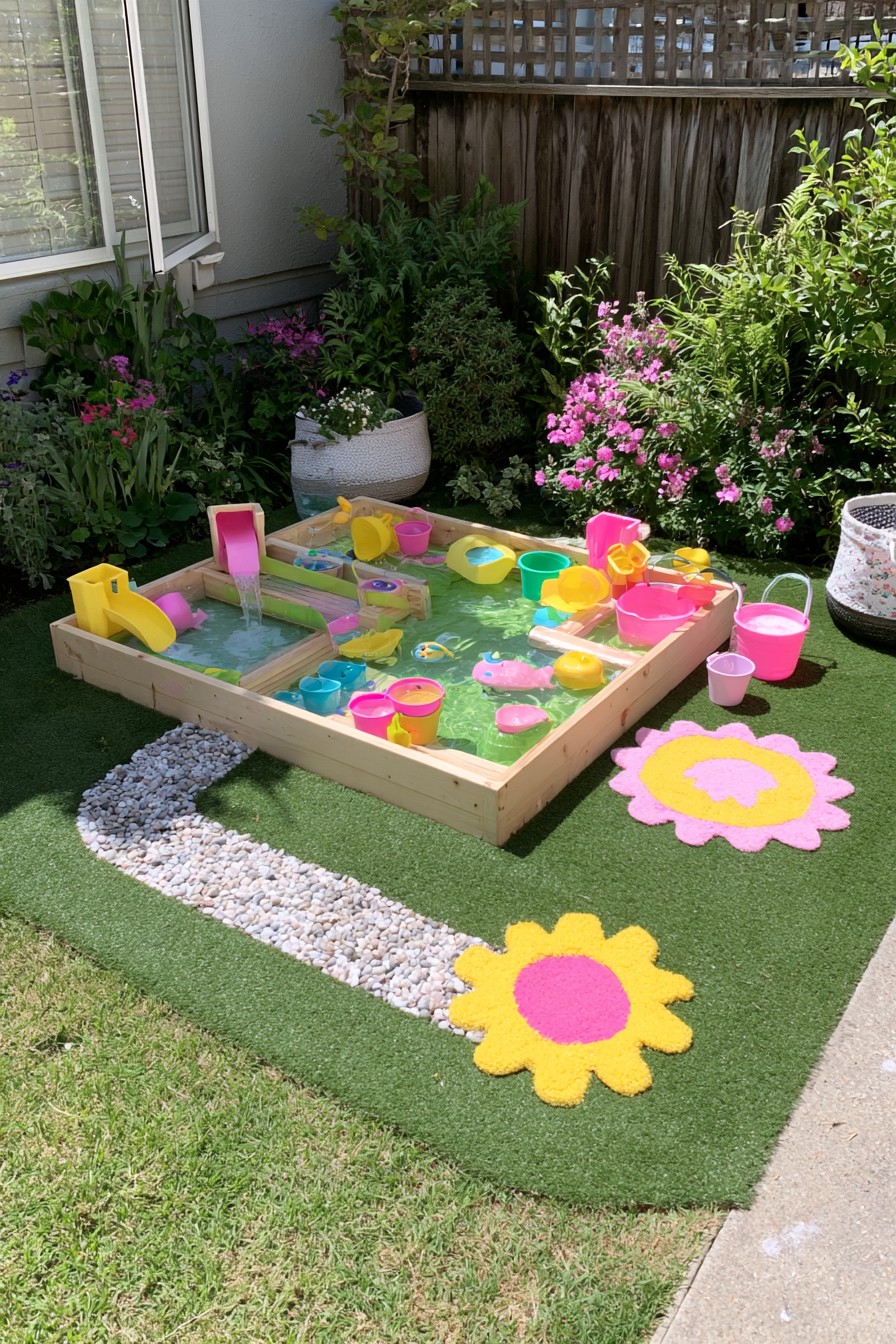
Removable containers turn this water station into a flexible place for pouring and comparing amounts. Their advantage is that they can be emptied, cleaned, and put away individually. Use age-appropriate, shatter-resistant vessels on a stable support designed for their filled weight, with a walking surface that handles spills without becoming a slippery route.
An adult should stay close and supervise continuously while young children use the station; a small amount of water is not a guarantee against drowning. Stop the activity before the supervising adult leaves or becomes occupied elsewhere. Empty all vessels immediately afterward, then clean, dry, and store them where rain cannot refill them. Keep electrical equipment away and reduce loose accessories to those needed for the current activity, avoiding small parts unsuitable for the youngest child.
23. Low Obstacle Course for Active Play
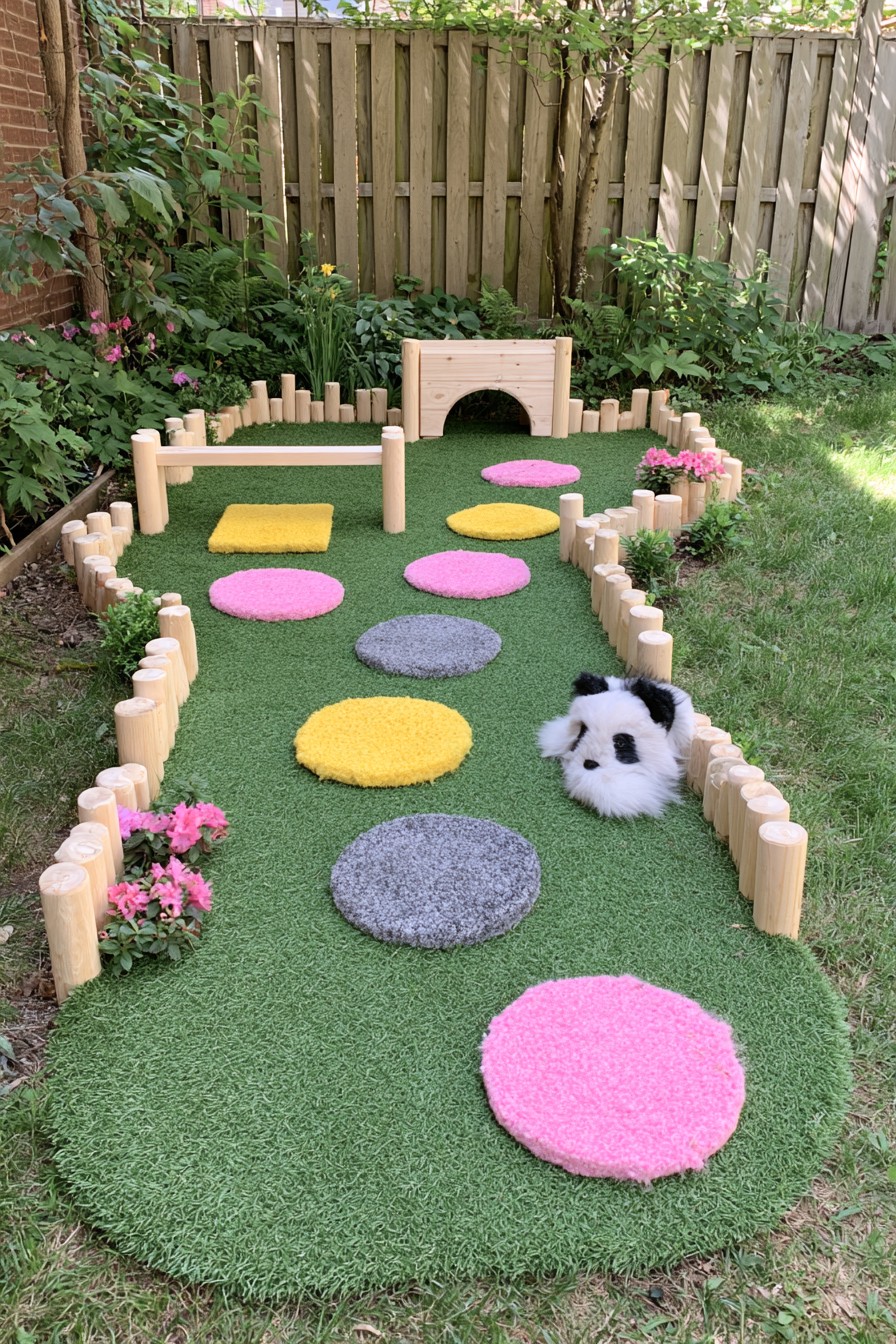
Colored spots, a low hurdle, and a crawl opening suggest an obstacle route that can change with a child’s abilities. Begin with ground-level movement, such as following a color sequence, before adding equipment that introduces jumping or climbing. Leave room between activities so a child finishing one task does not collide with the next participant or a surrounding border.
Choose age-appropriate equipment and follow its installation and use guidance. Low height alone does not prove that a setup is safe. Elevated play equipment needs protective surfacing matched to its fall height and a clear surrounding use area; lawn, ordinary soil, and thin decorative mats do not automatically provide that protection. Assess the hurdle and crawl structure independently, and remove worn or unstable components before the route is used again.
24. Sand and Digging Station
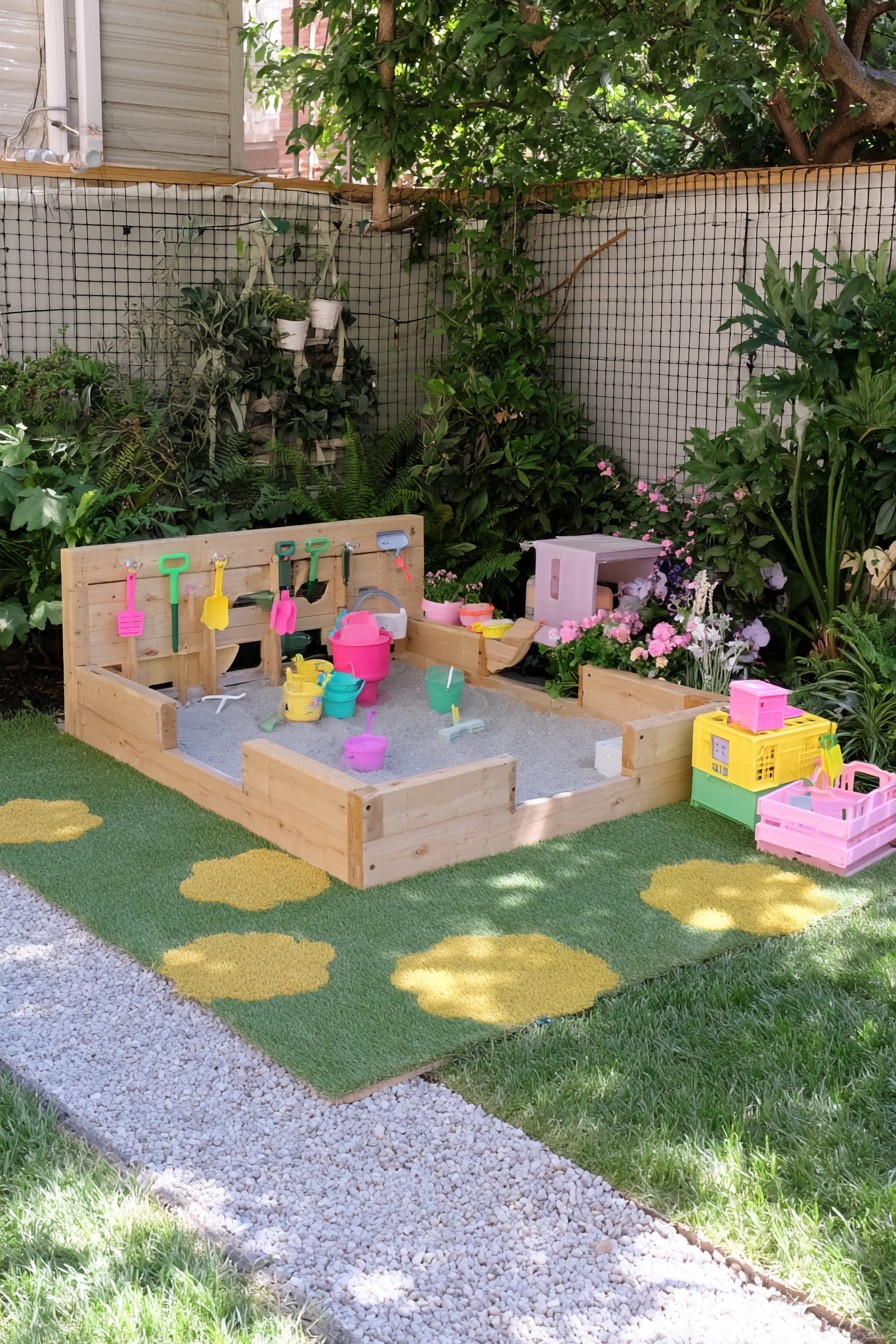
A sand station gives scooping and digging a destination apart from the planted beds. The adjacent tool panel makes cleanup easier when each scoop and bucket has a place to return. Choose play sand intended for children and a base that drains appropriately, then position the station where an adult can supervise and where actual shade can be assessed at playtime.
Inspect the sand regularly for debris or contamination, collect the toys after use, and clean or replace the material according to the supplier’s guidance. Use a cover designed for the station, including its handling instructions; a heavy improvised lid can create another problem. For ideas that combine shade and storage, explore a shaded sandbox for digging games. Keep tool handles and surrounding pots outside the entry area.
25. Low Balance Trail with Log Posts and a Small Bridge
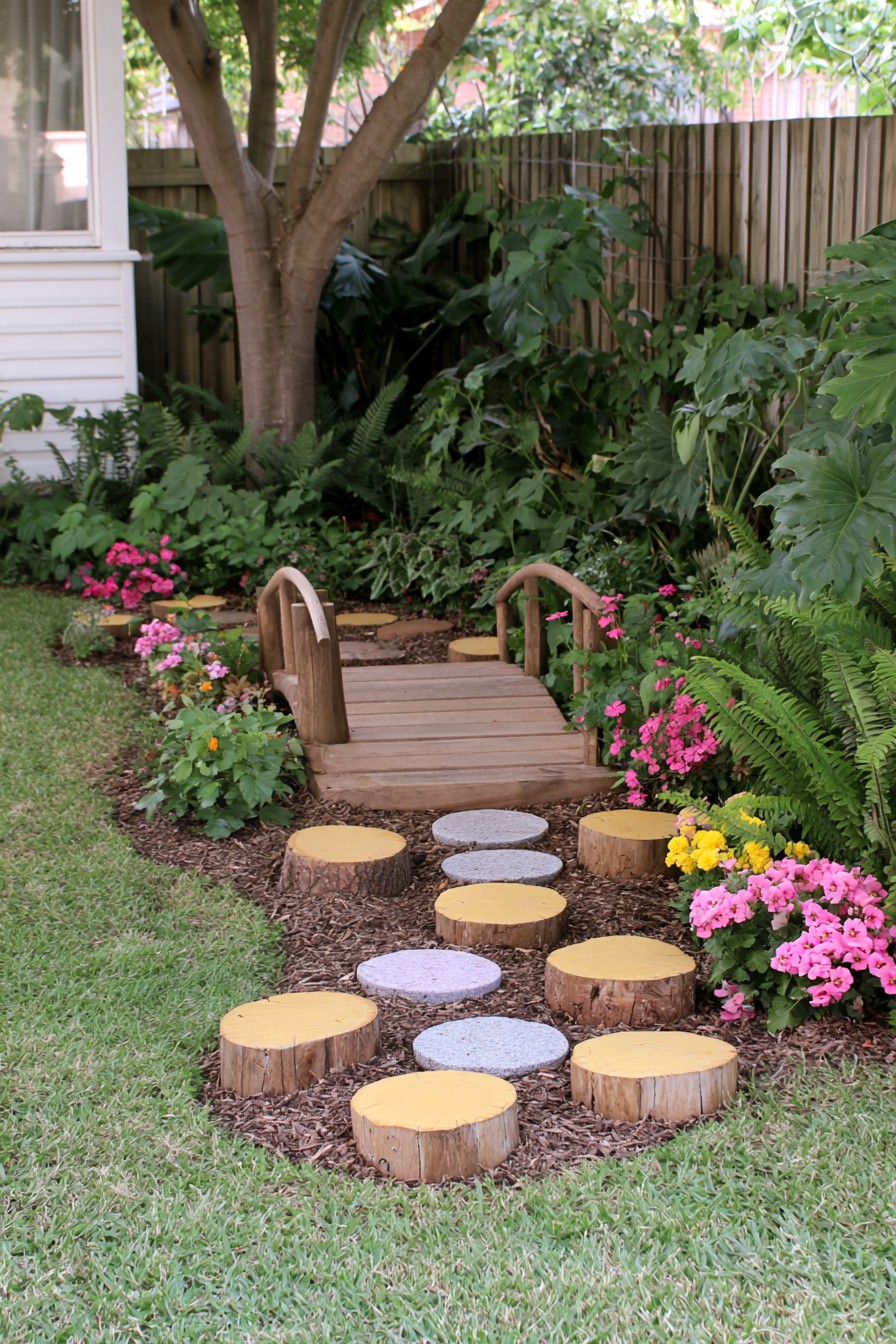
Log stepping posts lead toward a small bridge, making the route a sequence of balancing decisions instead of a row of identical steps. Plan a course appropriate to the children’s abilities, with space to step off without hitting pots, edging, or another piece of equipment. Each post needs secure support against sideways movement, reliable footing, and inspection for decay or splits.
The bridge requires its own load-bearing design; stable logs do not establish that the crossing is usable. Resolve the elevated elements and protective surfacing for their fall heights and use areas before building. Grass, bare earth, and decorative stepping mats are not substitutes for specified impact protection. A ground-level route of color markers offers a simpler alternative where a suitable play-equipment design and surrounding space cannot be provided.
26. Small Outdoor Track for Toy Cars
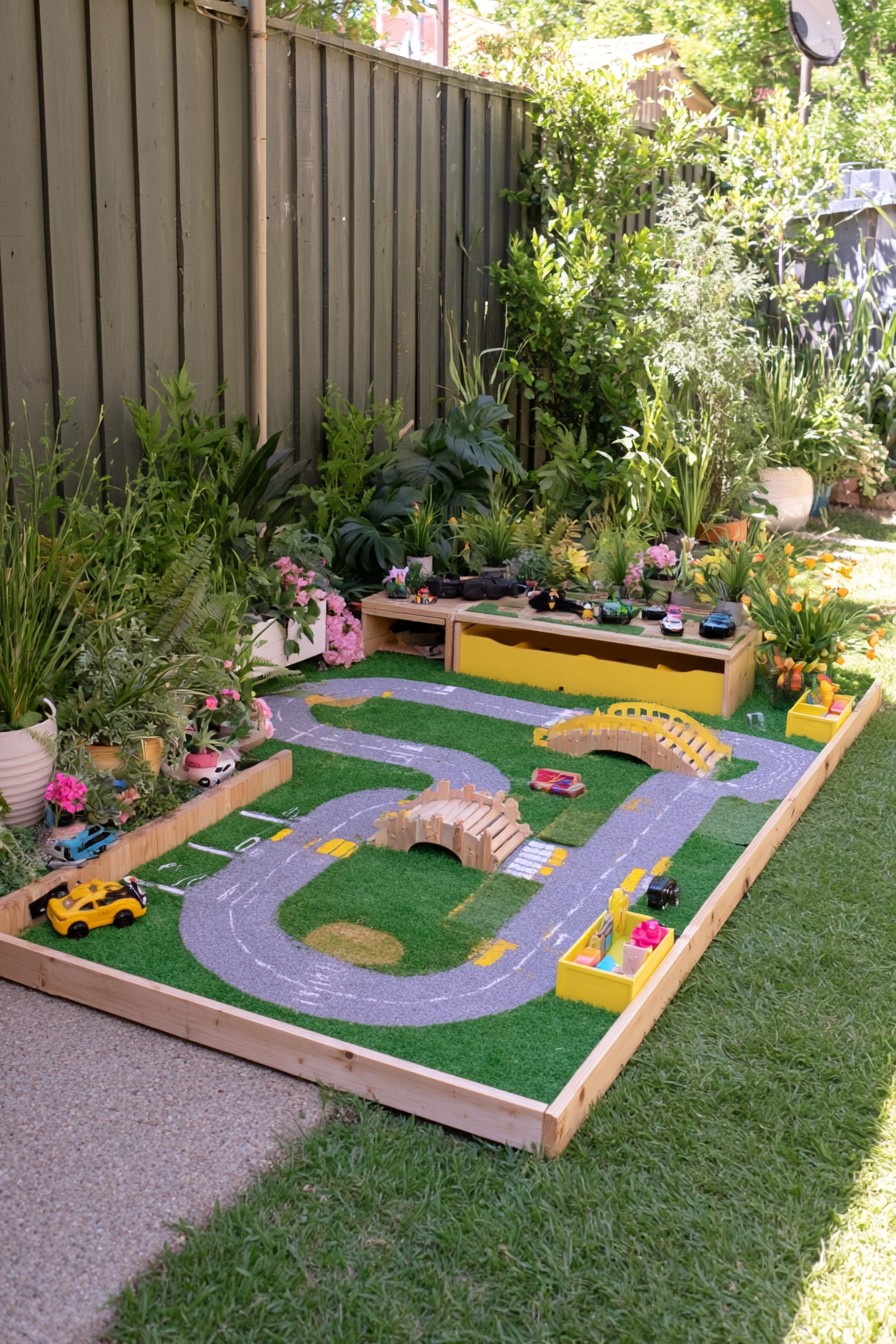
A narrow bordered track creates a miniature road network for small vehicles moved by hand. Curves and little crossings make it more engaging than a straight strip, while the edge helps keep toys within one defined area. This raised tabletop-like layout is not a riding surface for scooters, balance bikes, or ride-on cars.
Try the arrangement with the toy cars already owned before choosing road widths and turns. Use materials that suit outdoor exposure and finish accessible edges without splinters or sharp projections. Keep the track outside the main walking and mowing routes, with somewhere to collect vehicles after play. Any miniature bridges must suit the toys and remain secure without becoming an invitation to stand on them. Select accessories for the children’s ages rather than filling the track with tiny scenery pieces.
27. Rose Trellis Seating Nook
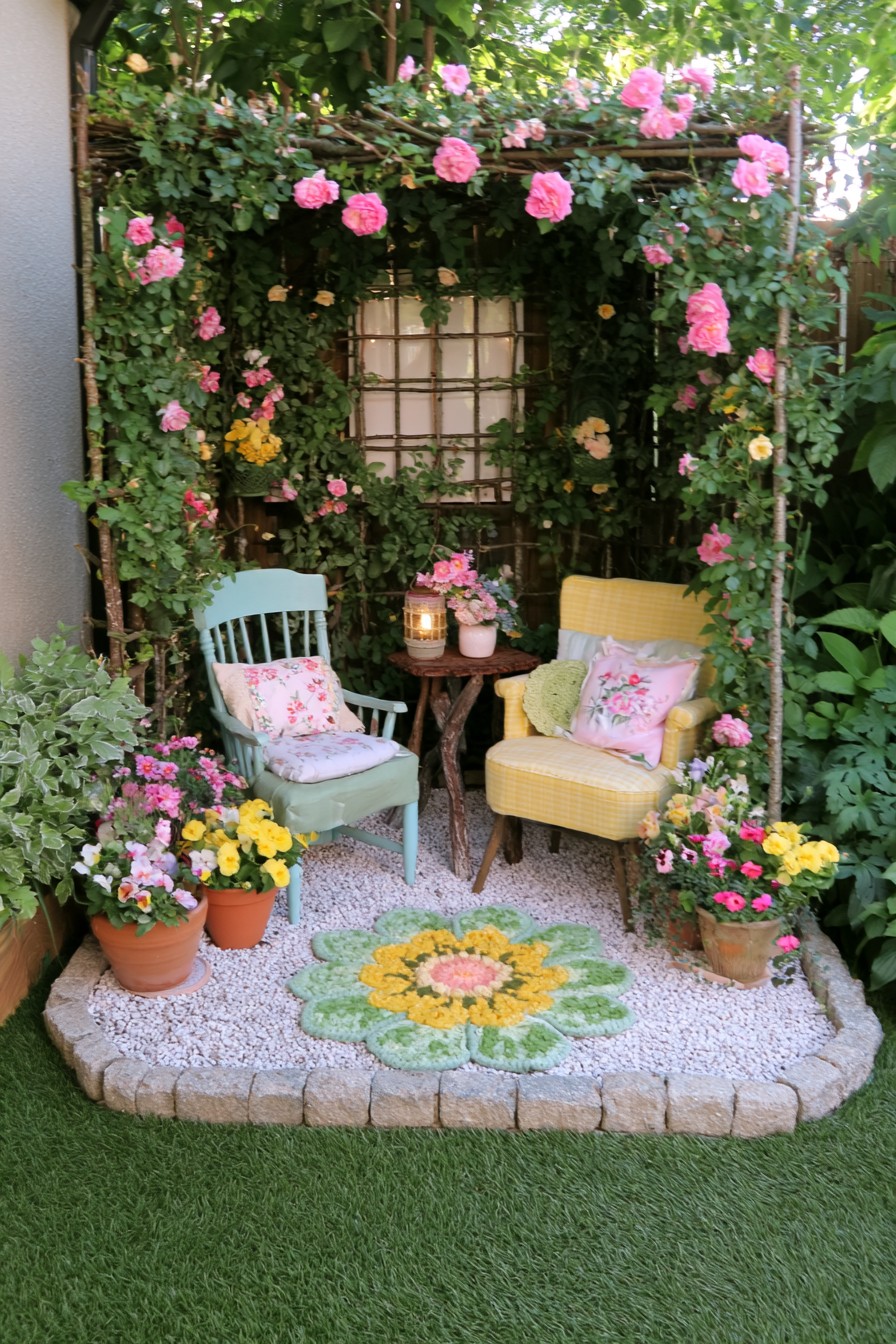
Climbing roses frame two chairs and a small table, turning a garden boundary into an intimate resting place. The trellis gives the plants a route upward while leaving the seating area open. Choose a variety for the climate, mature growth, and available support, then leave access to its base for watering and seasonal pruning.
Keep thorny stems away from the movements people actually make: approaching a chair, sitting back, reaching the table, and standing up. Guide new growth outward before it crosses those spaces. Design the support and anchoring for mature plant weight and wind, inspecting connections when pruning exposes them. Unlike a solid screen, the rose cover changes through the season and takes time to develop; it should not be relied on for immediate privacy or rain protection.
28. Circular Garden Nook with a Barrel Planter and Flower Border
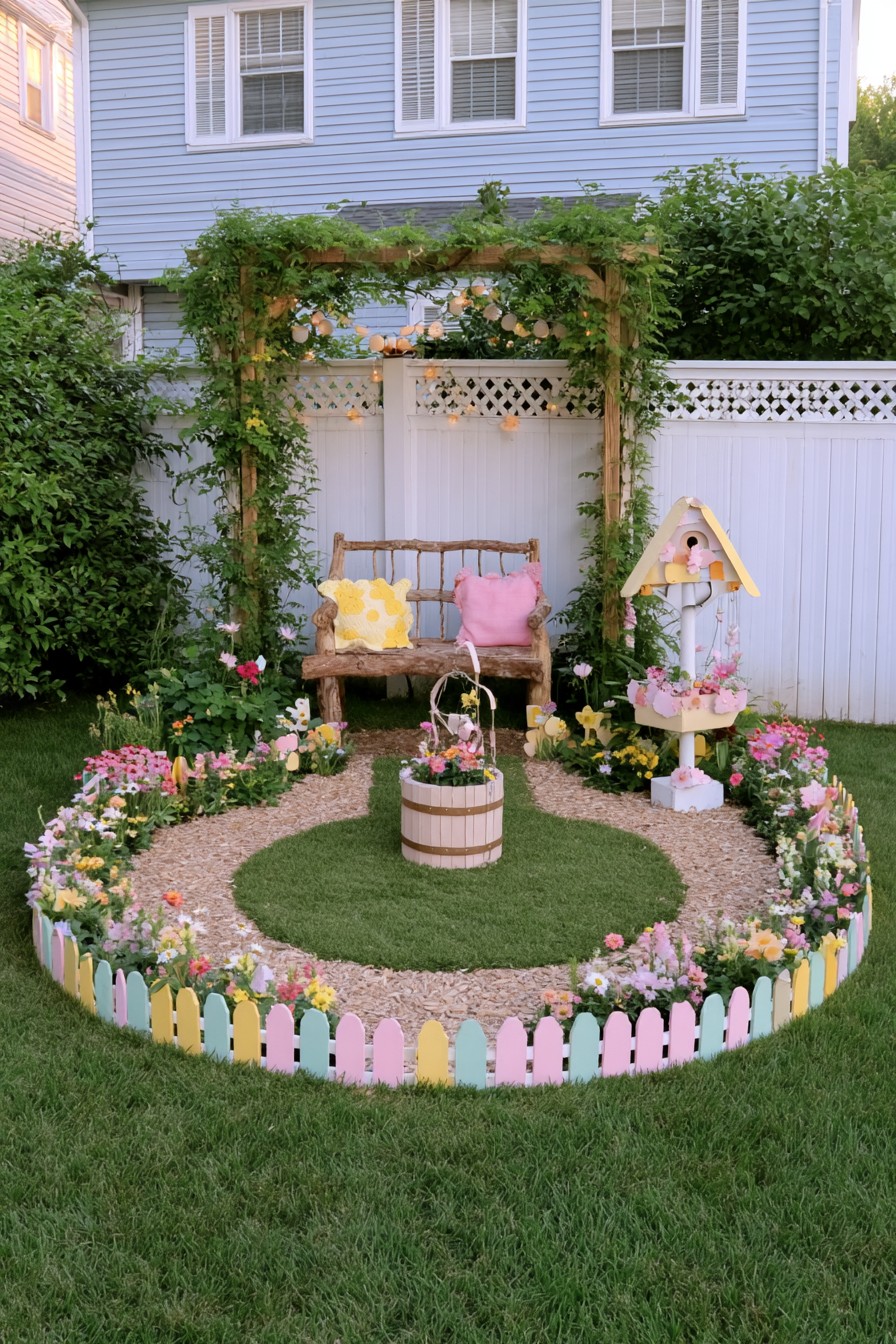
A barrel-shaped flower planter anchors the center of this circular nook, with a flower border and a bench behind it. The planter gives the middle a focal point; the seating and overhead greenery give the circle a destination. Recreate the relationship between those elements rather than adding a wishing-well structure, which is not part of this arrangement.
Leave an opening in the surrounding border and a clear route past the planter to the bench. Size the central container so it can be watered and reached without stepping through the flowers. Provide drainage and assess its stability on the prepared surface. Repeating a few border plants will make the circular layout easier to maintain and understand. Keep access to the rear planting and any climbing support as well as to the central display.
29. Low Garden Bridge over a Decorative Stream
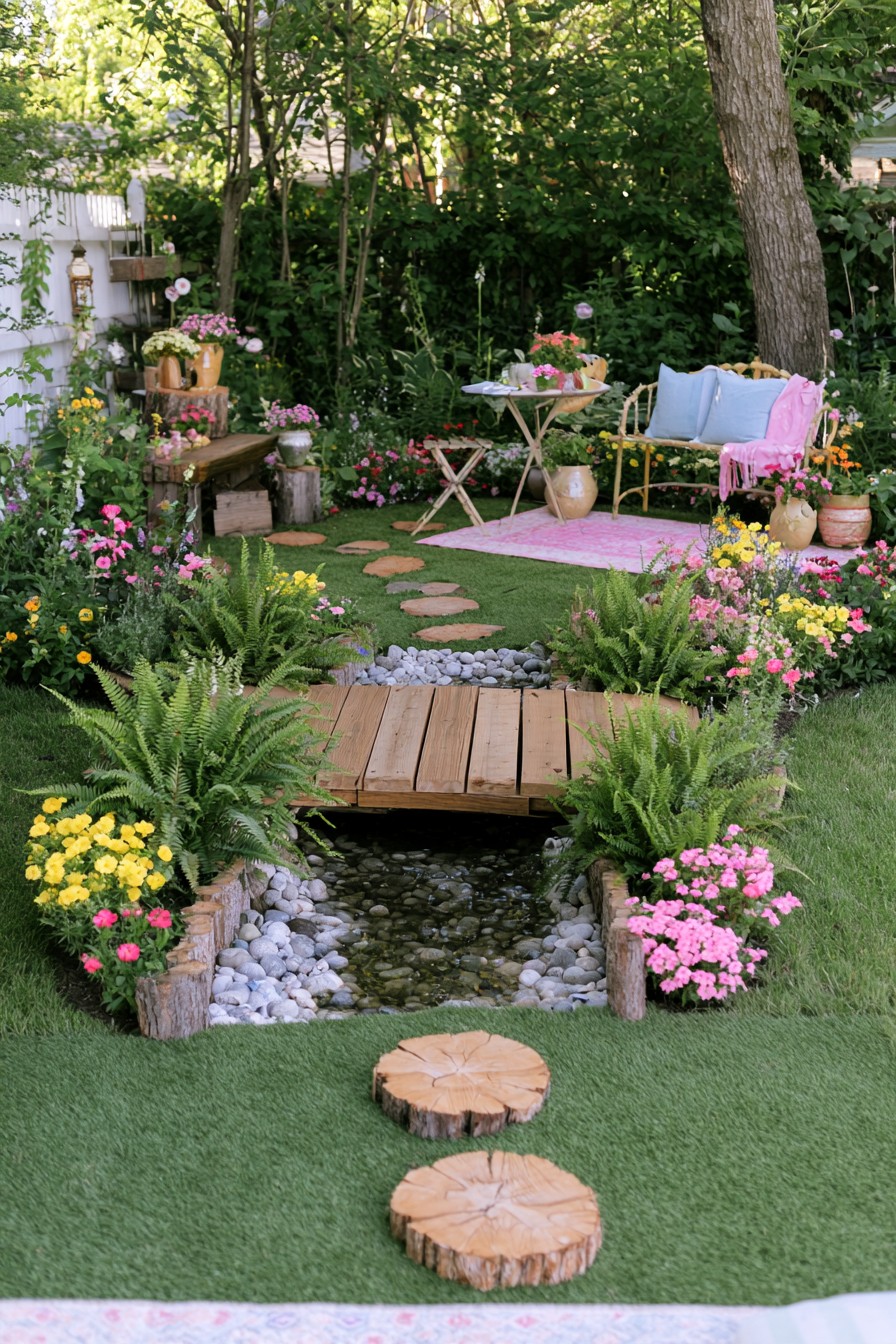
A timber crossing links the lawn path to a seating area beyond a decorative stream. First decide whether crossing the water is essential to the garden route. If the feature is mainly scenic, keep circulation on one side and use a planted bank or viewing spot to provide the focal point without a crossing.
A bridge intended for walking needs a site-specific plan for span, loads, supports, foundations, surface traction, and any required edge protection. Resolve the approaches too, so users are not forced onto loose pieces at either end. Inspect wet boards and the ground around supports as conditions change. Decorative stepping stones are not an automatically safer substitute. Where children use the garden, assess access to the water separately; the presence of a bridge does not address that risk.
30. Tiered Barrel Planters for a Layered Garden Corner
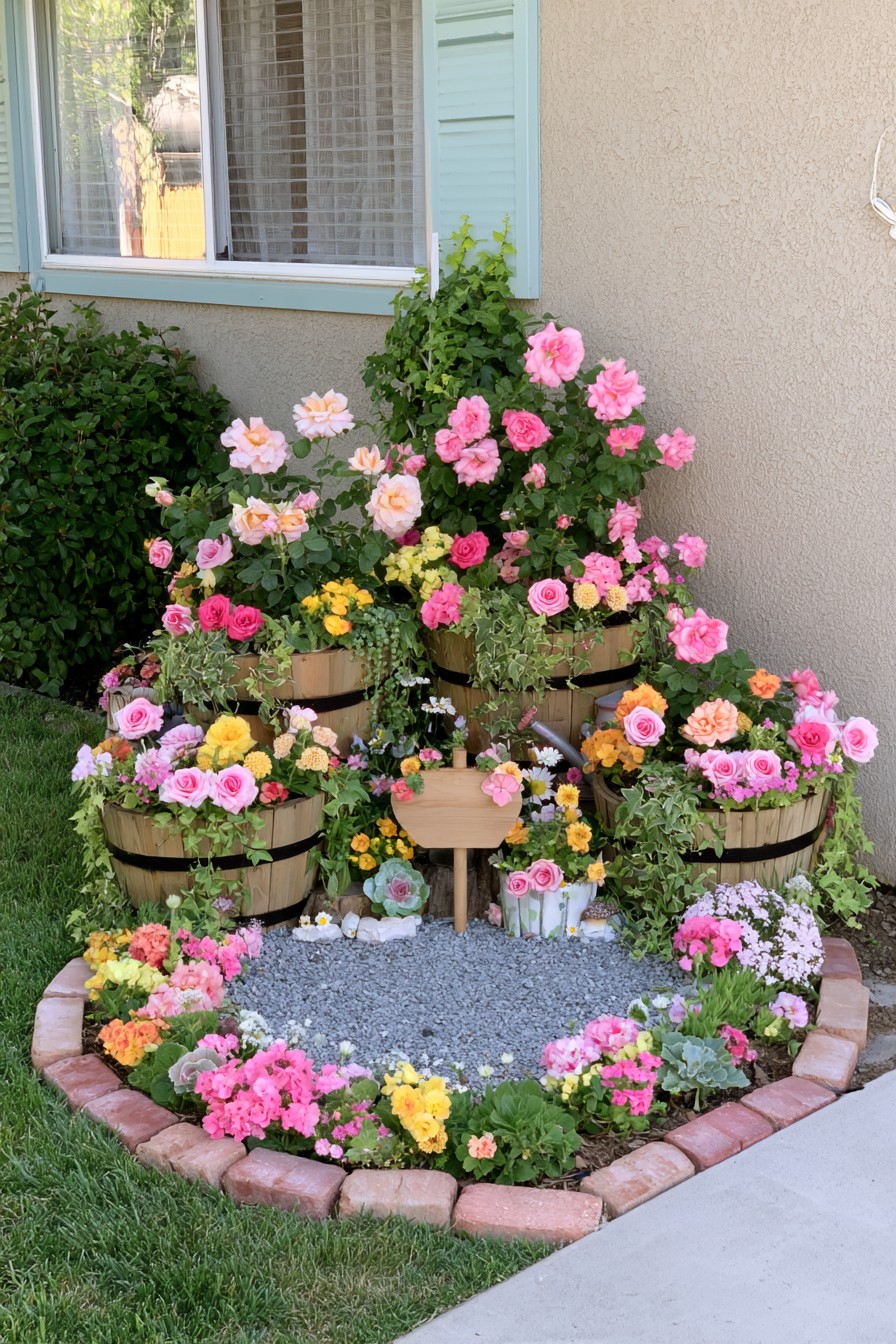
Barrel planters at several heights turn a plain corner into a layered flower display. Begin with the largest container, then place the upper barrels where their planting remains reachable for watering, trimming, and eventual replacement. A limited group of compatible plants keeps the different container shapes from making the display feel scattered.
Check reused containers for their previous contents, timber condition, and drainage before planting. Each upper support must carry the container and its growing medium when wet. Route drainage so water does not repeatedly collect in the lower barrels, and check moisture separately at every level. Leave gaps for inspection and cleanup, rather than pressing all the containers together. If upper pots cannot be maintained comfortably, arrange fewer barrels at ground level and let the planting supply the height.
Keep the Project Useful After Installation
Match the upkeep routine to the feature: clear paths and gravel edges, check growing containers for moisture and drainage, return tools after use, and dry textiles before storage. Inspect outdoor furniture and supports for movement, loose connections, decay, or surfaces that collect water. Follow the material and product instructions when cleaning or renewing finishes.
Start with the problem that occurs most often in your yard. Mark the proposed arrangement and check its access before committing to a permanent structure. If the full project exceeds the space or maintenance time available, keep its purpose and reduce its scale: a shorter bench, fewer planting tiers, or a ground-level activity can still make daily use easier.

Leave a Reply