
Resin can turn everyday storage into a decorative detail: a place for your rings, a tidy home for tea packets, or a floral frame for a favorite memory. These 20 creative resin projects explore useful objects with pressed botanicals, translucent color, mosaic effects, and playful shapes. Start with the small botanical casting guide below to understand the basic process, then choose an idea that suits your space. Each design includes styling and planning advice, with special attention to food contact, mounting, moisture, and everyday care.
Start with a small botanical casting
A shallow round coaster is a manageable way to learn measuring, mixing, flower placement, and curing before planning a hollow organizer or a hardware mounted piece. The eight panel sequence below demonstrates this foundation. The 20 designs that follow are inspiration ideas; each shaped container, frame, and assembled accessory needs its own mold or construction plan. For more shallow casting patterns, explore our resin coaster ideas and making guide before adapting the technique to a larger accessory.
Materials and tools for one approximately 10 cm coaster: one shallow silicone coaster mold, a matched two part epoxy kit suitable for that casting depth, two measuring cups, one mixing cup, one flat mixing stick, three small fully dried pressed blossoms, a little resin compatible pink tint, optional gold foil, tweezers, and a clean dust cover. Protect the work surface and prepare chemical resistant gloves, eye protection, and protective clothing as specified by the product’s safety data sheet.
Which resin should you use for home decor?
For the botanical starter casting, choose a clear two part epoxy system sold for small mold castings, with its matching hardener. Check the permitted depth against your mold before buying. A coating resin intended for a thin surface finish should not automatically be used for a deep bowl or thick organizer. Larger solid pieces may need a dedicated casting system with a slower cure. Hollow cups and divided containers also require molds that form their interior spaces. Choose by the intended application, not simply the words “clear resin” on a listing.
Epoxy and UV resin use different curing methods. The eight panel tutorial uses mixed epoxy resin and hardener. A UV curing product uses a specified light source instead; TotalBoat UV Cure Clear Resin, for example, cures through UV exposure, with timing affected by the light intensity, casting thickness, and amount of material. Light may need to reach the piece from several angles. Its faster curing method should not be substituted into an epoxy recipe without checking the mold and product requirements.
How much resin does a small mold need? Use the mold maker’s capacity when available. For a simple flat circular cavity, volume is approximately π × radius² × depth. A 10 cm diameter cavity filled to 3 mm has a calculated volume of about 24 mL; at 6 mm it is about 47 mL. These are sizing examples, not measurements of the illustrated mold. Rounded edges, decorative inclusions, and the actual cavity shape change the amount needed. Calculate the total mixed volume first, then divide it according to your resin’s ratio.
What does a 1:1 mixing ratio mean? If your particular kit specifies 1:1 by volume, 30 mL of resin and 30 mL of matching hardener produce approximately 60 mL of mixture. That example does not apply to a 2:1 system, and equal volumes do not necessarily mean equal weights. Use graduated cups for a volume ratio or an accurate scale with the manufacturer’s separate weight ratio. Stir for the stated duration, including the sides and bottom; follow any required transfer and additional mixing procedure. Never add extra hardener, water, or solvent to speed up curing.
Working time, demolding time, and full cure are different. Working time is the period available for pouring and arranging inclusions after mixing. Pot life describes usable time in the mixing container and can be shorter than the working time after spreading the mixture. Demolding time is the earliest specified stage for removing a casting without damaging it. Full cure is the later stage required for the manufacturer’s intended service properties. A surface that feels dry may still need more time before loading, assembling, cleaning, or using the piece.
A concrete curing example: TotalBoat Artist Resin’s technical sheet gives about 10 minutes of pot life and 30 minutes of total working time at approximately 21°C (70°F). It specifies at least 24 hours before demolding a casting and continued support for 3 to 5 days to prevent sagging. Its listed full cure is 3 to 5 days. These are product specific reference times, not a universal epoxy schedule. For the starter casting, keeping the piece supported until full cure is a cautious approach even when earlier demolding is permitted.
For the named Artist Resin example, consult the manufacturer’s safety data sheets for Part A and Part B (PDF), supplied with that product. Check the current label and obtain the latest SDS for the kit you actually use; this example does not establish the handling requirements of another formulation.
Temperature and humidity also matter. The same Artist Resin technical sheet specifies an application and cure range of about 18 to 24°C (65 to 75°F), with relative humidity below 60%. Use your own kit’s stated conditions, because another formulation can require a different range. Keep the work area stable during curing, and use a room thermometer rather than judging temperature by touch. Do not improvise with an oven, hair dryer, or direct sunlight to force an epoxy casting to harden sooner.
Choose compatible flowers, pigments, and tools. Use completely dried pressed flowers, clean dry molds, epoxy compatible colorants, and optional metallic foil. Damp botanicals and wet tools do not belong in this casting. Keep the tint within the manufacturer’s allowed amount and make a small sample before trying an unfamiliar inclusion. A shallow silicone mold, separate measuring cups, a mixing cup and stick, tweezers, a level protected surface, and a dust cover are the core tools. Add any extra mixing container required by your kit. Wear the specified gloves and eye protection and arrange suitable ventilation before opening the bottles.
Check for problems before using the piece. If a casting remains sticky, has soft patches, or bends beyond the product’s permitted demolding stage, keep it out of service and consult the maker’s troubleshooting instructions. More time can help an incompletely cured piece under the correct conditions, but waiting does not reliably fix an incorrect ratio. Do not coat over a failed, improperly mixed casting as a general repair. An approved gel stage recoat is a planned layering step, not a cure for a failed mixture. Choose the proper batch size and pour depth from the start; large concentrated amounts of mixed epoxy can produce excessive heat.
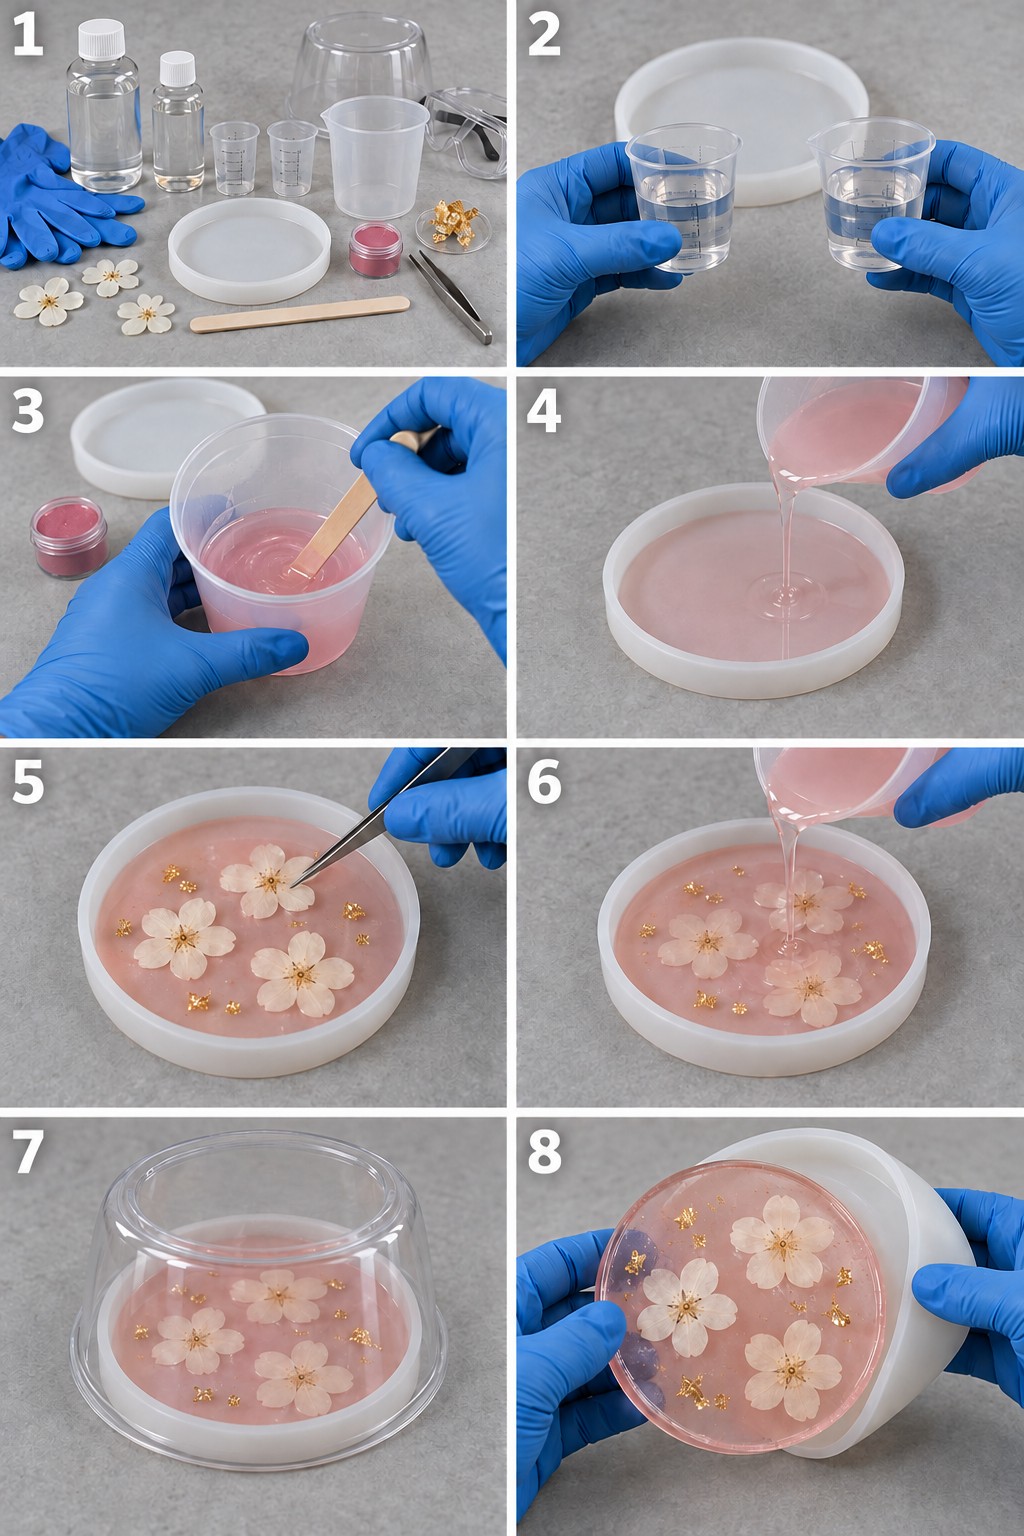
Read from left to right, then downward. The waiting periods between layers and before demolding follow the resin manufacturer’s instructions.
- Prepare the workspace and materials. Work on a level protected surface with the ventilation and protective equipment specified for your resin. Keep children, pets, food, and drink away. Make sure the mold, cups, and pressed flowers are clean and dry. Choose three flat blossoms that fit without overlapping.
- Measure the two components separately. Follow the exact ratio and measuring method on your kit. The cups illustrate separate measurement, not a universal recipe. Do not add extra hardener to try to shorten curing.
- Combine and mix, then tint. Stir for the product’s stated time, working around the sides and bottom. Add a small amount of compatible pink colorant within its stated limit and mix it through. Keep enough transparency for the flowers to remain visible.
- Pour the first shallow layer. Pour slowly into the mold without exceeding the permitted layer depth. Use the product’s approved bubble removal method. Keep the batch within the manufacturer’s mixing limits; a large mass of curing epoxy can build up heat.
- Position the three blossoms. At the product’s approved stage for embedding and recoating, use tweezers to arrange the fully dried flowers and a few foil flecks. Leave gaps so the composition stays readable. Plan which mold face will be the display face before orienting the flowers.
- Encapsulate the flowers. Mix a fresh small batch when needed and pour gently to enclose all petals. Do not reuse a batch that has passed its working time. Follow the recoat window and any surface preparation required for a cured first layer.
- Cover and allow the specified cure. Keep the mold level and the dust cover above the resin. Maintain the product’s stated conditions. Firmness or a dry surface does not establish full cure; use the manufacturer’s schedule rather than a generic overnight wait.
- Demold and inspect. After the required cure, peel the flexible mold away from the rigid casting. Check for tackiness, exposed petals, and rough edges. Do not put a sticky or incompletely cured piece into service. If finishing is necessary, follow the product’s instructions and control sanding dust.
Before using the finished piece: this pink botanical example is a decorative casting, not a claim of food contact suitability or high heat resistance. For drink use, confirm the resin’s temperature limit. For any food related project, verify the exact formulation, additives, full cure, and intended contact conditions. A separate ceramic or glass insert is a practical way to keep food off an undocumented decorative casting.
Think about the small objects you reach for every day: your rings, makeup brushes, keys, or tea packets. Resin gives these familiar accessories room for a more personal design, from delicate pressed flowers to flowing color and sculptural edges. The 20 ideas below explore how those details can fit into everyday rooms. Choose a piece that serves a useful purpose, then adapt its colors, proportions, and decorative details to the furniture and accessories around it.
Table of Contents
- 1. Blush Blossom Jewelry Tray
- 2. Green Mosaic Pencil and Brush Cup
- 3. Lilac Shell Effect Makeup Organizer
- 4. Amber Key Bowl with a Terrazzo Detail
- 5. Daisy Resin Surround for a Butter Dish
- 6. Pressed Daisy Tissue Box Cover
- 7. Botanical Backplate for a Brass Wall Hook
- 8. Petal Shaped Amber Fruit Bowl
- 9. Autumn Leaf Napkin Holder
- 10. Smoky Lilac Remote Control Caddy
- 11. Flower Base Paper Towel Stand
- 12. Garden Inspired Tea Packet Organizer
- 13. Wildflower Resin Photo Frame
- 14. Purple Floral Bedside Carafe Platform
- 15. Orange Slice Magnetic Note Clip
- 16. Pink Floral Cotton Pad Canister
- 17. Leaf Filled Salt and Pepper Tray
- 18. Candy Swirl Tape Dispenser
- 19. Tulip Cups for Makeup Sponges
- 20. Botanical Resin Drawer Dividers
1. Blush Blossom Jewelry Tray
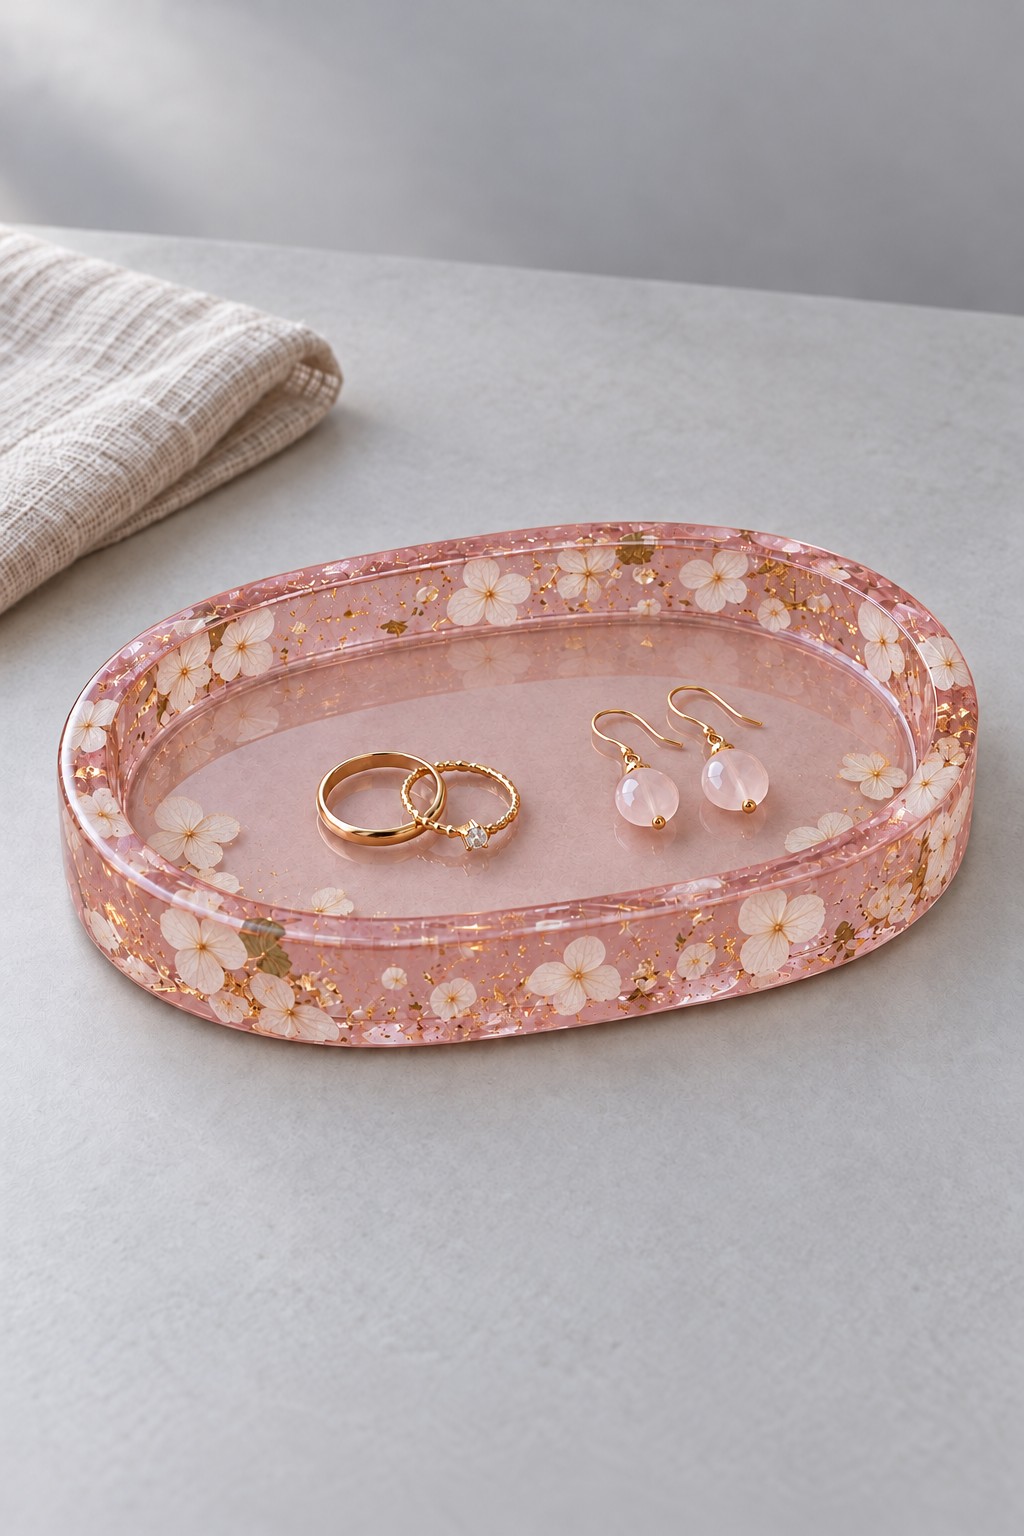
A shallow oval tray gives rings and earrings a defined landing place without taking over a dressing table. Translucent blush pink keeps the center visually calm, while small white blossoms and scattered gold flecks add detail around the raised rim. Pair it with a folded linen cloth or a simple ceramic container so the floral border remains the main decorative element. The open center is particularly useful when you want to find a small stud or ring quickly. Store necklaces separately, on suitable hooks or in compartments long enough to keep chains apart, rather than piling them into the small tray.
For a similar design, choose a tray mold with a rounded lip and a usable interior large enough for your daily jewelry. Keep inclusions enclosed within the resin, especially along edges that hands will touch. A rimmed tray needs its own mold and casting plan; the starter coaster technique only introduces botanical embedding. Lift delicate jewelry rather than dragging it across the surface, and reserve this piece for dry storage.
2. Green Mosaic Pencil and Brush Cup
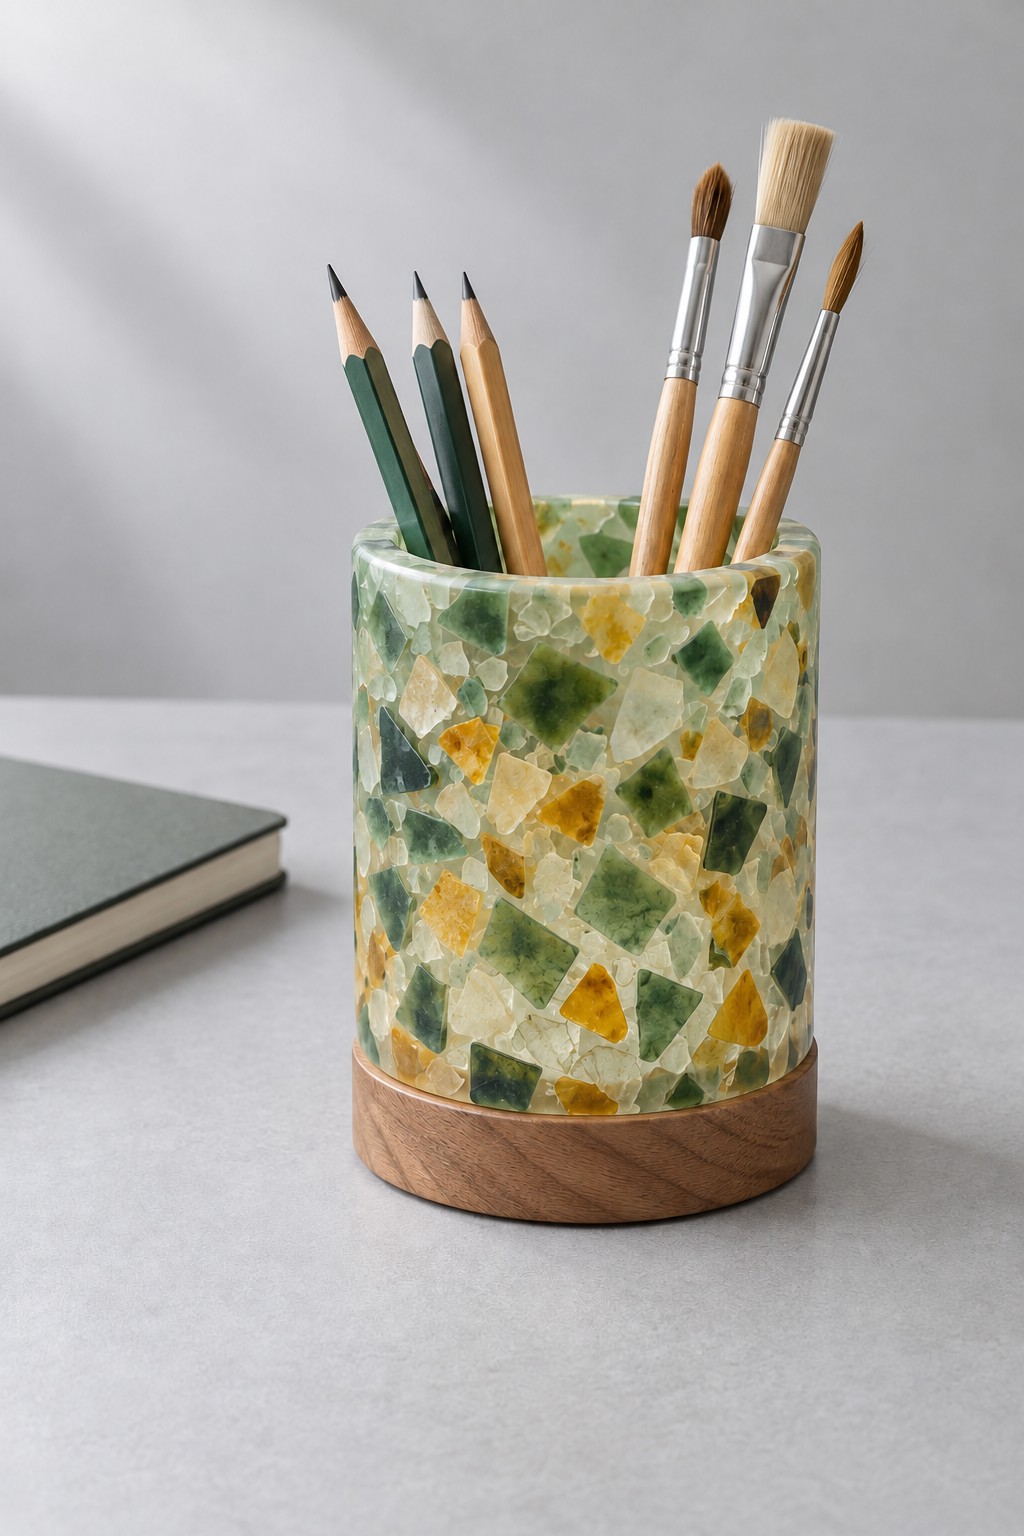
Angular pieces in moss green, pale yellow, and translucent cream create a mosaic effect that suits a workspace with wood furniture or leafy accents. The cylindrical shape keeps the pattern continuous, while a plain wooden base gives the cup a grounded appearance. Use it for a small collection of pencils and dry paintbrushes rather than filling every inch. A few taller tools show off the patterned sides and are easier to pick up during a creative session.
When planning this style, measure the longest tools you actually use and choose a cup deep enough to support them without hiding short pencils. Resin compatible decorative chips can suggest mosaic without exposed sharp edges. The hollow interior requires an appropriate cup mold, not a solid cylindrical casting. Keep the rim smooth, check that the wooden base sits flat, and store rinsed brushes elsewhere until they are completely dry.
3. Lilac Shell Effect Makeup Organizer
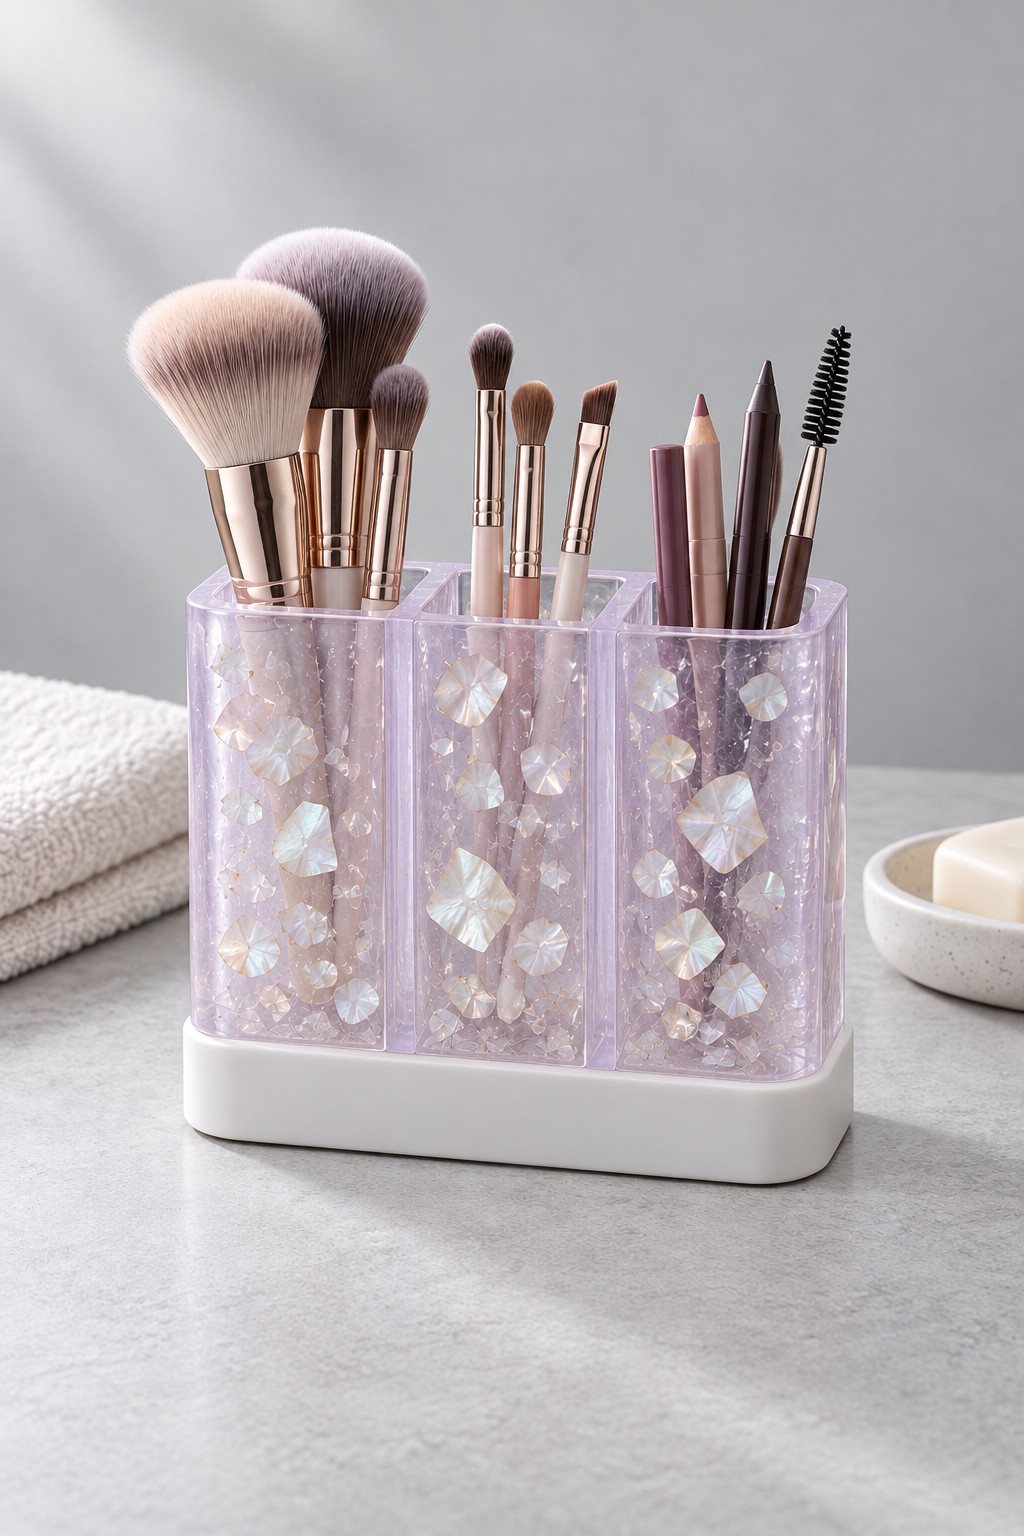
A lilac organizer with three upright compartments makes a dressing area feel coordinated while separating tools by purpose. Pale pearly flakes add a shell effect that works with white cabinetry, silver accessories, or muted pink textiles. Place large powder brushes in one section, smaller eye brushes in another, and pencils or a spoolie in the third. This simple division saves you from searching through one crowded container and keeps the prettiest handles visible.
Choose compartment widths from the brushes you own; a broad fluffy brush needs more clearance than an eyeliner pencil. Smooth internal corners and a level white base matter more than adding extra sparkle. For a related casting, plan the dividers and hollow sections before selecting a mold. Keep the organizer away from sink splashes and use it for clean, dry tools. Wash brushes separately, then allow them to dry thoroughly before returning them to the compartments.
4. Amber Key Bowl with a Terrazzo Detail
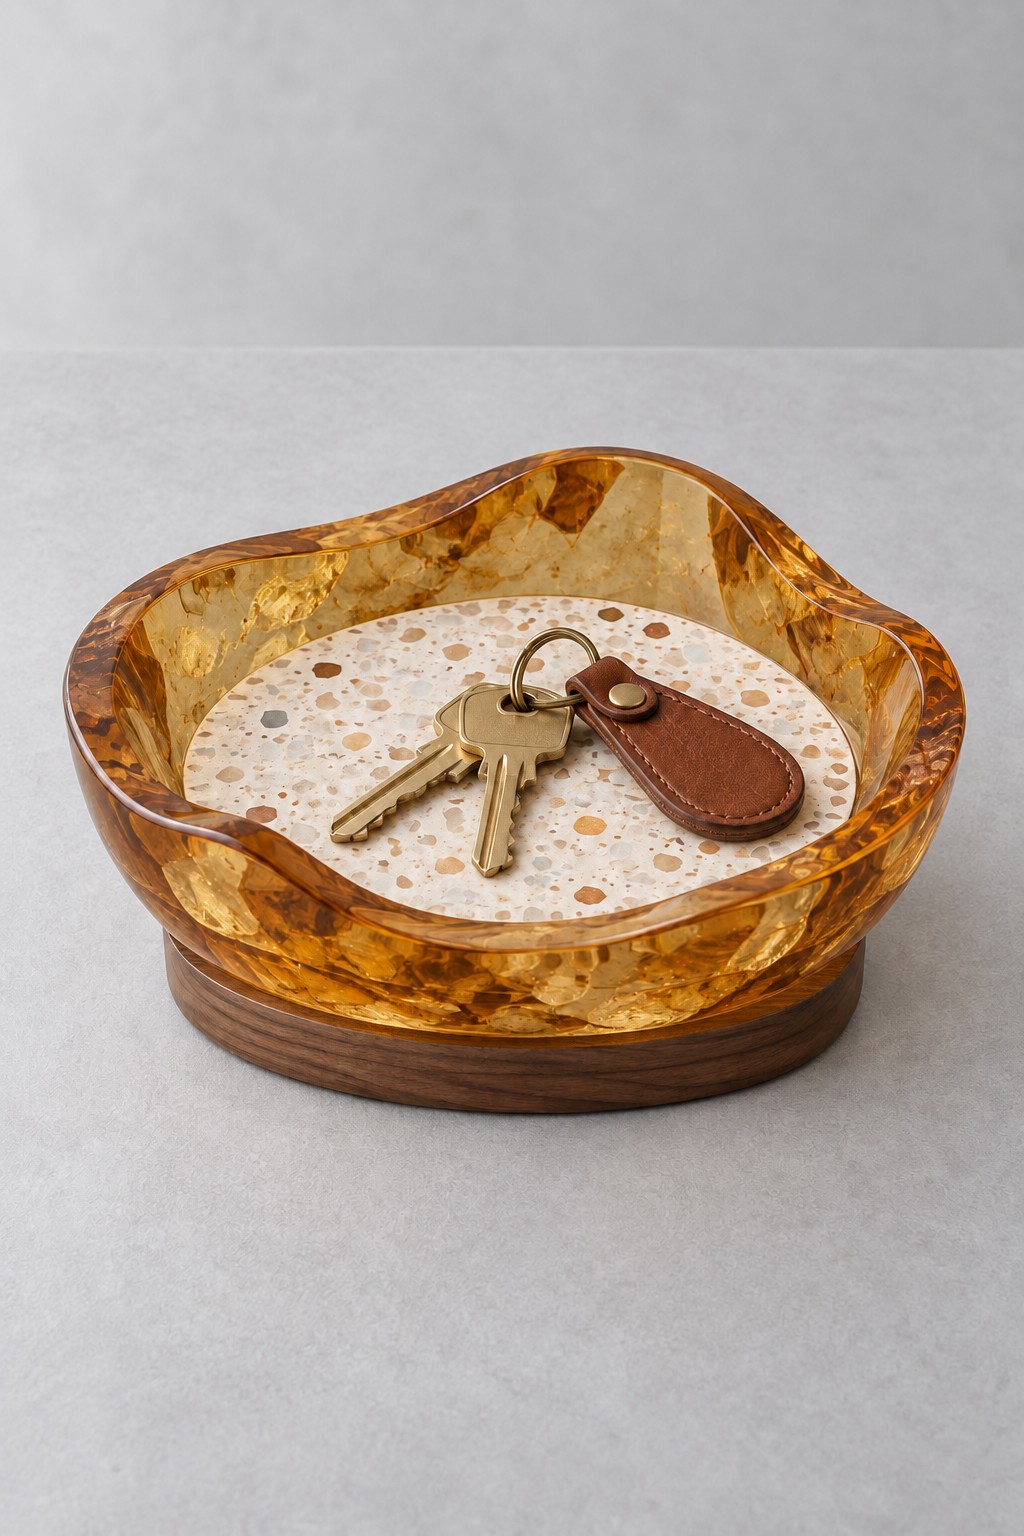
An amber catchall bowl brings a warm accent to an entry console, especially beside pale walls or a wooden door. Its softly uneven rim makes the form feel sculptural, while a round cream terrazzo style insert breaks up the transparent golden color. The low wooden base ties the piece to surrounding furniture. Give it one clear job, such as holding your everyday keys and a leather key fob, so the attractive center remains visible.
Before choosing the size, lay your keys together and check that they fit without hanging over the rim. A broad, low bowl is easier to reach into than a narrow deep one. Treat the terrazzo effect as a decorative design choice rather than assuming a particular material recipe. If you want to reproduce the layered look, each insert and base needs a compatible fit. Place a discreet protective pad underneath and avoid dropping heavy key bunches onto the surface.
5. Daisy Resin Surround for a Butter Dish
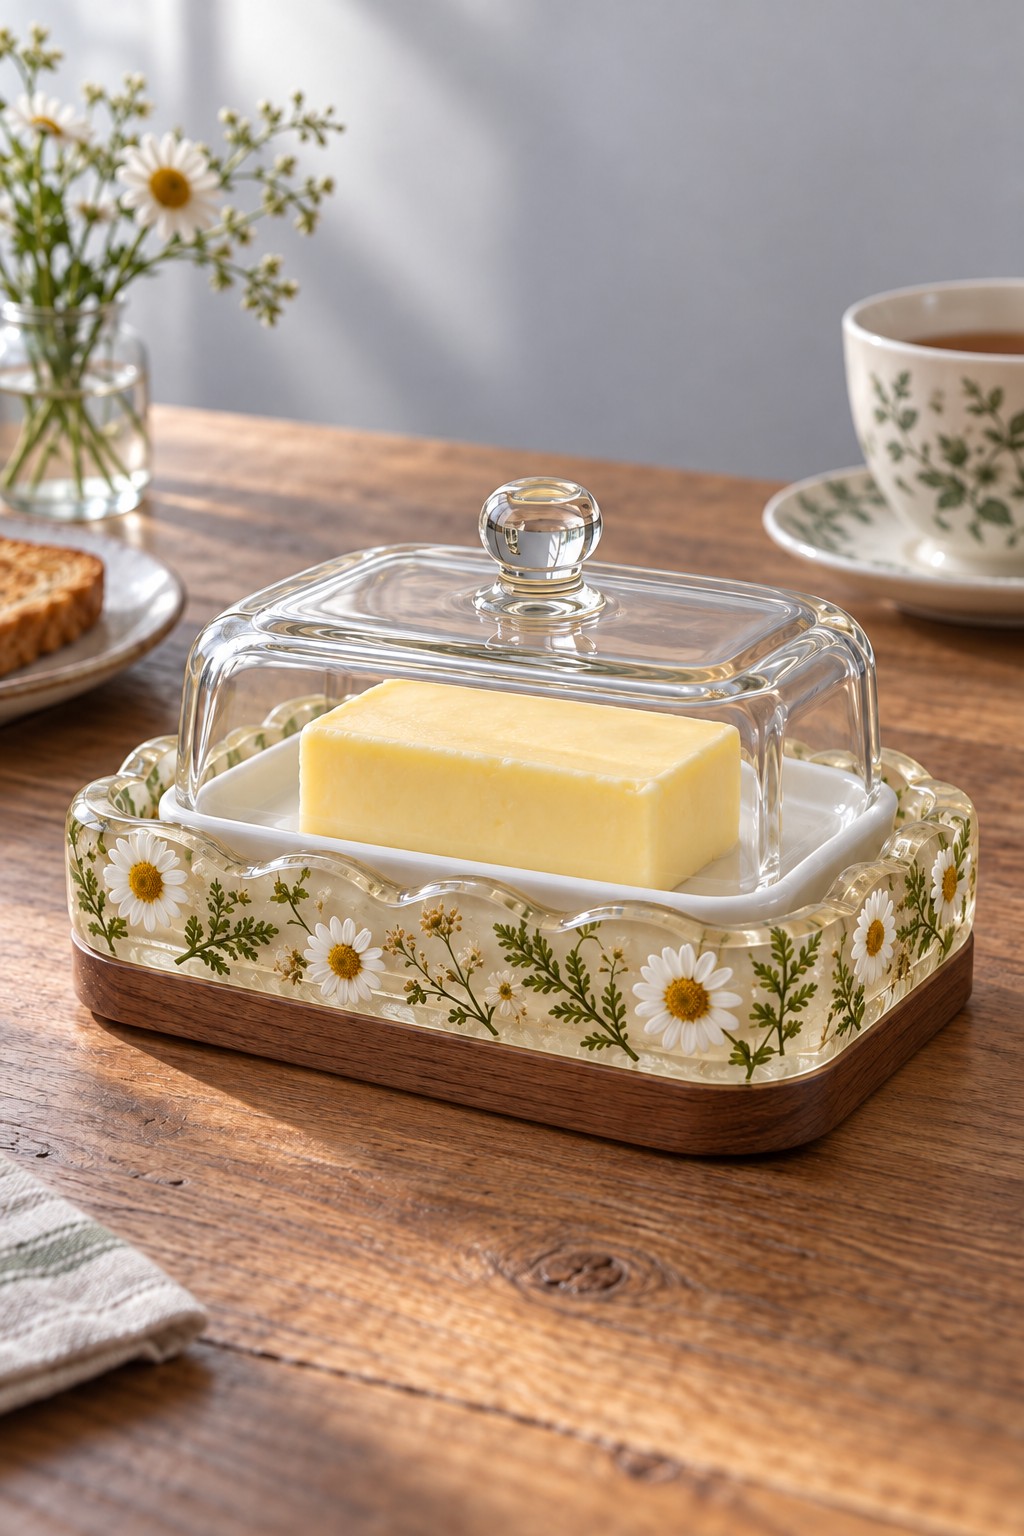
A band of white daisies and green stems can make a familiar butter dish feel like part of a carefully arranged breakfast table. The floral resin surrounds a separate white dish, and a clear glass lid keeps the central shape visually light. A wooden base complements the yellow butter and the tiny flower centers. This approach suits a country kitchen without requiring a full set of matching floral crockery.
The practical detail is the removable food dish: let a suitable ceramic or glass insert hold the butter while the resin serves as the decorative outer support. Do not assume that a clear or hardened casting is suitable for direct food contact; product claims depend on formulation, additives, and curing conditions. Check that the lid and insert lift out comfortably and that the surround does not trap crumbs in tight seams. Wash the removable components according to their own instructions and wipe the decorative base separately.
6. Pressed Daisy Tissue Box Cover
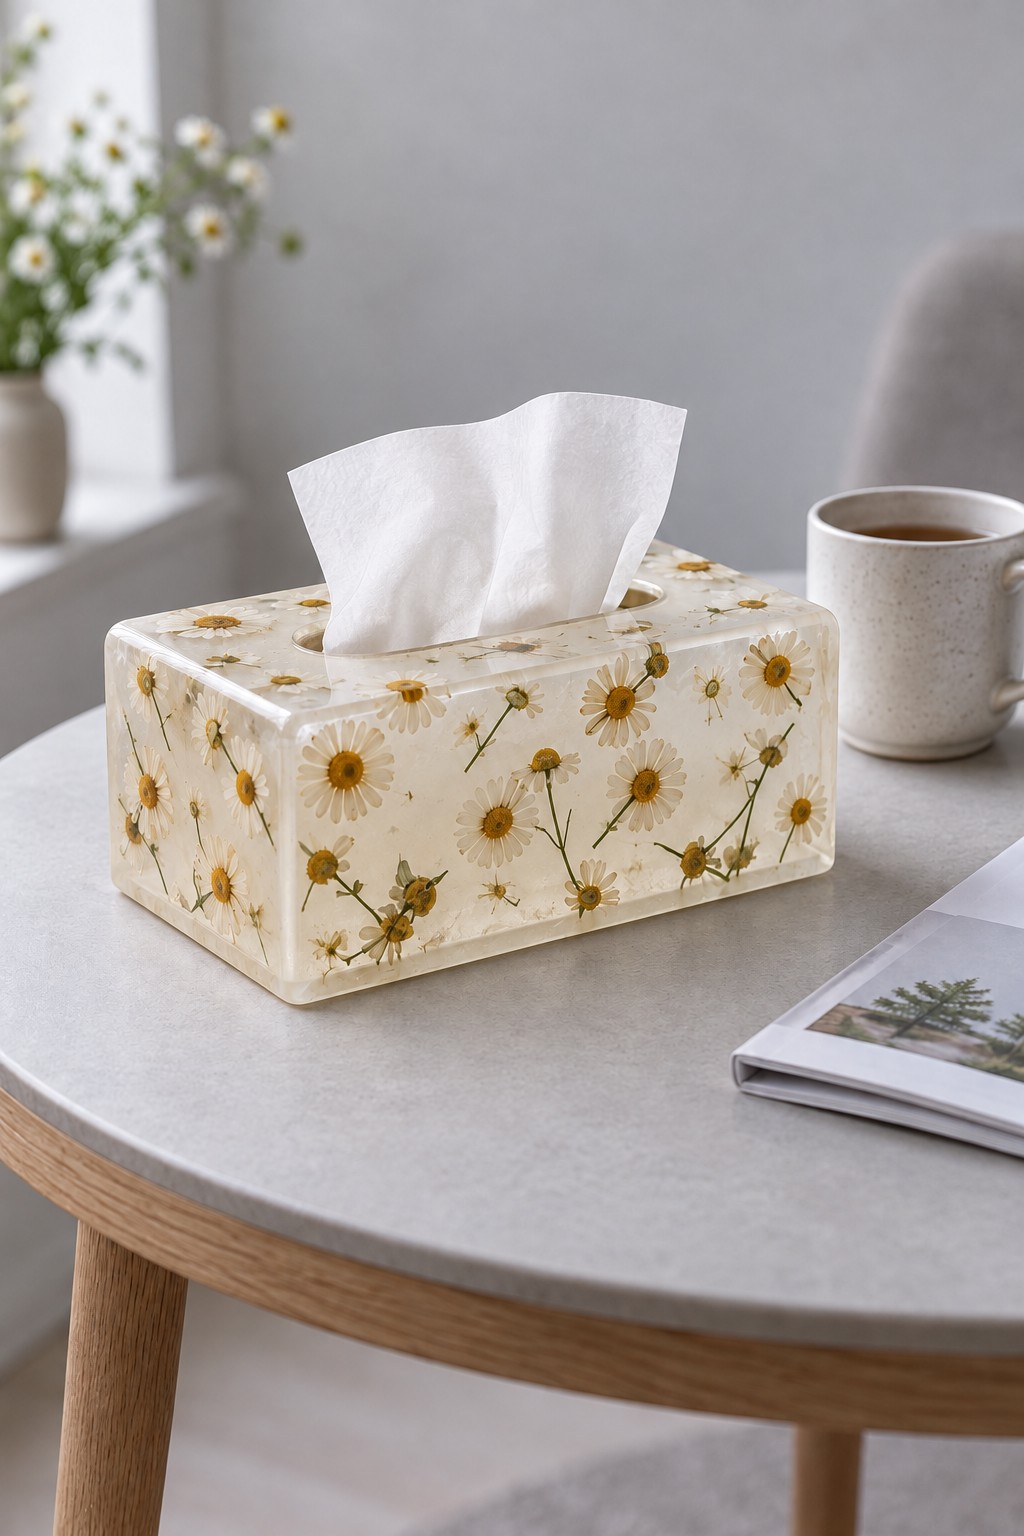
A tissue box cover decorated with small white daisies turns a practical bedside item into a softer decorative accent. A pale cream background gives the stems definition without making the box visually heavy. The rectangular form fits naturally beside a mug, a book, or a small vase, and the repeated flowers work well with plain upholstery. Keep the surrounding surface uncluttered so the cover has room to feel intentional. To carry the soft floral theme into other accessories, explore our shabby chic craft ideas and repeat one gentle color across a few useful pieces.
Measure the tissue box you buy most often before choosing the cover dimensions. Allow enough internal clearance for refilling and enough space at the top opening for a tissue to pull through without catching. This is a hollow cover, so its construction is different from pouring a solid rectangular block. Make sure the opening has smooth edges and the refill route is convenient. For a similar botanical finish, use fully dried flowers and keep the stems completely enclosed. Dust the corners when replacing the box.
7. Botanical Backplate for a Brass Wall Hook
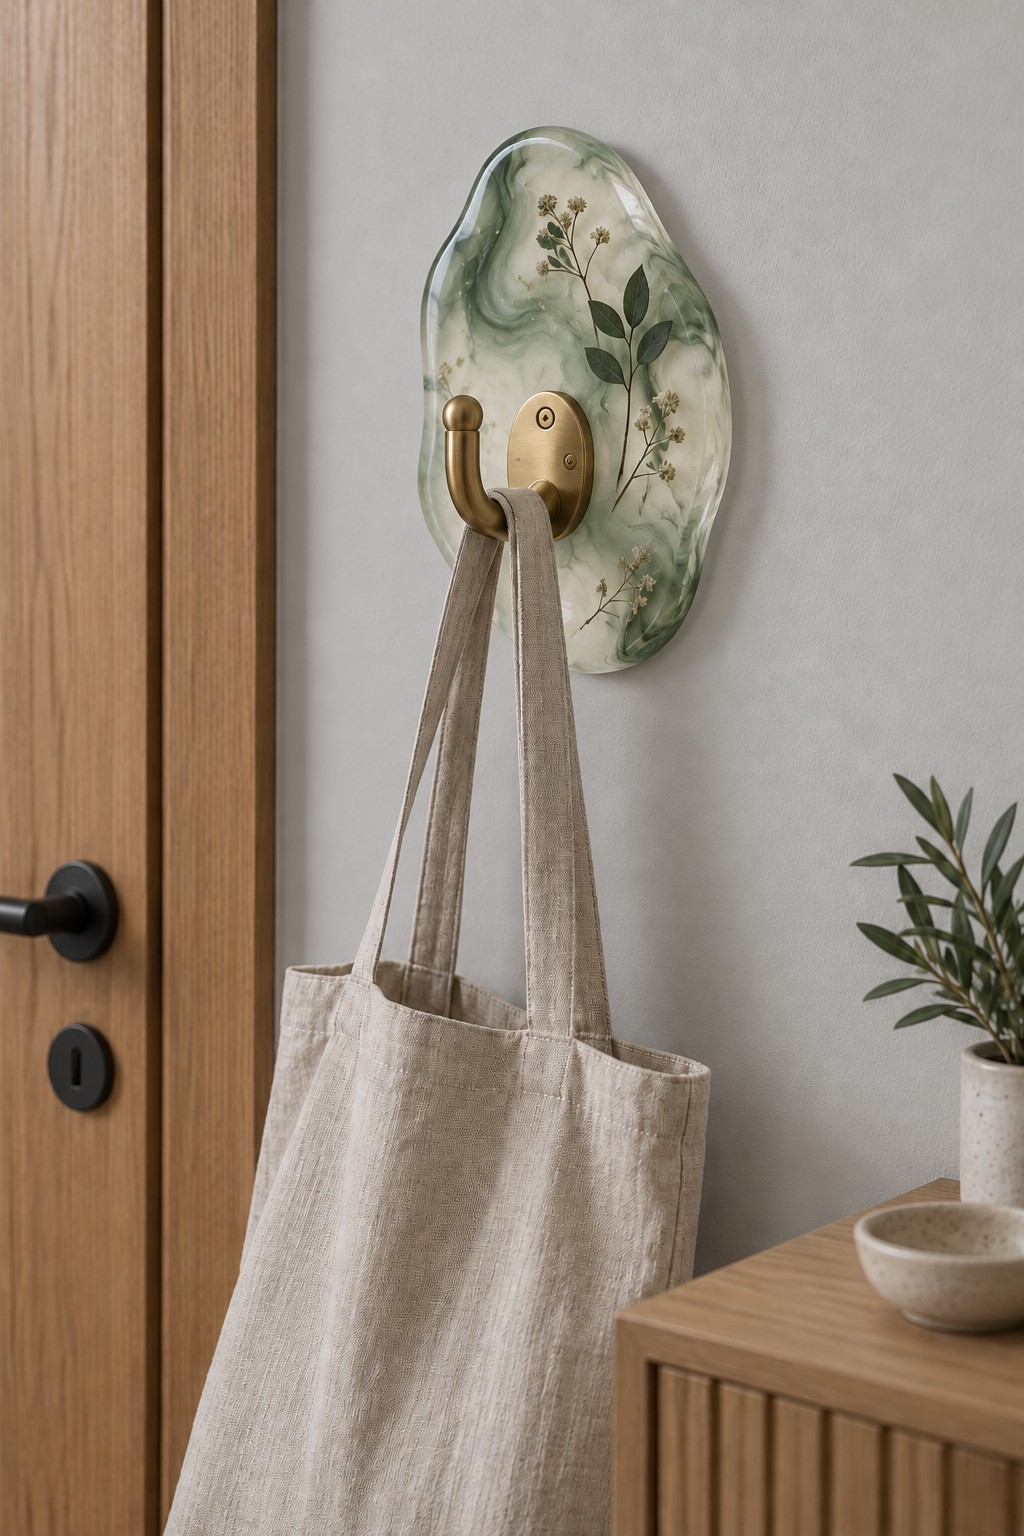
A single brass hook becomes a decorative entryway feature when paired with an irregular botanical backplate. Pale green resin, pressed leaves, and small flowers echo the shape of a loose garden arrangement. The warm metal provides a clear focal point against the transparent background. Use the combination beside a door for a lightweight fabric tote, where it adds interest without needing a whole row of hooks.
Plan the mounting before making the backplate. The hook and its suitable fasteners should carry the intended load into an appropriate wall support; the decorative resin plaque should not be assumed to have a safe load rating. Allow enough clearance around screw heads, and avoid placing mounting holes close to fragile edges. A resin backplate needs a hardware layout of its own, not just the coaster method enlarged. Choose fasteners for your wall type and the hook manufacturer’s stated capacity. Inspect for movement before hanging anything.
8. Petal Shaped Amber Fruit Bowl
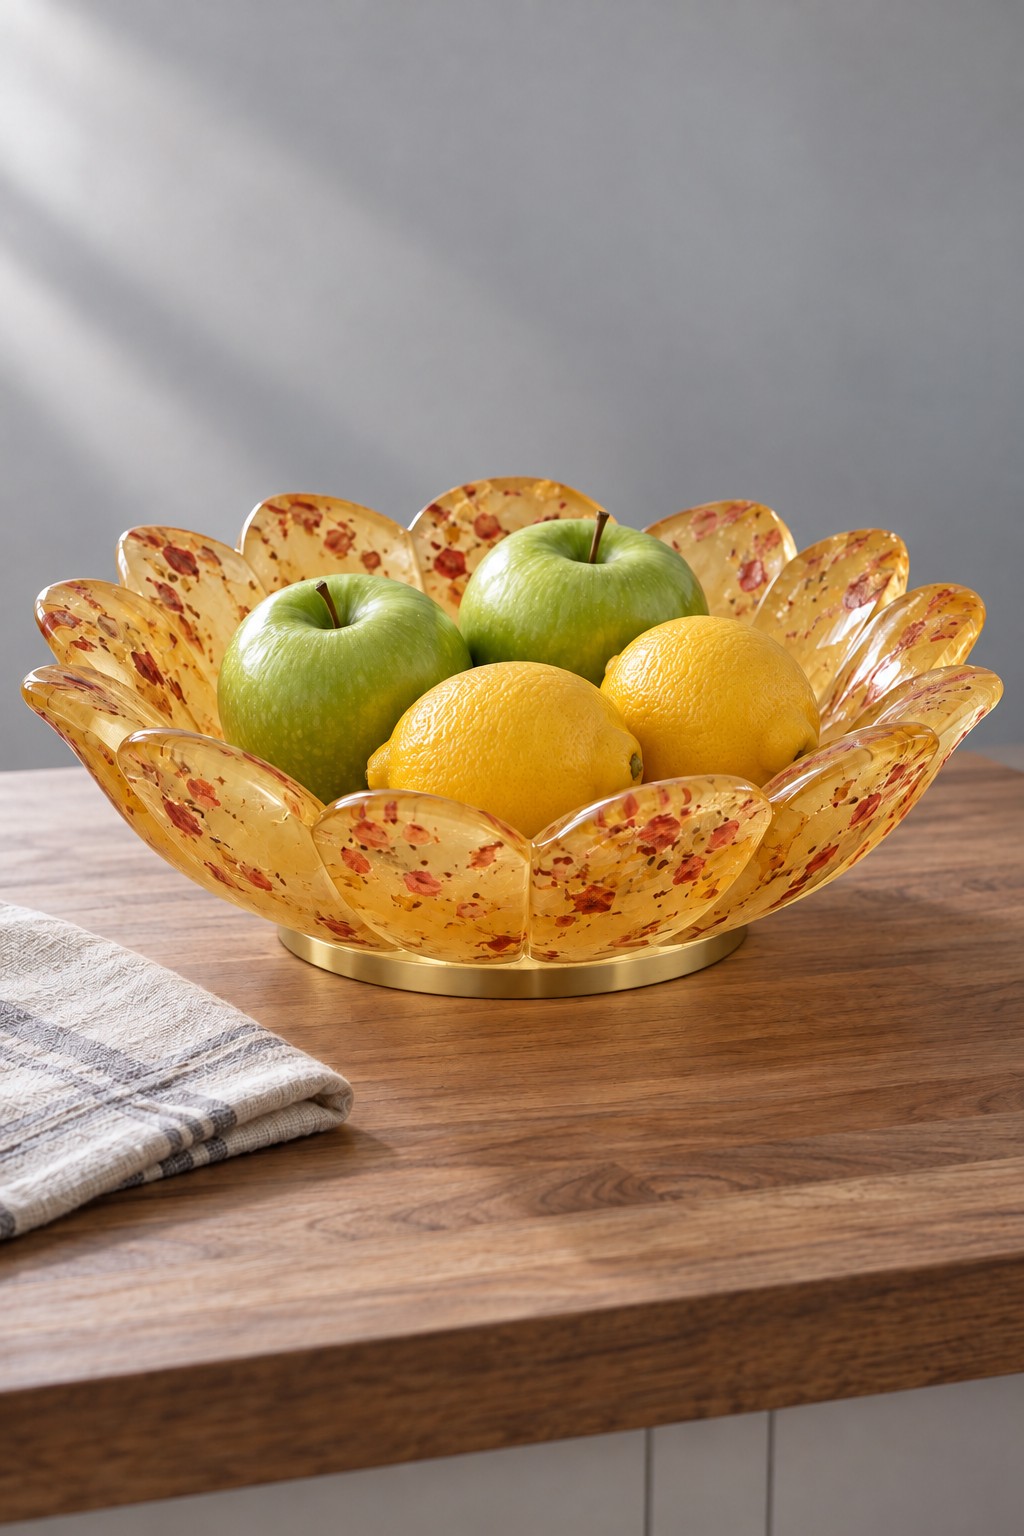
A bowl with overlapping petal shaped sides creates a lively focal point on a kitchen island or dining table. Amber resin and orange flecks give the form a warm, almost autumnal character, while a gold colored foot lifts it slightly from the surface. Green apples and yellow lemons provide a strong color pairing with the bowl. The effect works best when the surrounding accessories stay simple, such as a plain linen towel and a neutral countertop.
Treat food contact as a separate material requirement when adapting this idea. Without documentation for the exact resin system and finished surface, use the bowl decoratively or add a suitable food safe liner that prevents fruit from touching the resin. Choose a stable foot and a rim that leaves room to lift contents easily. A petal form needs a dedicated mold or a separately planned assembly, rather than bending a cured flat casting. Keep it away from the stove and do not use it for hot food.
9. Autumn Leaf Napkin Holder
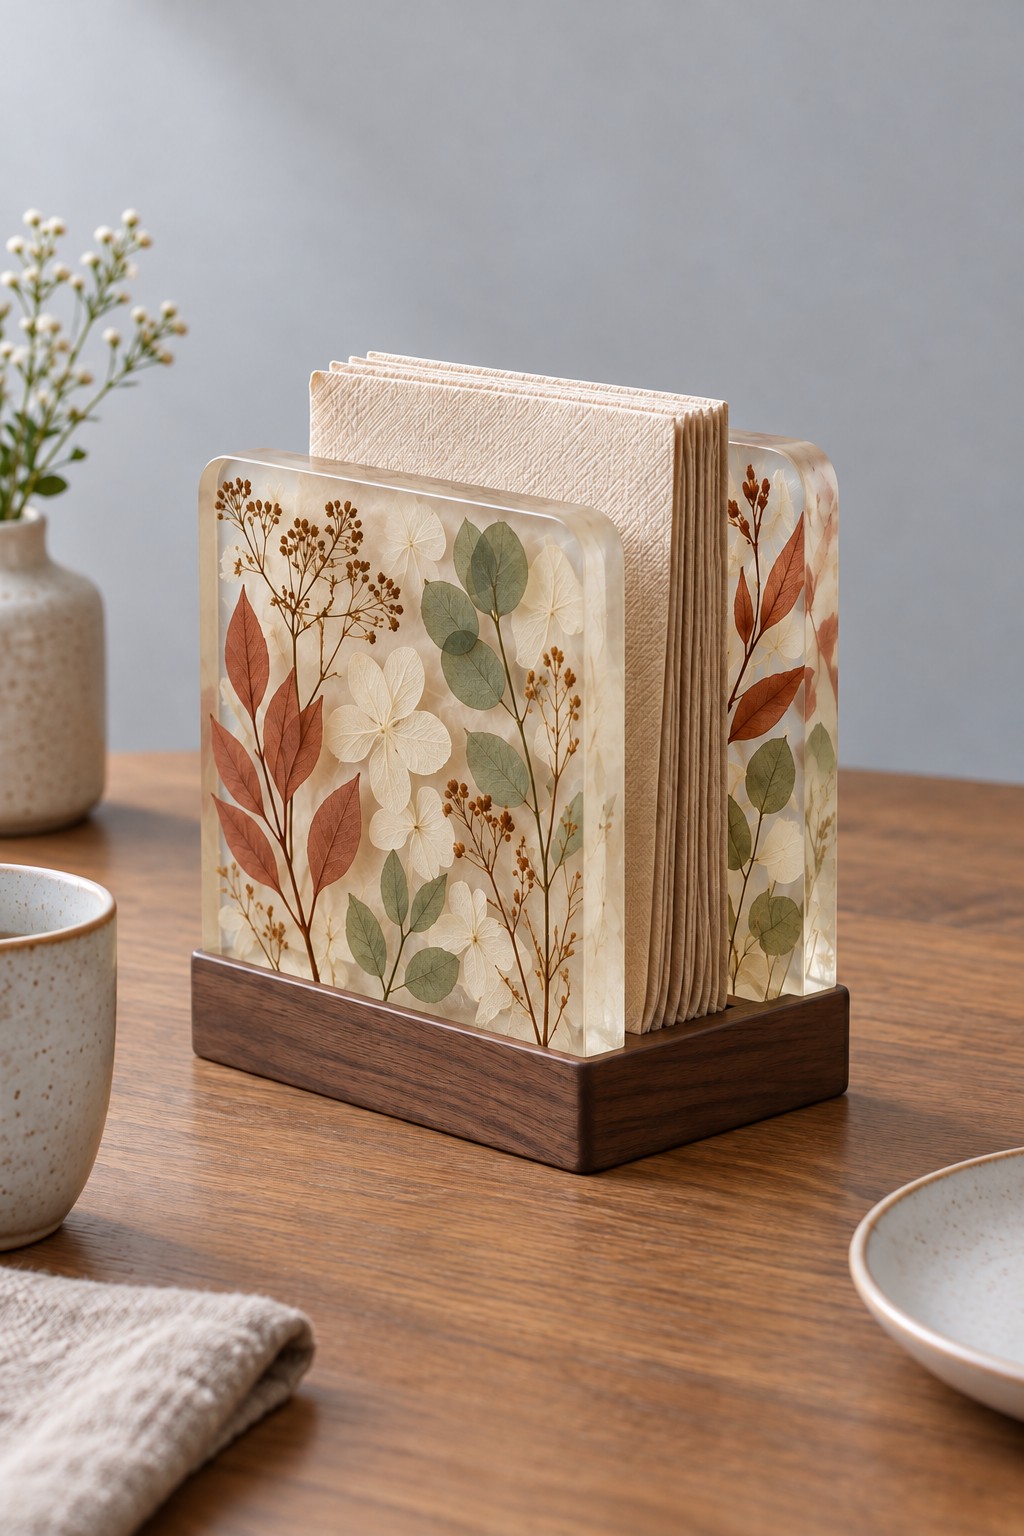
Two transparent botanical panels give ordinary paper napkins a decorative frame. Rust colored leaves, soft sage greenery, and cream petals create a gentle autumn palette that can stay on the table beyond a single seasonal meal. A dark wooden base adds contrast and keeps the upright panels visually connected. Pair the holder with plain napkins so the leaves remain easy to read through the clear sides. For more ways to arrange botanicals in everyday decor, explore our leaf craft projects, including pressed displays and transparent decorations.
Measure a folded napkin before deciding the gap between the panels. It should slide in easily and lift out without pulling the whole holder across the table. The panels need smooth upper edges and a secure connection to their base. If you plan a similar build, arrange the botanical composition separately for each side before casting; balanced color matters more than identical placement. Avoid squeezing the napkins into an overly narrow slot. Set the holder where spills are unlikely, and wipe the base without soaking the wooden joints.
10. Smoky Lilac Remote Control Caddy
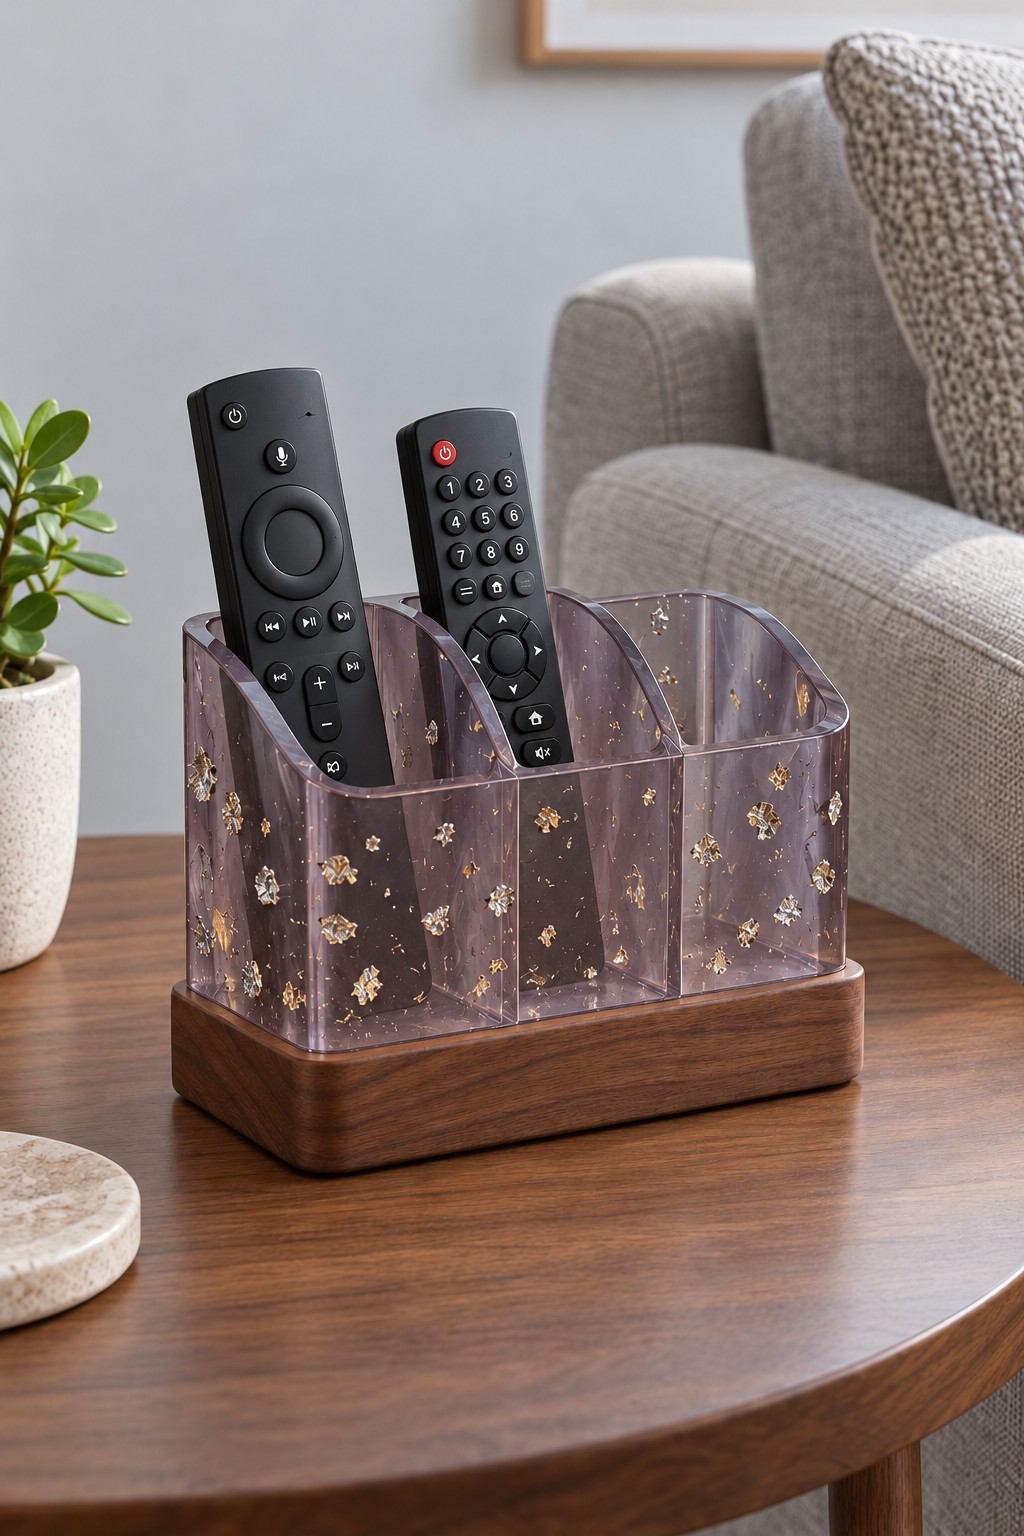
A smoky lilac caddy gives remote controls a consistent home beside the sofa. Transparent walls keep buttons and familiar shapes visible, while tiny pale flowers add a subtle pattern rather than competing with the television area. The divided interior stops two remotes from slipping into one pile, and the dark wood base suits a side table with warm grain. Position it within easy reach of your usual seat.
Use your widest remote as the starting measurement and leave room for your fingers around each compartment. A shorter front wall can make a small remote easier to grasp, while taller sides support a longer handset. For a related design, plan the hollow compartments, sloped edges, and base attachment before casting. Keep enough space to clean the corners with a cloth. Do not treat the caddy as a place for open drinks, and check periodically that the base has not loosened from repeated handling.
11. Flower Base Paper Towel Stand
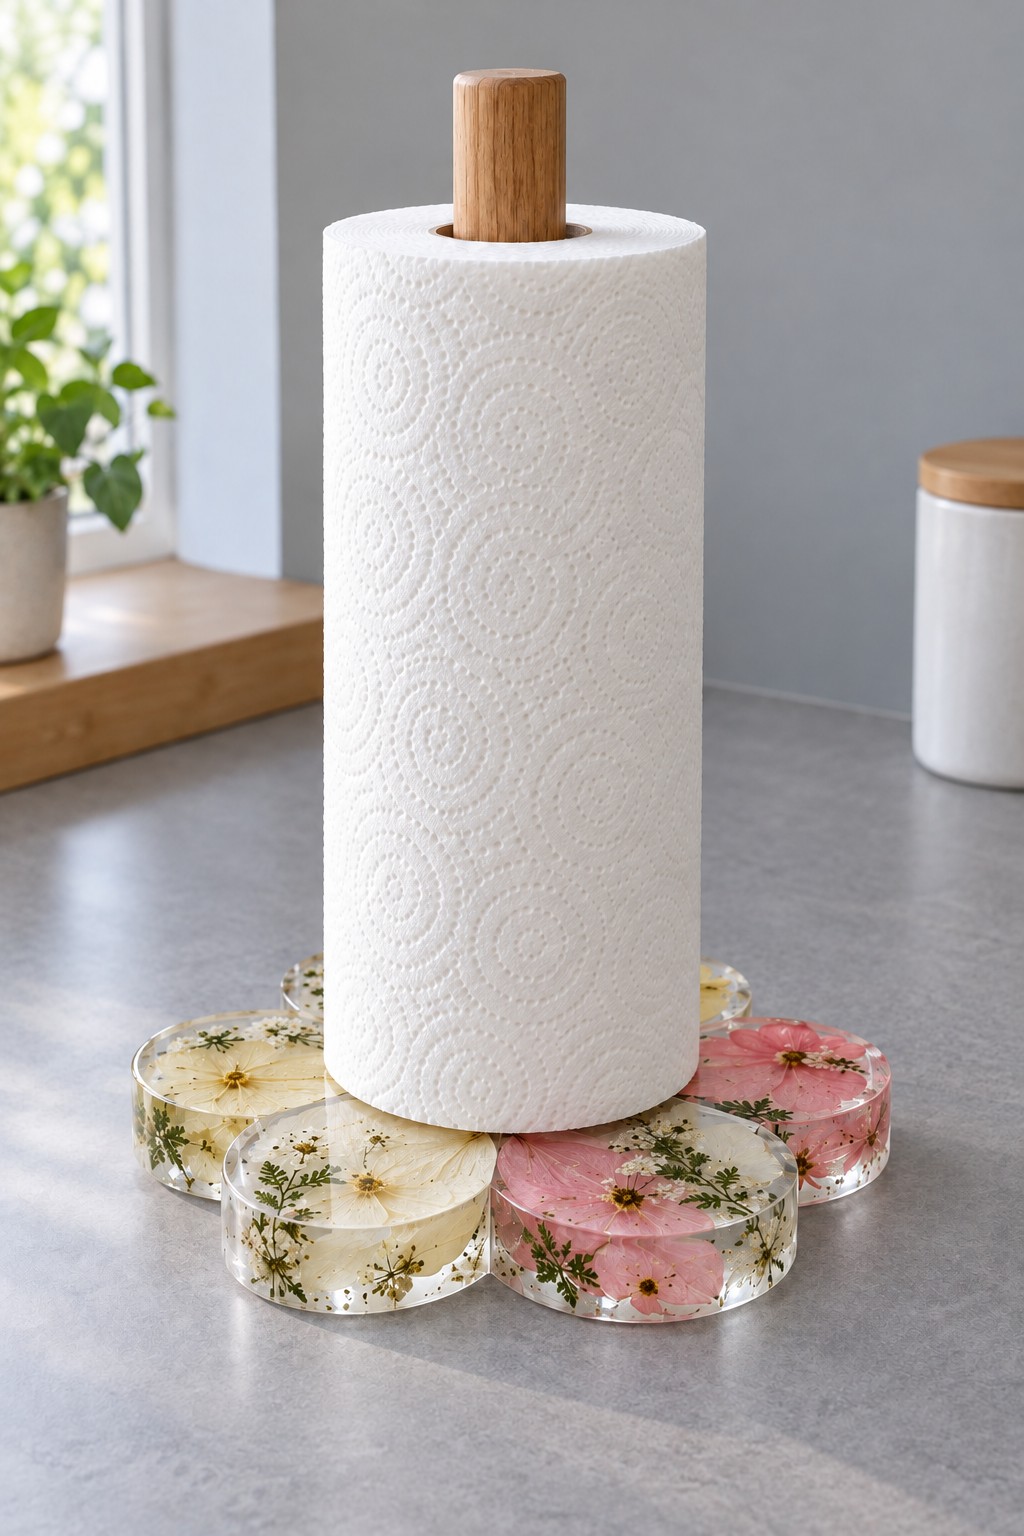
A flower shaped base adds personality to a simple wooden paper towel stand. Alternating clear daisy filled petals and pink floral petals create a cheerful detail at counter level, while the straight wooden spindle keeps the overall silhouette uncomplicated. The white paper roll acts as a neutral center, so this design can brighten a kitchen without adding another large decorative object. Let the petals remain visible around the roll instead of placing the stand in a crowded corner.
Function starts with stability. The base should sit evenly, support the spindle securely, and give you enough room to replace the roll. Check how the stand behaves when you pull one sheet; a decorative petal shape alone does not guarantee resistance to tipping. If making a similar holder, plan the spindle attachment and base thickness together. Keep the stand away from the hob, remove the paper before cleaning, and dry the wooden post after wiping any splashes.
12. Garden Inspired Tea Packet Organizer
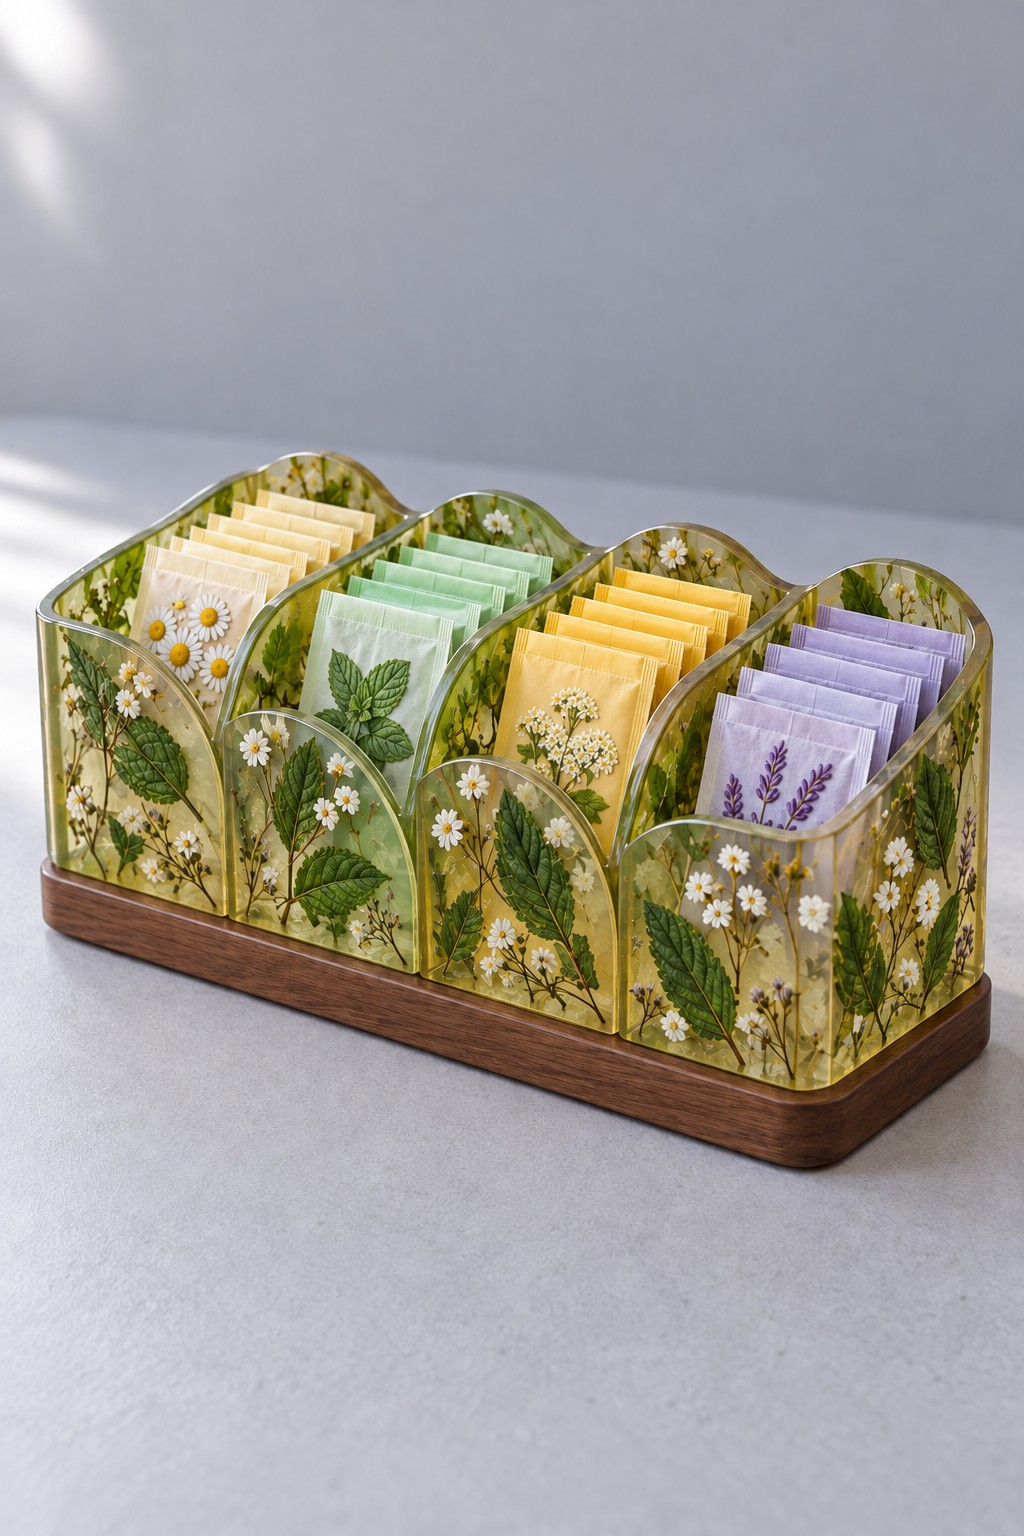
Four upright compartments turn a collection of tea packets into an inviting kitchen display. Clear resin filled with green leaves and small white flowers gives the holder a garden theme, while the wooden base adds warmth. Separate packets by flavor, caffeine preference, or how often you reach for them. Pale yellow, mint, and lilac wrappers create their own color arrangement through the transparent dividers.
Measure the packet width and height before choosing the compartments. A little clearance makes it easier to remove a sachet without bending the wrapper, and the front edges should leave the upper portion accessible. Use this design for individually wrapped tea rather than loose leaves, which are better kept in an appropriate closed storage container. When planning a matching organizer, the hollow sections and divider joints deserve as much attention as the flowers. Keep it in a dry spot away from kettle steam, and leave space around it for routine cleaning.
13. Wildflower Resin Photo Frame
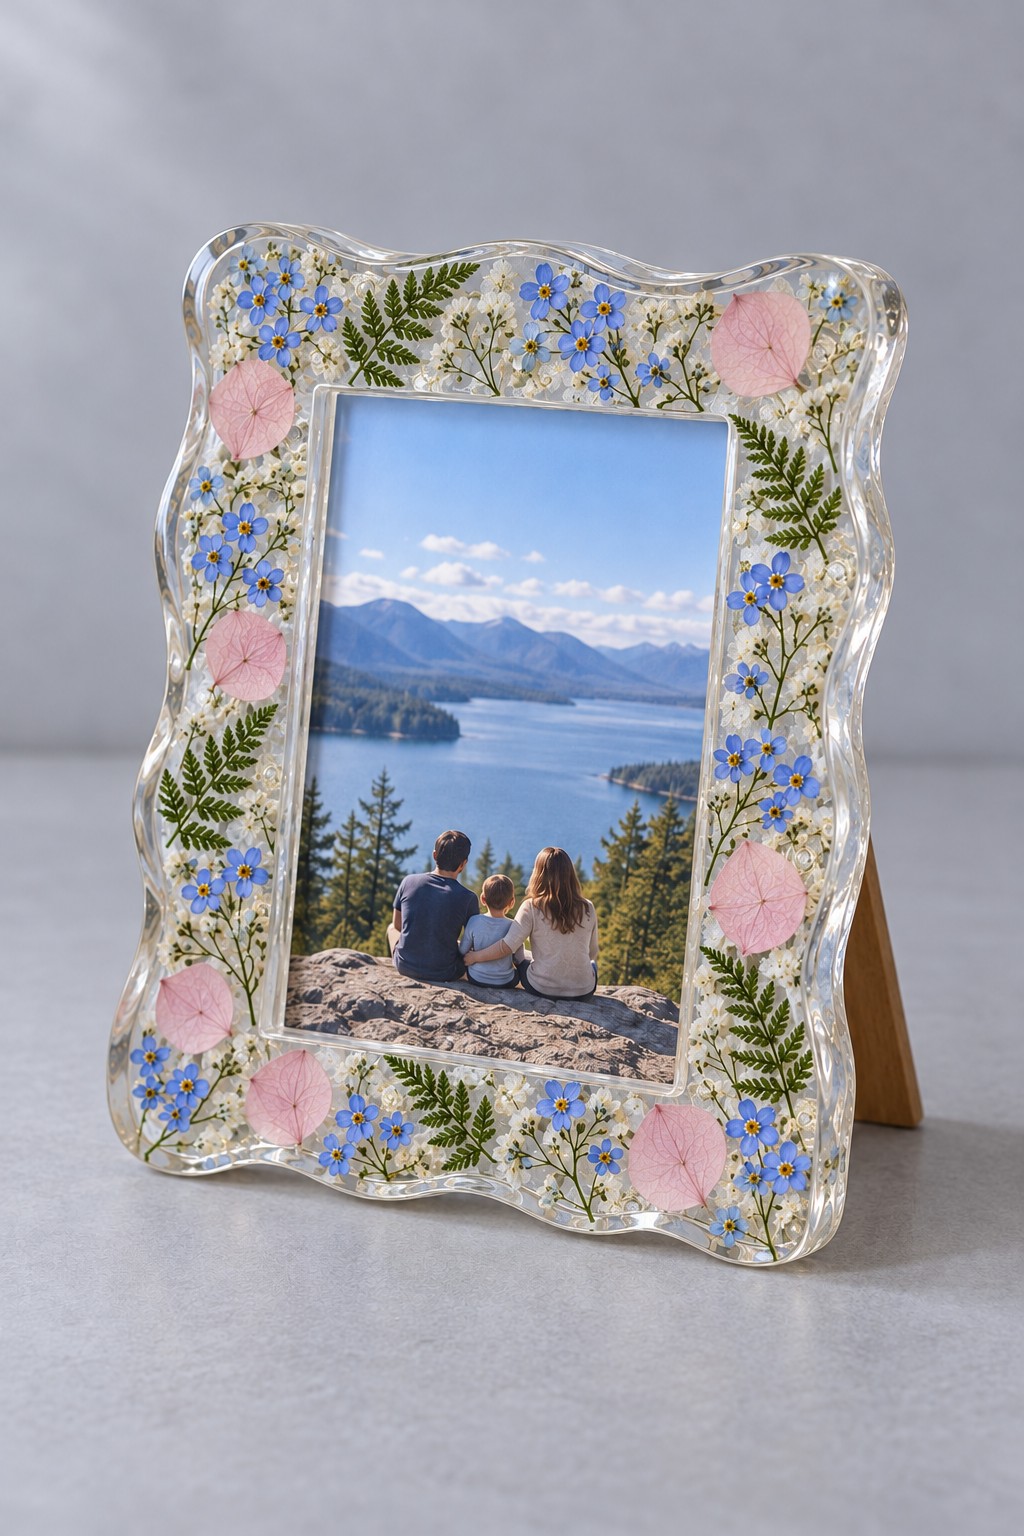
A transparent frame with a gently wavy outline gives a favorite photograph a botanical border. Small blue flowers, pink petals, and fern leaves create variation without relying on a painted pattern. The clear spaces between them let the background become part of the display. This style suits a travel photograph or a family memory with greens and blues, especially on a simple wooden shelf.
Keep the flowers in the border so the central opening stays readable and the frame does not compete with the subject. Before casting a similar version, decide how the photograph, backing, and stand will fit after curing. An accessible backing lets you change the picture later; sealing the photograph permanently inside resin would create a different project. Check both portrait and landscape support if you want that flexibility. Display the frame away from prolonged direct sun and dust around the wavy edges with a soft cloth.
14. Purple Floral Bedside Carafe Platform
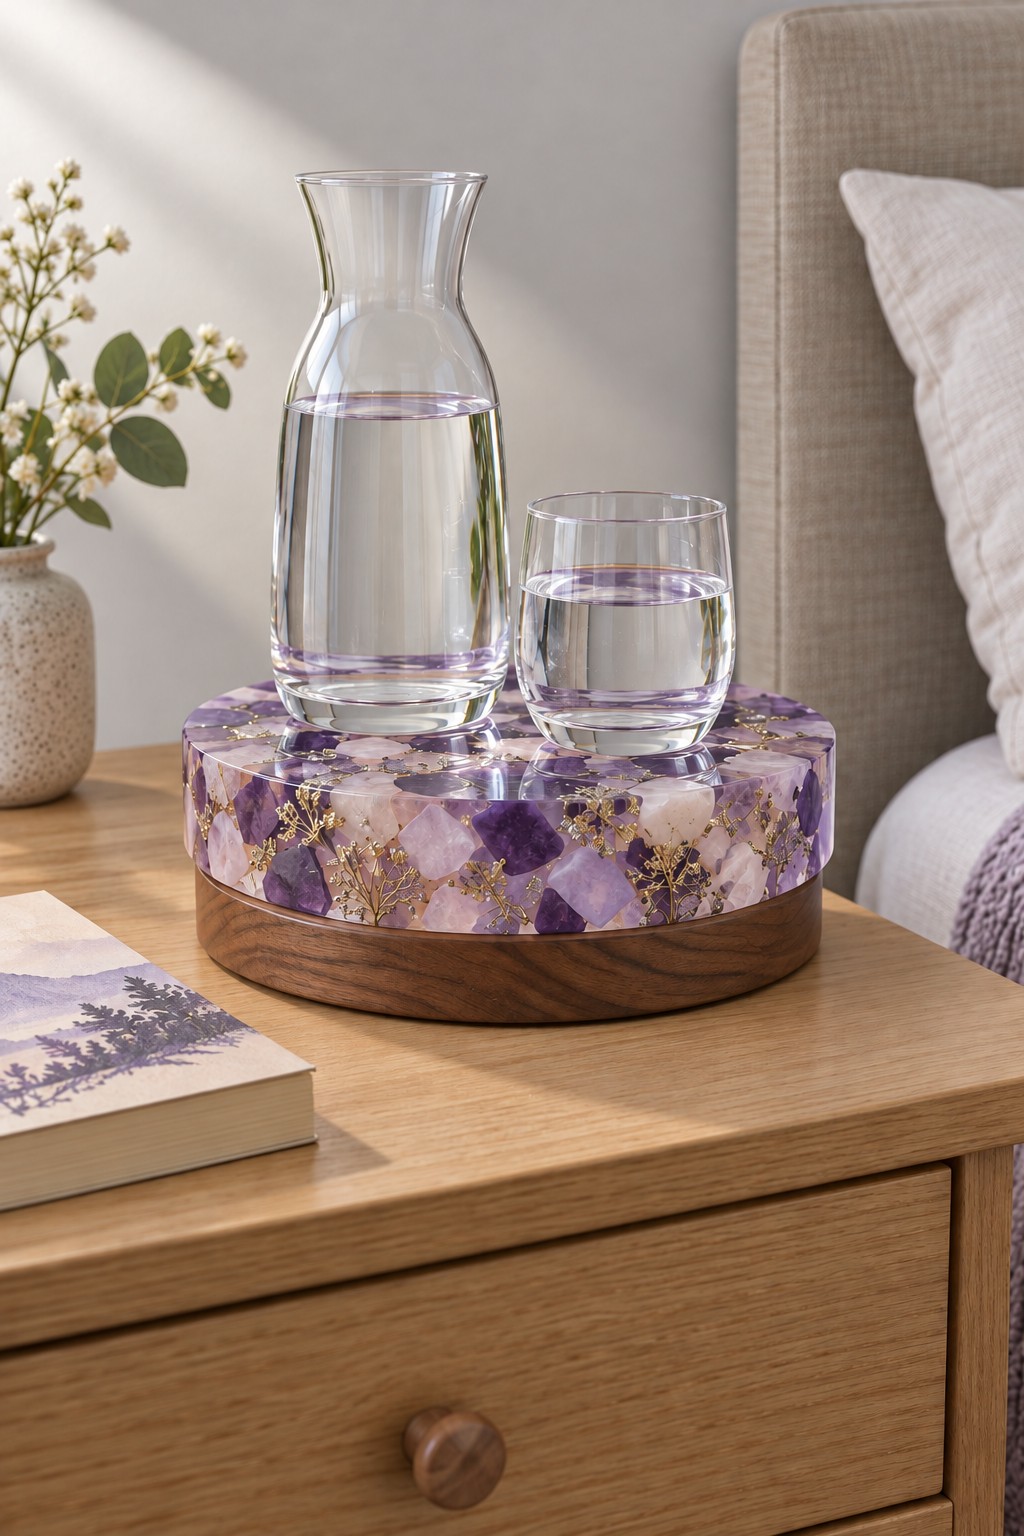
A low circular platform brings a water carafe and drinking glass together on a bedside table. Purple and pale blush botanical details create a decorative band around the edge, while the wooden lower section echoes the furniture underneath. The raised grouping feels deliberate and leaves the rest of the nightstand available for a book or glasses. Keep the arrangement small enough that the carafe remains easy to lift without reaching across the bed.
Choose the top diameter by placing your actual carafe and glass side by side, then allowing a little space between them and the edge. A flat, level top is essential for both items to sit securely. Treat this as a platform unless a separate rotating mechanism has been planned; a circular shape does not make it a turntable. Water belongs in the glass vessels, not in a resin cavity. Wipe condensation promptly, protect wooden joints from soaking, and avoid balancing a tall carafe on a narrow base.
15. Orange Slice Magnetic Note Clip
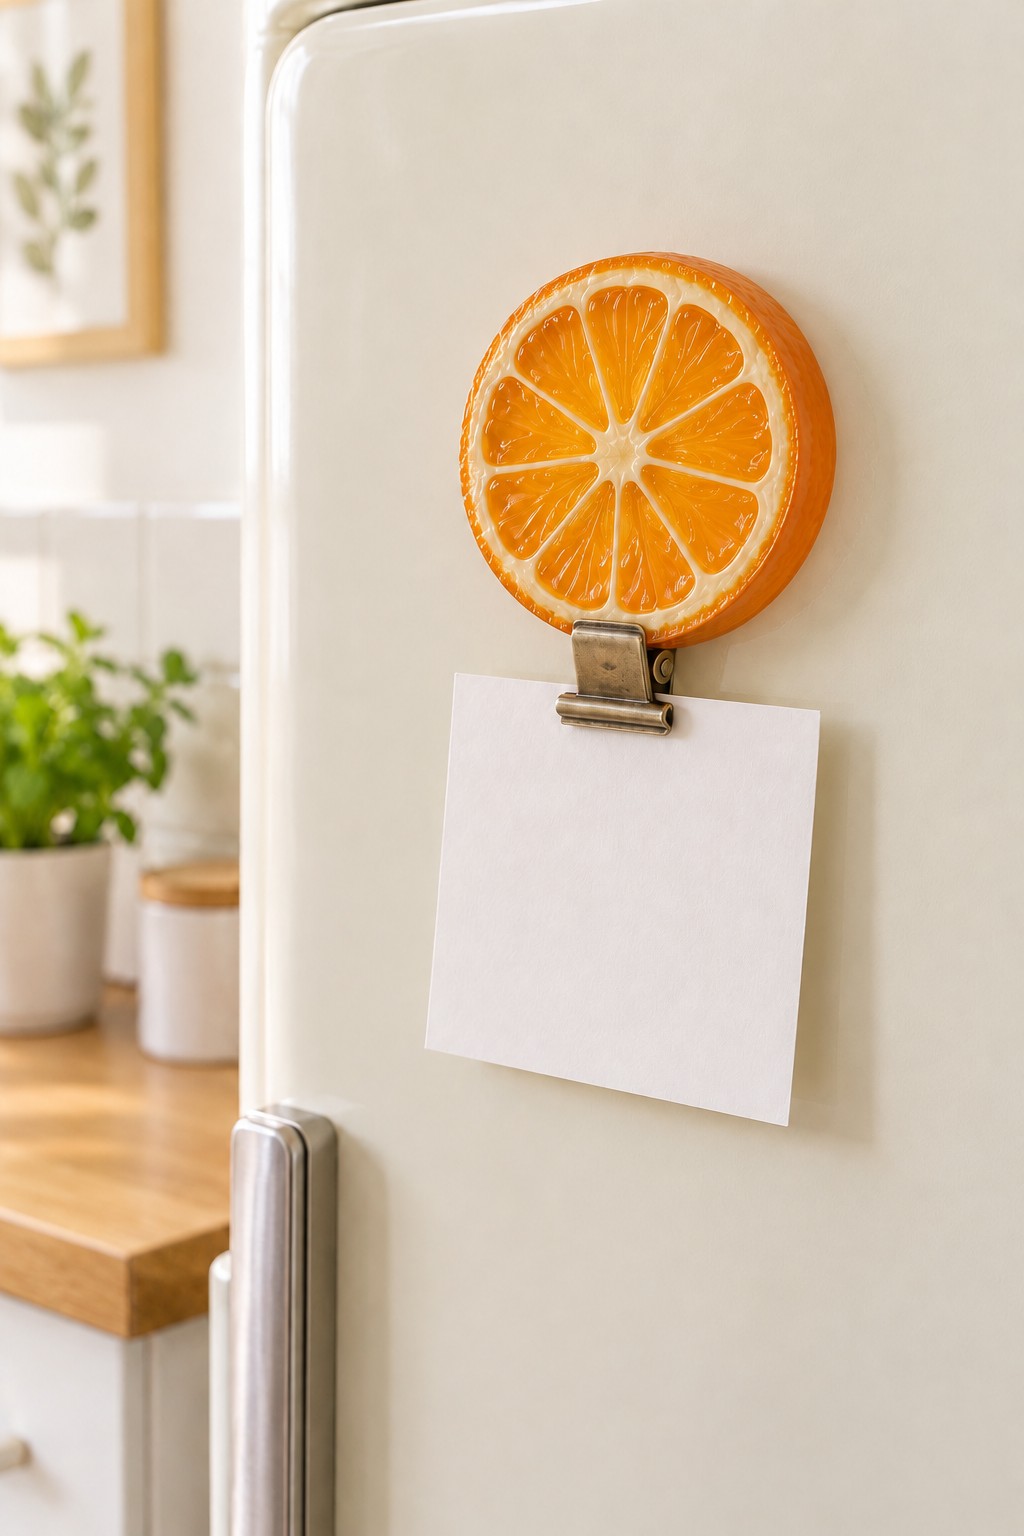
An orange slice note clip makes a refrigerator reminder feel like a small kitchen accent. The bright citrus circle contrasts with a pale appliance door, and the compact brass colored clip leaves the note visible below it. Use it for a shopping reminder or a short handwritten message rather than a thick stack of papers. Its simple shape adds color without turning the whole refrigerator into a crowded noticeboard.
For a similar piece, decide whether the citrus effect will come from a completely dried slice or a resin compatible printed insert. Moist fresh fruit should not be enclosed as if it were a stable decorative inclusion. Keep the clip outside the casting so it remains movable, and plan a secure attachment for the magnet on the back. Use an enclosed magnet and keep small detachable hardware away from children. Check that your appliance door attracts magnets, and add a protective backing to reduce rubbing against the finish.
16. Pink Floral Cotton Pad Canister
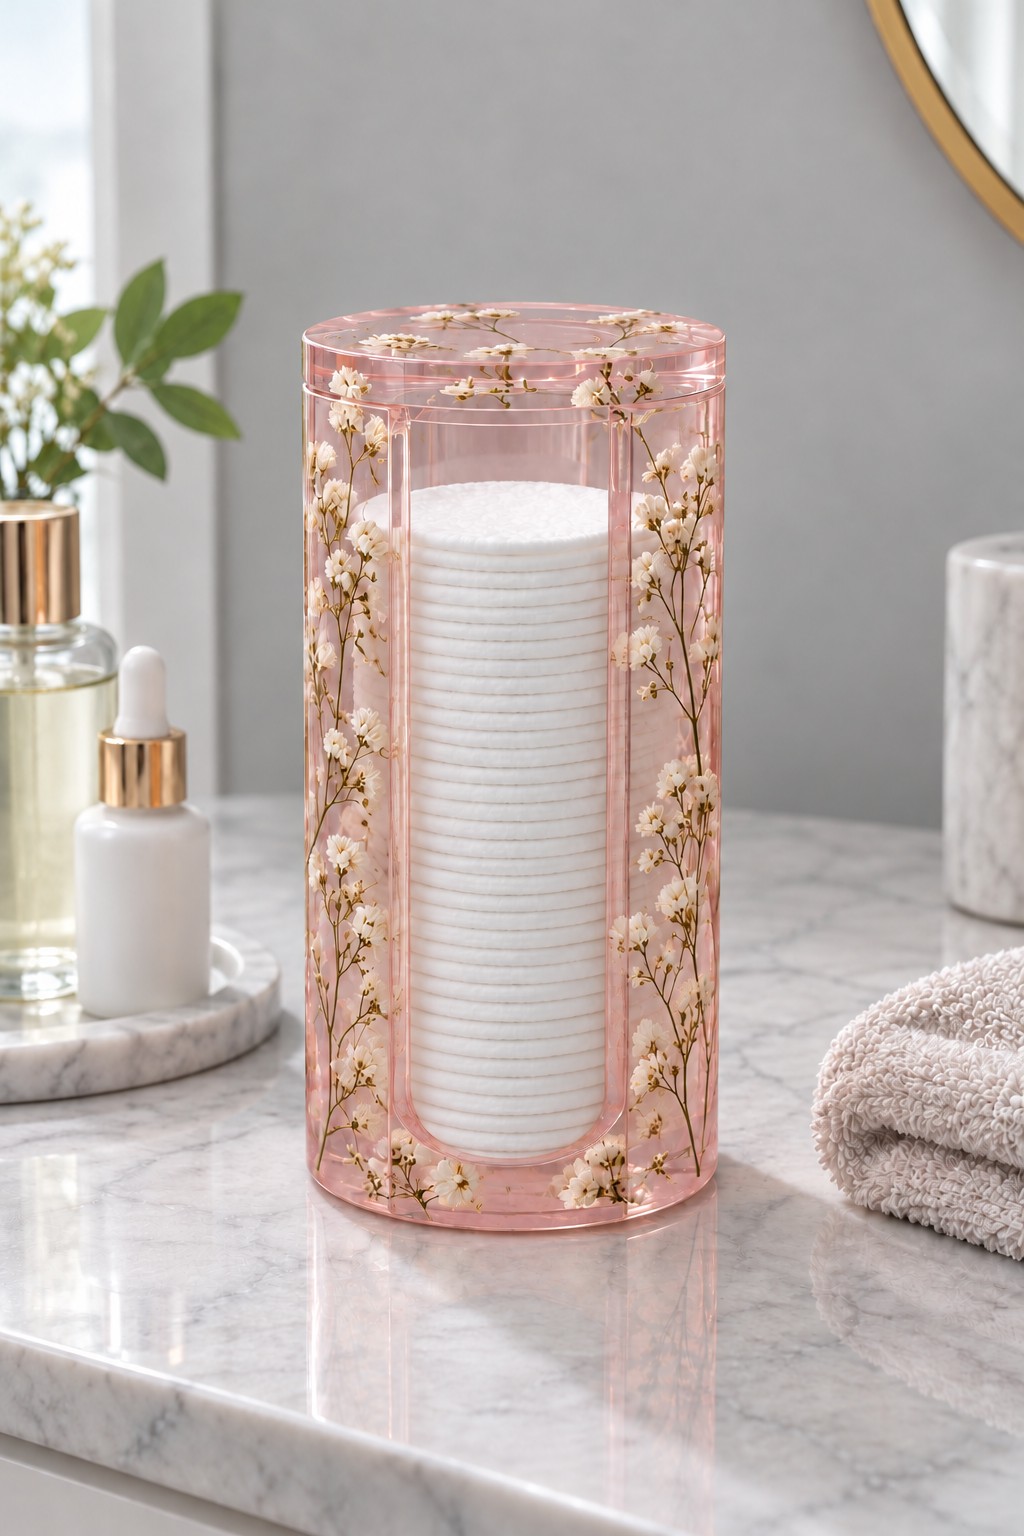
A tall pink floral canister brings order to a vanity while keeping a stack of white cotton pads visible. Small stems and blossoms around the sides form a vertical pattern, and a matching lid gives the container a finished silhouette. The white rounds provide a quiet background for the flowers, making this design particularly suitable beside pale towels and simple skincare bottles.
Measure the diameter of your cotton pads and allow enough internal clearance to lift one without scraping it along the rim. A smooth interior matters because loose fibers can catch on rough edges. When adapting the idea, a removable glass or suitable plastic inner container can make cleaning simpler while the resin serves as the decorative shell. Keep the pads dry and close the lid after use. Choose a convenient lid grip, avoid storing the canister directly beside a splashing tap, and let cleaned parts dry before refilling.
17. Leaf Filled Salt and Pepper Tray
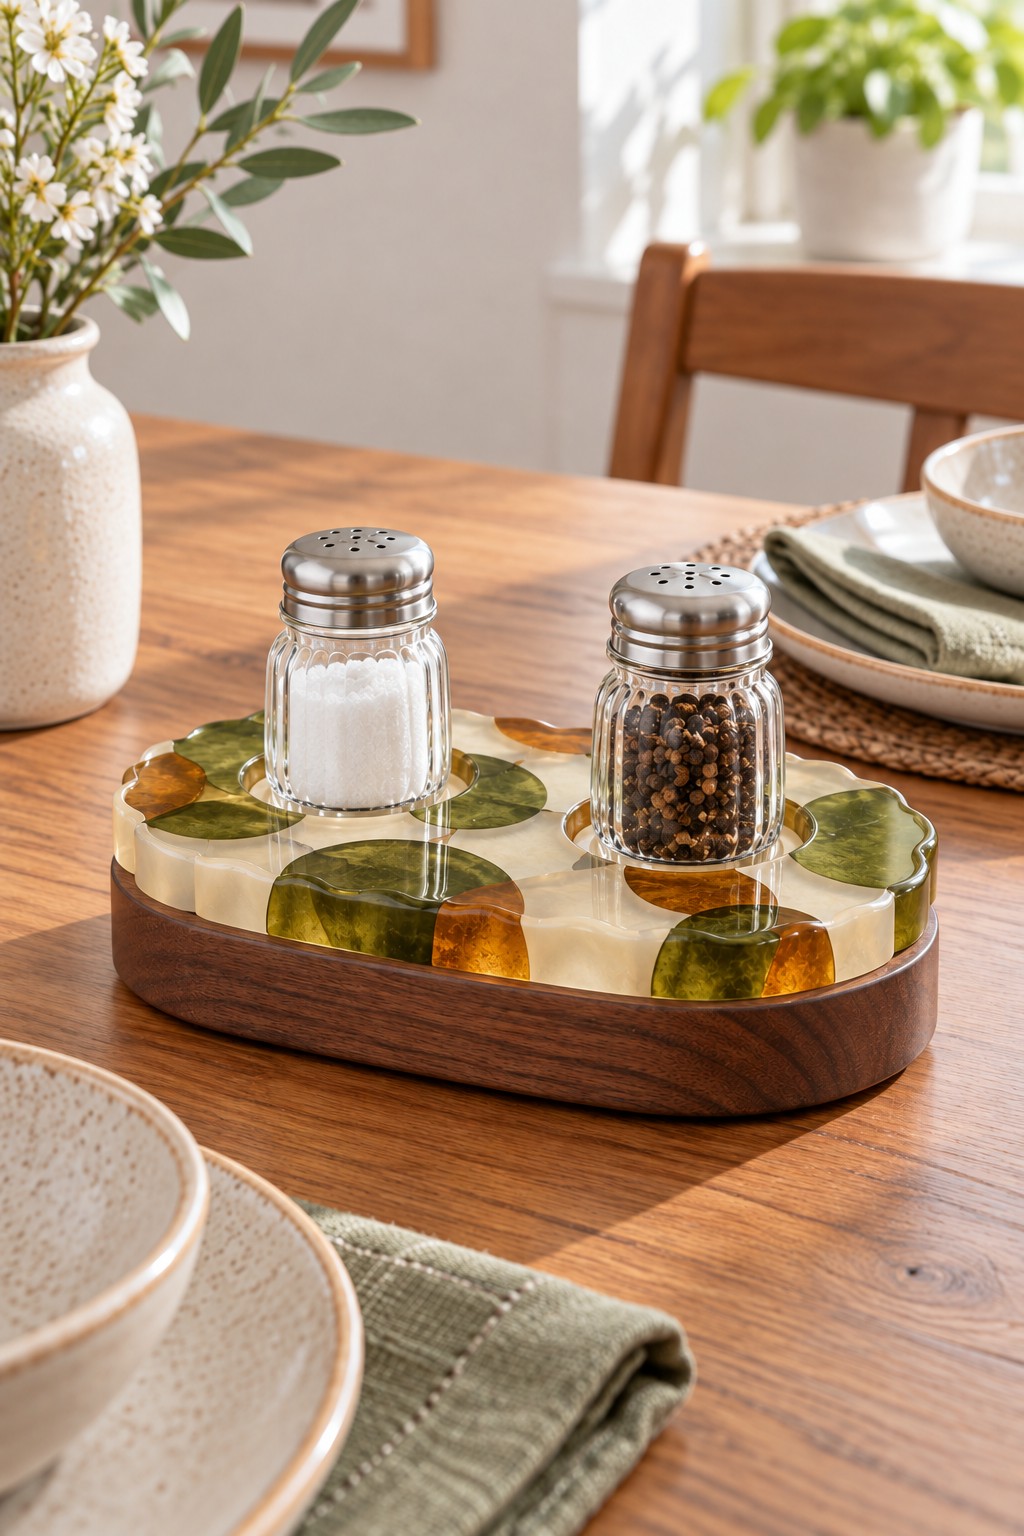
A compact seasoning tray gives salt and pepper shakers a defined spot on the dining table. Green and amber leaf shapes inside clear resin echo wood grain without disappearing into it. The dark wooden lower section outlines the arrangement, and the modest raised edge makes the pair look like a complete table accessory. This is an easy decorative theme to repeat with plain napkins and earthy ceramics.
Size the tray around the shaker bases, with enough space to grasp each one comfortably. The glass containers hold the seasoning, so the resin can remain an outer decorative support. Do not scatter loose salt or pepper onto a surface whose food contact suitability has not been established. Check that the shakers stand level and do not rock on raised embellishments. If planning a similar tray, keep inclusions enclosed and the top smooth. Empty the holder before wiping it, and remove spilled seasoning from the corners rather than washing the whole wooden base under running water.
18. Candy Swirl Tape Dispenser
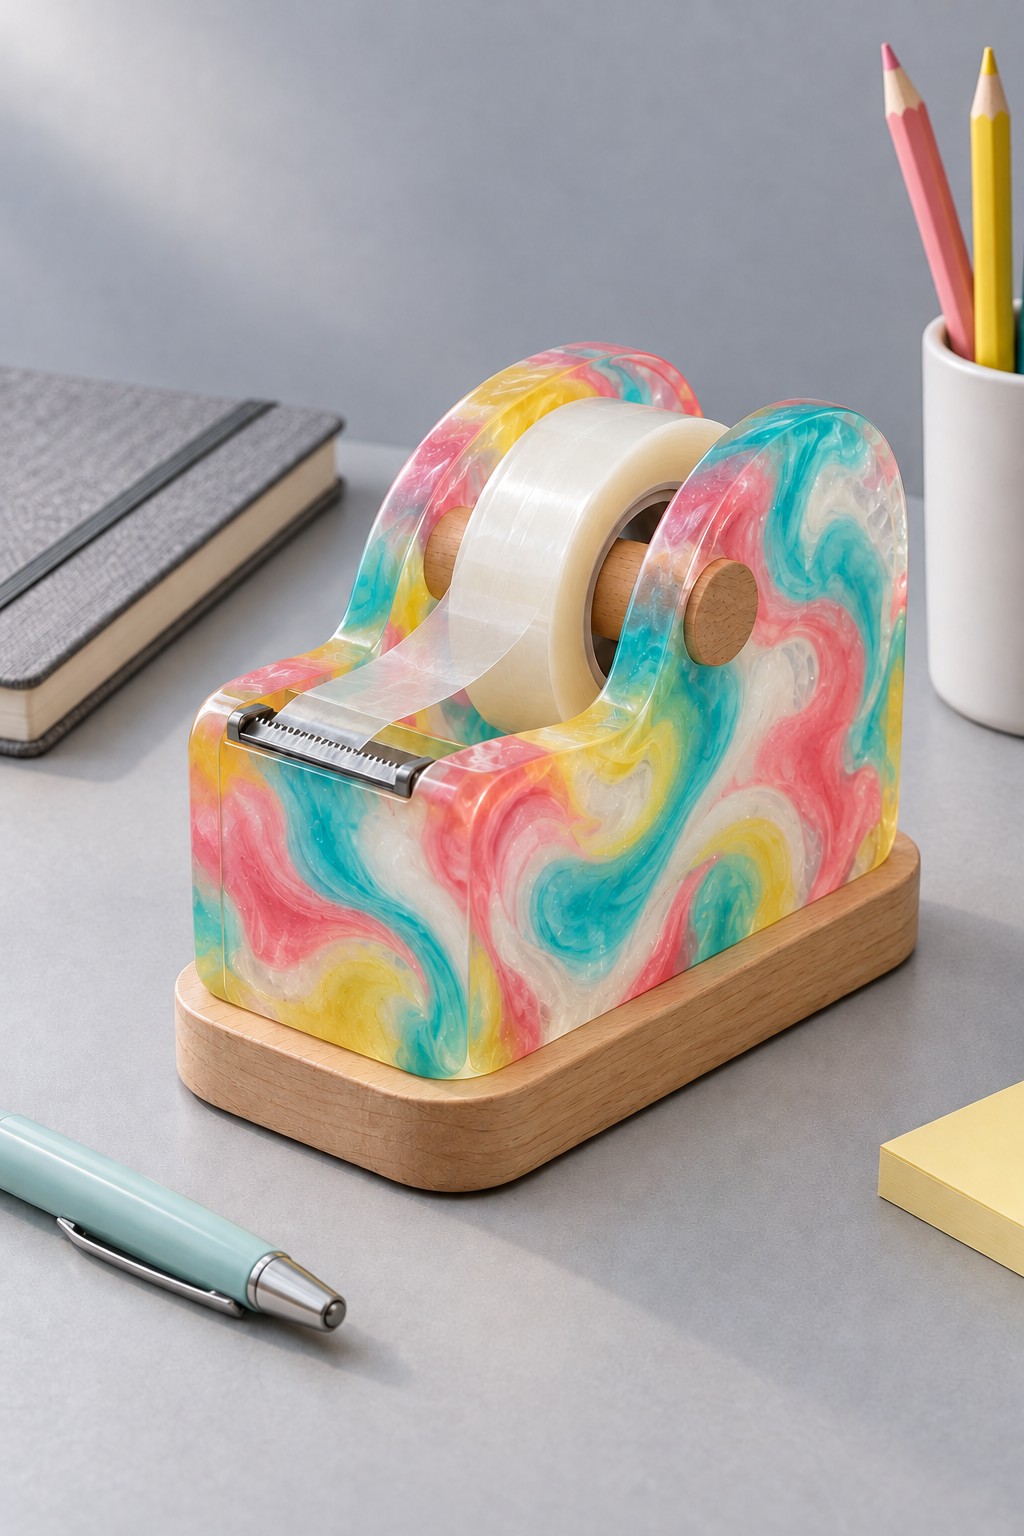
Pink, turquoise, yellow, and white swirls make a tape dispenser feel like a playful desk sculpture. A natural wooden base gives the colorful resin body a quieter foundation. This piece works particularly well in a craft corner where the surrounding supplies already include a few bright accents. Keep the palette limited elsewhere on the desk so the swirling pattern has room to stand out.
The useful parts deserve careful planning: the roll needs a correctly sized axle, space to rotate, and a metal cutting edge positioned where the tape can reach it. For a similar project, a donor dispenser mechanism is a more practical starting point than trying to create those moving parts in resin. Keep resin clear of the axle and cutting teeth during assembly. Check that the roll can be replaced without dismantling the body, choose a stable base for pulling tape, and keep the exposed cutter away from young children.
19. Tulip Cups for Makeup Sponges
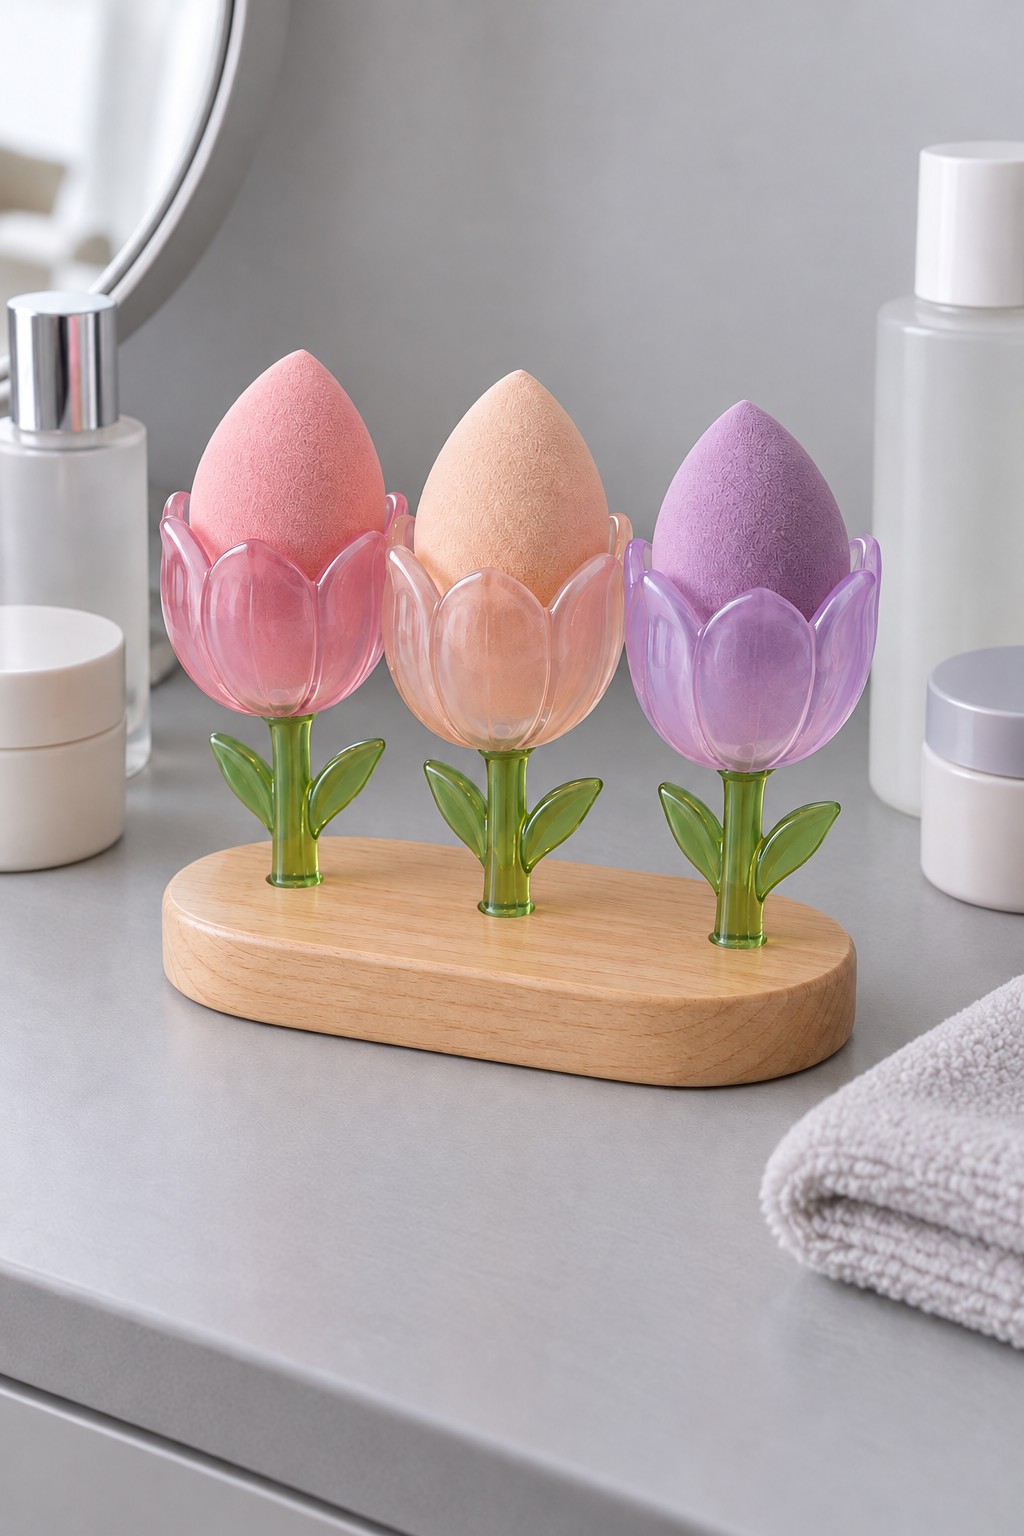
Three tulip shaped cups turn a small makeup station into a playful floral display. Pink, peach, and lilac petals surround the sponges, while green stems make each holder read as an individual flower. An oval wooden base groups the trio without using much counter space. The palette suits a vanity with pale towels or soft colored accessories, and separate cups make it easy to keep different sponges apart.
Start with the size of your sponges when planning the cups. They should rest loosely enough to lift out, rather than being compressed into narrow petals. The slender stems need secure support in the base, and the cup interiors should be smooth and accessible for cleaning. Use this arrangement to store clean, fully dry sponges; open drying space is a better choice immediately after washing than a deep cup. Wipe away makeup residue before it builds up, and avoid leaving moisture around the wooden base or stem joints.
20. Botanical Resin Drawer Dividers
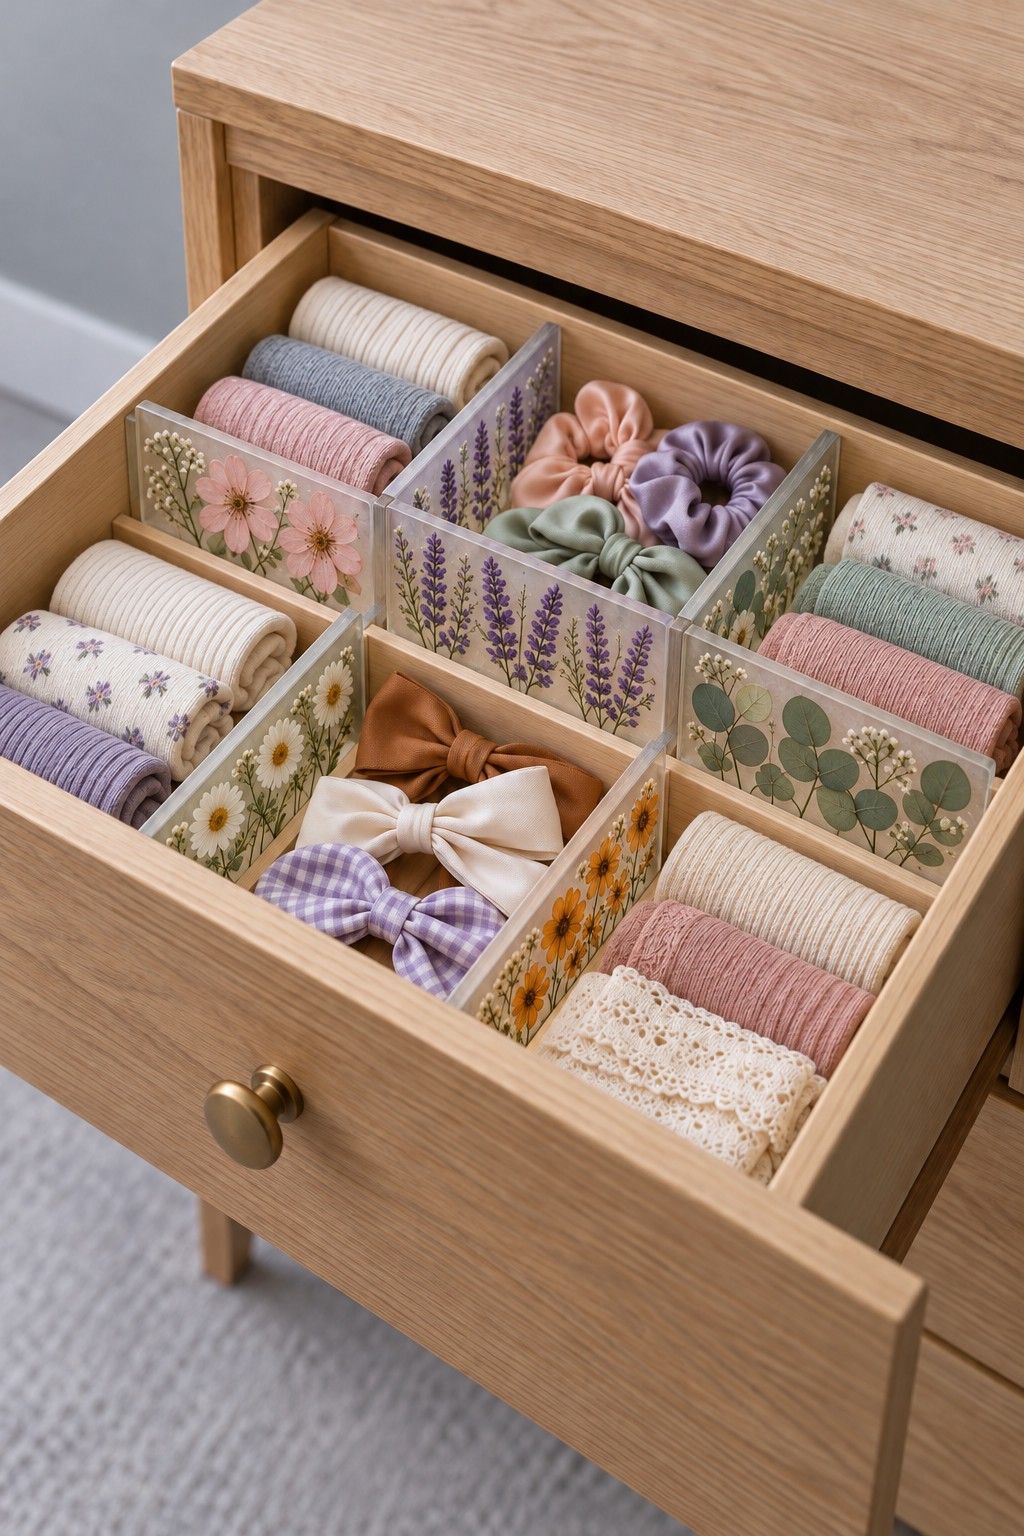
Transparent botanical divider panels add a decorative detail inside a dresser drawer, where it appears only when you need it. Pink daisies, lilac flower stems, and muted green leaves coordinate with folded textiles and soft fabric accessories. Combining resin panels with wooden compartments creates a varied layout while keeping each storage area clearly defined. Use the smaller sections for hair accessories and the longer channels for neatly folded pieces.
Measure the drawer’s usable interior, including clearance below the furniture above it, before deciding the panel height. Test the layout with cardboard strips first so the compartment sizes reflect your belongings. If adapting this design, make sure each resin panel has smooth edges that cannot snag lace or fine fabric. Support the panels securely so they do not slide when the drawer opens. Keep the arrangement removable where possible for cleaning, avoid forcing an oversized divider into place, and leave enough room to lift items without disturbing neighboring sections.
Choose a project around an everyday need
Begin with the spot you want to organize, then measure the objects that will live there. A shallow catchall is a simpler casting than a divided organizer; a hook or tape dispenser also needs a separate hardware plan. Make a cardboard sizing model before buying a mold, and try unfamiliar inclusions in a small sample before committing to a larger piece. A decorative object earns its place when it is comfortable to use, stable, and easy to clean.
Care for the finished surface. Follow the resin and base material’s care instructions. As a cautious default, use a soft slightly damp cloth, dry wooden parts promptly, and avoid abrasive cleaning. Hand clean the piece, and keep it out of the dishwasher unless the exact resin and every attached material are documented as suitable. Keep resin accessories away from hot pans and prolonged direct sunlight, and check joined parts whenever they start to feel loose.



Leave a Reply