
A Valentine poster can hold more than a sweet sentence. Folded cherries can stand away from the paper, a tiny record sleeve can carry a private note, and a pair of strawberry doors can open onto a favorite memory. These Valentine poster projects with clever handmade details combine paper, thread, felt, ribbon, and simple moving parts to make the message part of the design.
Start with the folded heart balloon tutorial below to learn how to cut matching shapes, build paper depth, and arrange a readable poster. Then adapt those skills to the 24 ideas that follow. Each idea explains suitable materials, a practical assembly approach, and the detail that deserves extra care. The suggested measurements are starting points for your own version; make a small paper mockup before committing to a moving mechanism.
Table of Contents
- Materials and Tools for a Handmade Valentine Poster
- How to Make a Folded Heart Balloon Poster
- Small Assembly Choices That Make the Details Work
- 1. A Matchbox Poster with a Sliding Heart Surprise
- 2. Folded Paper Cherries with a Heart Shaped Stem
- 3. A Neighborhood of Little Love Letter Houses
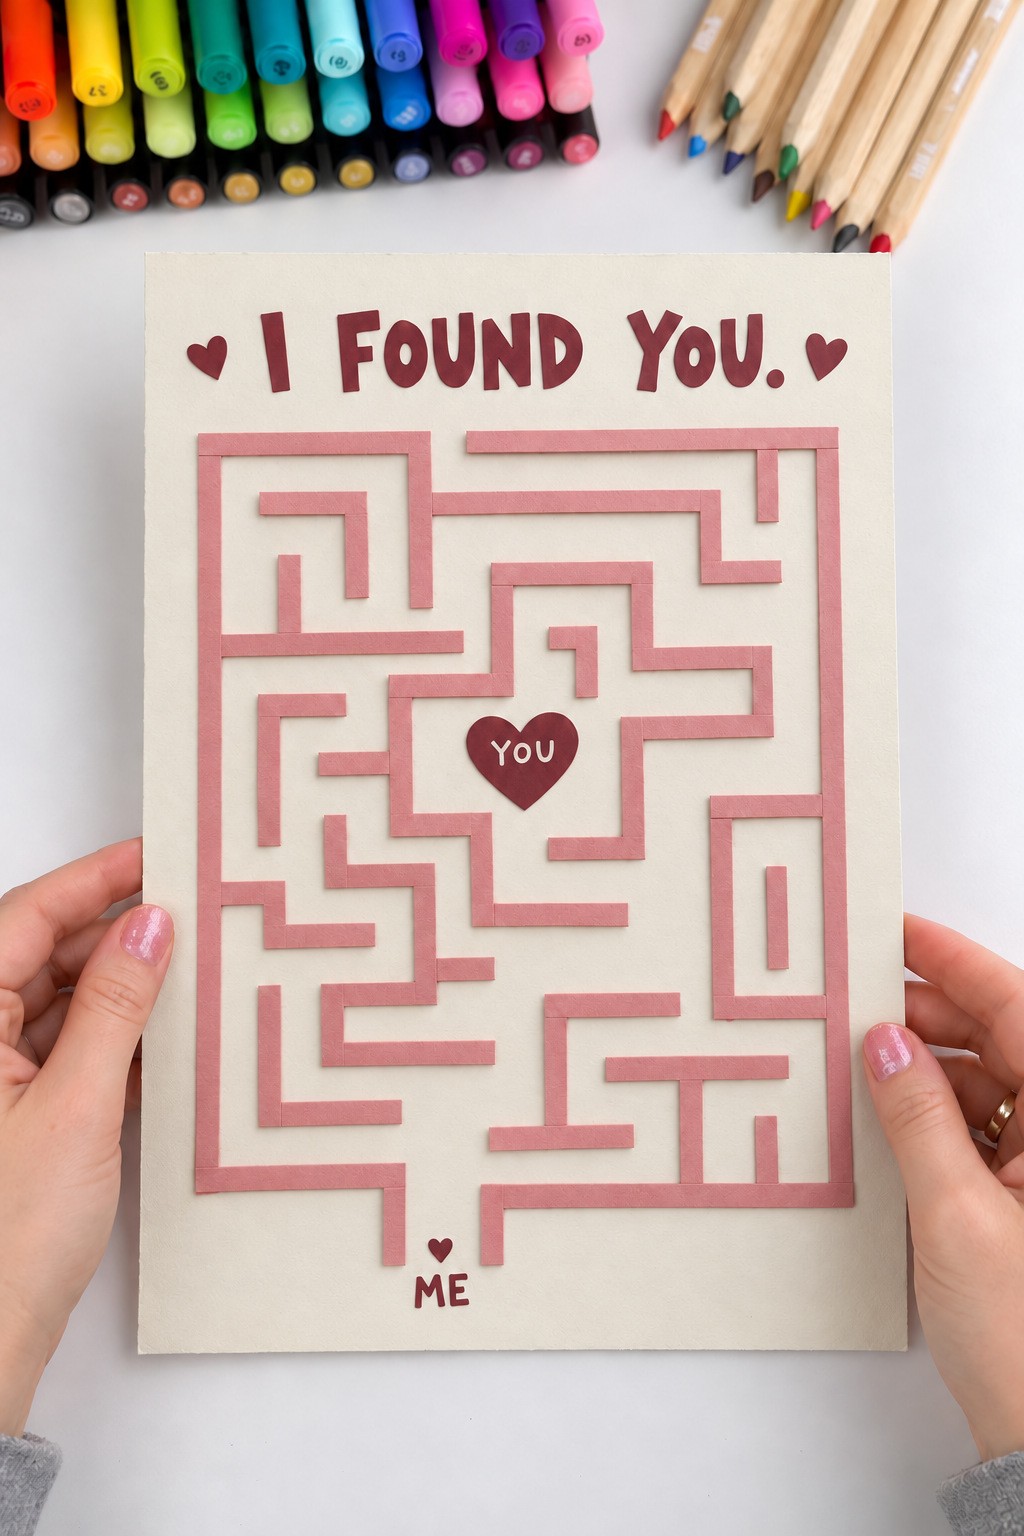
- 4. A Paper Maze with a Thread Path to You
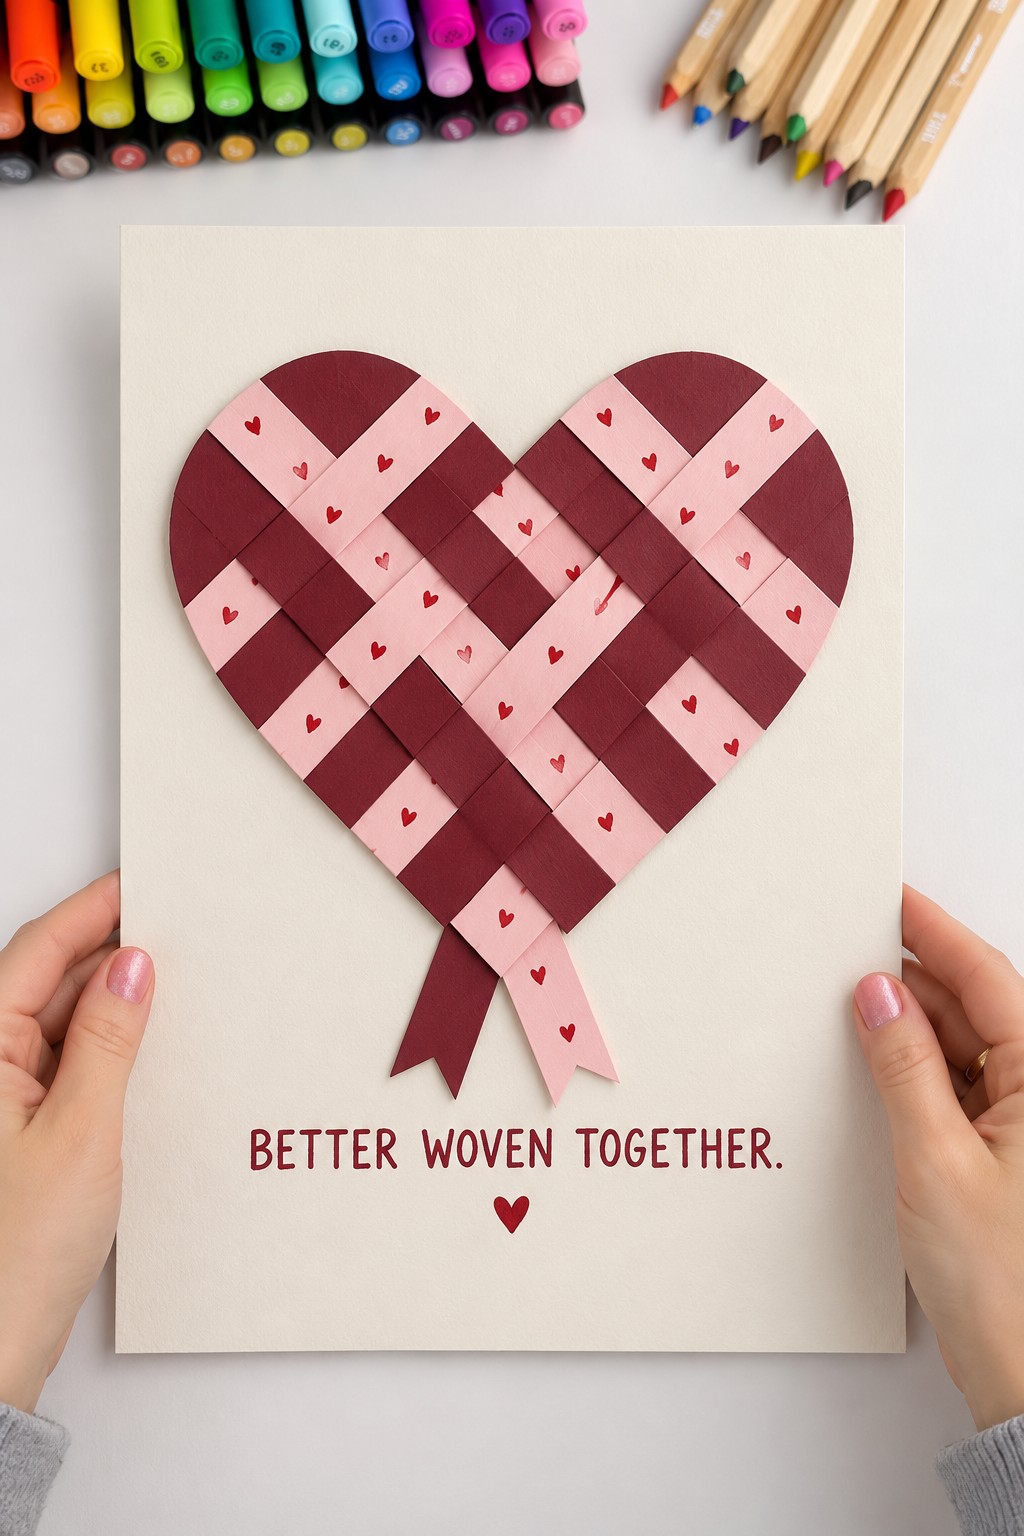
- 5. A Woven Heart Made from Contrasting Paper Strips
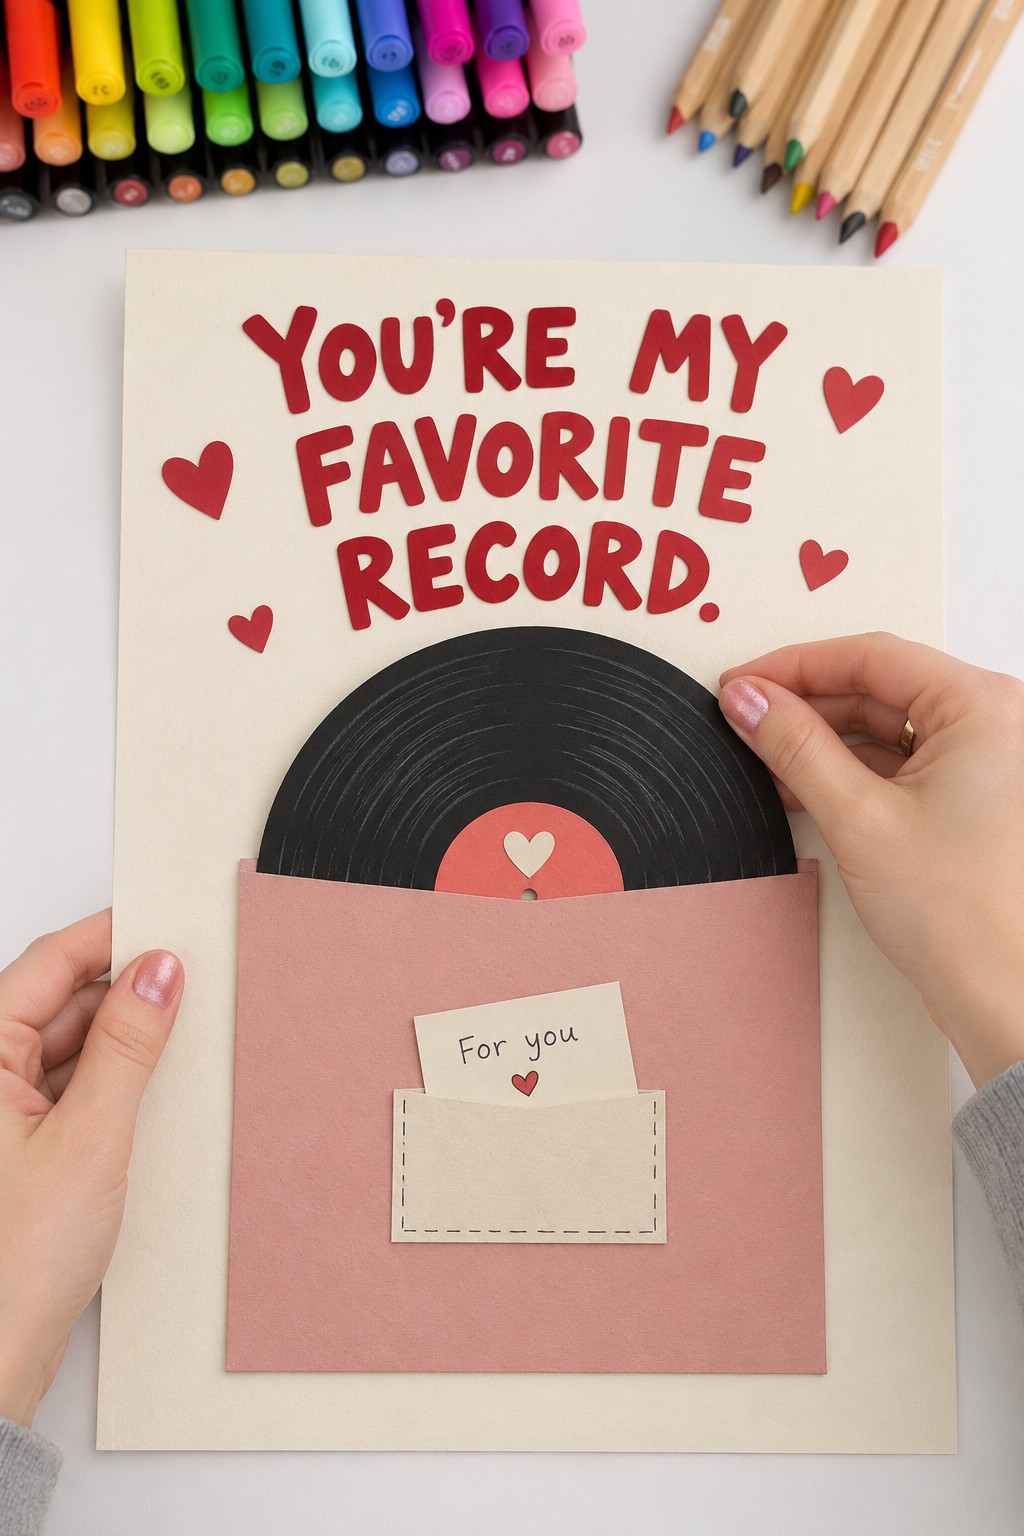
- 6. A Paper Record Sleeve for a Favorite Person
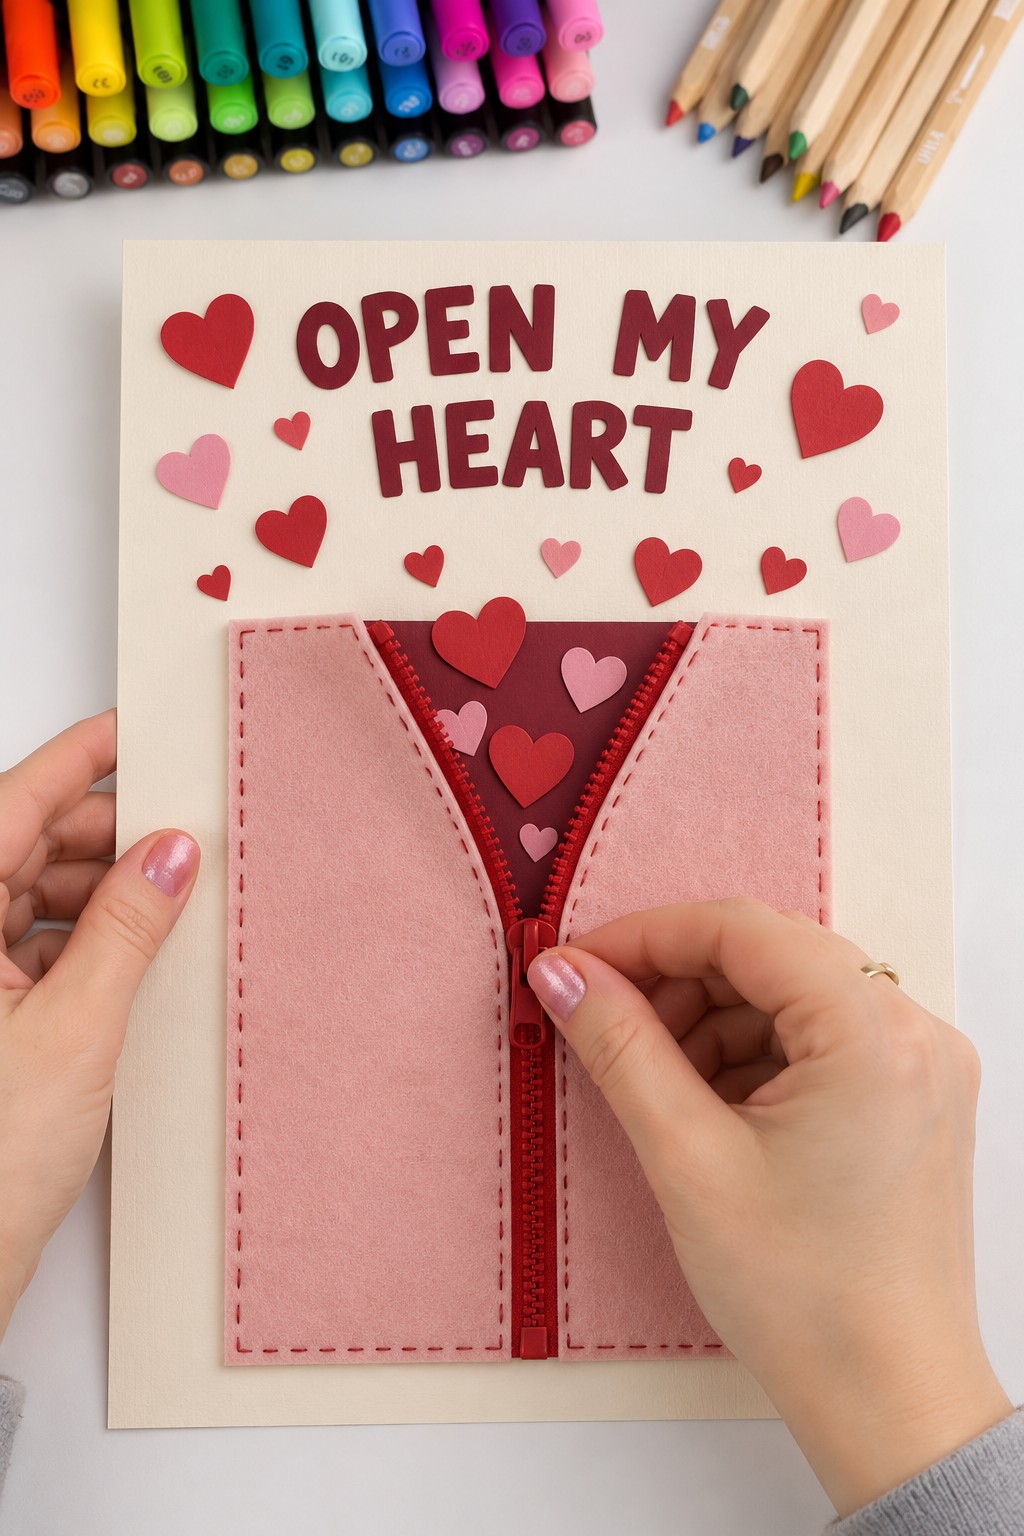
- 7. A Zipper Reveal with Felt Panels and Paper Hearts
- 8. A Heart Greenhouse Filled with Paper Plants
- 9. Strawberry Doors That Open onto a Shared Memory
- 10. Heart Balloons Carrying a Tiny Envelope
- 11. A February 14 Wreath of Folded Hearts
- 12. A Favorite Person Search Poster with Raised Keys
- 13. A Fox Whose Hug Opens to Reveal a Message
- 14. A Keepsake Pocket Filled with Paper Kisses
- 15. A Butterfly Dial with a Turning Pointer
- 16. A Spinning Heart with You on One Side and Me on the Other
- 17. A Balancing Heart Seesaw
- 18. A Sliding Train That Travels Toward a Little House
- 19. Satin Ribbon Cherries with Soft Sculptural Texture
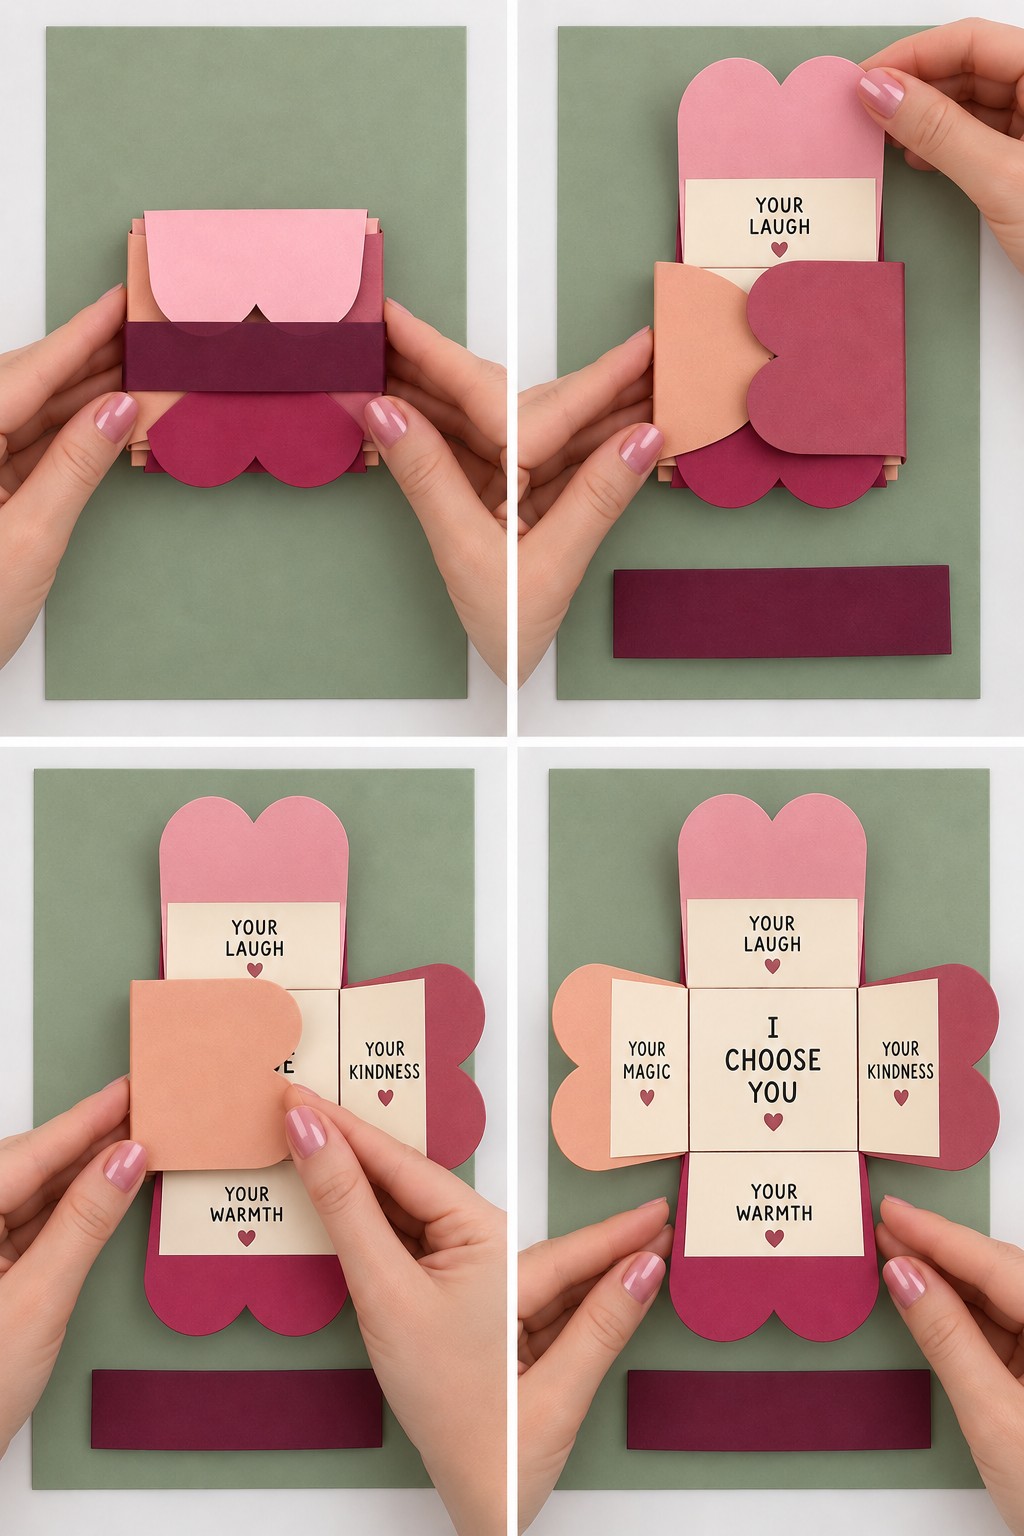
- 20. A Foldout Flower of Reasons to Choose Someone
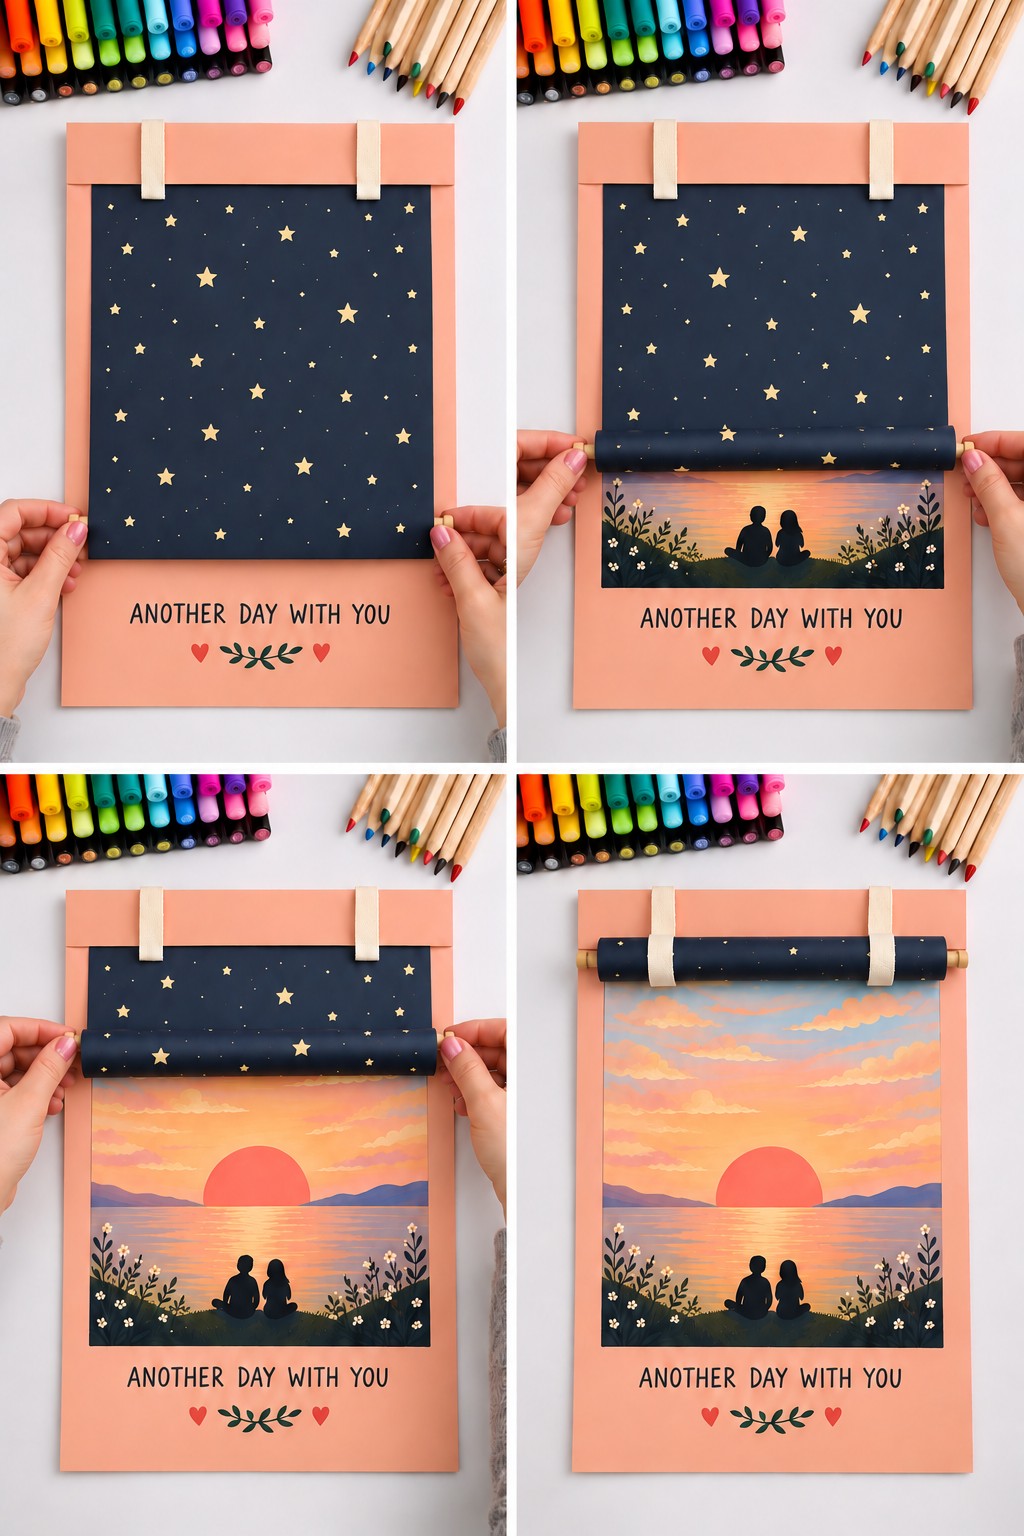
- 21. A Starry Paper Blind That Reveals a Sunset
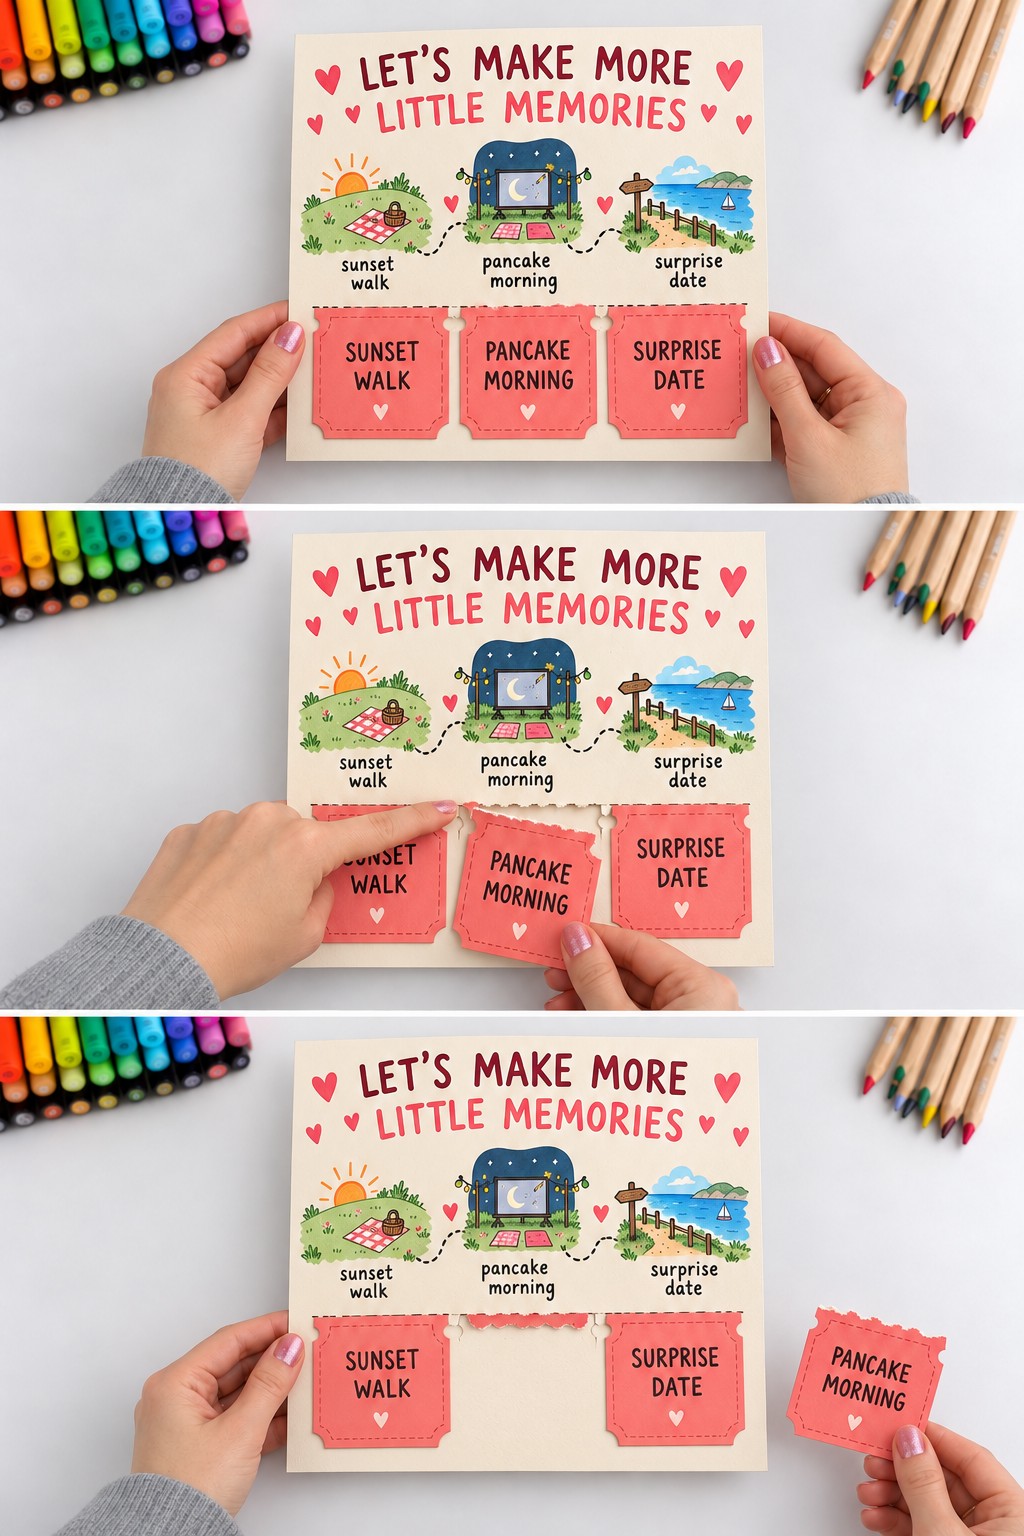
- 22. Three Removable Date Tickets Beneath Little Scenes
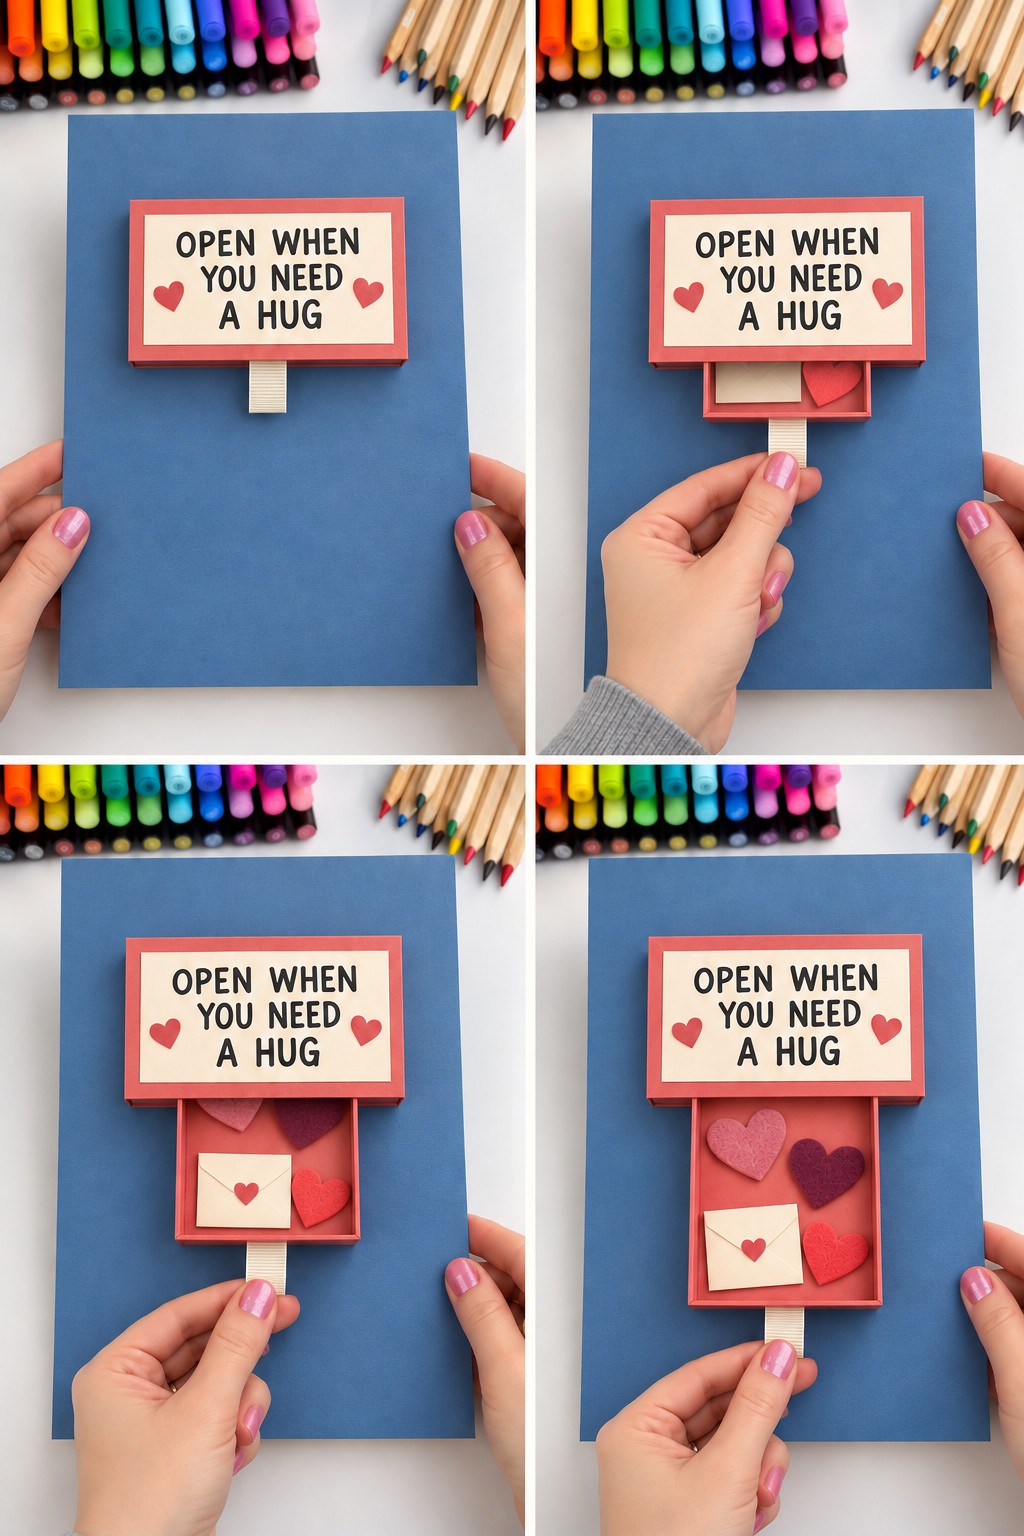
- 23. A Pull Down Drawer for a Little Paper Hug
- 24. A Pencil Shaving Heart with a Colorful Trail
- Finish the Poster for the Way It Will Be Used
Materials and Tools for a Handmade Valentine Poster
For the introductory balloon project, use an A4 ivory backing measuring 21 × 29.7 cm, preferably about 300 gsm. Choose burgundy and dusty rose paper around 120 to 160 gsm for the folded hearts, plus pale blue paper for the clouds. Lighter paper folds more easily than thick mounting board, while a firm backing helps the finished poster stay flat.
- Ivory backing card and burgundy, dusty rose, and pale blue craft paper.
- Scrap paper for two heart templates, scissors, pencil, eraser, and ruler.
- A paper glue stick and a black fineliner for the balloon strings and lettering.
- For the later ideas, choose only the extras you need: thick PVA craft glue, paper adhesive tape, foam pads, cotton thread, felt, ribbon, paper fasteners, or printed photographs.
Use a glue stick for broad, flat paper layers. Apply thick PVA craft glue sparingly to porous embellishments and small structural tabs, then hold the joint until it stays in place and allow the label's drying time. Felt and ribbon may need an adhesive specifically suitable for those materials. Test on an offcut first, especially with satin, coated paper, and photographs. Use photo corners or an adhesive labeled suitable for photographs when mounting a treasured print.
How to Make a Folded Heart Balloon Poster
This six stage project introduces the cutting, folding, and positioning skills used throughout the collection. Keep the same backing and templates from beginning to end. The large balloon uses three matching burgundy hearts, and the smaller balloon uses three matching dusty rose hearts.
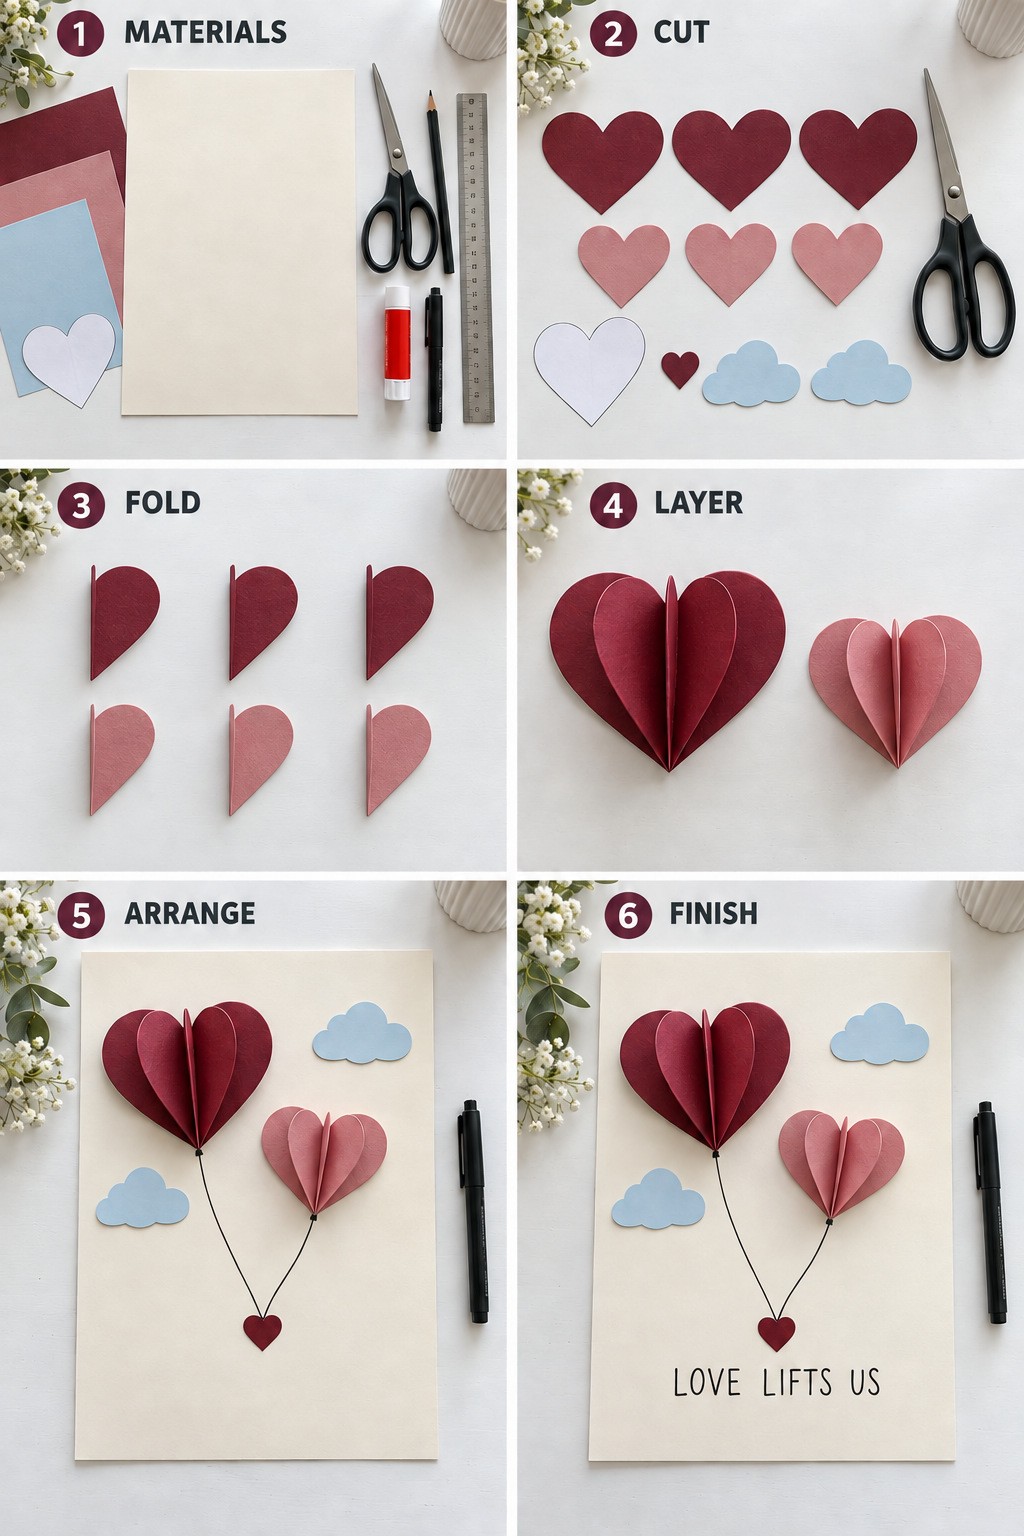
- Prepare the materials. Place the ivory backing vertically on a clean table. Set out the colored paper, scissors, pencil, ruler, glue stick, and black pen. Keep the bottom quarter of the board available for your message.
- Cut matching pieces. Make a symmetrical heart template about 8 cm wide and another about 6 cm wide. Trace and cut three burgundy hearts with the larger template and three dusty rose hearts with the smaller one. Cut two pale blue clouds and one small burgundy heart about 2 cm wide for the point where the strings meet.
- Fold each heart. Bring the two lobes together and crease vertically from the top notch to the bottom point. Fold all six hearts individually. Check that the edges line up before sharpening the crease with your fingertip. Do not glue the folded hearts closed.
- Build the balloon layers. For each color, reopen one heart and flatten it as the backing shape. Align a second heart over it and glue only its left half onto the left half of the backing. Leave its right half standing upward. Align the third heart and glue only its right half onto the right half of the backing, leaving its left half raised. The three center folds and bottom points should coincide. Gently fan the two free halves apart.
- Arrange the poster. Position the burgundy balloon toward the upper left and the smaller pink balloon lower on the right. Place one cloud at the upper right and the other below the burgundy balloon. Glue only the flat backs of the completed balloons to the board. Draw two curved strings down to a shared point, then cover that meeting point with the small flat heart.
- Add the message and let everything dry. Lightly mark a lettering guide beneath the small heart, write “LOVE LIFTS US,” and erase visible pencil marks after the ink dries. Support the board flat while the adhesive sets, keeping weight away from the raised paper. Display it where the balloon layers will not be crushed.
To adapt this method, use circles for cherries, smaller folded hearts for a wreath, or a tiny envelope at the meeting point of the strings. A new shape should still use matching cutouts within each layered unit. Assemble one sample first so you can judge its thickness and the space it needs.
Small Assembly Choices That Make the Details Work
Draw lettering before attaching bulky decorations, or leave a clearly marked space for it. If you prefer painted lettering, use an acrylic paint marker or a small brush with acrylic craft paint on suitable card, working in thin applications. Let painted layers dry before gluing or folding them. Avoid saturating ordinary paper with water.
Score folding lines gently with a blunt tool. Keep adhesive away from hinges, sliding channels, zipper teeth, and pivot holes. A pocket needs an open edge, a turning piece needs clearance, and a pull tab needs a stop so it cannot disappear inside its sleeve. Try moving parts several times before adding the final decorative layer.
Use a cutting mat and have an adult handle craft knives and hole making tools when children participate. Cover the spread legs of metal paper fasteners on the back of the board. Choose display supports that suit the finished weight, and leave enough room for raised pieces and opening flaps.
With those basics in place, choose a Valentine poster idea that suits your message. Some rely on a single sculptural detail; others invite the recipient to open, turn, or slide a piece to discover what you have written.
1. A Matchbox Poster with a Sliding Heart Surprise
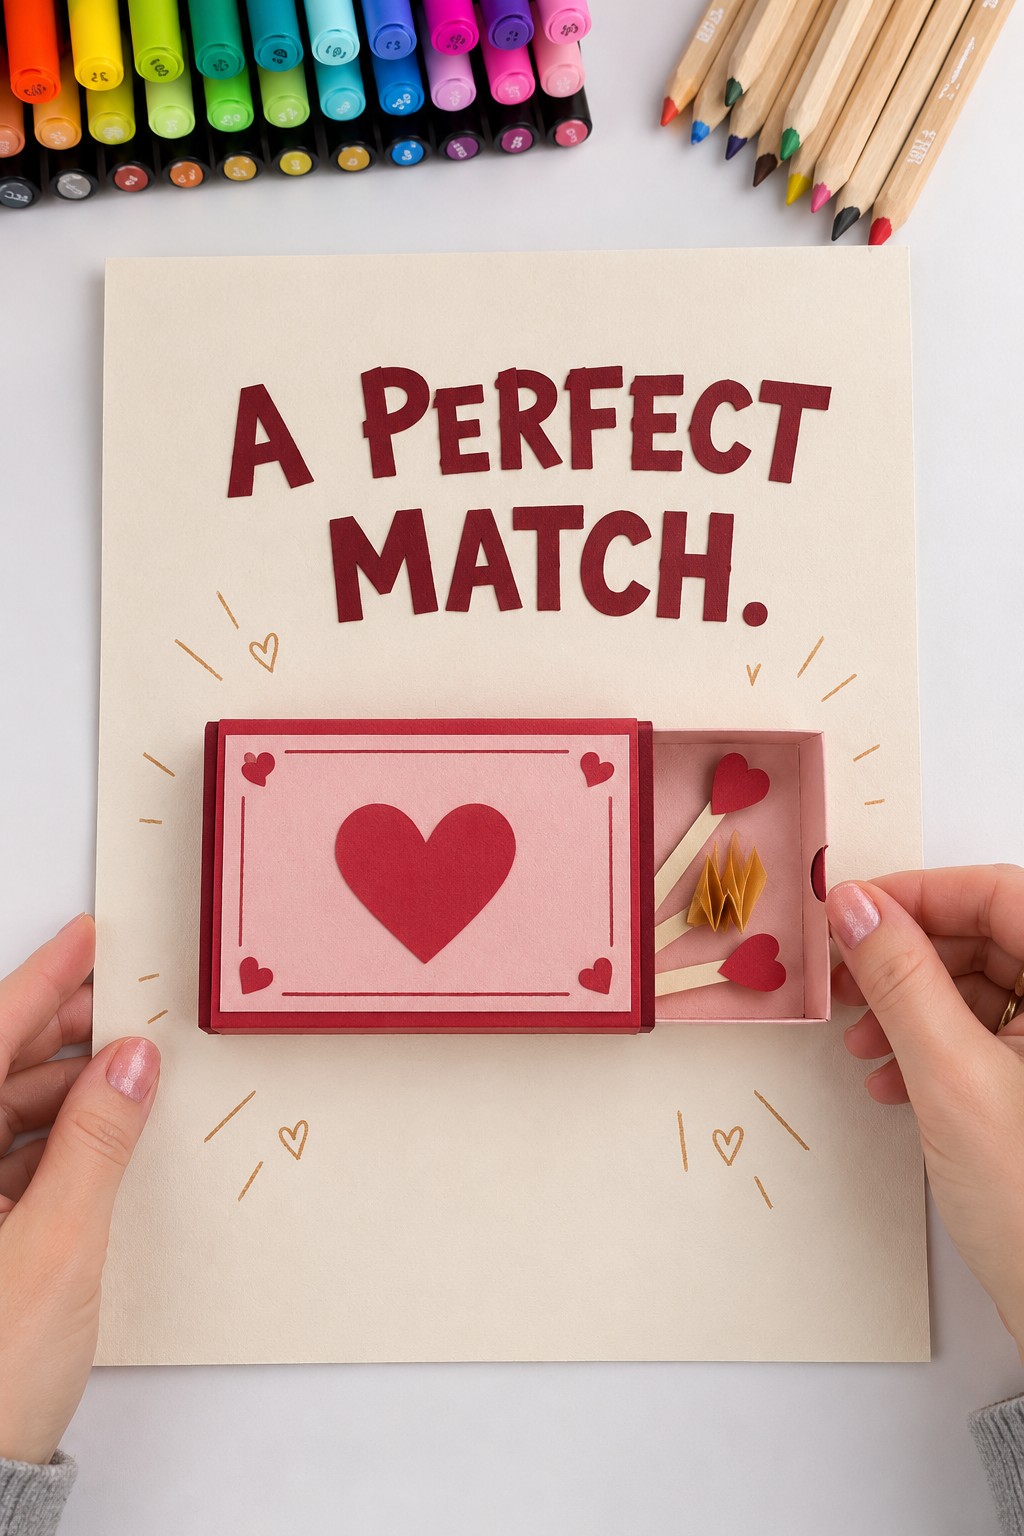
“A Perfect Match” becomes a small discovery when the central decoration is a working paper drawer. Use ivory backing card, burgundy and pink cardstock, and a shallow tray made from sturdy card. For a manageable version, start with a tray about 10 × 7 cm and 1 cm deep. Cut and score the tray walls, glue the corner tabs, and let them set before making a sleeve around the finished tray.
Wrap the sleeve with a little clearance and attach only its back to the poster. Add a folded paper spring or small paper hearts inside the drawer, plus decorative paper match shapes if desired. These are paper embellishments, not usable matches. Leave the drawer's finger notch accessible and check that the inner decorations fit beneath the sleeve when closed.
2. Folded Paper Cherries with a Heart Shaped Stem
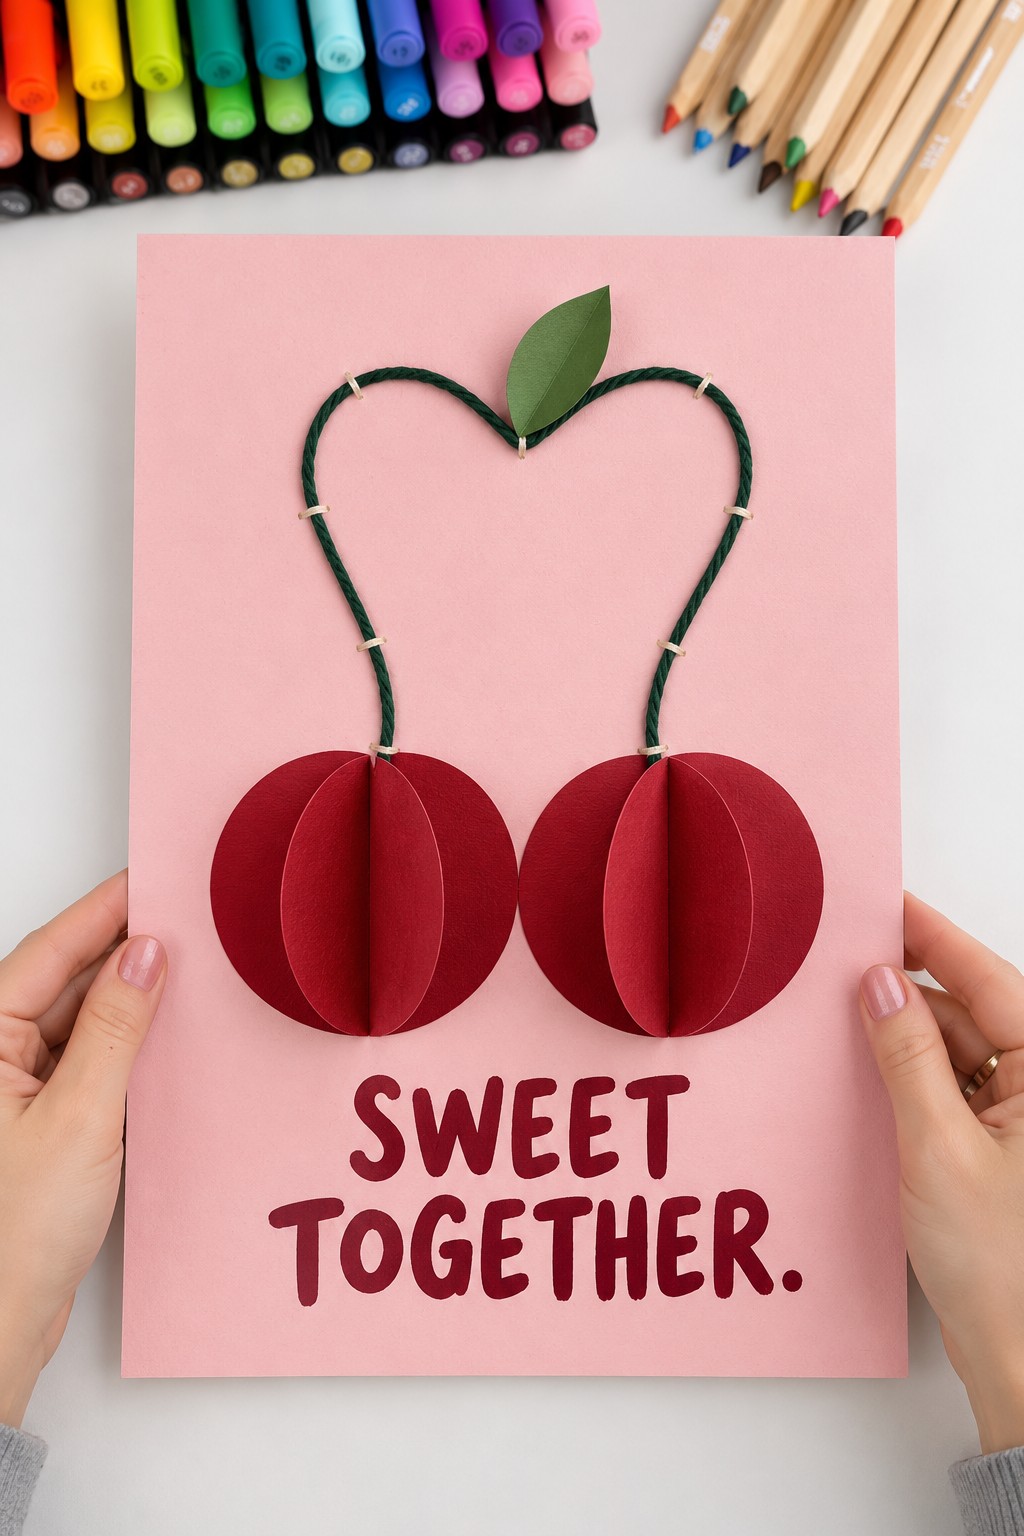
Two rounded cherries make a bold focal point against pale pink card. Cut matching red paper circles, fold each in half, and glue adjoining halves together to create a fan of curved surfaces. Leave the two outside halves available to open flat against the backing. Make both cherries with the same circle template and number of layers so their depth remains balanced.
Arrange green cord above them as two stems that meet in a heart outline. Secure the cord with small paper loops or tiny dabs of thick craft glue, then add one folded green leaf at the top. Place “Sweet Together” beneath the fruit. Position the stems first, tucking their lower ends behind the cherries for a tidy finish.
3. A Neighborhood of Little Love Letter Houses
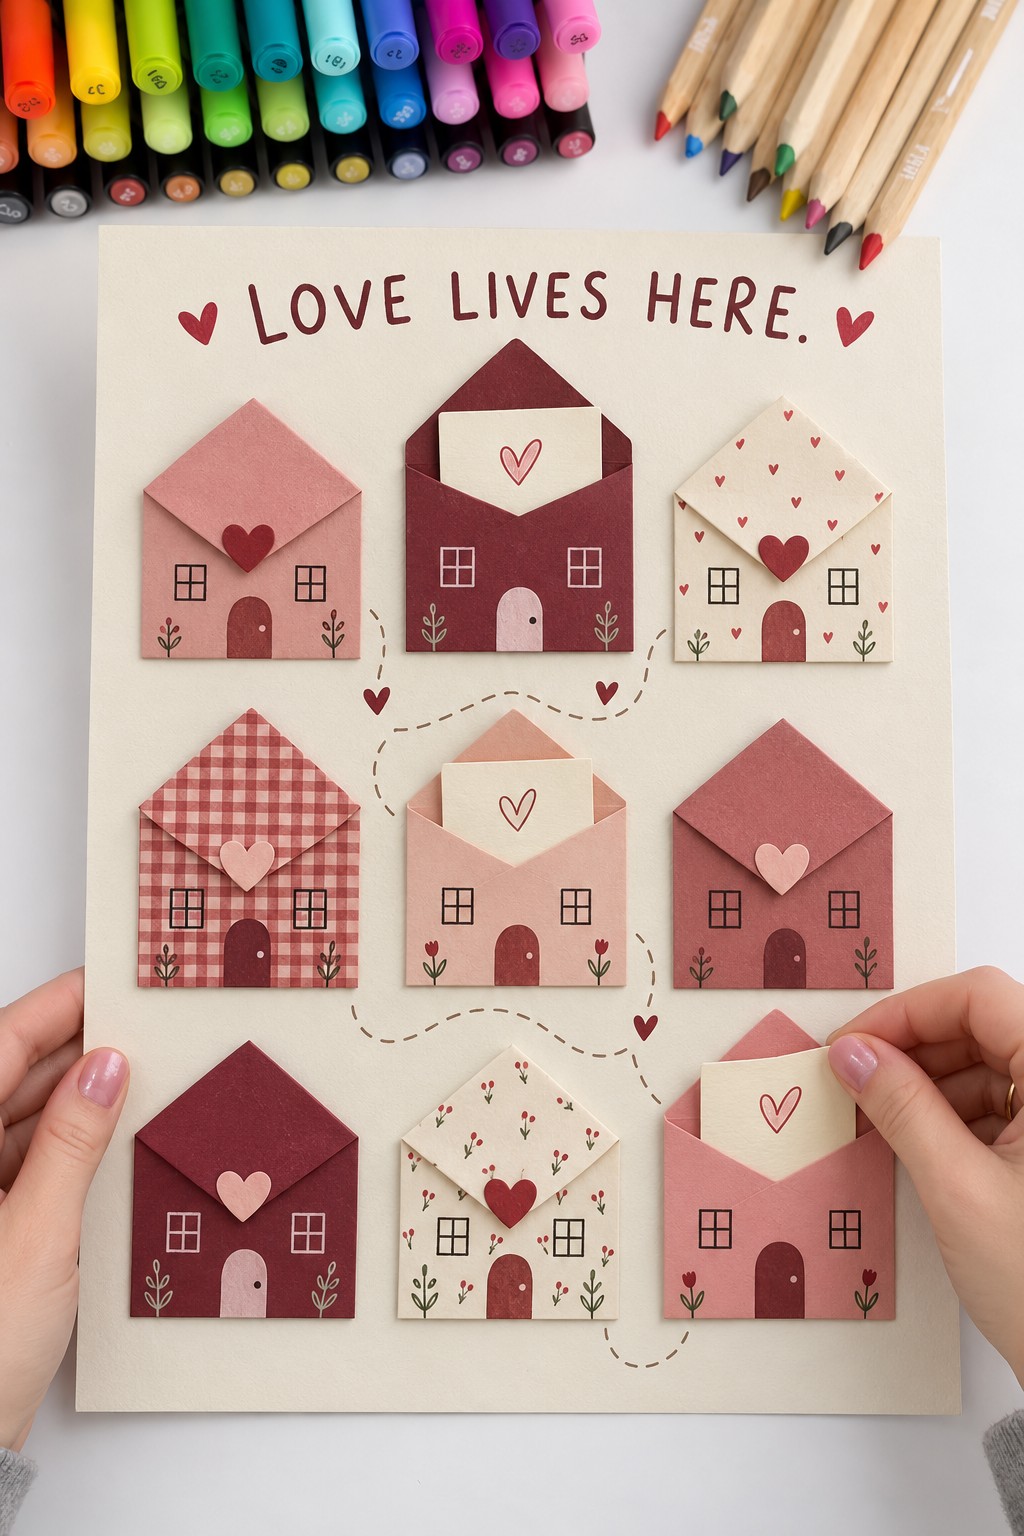
Turn nine miniature envelopes into a neighborhood of affectionate messages. Use cream, burgundy, gingham, and dusty pink paper for the houses. A practical starting size is about 5 cm wide per house on a larger backing around 30 × 42 cm. Fold the side and bottom tabs into pockets, keeping the roof flaps free to open.
Draw doors and windows on the fronts before mounting the pockets in three rows. Slip a small note into each one, then connect the houses with a wandering dotted path. Leave enough room above each house for its flap to lift without catching the row above. Vary the notes with a memory, a thank you, and a small plan you would enjoy together.
4. A Paper Maze with a Thread Path to You
A maze gives “I Found You” a story the recipient can follow. Build the walls from narrow strips of pink cardstock on a firm ivory board, with a burgundy heart as the destination. Sketch the route first, making certain there is a continuous open corridor from the bottom entrance to the heart. Add the walls around that route, then create the remaining branches.
The first version leaves the maze ready to solve. For the completed version, lay red cotton thread along the solution and fix it at the corners with small spots of craft glue. Keep the thread inside the corridors, without crossing a wall or adding disconnected branches. Space the walls widely enough for the thread and a fingertip to follow the path comfortably.
5. A Woven Heart Made from Contrasting Paper Strips
Burgundy and pale pink strips create a woven heart with more texture than a flat cutout. Begin with a rectangular weave on scrap paper, alternating each strip over and under the next. Use strips of consistent width, such as 1.5 cm, and reverse the pattern on every row. Small printed or drawn hearts on the pink strips add detail without hiding the weave.
Once the weave is large enough, trace a heart over it and secure the intersections just inside the outline. Let the glue set before trimming. Mount the heart on a matching card backing so the cut ends stay secure, and attach two separate ribbon shaped paper tails beneath it. Keep the woven surface loose enough to retain its texture.
6. A Paper Record Sleeve for a Favorite Person
A black paper record tucked into a dusty rose sleeve makes a playful music themed Valentine. Cut a disc from black cardstock and add fine concentric groove lines with a gray pencil. A coral center label and tiny cream heart complete the record. The disc can hold a personal message on its reverse.
Fold a sleeve slightly wider than the record, allowing several millimeters of clearance at each side. Glue its side and bottom tabs, leaving the top open, and attach the sleeve to the poster. Add a smaller cream note pocket to the front. If you want to expand the music and memory theme into another gift, explore the moving photo scroll project.
7. A Zipper Reveal with Felt Panels and Paper Hearts
A working zipper gives “Open My Heart” an immediate invitation. Choose a short closed end zipper, two pieces of pink felt, burgundy card, and small paper hearts. Sew the felt to the outer edges of the zipper tape before mounting the assembly. Keep the stitches and fabric clear of the teeth so the slider moves freely.
Arrange the hearts on a burgundy panel beneath the opening. Attach only the outer felt margins and the ends of the zipper assembly to the backing, leaving the inner felt edges free to spread when unzipped. Reinforce the board behind the zipper's ends because repeated pulling puts pressure there. For another project that combines felt with a useful pocket, try the hand sewn felt cat card holder.
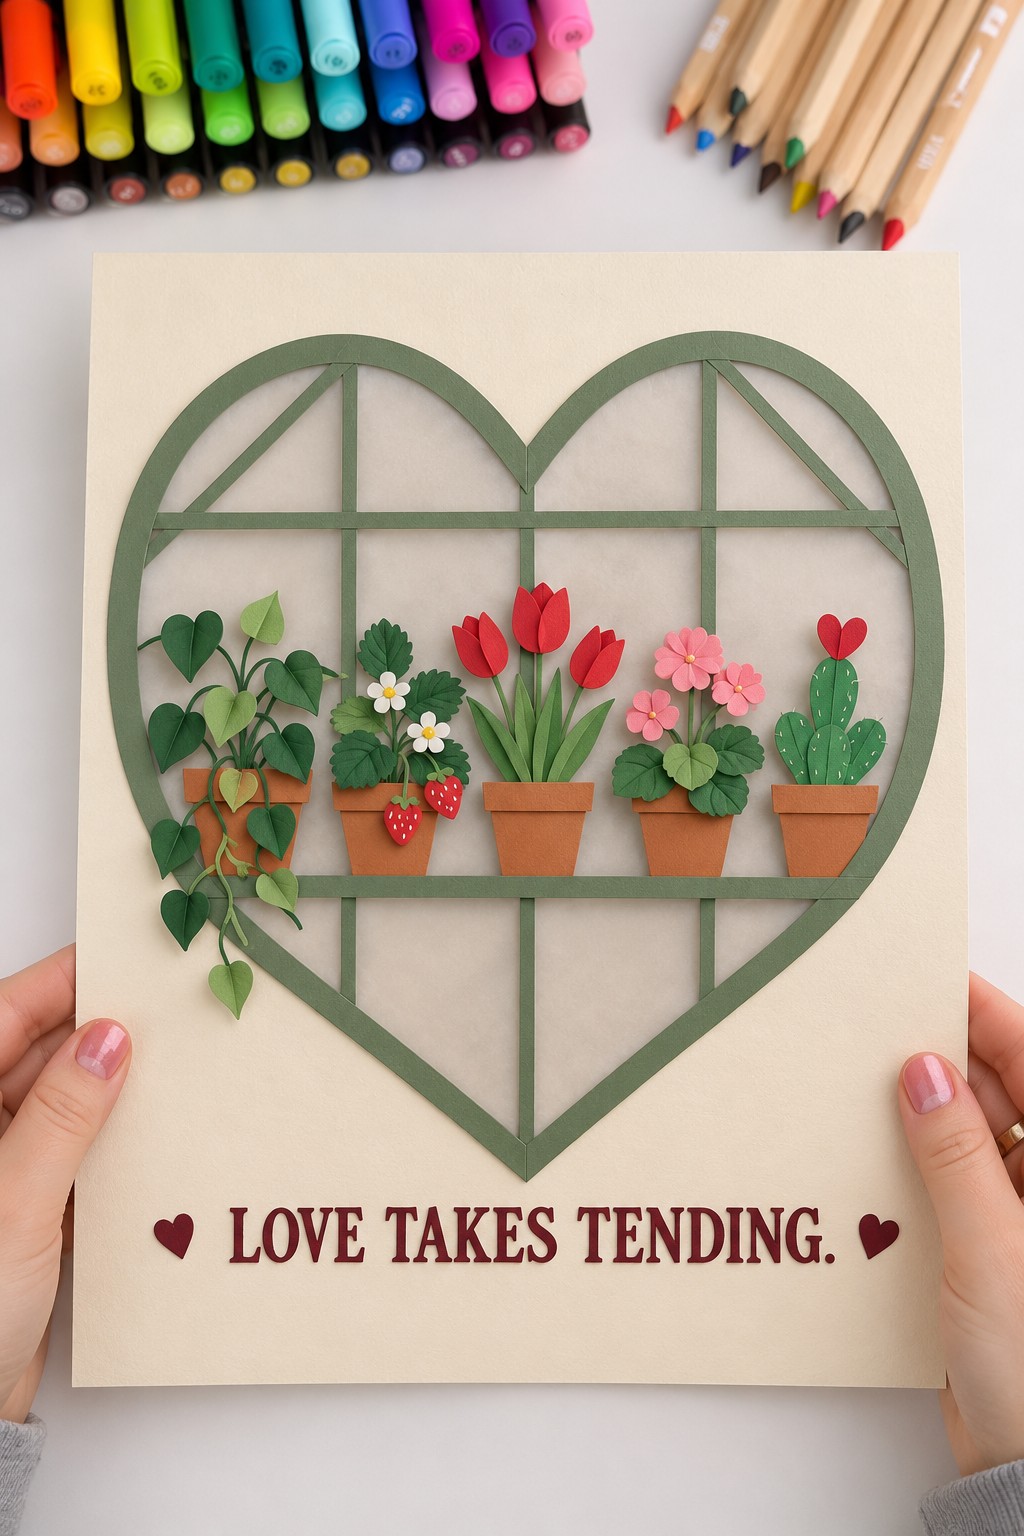
8. A Heart Greenhouse Filled with Paper Plants
A sage green heart becomes the outline of a miniature greenhouse filled with tulips, daisies, trailing leaves, and a cactus. Cut the heart frame and its crossbars from sturdy cardstock, then add paper pots along a narrow horizontal strip. Give the pots a little depth with folded side tabs rather than heavy solid embellishments.
Build each plant separately using small leaf shapes, rolled stems, and layered petals. Attach the stems behind the pot rims so the plants appear to grow from them. This is a decorative paper scene, so the shelf only needs to support lightweight paper pieces. Keep the plant tops within the heart frame and finish with “Love Takes Tending” below.
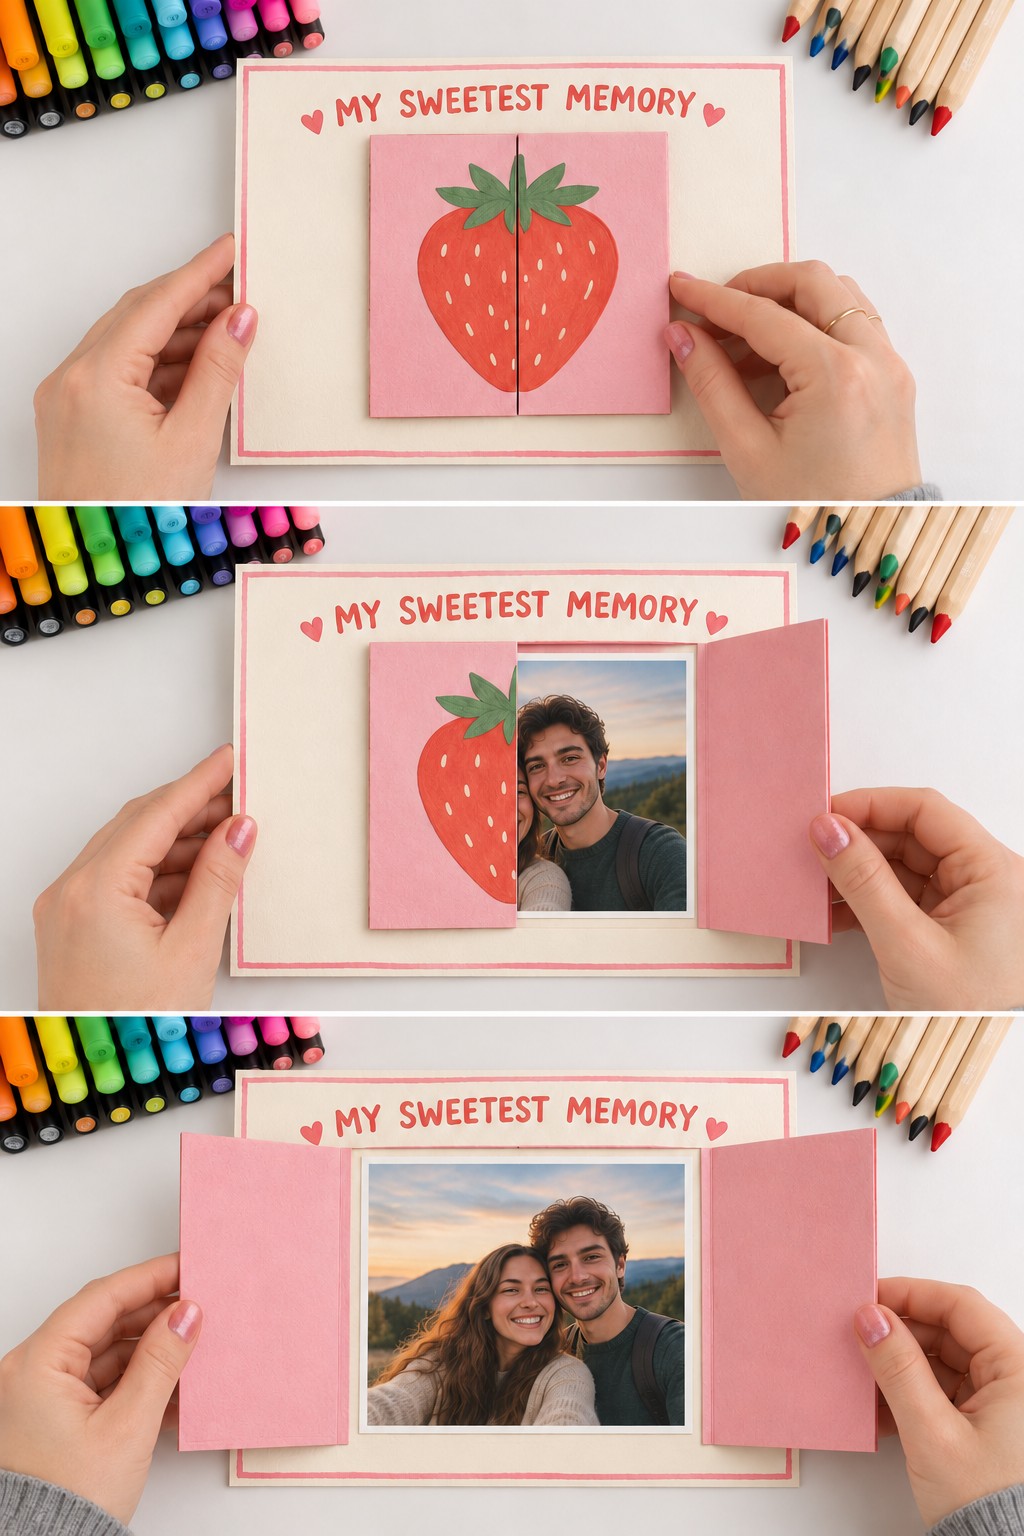
9. Strawberry Doors That Open onto a Shared Memory
Two pink doors conceal a photograph beneath a strawberry illustration. Mount a photo on a firm rectangular panel, then make two doors that meet at its center. Each door should cover half the photograph and include an outer hinge tab. Score the hinge lines, attach the tabs outside the image area, and test both doors before decorating them.
Cut a red strawberry and green leafy top, decorate them with tiny seed marks, and split the motif along the same central seam. Attach one half to each door without bridging the opening. Leave a small gap between the doors so they close cleanly. For a larger display of several memories, the Valentine rotating photo wheel offers another way to make photographs part of an interactive gift.
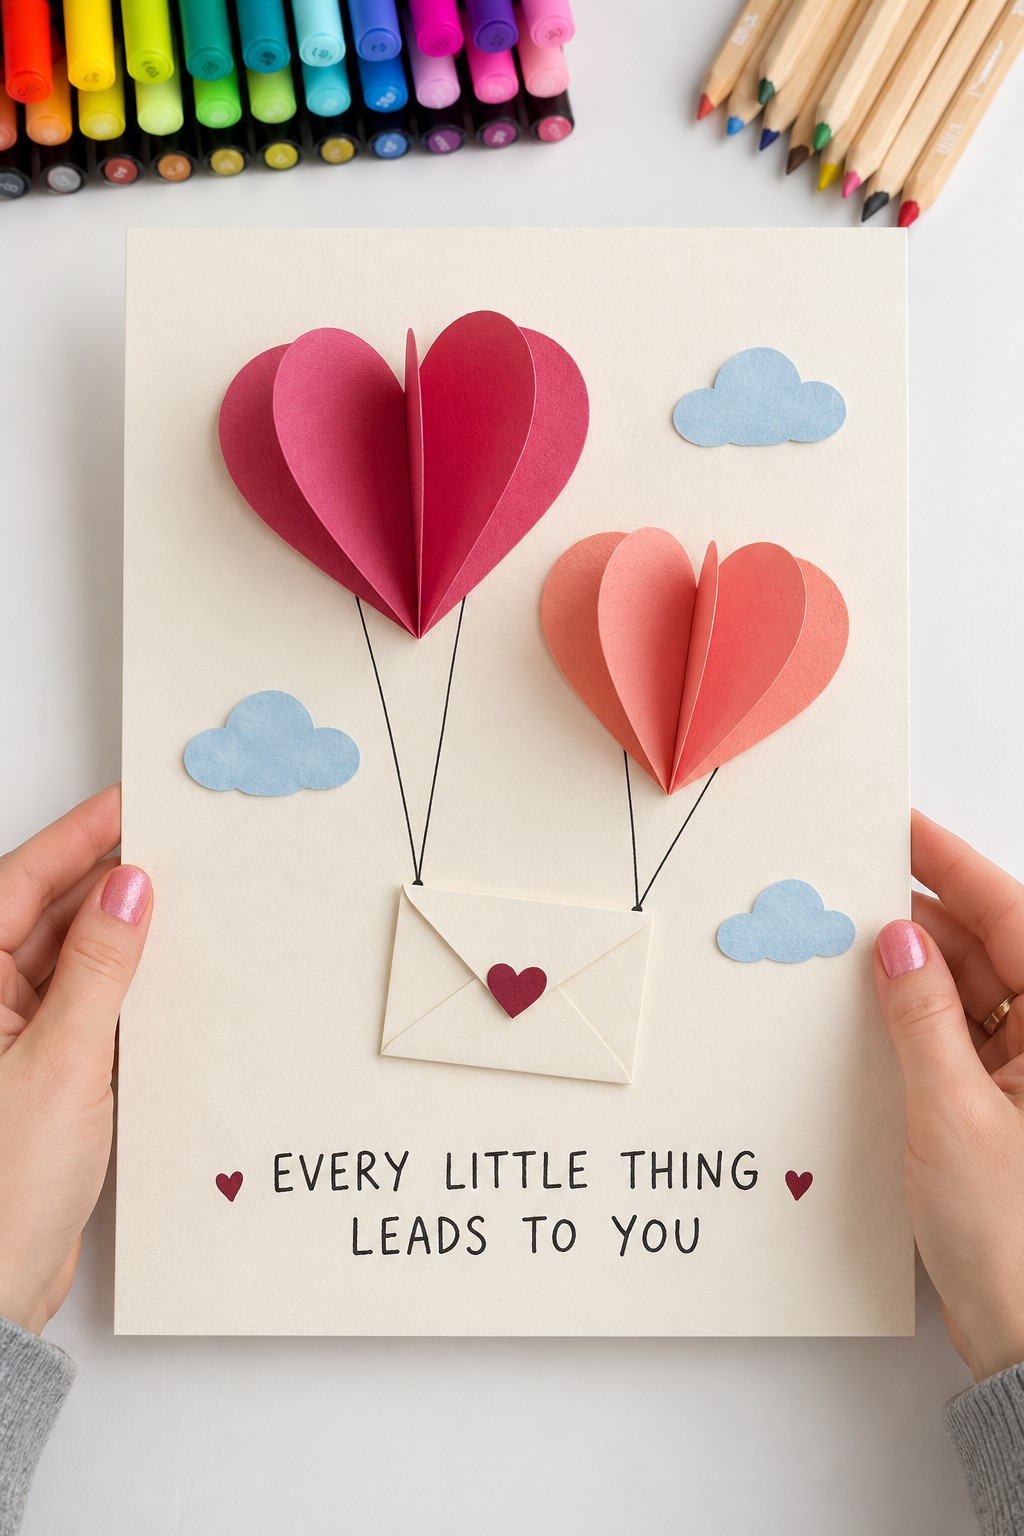
10. Heart Balloons Carrying a Tiny Envelope
Use the introductory folding method to make two heart balloons, one raspberry and one coral. The different sizes keep the arrangement lively while the repeated folds tie it together. Cut pale blue clouds and place them around the balloons without crowding their raised edges.
Here the strings lead to a small cream envelope instead of the flat heart used in the tutorial. Draw the strings before attaching the envelope, then glue only the envelope's back onto the board. Leave its flap usable if you want to tuck a note inside. Keep the envelope lightweight and avoid threading real tensioned strings through the balloons, which could pull their paper layers out of shape.
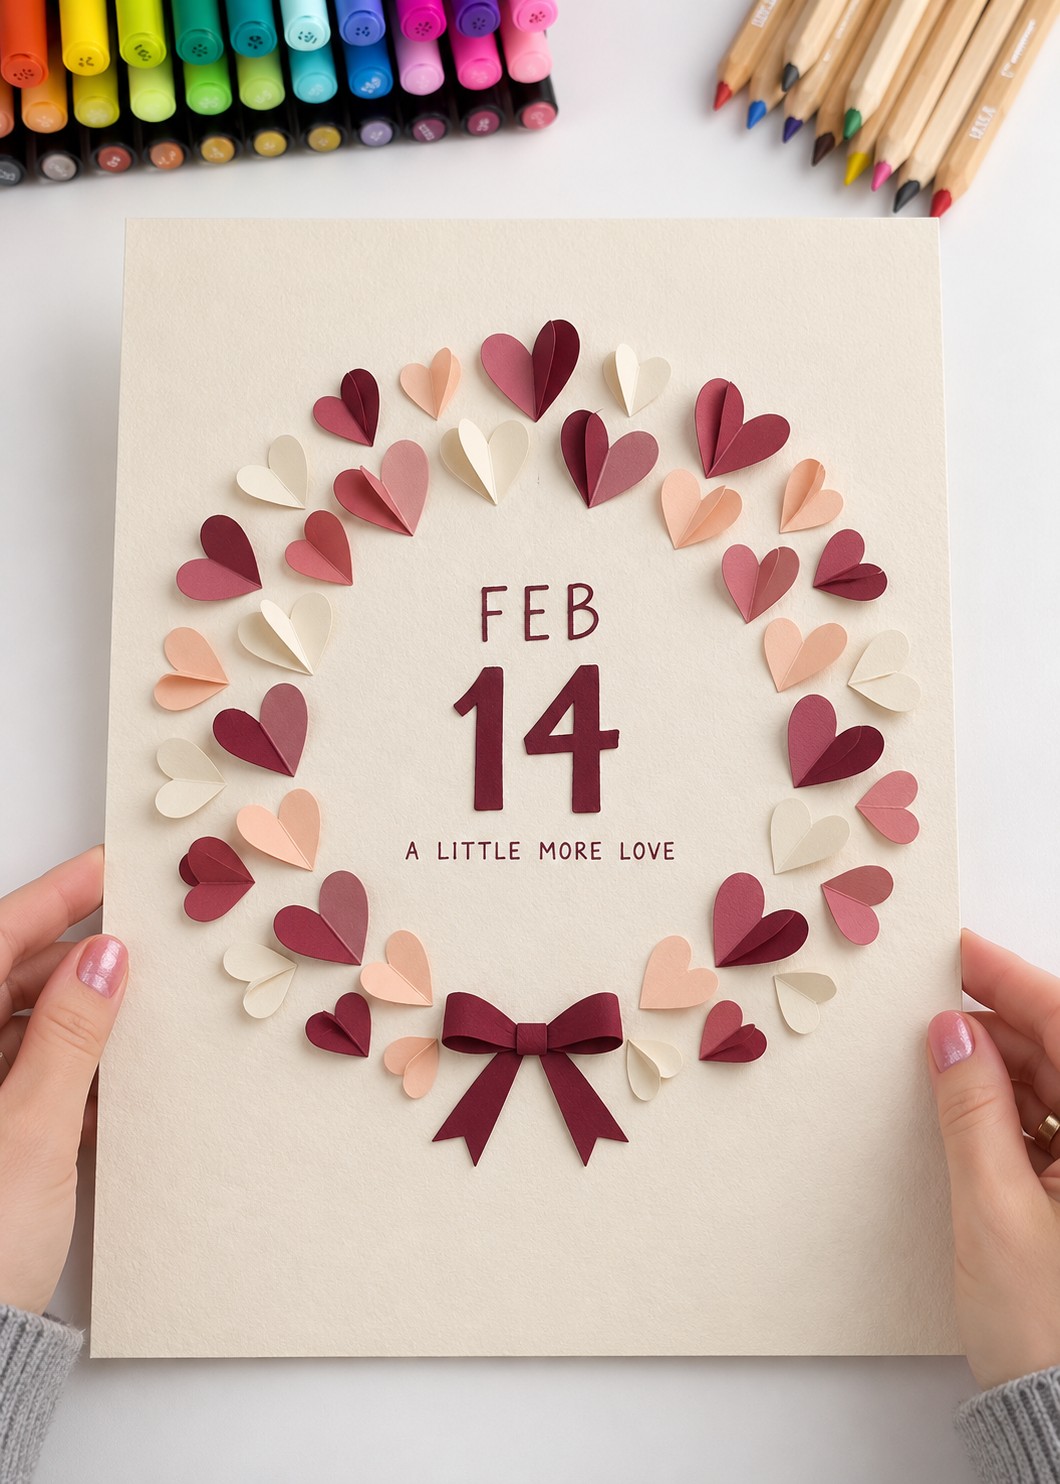
11. A February 14 Wreath of Folded Hearts
A ring of small hearts frames the date while leaving generous space for the lettering. Choose cream, peach, dusty rose, and burgundy paper, then cut hearts in two or three sizes. Fold each heart vertically and arrange them around a lightly penciled circle. Place the darker colors at intervals so one side does not feel much heavier than the other.
Attach each heart along a narrow area at its fold, allowing the sides to lift. Write the date before adding the raised pieces, and complete the bottom of the wreath with a small burgundy bow. Keep the bow clear of the central message and erase any remaining pencil circle once the glue is dry.
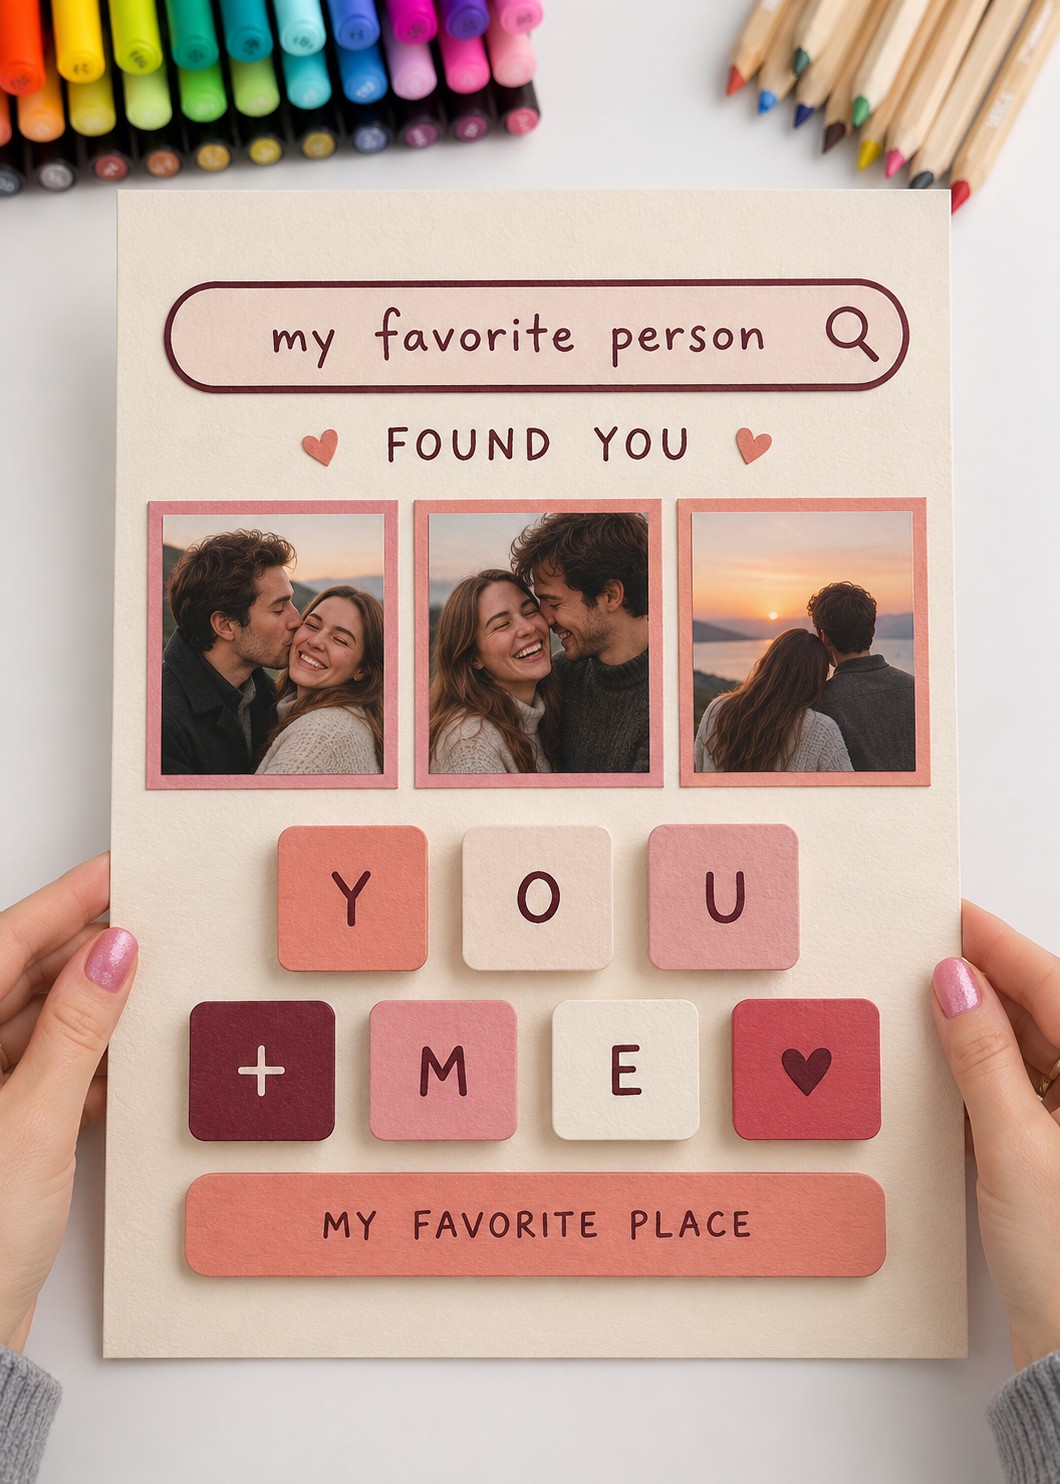
12. A Favorite Person Search Poster with Raised Keys
A drawn search field, three personal photographs, and soft colored keyboard tiles turn a familiar screen layout into a handmade keepsake. Use ivory card, photo prints, pink mats, and layered cardstock rectangles with rounded corners. Mount the photographs in an evenly spaced row below the search field.
Build the “YOU” and “+ ME” tiles from several glued card layers or lightweight foam covered with cardstock. Add the letters before attaching the tiles, then use a ruler to align their bottom edges. These are fixed decorations, so no moving key mechanism is needed. A long coral bar beneath them gives you space for a short personal phrase.
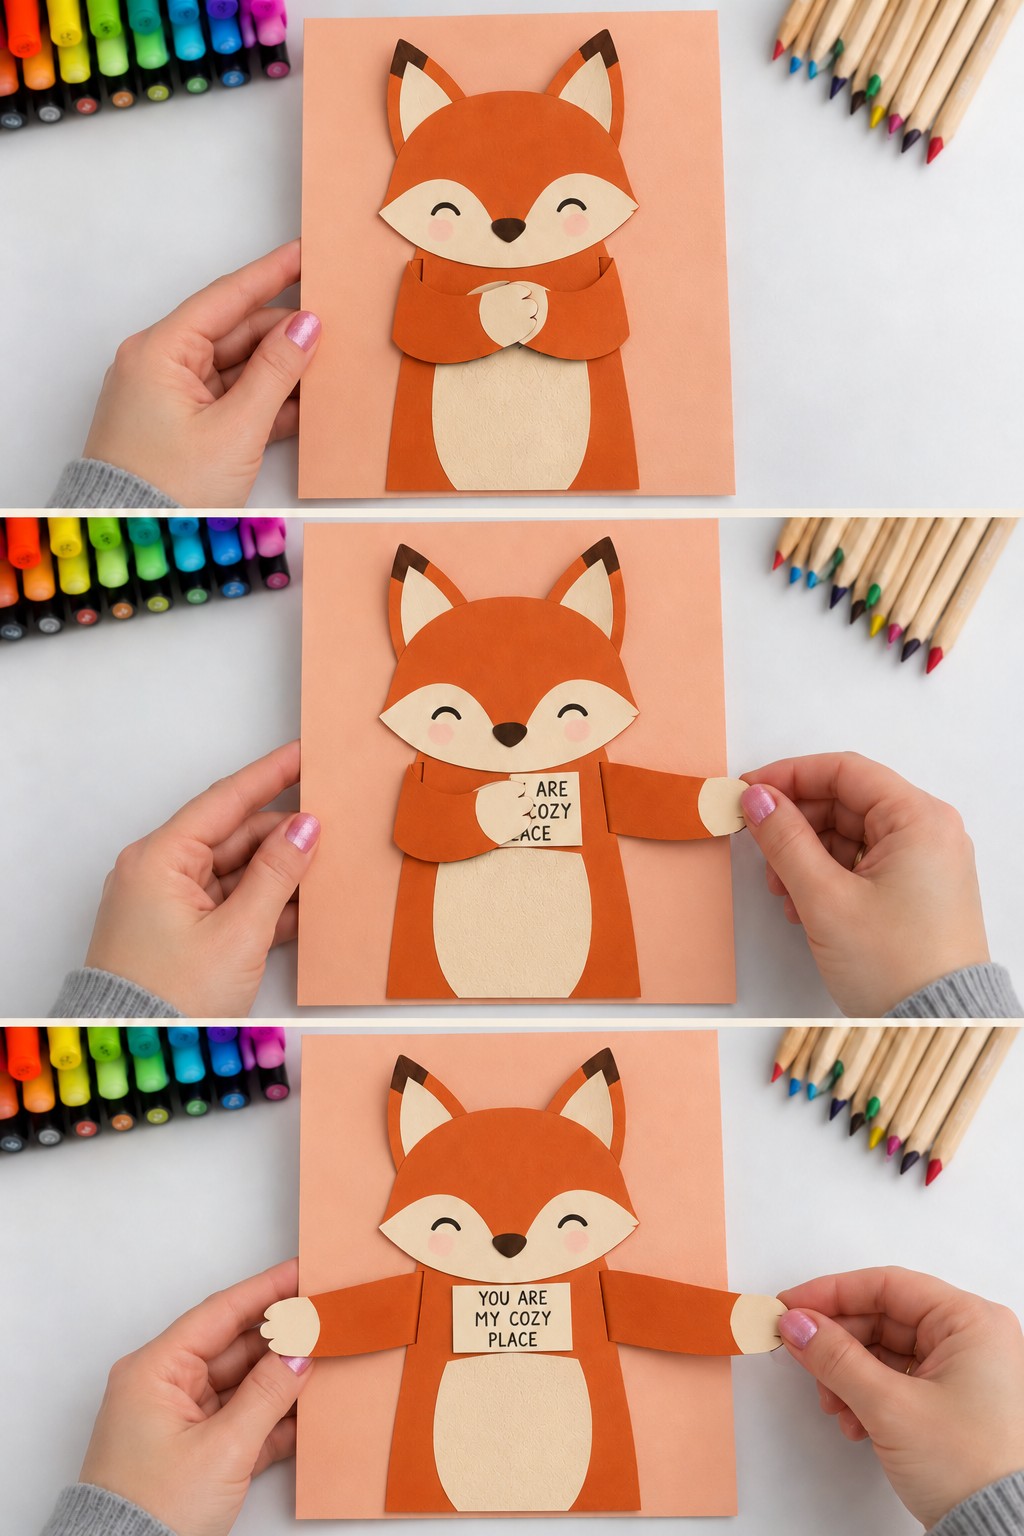
13. A Fox Whose Hug Opens to Reveal a Message
An orange paper fox hides a message behind its folded arms. Build the body from orange and cream cardstock, keeping the head separate until the arm hinges are positioned. Place a small message rectangle on the chest. Cut two arms with narrow shoulder tabs, score those tabs, and attach them beneath the outer edges of the body or head layer.
Fold the arms inward so the cream paws meet over the message, then open them to either side. Leave the paws unattached and keep the hinge folds free of glue. The surprise works best with a short message that fits completely on the chest, so every word becomes visible when the hug opens.
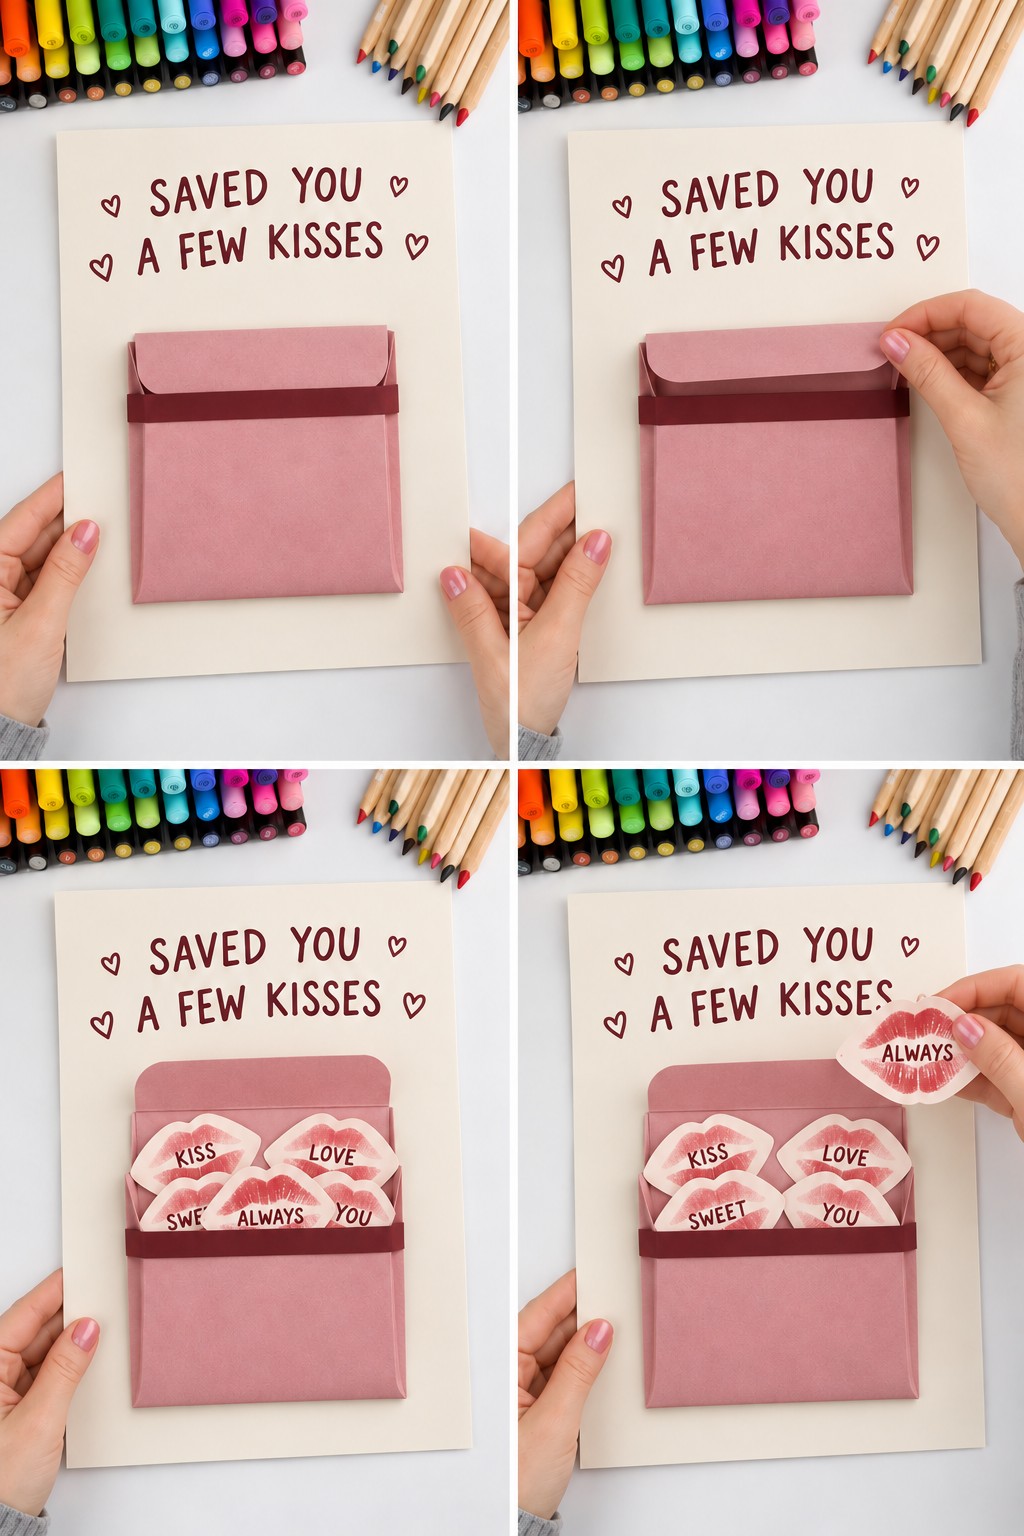
14. A Keepsake Pocket Filled with Paper Kisses
A dusty pink pocket holds several circular tokens printed or drawn with lips and affectionate words. Fold the pocket with side tabs, a bottom tab, and a generous top flap. Glue the side and bottom tabs to a separate backing panel first, then mount the completed pocket beneath the heading.
Add a burgundy strip across the pocket front for contrast, positioning it so the top flap can tuck beneath it. Cut the tokens from firm cream card and make them slightly narrower than the pocket opening. Keep the pocket lightly filled so the flap closes without bulging. You can write a tiny promise or shared memory on the reverse of each token.
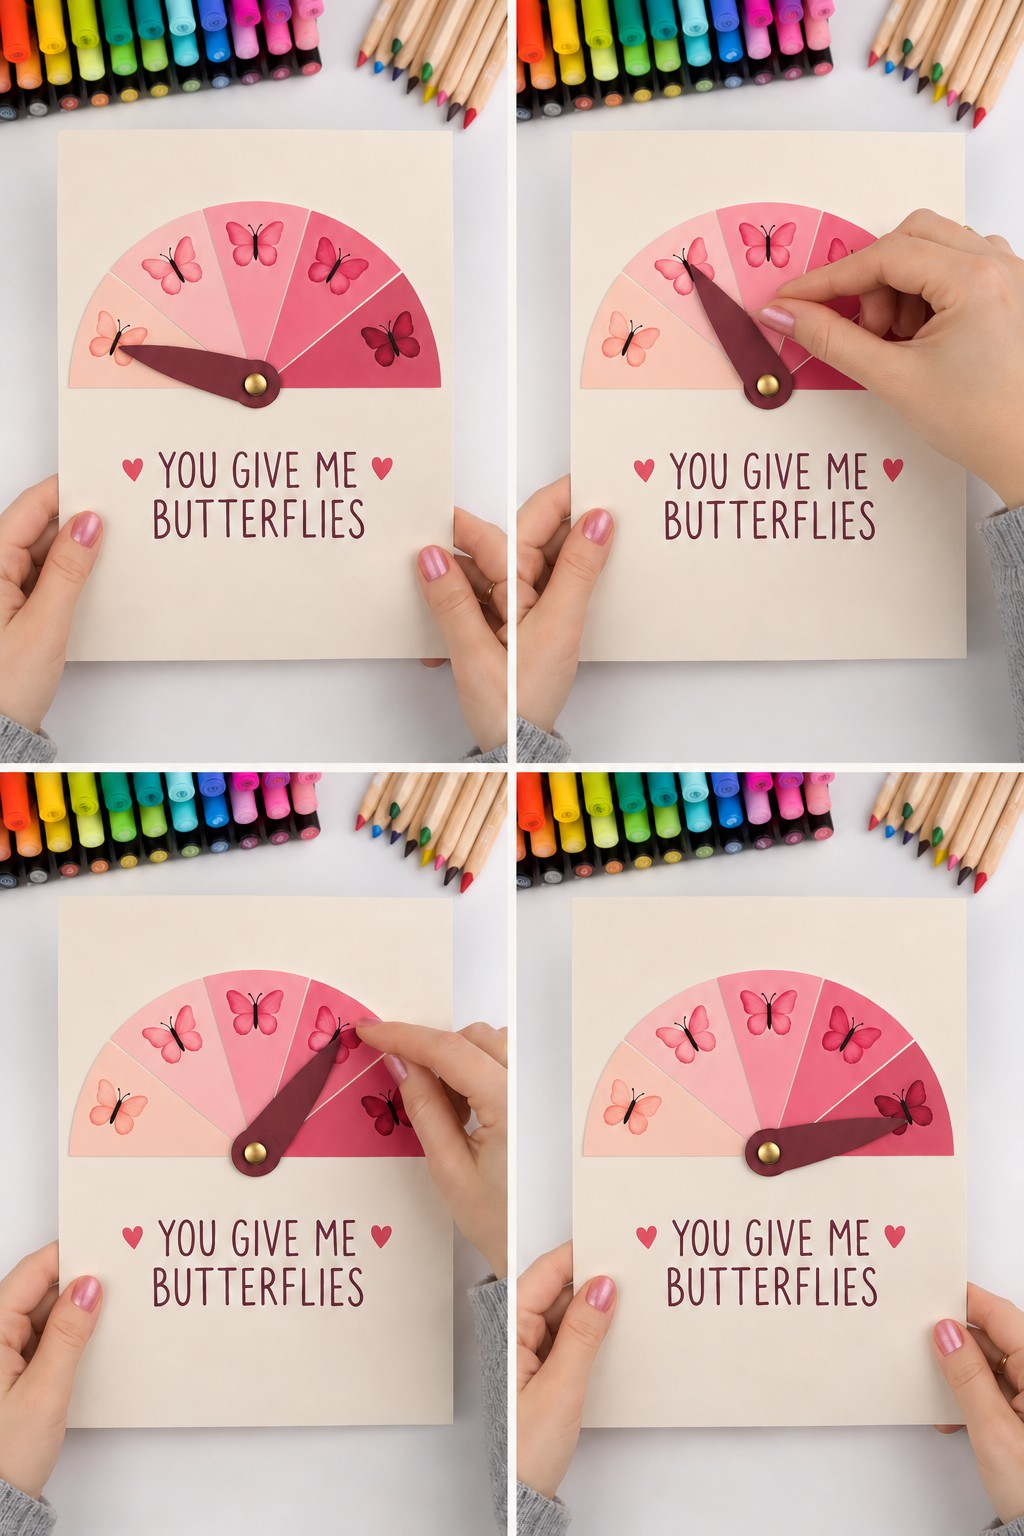
15. A Butterfly Dial with a Turning Pointer
A semicircular dial turns the phrase “You Give Me Butterflies” into a small interactive detail. Divide a pale pink semicircle into colored wedges and decorate each segment with a miniature butterfly. Cut a burgundy pointer from two laminated card layers so it holds its shape when turned.
Pierce the pointer and the dial at the center of the semicircle's straight edge. Join them with a paper fastener, adding a small card washer behind the pointer if needed. Spread the fastener legs loosely enough for rotation, and cover them on the back of the poster. Keep raised butterfly wings outside the pointer's sweep, or use flat butterflies where the pointer passes.
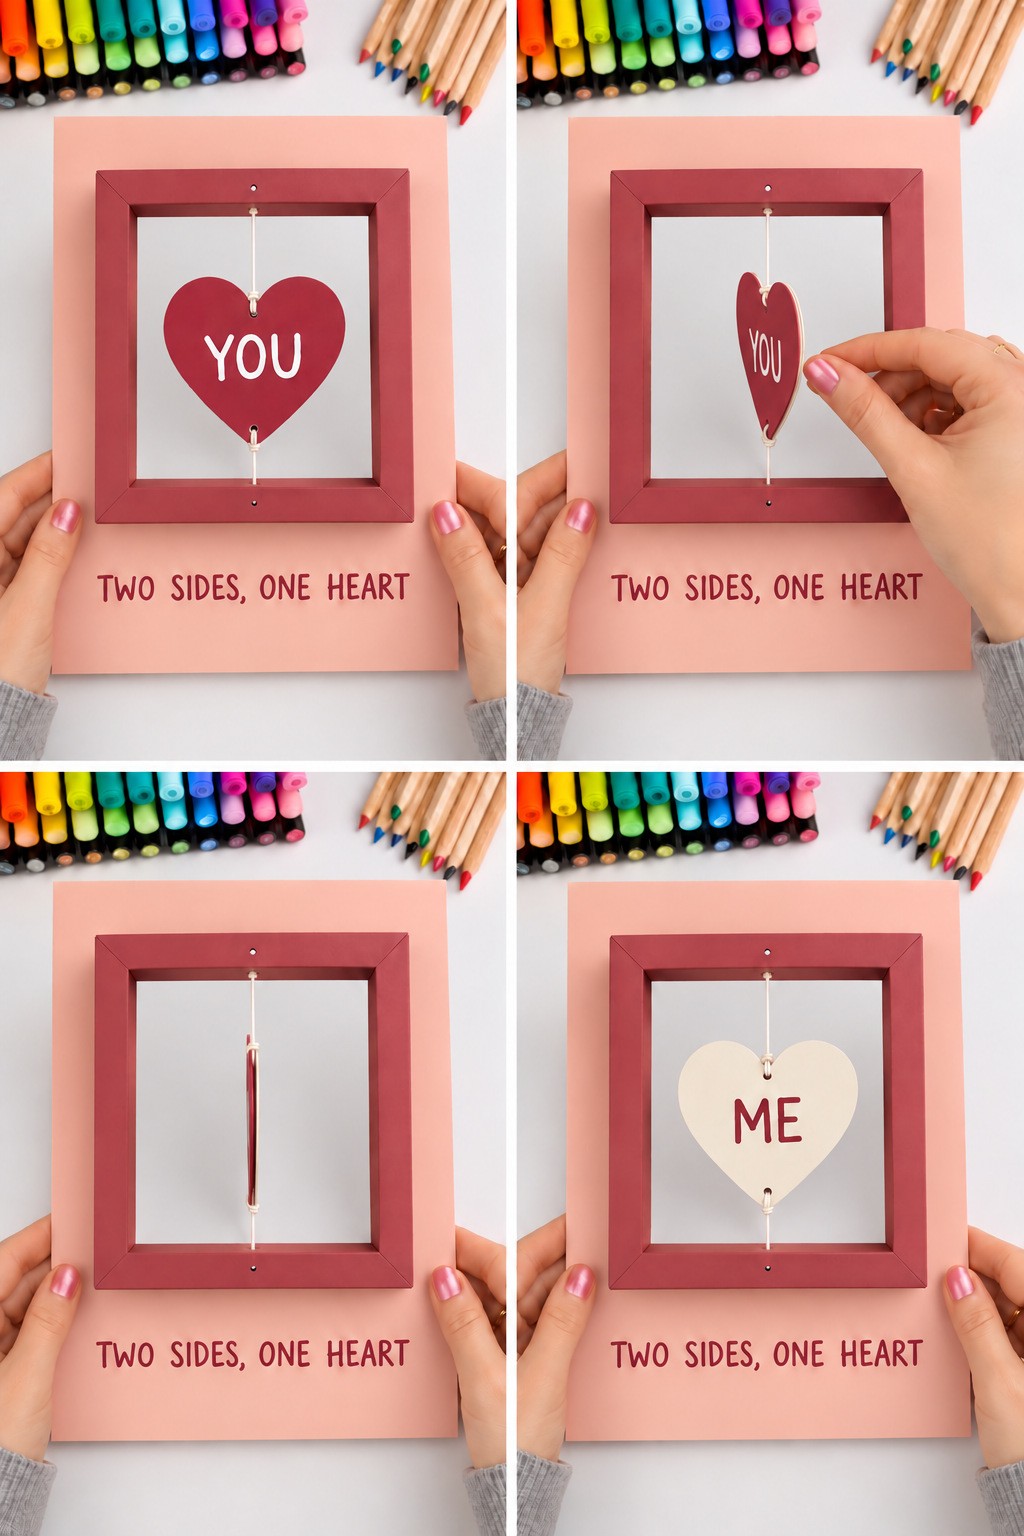
16. A Spinning Heart with You on One Side and Me on the Other
A heart suspended in an open frame changes its message as it turns. Cut a rectangular opening through the poster board, then reinforce its edges with a burgundy card frame. Make the heart from two matching card shapes glued back to back, with “YOU” on the burgundy face and “ME” on the cream face.
Connect the top and bottom of the heart to the frame with aligned lengths of strong thread, securing the knots behind the frame. Keep the tension just firm enough to hold the heart upright without bending it. The opening must be larger than the heart, and the heart needs room in front and behind to rotate. For an 8 cm wide heart, allow more than 4 cm of clearance on each side of the poster plane. Hold or display it away from a wall when turning it.
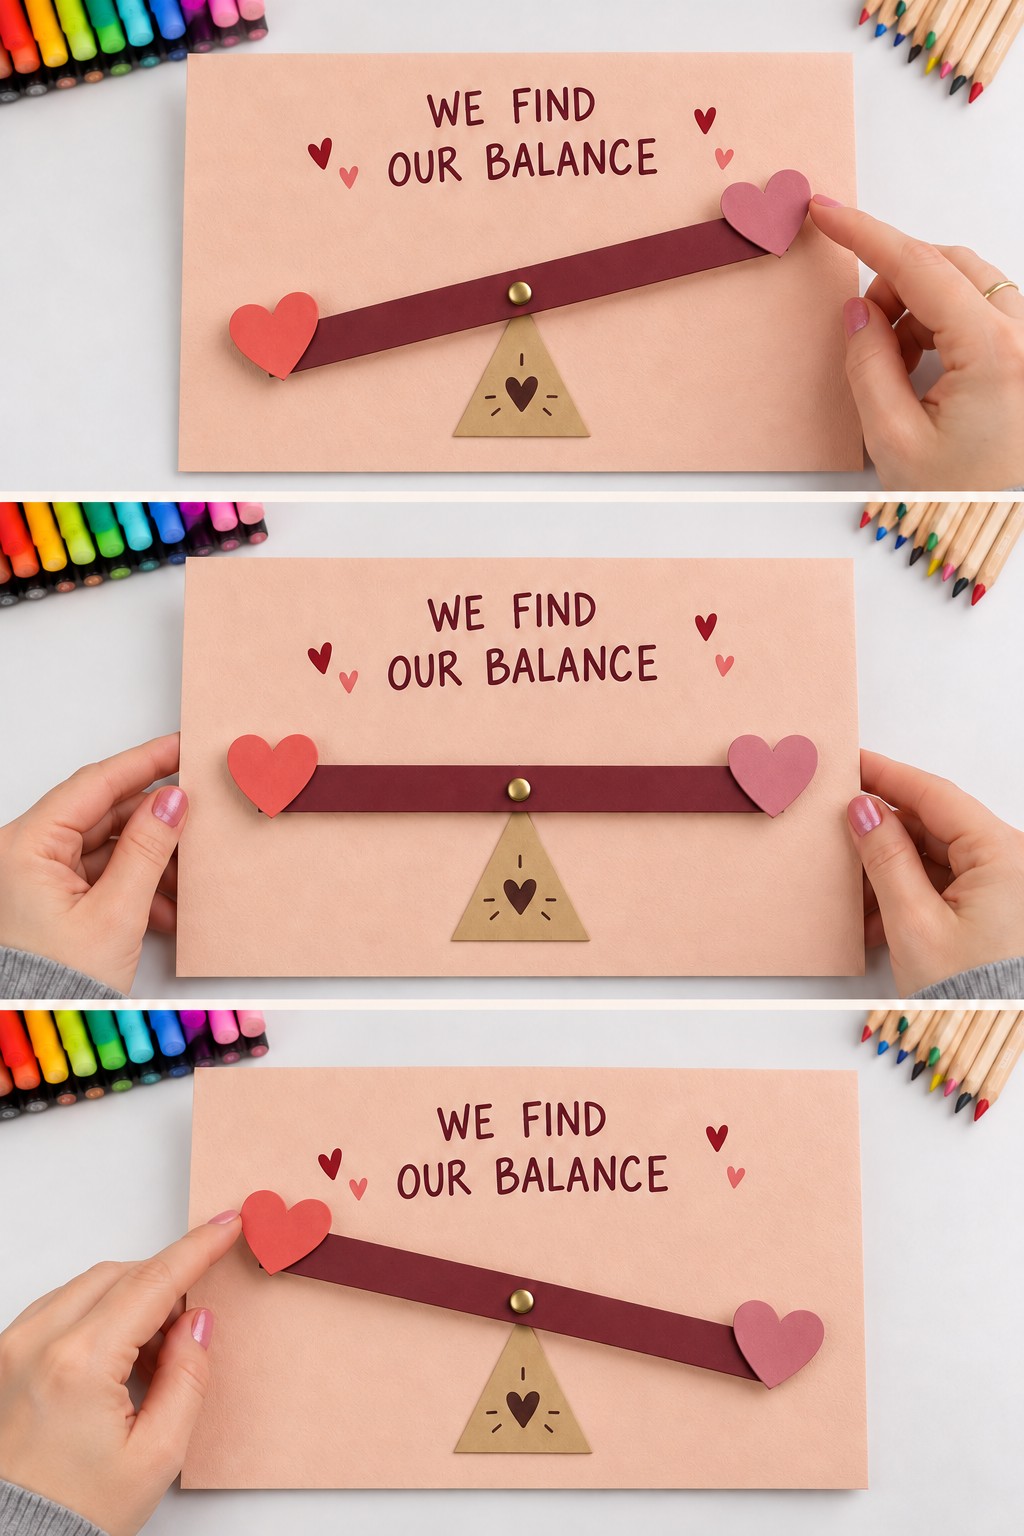
17. A Balancing Heart Seesaw
A burgundy beam with a heart at each end pivots above a small triangular base. Make the beam from two layers of cardstock and use matching heart cutouts so the ends have similar weight. The gold paper fastener belongs at the beam's midpoint, with the triangle positioned beneath it as a visual support.
Attach the beam through the backing with the fastener, leaving enough looseness for it to tilt. A small card washer can prevent rubbing against the painted or paper surface. This is a manually moved decorative seesaw; it does not need to settle perfectly level on its own. Keep the heading above the full arc of movement so the hearts never cover the words.
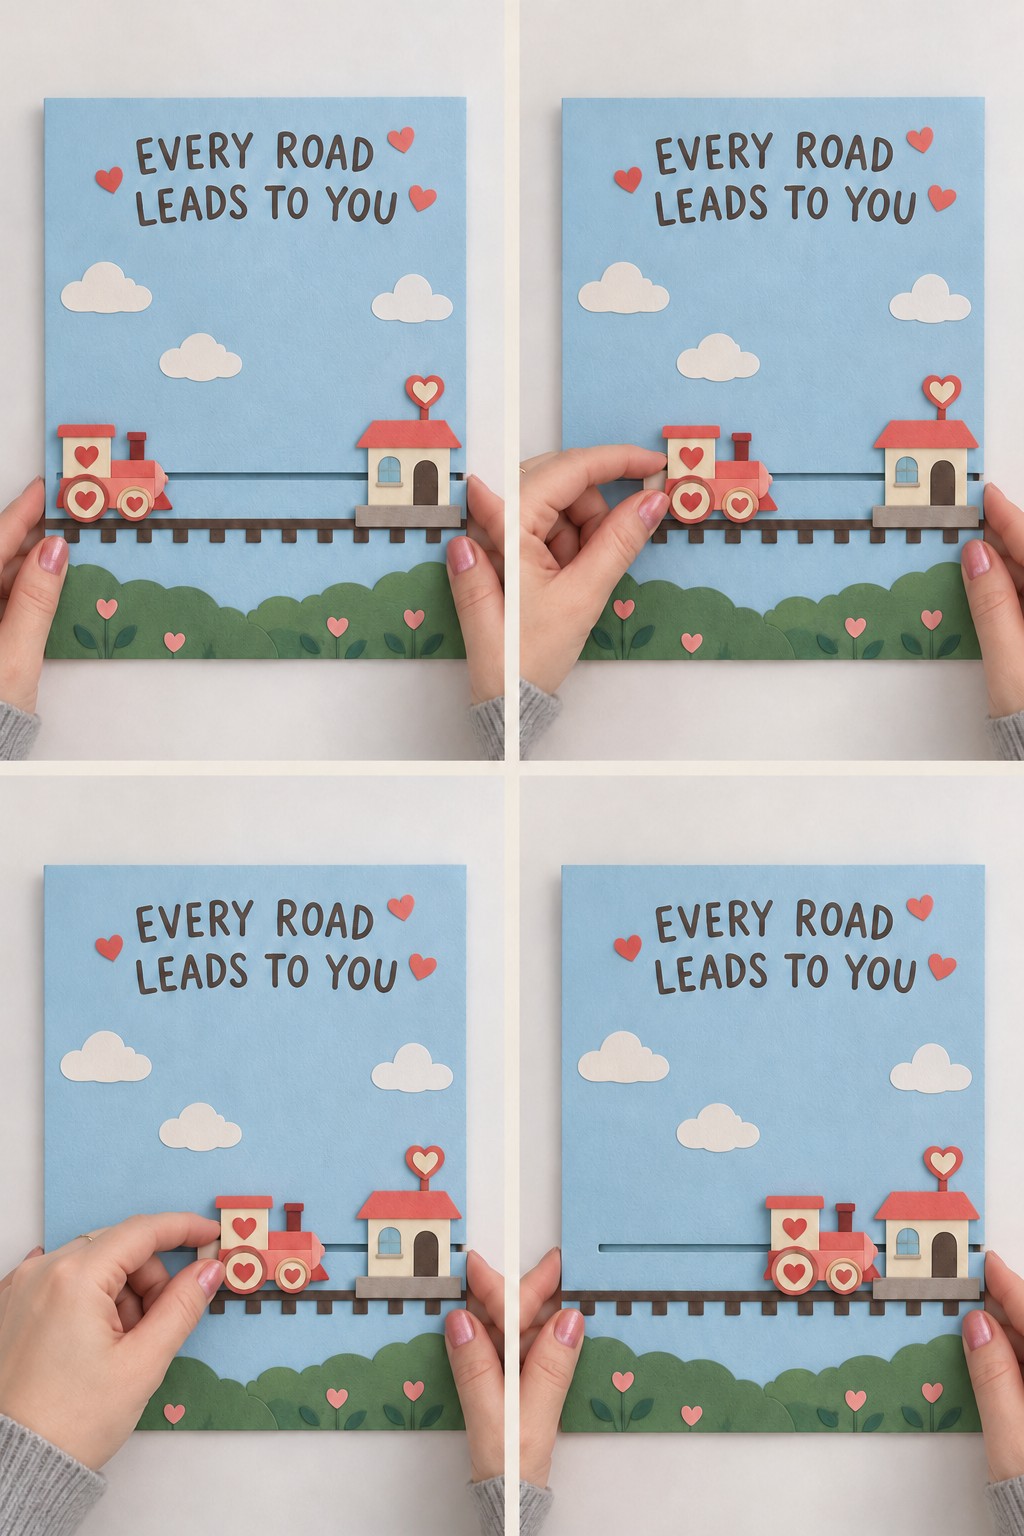
18. A Sliding Train That Travels Toward a Little House
A small red train moves along a track toward a house beneath a blue sky. Build the train, house, clouds, and green landscape from layered cardstock. Before attaching the scene to the backing, cut a narrow horizontal slot just above the visible track. Mount the scene on foam strips placed outside the train's travel path.
Connect the train to a wider hidden card retainer behind the slot with a short card tab that fits loosely through it. The retainer prevents the train from falling out, while the foam spacing gives it room to slide. Keep adhesive off the slot edges and test the journey from end to end. Position the house just beyond the stopping point so the train approaches it without colliding with its layers.
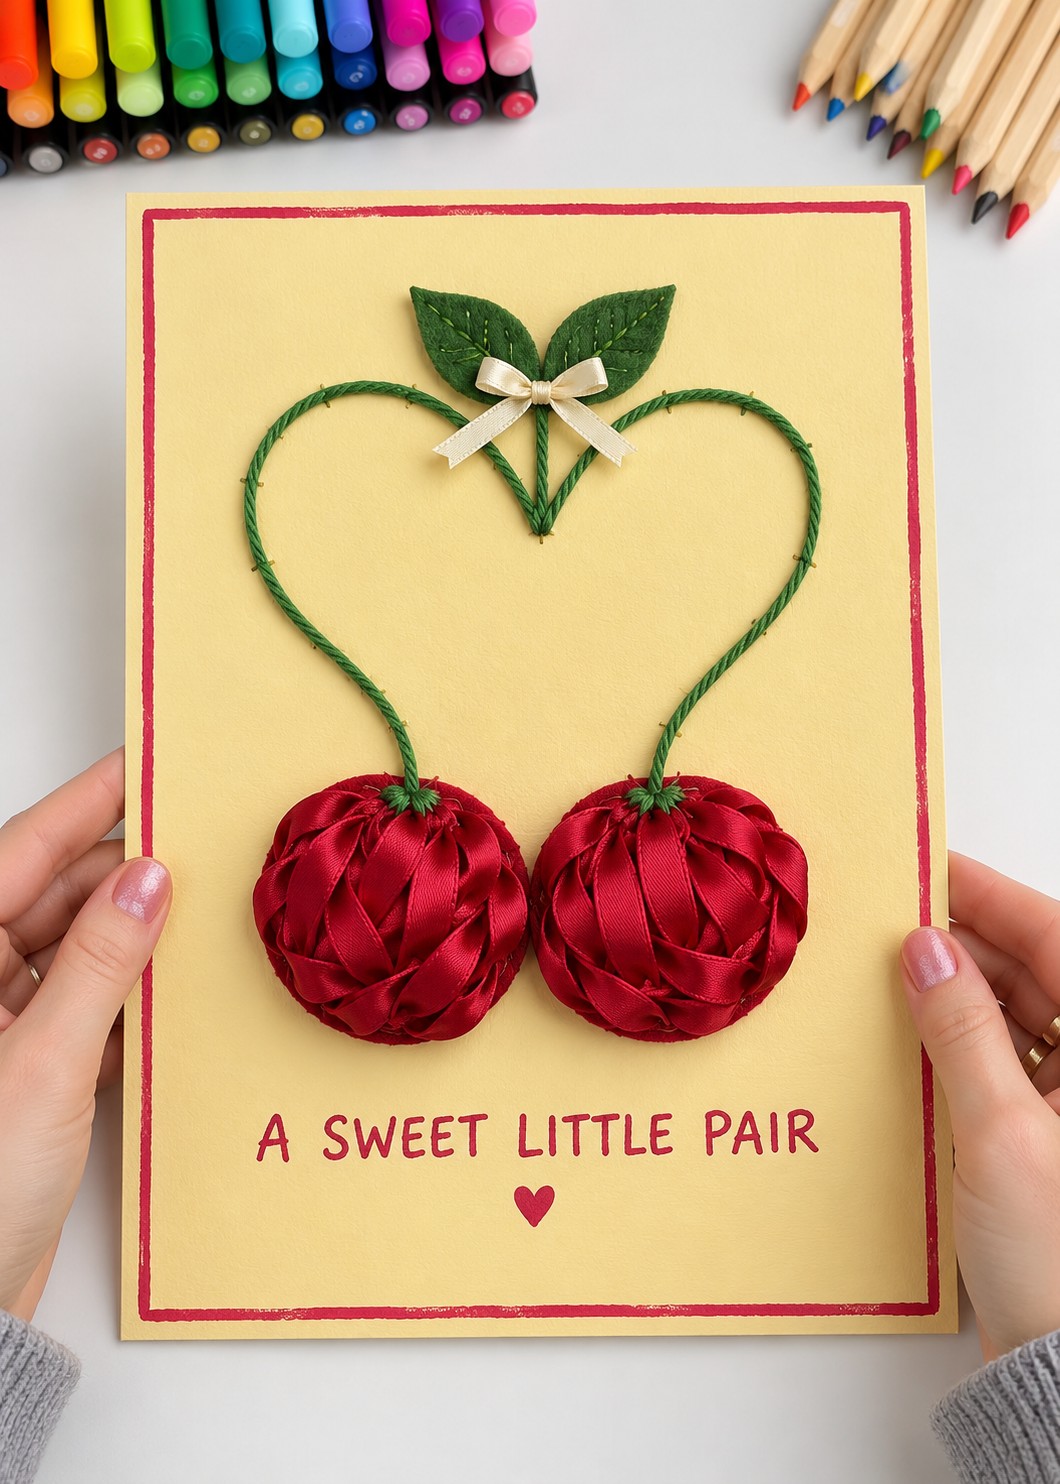
19. Satin Ribbon Cherries with Soft Sculptural Texture
Deep red satin gives this cherry pair a richer finish than folded paper. Use two lightweight foam half spheres of equal size, green cord, felt leaves, and a small cream bow. Their flat backs make them easier to mount securely than complete round balls. Cover each dome with overlapping ribbon loops, working around the surface and tucking the ends toward the back.
Use an adhesive labeled suitable for both the ribbon and foam, and test for staining or damage on scraps first. Attach the covered domes to a firm yellow backing, then curve the green stems into a heart above them. Add the felt leaves and bow at the meeting point. Keep both cherries at the same height so the stem outline reads clearly.
20. A Foldout Flower of Reasons to Choose Someone
A compact paper parcel unfolds into four affectionate messages around “I Choose You.” Begin with a central square about 6 cm wide and attach a flap of the same width to each side using scored tabs. Round each flap's outer edge into two lobes to create the flowerlike outline when open. Use contrasting pink, coral, and burgundy card.
Write the short messages before assembly and keep them inside the areas that will remain visible. Attach only the back of the central square to the green poster. Fold the flaps inward one at a time, then slide a separate burgundy paper band around the folded packet. Make the band loose enough to remove without bending the flaps and keep it free from the poster backing.
21. A Starry Paper Blind That Reveals a Sunset
A navy paper blind hides a warm sunset scene with two seated silhouettes. Make or print the sunset on a rectangular panel, then prepare a navy paper sheet of the same width with small painted stars. Fix its top edge just above the sunset and attach a lightweight paper tube along its lower edge to help it roll evenly.
Roll the blind upward by hand to reveal the scene. Two cream keeper straps at the top can close around the rolled blind with small reusable fastening dots. Allow the straps to release for unrolling, and keep the tube ends within the poster edges. Use flexible paper for the blind; very thick cardstock will resist rolling and can spring open.
22. Three Removable Date Tickets Beneath Little Scenes
Three illustrated scenes suggest a sunset walk, a pancake morning, and a surprise date. Beneath each scene, attach a small coral pocket containing a removable ticket. Use cardstock for the pockets, lighter card for the tickets, and colored pencils or markers for the illustrations.
Glue only the side and bottom edges of each pocket, keeping the top open and the inside slightly wider than its ticket. Add a small tab or leave enough of the ticket exposed for easy removal. Write a specific plan on the reverse, such as a favorite walking route or breakfast menu. Keeping the tickets replaceable lets you add new plans after the first three are enjoyed.
23. A Pull Down Drawer for a Little Paper Hug
A small raised sign on a blue poster conceals a shallow drawer filled with paper hearts and a tiny envelope. Build the drawer from coral cardstock with folded walls, then make a sleeve around it that is open at the bottom. Mount “Open When You Need a Hug” on the sleeve's fixed front.
Add a cream pull tab to the drawer's lower edge. Keep the contents low enough to fit inside the sleeve and attach them so they cannot catch while moving. Before closing the sleeve assembly, add a short folded paper tether between the drawer and the sleeve interior. It should unfold as the drawer moves and stop it before it falls free. Test this stop before mounting the sleeve to the board.
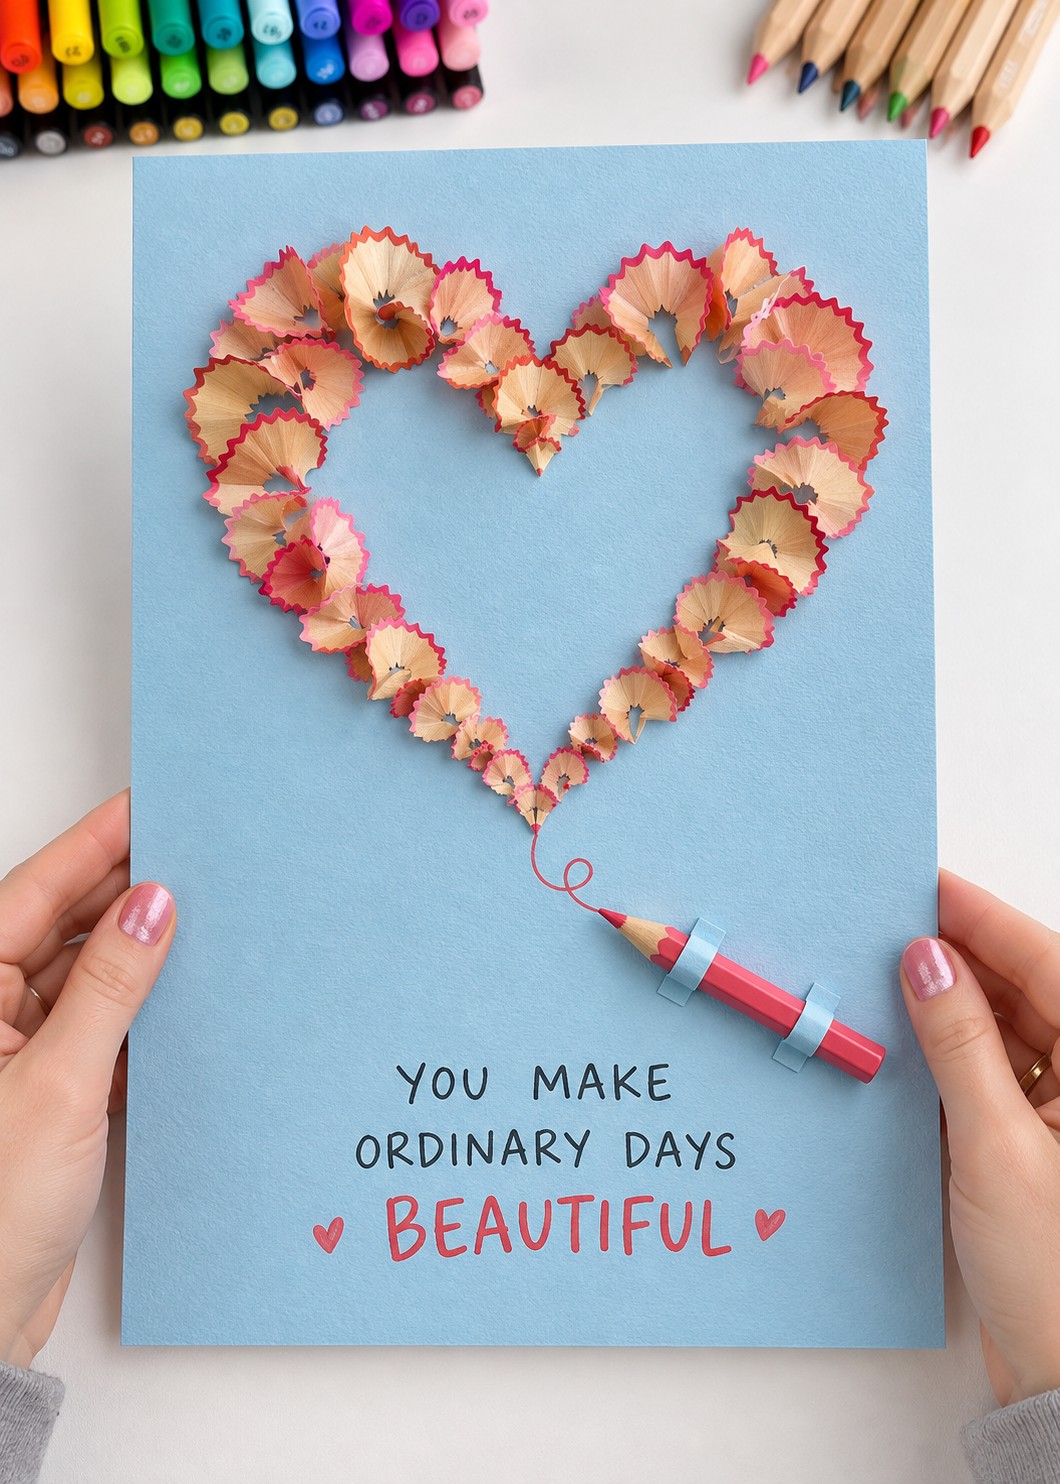
24. A Pencil Shaving Heart with a Colorful Trail
Curled pencil shavings form a delicate heart with a warm wood texture and bright colored edges. Sharpen colored pencils slowly over a clean tray, saving the broad curls and discarding dust and broken fragments. Draw a light heart guide on blue card, then arrange the larger curls around the lobes and smaller pieces near the point.
Attach each shaving with a tiny dot of thick craft glue and let the arrangement dry without pressing it flat. Add a short red pencil beneath the heart using two secure paper straps, with a drawn red line linking its tip to the heart. A firm backing supports the pencil's weight. Display the finished poster under a deep frame or in a sheltered spot because the shavings are fragile.
Finish the Poster for the Way It Will Be Used
Choose a display method that preserves the detail you made. Flat paper compositions can sit in a standard frame if nothing touches the glass. Folded hearts, ribbon cherries, and pencil shavings need more depth. Posters with doors, pockets, or pull tabs should remain accessible, while the spinning heart needs an open space behind it.
Before giving the poster, lift it upright, check every attachment, and open or move each interactive part gently. If a piece catches, adjust the clearance instead of pulling harder. Add your own date, memory, or handwritten sentence where it belongs in the design. That small personal detail makes the finished poster specific to the person receiving it.

Leave a Reply