
This paper frog craft is a fun project for children who enjoy colorful animal crafts with a playful twist. The frog is made from turquoise cardstock and decorated with oversized layered eyes, peach cheeks, black nostrils, long frog legs, and a curled coral tongue. A striped straw is added through the top center of the frog, and the finished project sits on a bright blue pond base. This version uses a decorative paper curl for the tongue.
The design in this tutorial follows a very clear visual sequence. The frog body begins as a folded turquoise circle, then a small notch is cut at the top center. The eyes, cheeks, and face details are added before the legs and tongue are prepared. The tongue is made separately, the striped straw is positioned, the back support is secured, and the frog is finally placed on a blue pond circle.
Table of Contents
- Tutorial Video
- Materials You Will Need
- 1. Cut the Frog Body
- 2. Make the Body Notch
- 3. Make the Big Layered Eyes
- 4. Add the Face Details
- 5. Cut and Prepare the Frog Legs
- 6. Create the Curled Coral Tongue
- 7. Add the Striped Straw
- 8. Secure the Tongue and Inner Support
- 9. Cut the Blue Pond Base
- 10. Assemble the Frog on the Pond
- Final Look of the Finished Frog
- Safety Note
Tutorial Video
Materials You Will Need
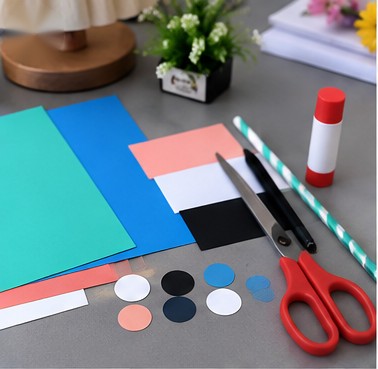
Prepare these supplies before starting:
- Turquoise cardstock
- Blue cardstock
- Coral cardstock for the tongue
- White cardstock
- Black cardstock or black paper
- Peach cardstock
- One striped paper straw
- Glue stick
- Scissors
- Pencil
- Black marker
You will also need several pre cut circles and small paper shapes for the layered eyes and face details. The main color palette in this project is turquoise, coral, peach, white, black, and blue.
1. Cut the Frog Body
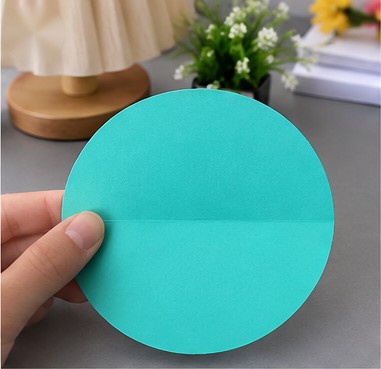
Begin by cutting a large circle from turquoise cardstock. This circle will form the main frog body.
Once the circle is cut, fold it in half evenly so that a straight crease runs across the middle. The folded piece should still keep a rounded shape, with the crease clearly visible. This fold is important because it gives the frog body structure and helps it sit neatly once the other parts are added.
Make sure the circle is smooth and evenly trimmed. If the edge looks uneven, trim it before moving on. The frog body should look simple at this stage: just one folded turquoise circle.
2. Make the Body Notch
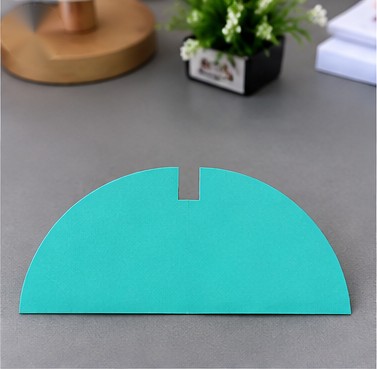
Take the folded turquoise circle and cut a small rectangular notch at the top center of the folded edge. This notch should be narrow and not too deep.
The notch creates the opening where the straw will later pass through. Keep it centered so the finished frog remains balanced. If the notch is too wide, the straw can shift around too much. If it is too narrow, the straw may be difficult to insert.
After cutting the notch, the folded shape should still look clean and rounded, with the small opening positioned between where the frog’s eyes will go.
3. Make the Big Layered Eyes
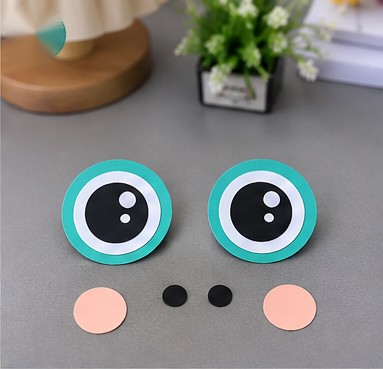
Cut or prepare the eye pieces next. Each eye needs several layers:
- One large turquoise outer circle
- One slightly smaller white circle
- One black inner eye circle
- Small white highlight dots
Glue the layers together so the eyes appear large, bright, and cartoon like. The turquoise outer layer should match the frog body, while the white and black layers create strong contrast.
Prepare two identical eyes. Keep them similar in size and spacing so the frog’s expression looks balanced. These large eyes are one of the defining features of the craft, so they should be neat and clearly shaped.
4. Add the Face Details
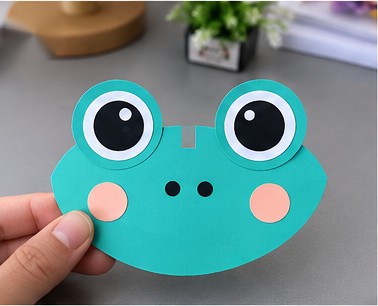
Glue the two completed eyes onto the top rounded portion of the frog body, one on each side of the center notch. They should rise above the top edge slightly, creating the familiar frog face shape.
Next, add two peach circles for the cheeks and place them lower on the face, one on each side. Then add two small black nostril dots in the center between the cheeks.
At this stage the frog’s face becomes recognizable. Even though the body is still very simple, the large eyes, cheeks, and nostrils give it a playful and friendly expression.
5. Cut and Prepare the Frog Legs
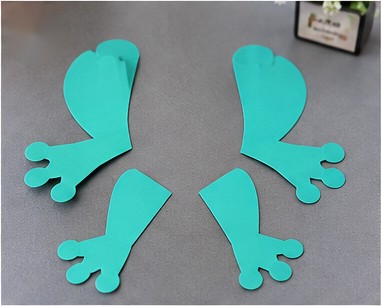
Using turquoise cardstock, cut four frog leg pieces. The top pair can be shaped as the front legs and the lower pair can be slightly longer for the back legs. Each leg should end with simple frog toes.
Lay the pieces out before attaching them so you can check the proportions. The legs do not need to be highly detailed, but they should clearly resemble frog limbs. Keeping all four legs the same color as the main body makes the craft look more coordinated.
At this step, the legs are prepared and ready, even if they are not yet fully assembled onto the final pond base.
6. Create the Curled Coral Tongue
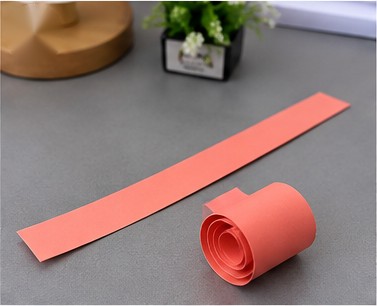
Cut a long narrow strip from coral cardstock. This strip will become the frog’s tongue.
Wrap the strip around a pencil or your finger to create a curled spiral shape. Once released, it should keep a rounded curl instead of lying flat. The curl gives the project its playful look and helps the finished frog stand out from a basic flat paper craft.
The tongue should remain clearly visible and neatly rolled. This coral color gives the frog a more original look than a standard bright red tongue.
7. Add the Striped Straw
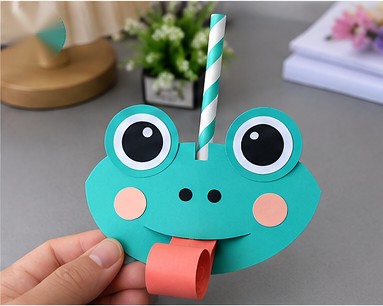
Insert the striped straw through the notch at the top center of the frog body. The straw should pass down through the center area of the frog.
Position the curled coral tongue at the lower center front so it appears to come from the frog’s mouth area. At this stage, the frog face and tongue are visible from the front, and the straw extends upward from the top center between the eyes.
Check that the straw sits straight and that the tongue remains curled and centered. The straw and curled tongue create the layered arrangement shown in the front view.
8. Secure the Tongue and Inner Support
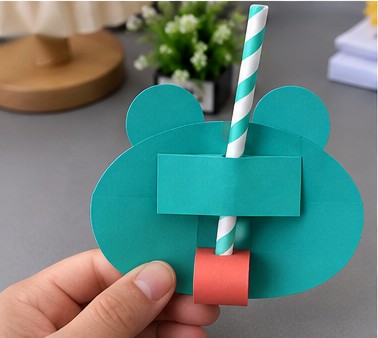
Turn the frog over to work on the back. Add a horizontal support strip across the back section to hold the inner parts in place.
This support strip helps secure the straw and keeps the coral tongue arrangement more stable. The back view should show the turquoise frog body, the support strip, the striped straw passing through the center, and the coral tongue attached underneath.
This step is important because it strengthens the construction and helps the finished frog hold its shape better.
9. Cut the Blue Pond Base
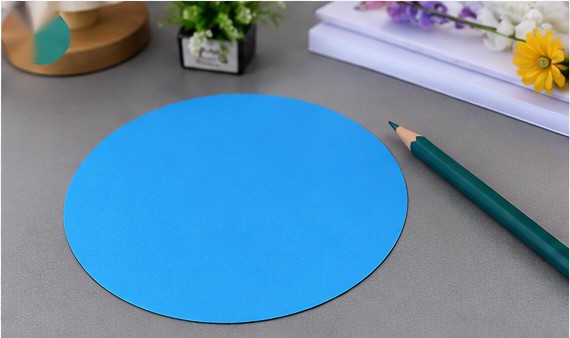
Cut a large circle from blue cardstock to create the pond base.
The blue circle should be larger than the frog body so it remains visible around the edges once the frog is placed on top. Keep the circle smooth and even. This bright blue base gives the craft a clean background and makes the turquoise frog stand out more clearly.
At this stage, only the base is prepared. The frog is added afterward.
10. Assemble the Frog on the Pond
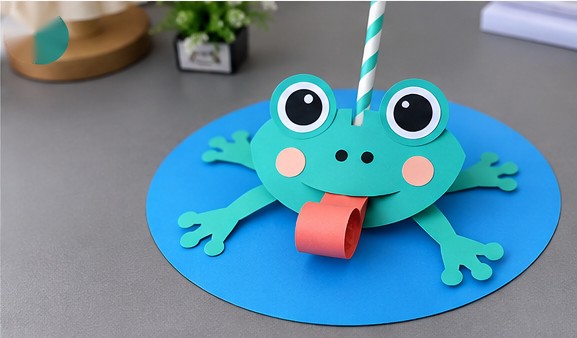
Place the frog over the blue pond base and attach it in position. Arrange the legs so they spread outward around the body and look natural on the blue circle.
Make sure the frog face points forward, the straw remains visible at the top center, and the curled coral tongue sits clearly at the front. The blue pond should still be visible around the frog so the final composition looks complete.
Once the frog is attached, press gently so the pieces stay in place without flattening the tongue curl.
Final Look of the Finished Frog
The completed craft should show:
- A folded turquoise frog body
- Two large layered eyes
- Two peach cheeks
- Two black nostrils
- Four turquoise frog legs
- One curled coral tongue
- One striped straw through the top center
- One blue pond base
The finished frog has a playful and cheerful look that works especially well for kids crafts, classroom activities, and simple paper craft sessions at home. The color combination of turquoise, coral, peach, and blue gives the project a fresh look while keeping the frog easy to recognize.
For another animal craft with a curled paper detail, try this red paper snail project. To use a different base shape for a character craft, explore the paper cup dragon tutorial.
Safety Note
Adult supervision is recommended during cutting, especially when shaping the notch and smaller paper parts. Use child safe scissors and glue, and allow the glued sections to dry before handling the finished craft.

Leave a Reply