
These creative DIY piggy bank ideas for adults turn loose change into a small project worth keeping on display. Explore 25 designs, from a coffee pot coin bank and a wooden cabin to patchwork animals, miniature appliances, and savings frames with clear windows. You will also find a practical materials guide and a six stage making collage for a fabric covered cat bank, with instructions you can adapt to several of the simpler designs.
Start with the part that does the work: a sturdy container, an opening that accepts your coins, and a way to retrieve them. Then choose the character, colors, and surface finish. A modest wooden box can become a cat, panda, or miniature piano; a suitable bottle can become a strawberry; a deep wooden frame can hold a visible collection. The individual ideas explain how to approach those different structures without treating every decorative shape as the same project.
Table of Contents
- Choose a Piggy Bank Structure Before Buying Decorations
- Materials for the Illustrated Patchwork Cat Coin Bank
- How to Make the Patchwork Cat Bank in Six Stages
- 1. Prepare the Wooden Box and Plan the Wrap
- 2. Cover the Four Vertical Sides
- 3. Attach the Muzzle and Nose
- 4. Add Two Supported Ears
- 5. Refit the Removable Bottom
- 6. Let the Materials Cure and Check the Finished Bank
- Adapt the Method to Other Materials and Shapes
- 1. Repurpose a Moka Pot into a Coffee Fund Bank
- 2. Build a Wooden Cabin Bank with a Forest Green Roof
- 3. Frame Your Savings in a Wooden Rain Cloud
- 4. Fold a Strawberry Bunny Bank from Reinforced Cardboard
- 5. Make a Lavender Washing Machine Savings Box
- 6. Make a Cardboard Hamster Bank with a Clear Coin Drawer
- 7. Turn a Wide Neck Bottle into a Strawberry Bank
- 8. Cover a Cat Bank with Soft Patchwork Fabric
- 9. Create a Bear and Bee Coin Run in a Wooden Frame
- 10. Dress a Lidded Cylinder as a Mint Dragon
- 11. Shape a Pink Penguin Bank with a Beak Above the Slot
- 12. Add a Panda Face to a Wood Slat Savings Box
- 13. Build a Blue Mouse Piano Coin Bank
- 14. Sculpt a Chameleon Bank Around a Hollow Core
- 15. Place a Felt Butterfly inside a Clear Savings Frame
- 16. Make a Hippo Bathtub Bank with an Oval Container
- 17. Sew a Sleepy Knit Cover for a Bottle Shaped Bank
- 18. Turn a Small Box into a Polar Bear Refrigerator
- 19. Assemble a Yellow Oven Bank with a Viewing Window
- 20. Make a Layered Wooden Sheep with a Clear Belly
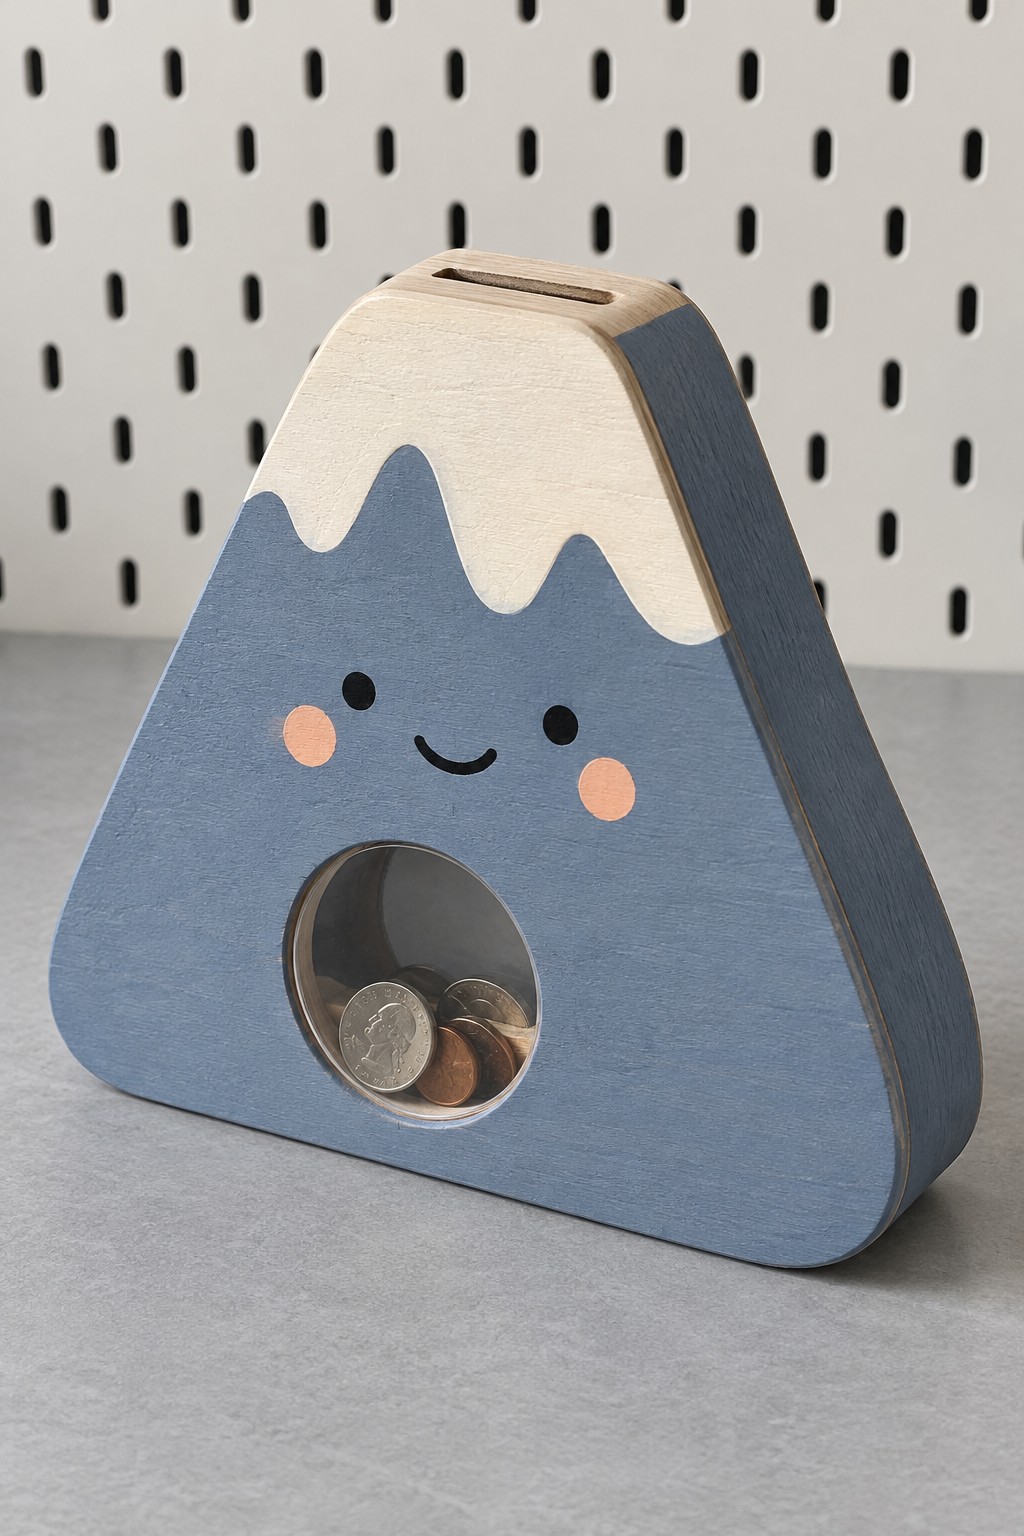
- 21. Cut a Mountain Bank with a Round Savings Window
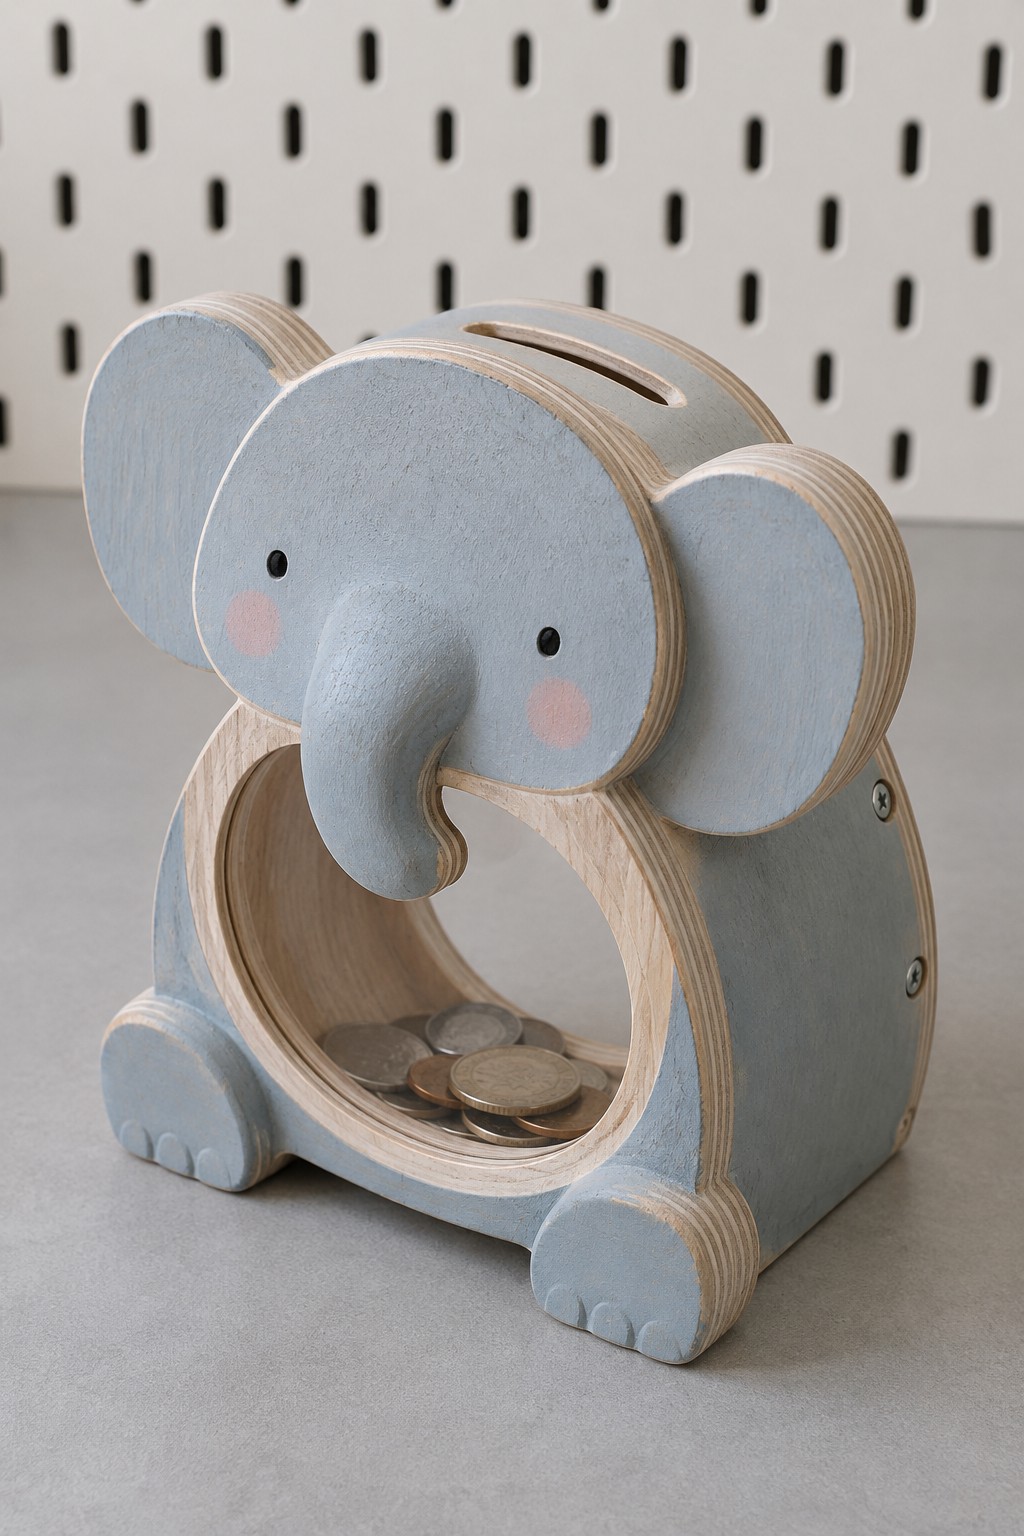
- 22. Create an Elephant Bank with a Transparent Tummy
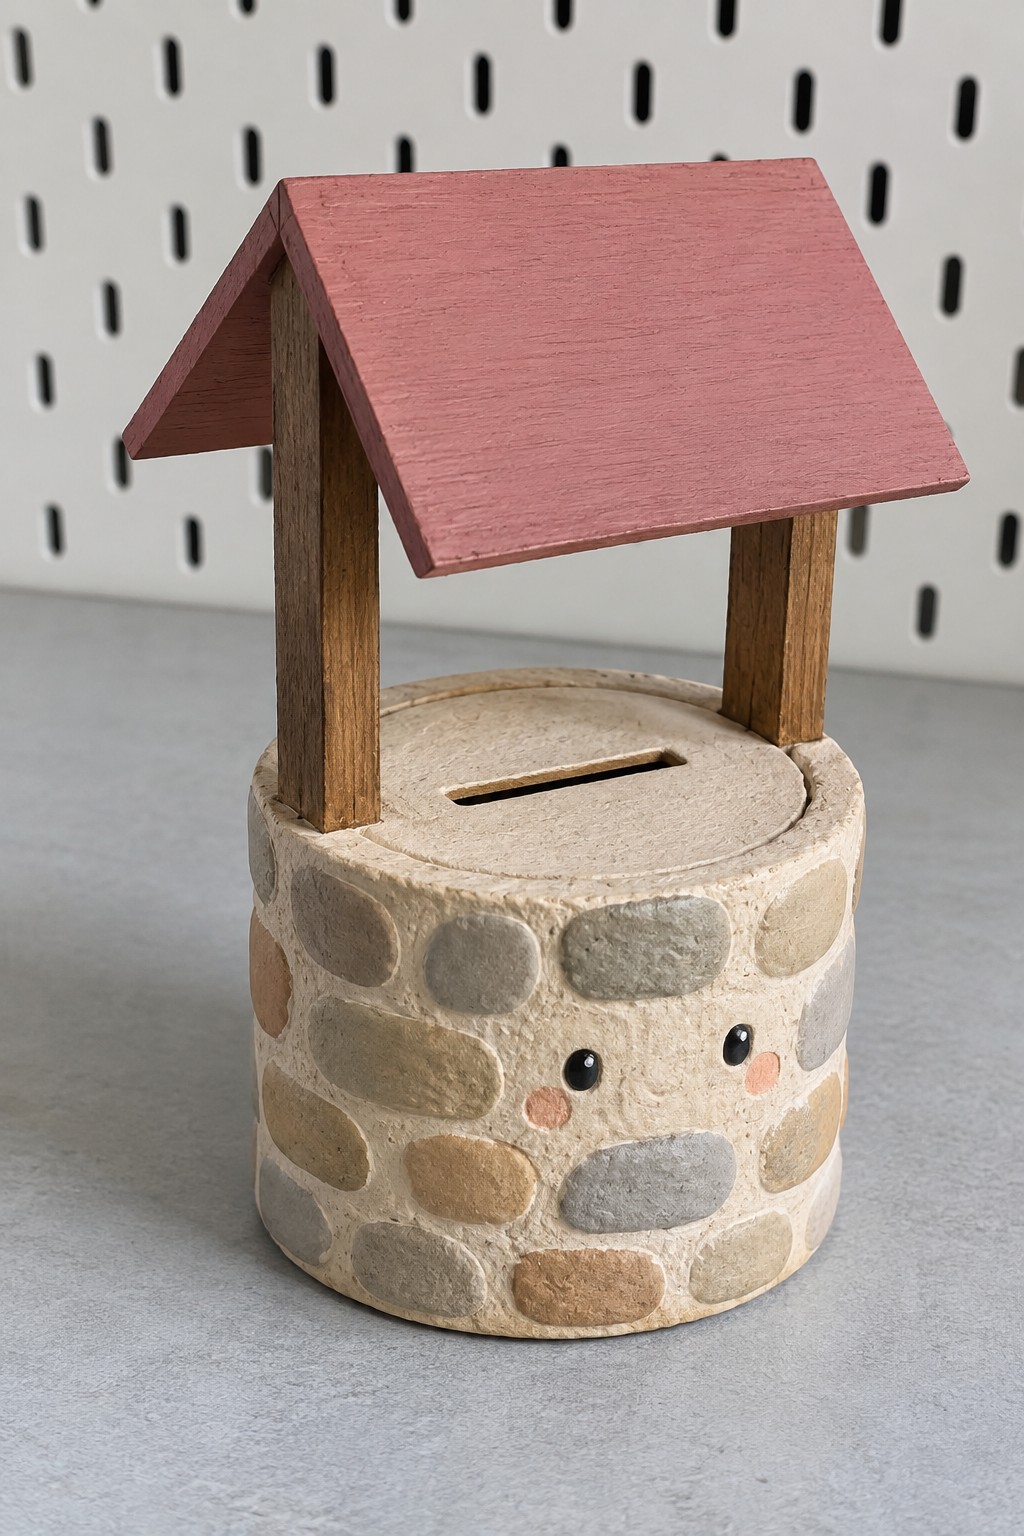
- 23. Build a Wishing Well Bank from a Round Box
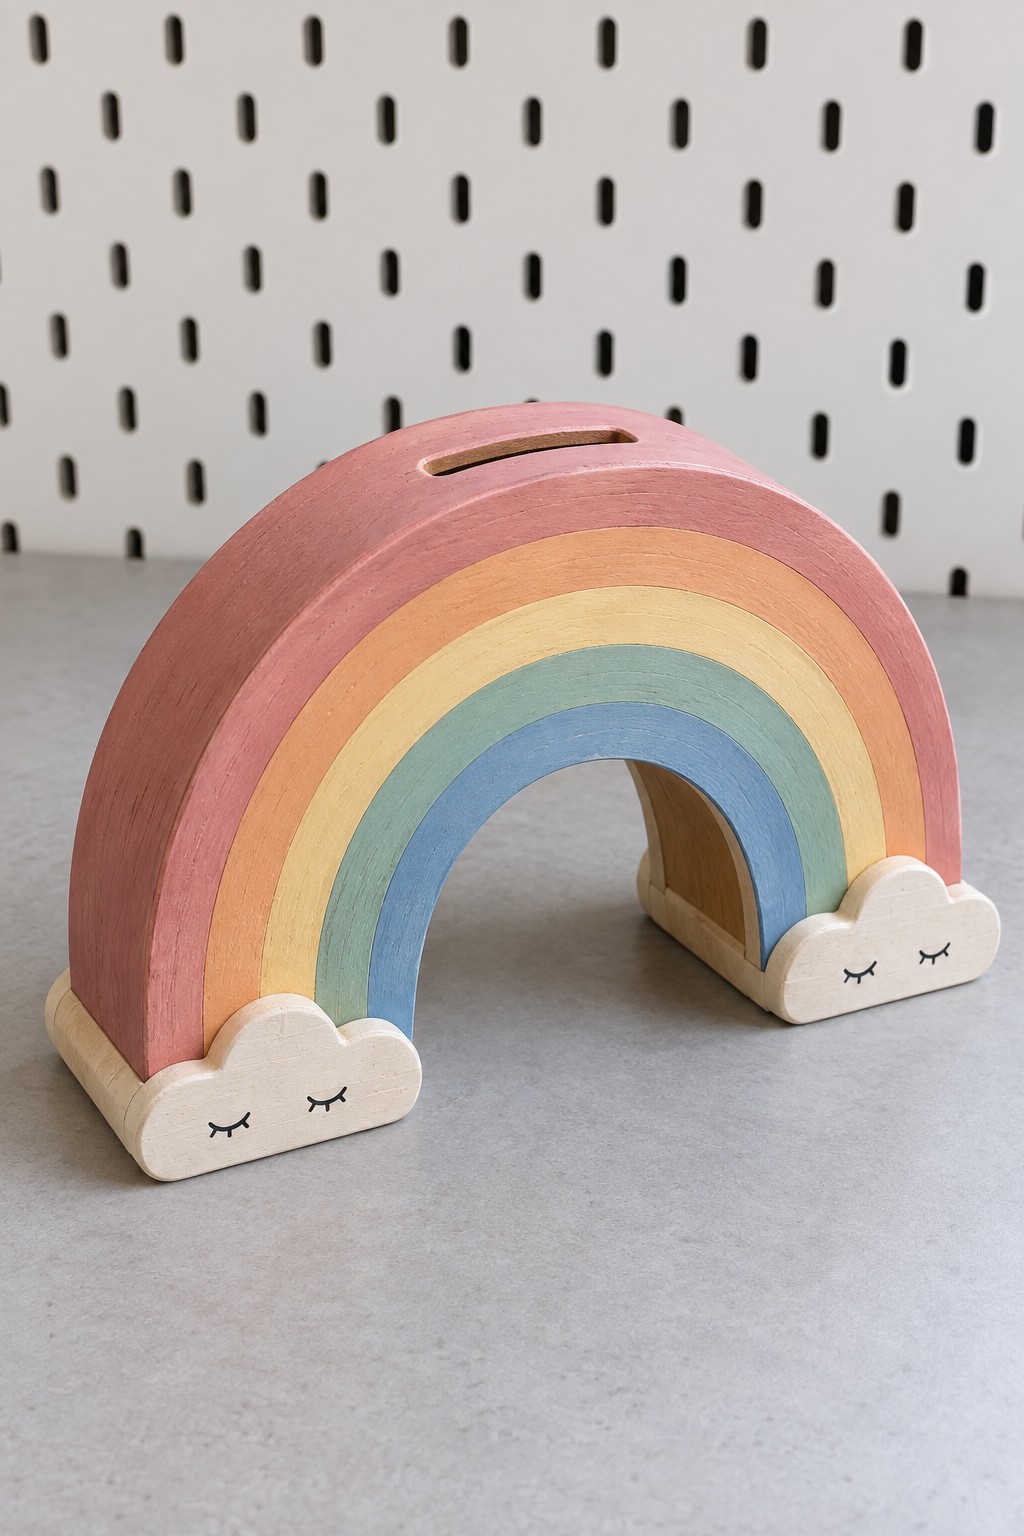
- 24. Form a Pastel Rainbow Bank with Hollow Arch Storage
- 25. Give a Blue Monster Bank a Pink Feeding Tray
- Choose a Finish You Can Live With and an Opening You Can Reach
Choose a Piggy Bank Structure Before Buying Decorations
For a first project, choose an unfinished wooden money box with an existing slot and a removable base. It avoids the most demanding cutting and gives fabric, felt, paper, or wooden trim a dependable backing. Reinforced cardboard is useful for lightweight models and trial versions. Clear front banks need a rigid frame and a securely retained transparent panel. Rounded sculpted designs are easier to manage when decoration surrounds a separate container rather than carrying the coin weight itself.
Measure the largest coin you intend to save. A slot must be longer than its diameter and wider than its thickness, with enough clearance for an easy drop after painting or covering. For example, a 35 × 4 mm opening can be a starting point for coins up to about 30 mm across and 3 mm thick, but test your actual currency and the finished opening. A chute carrying coins flat needs clearance for the full coin diameter along its entire route.
Decide how the bank will open before attaching the first decoration. Keep a removable bottom, screw cap, rear panel, or collecting drawer accessible. A decorated seam that has been glued shut can turn an otherwise useful bank into a container you must damage to empty.
Materials for the Illustrated Patchwork Cat Coin Bank
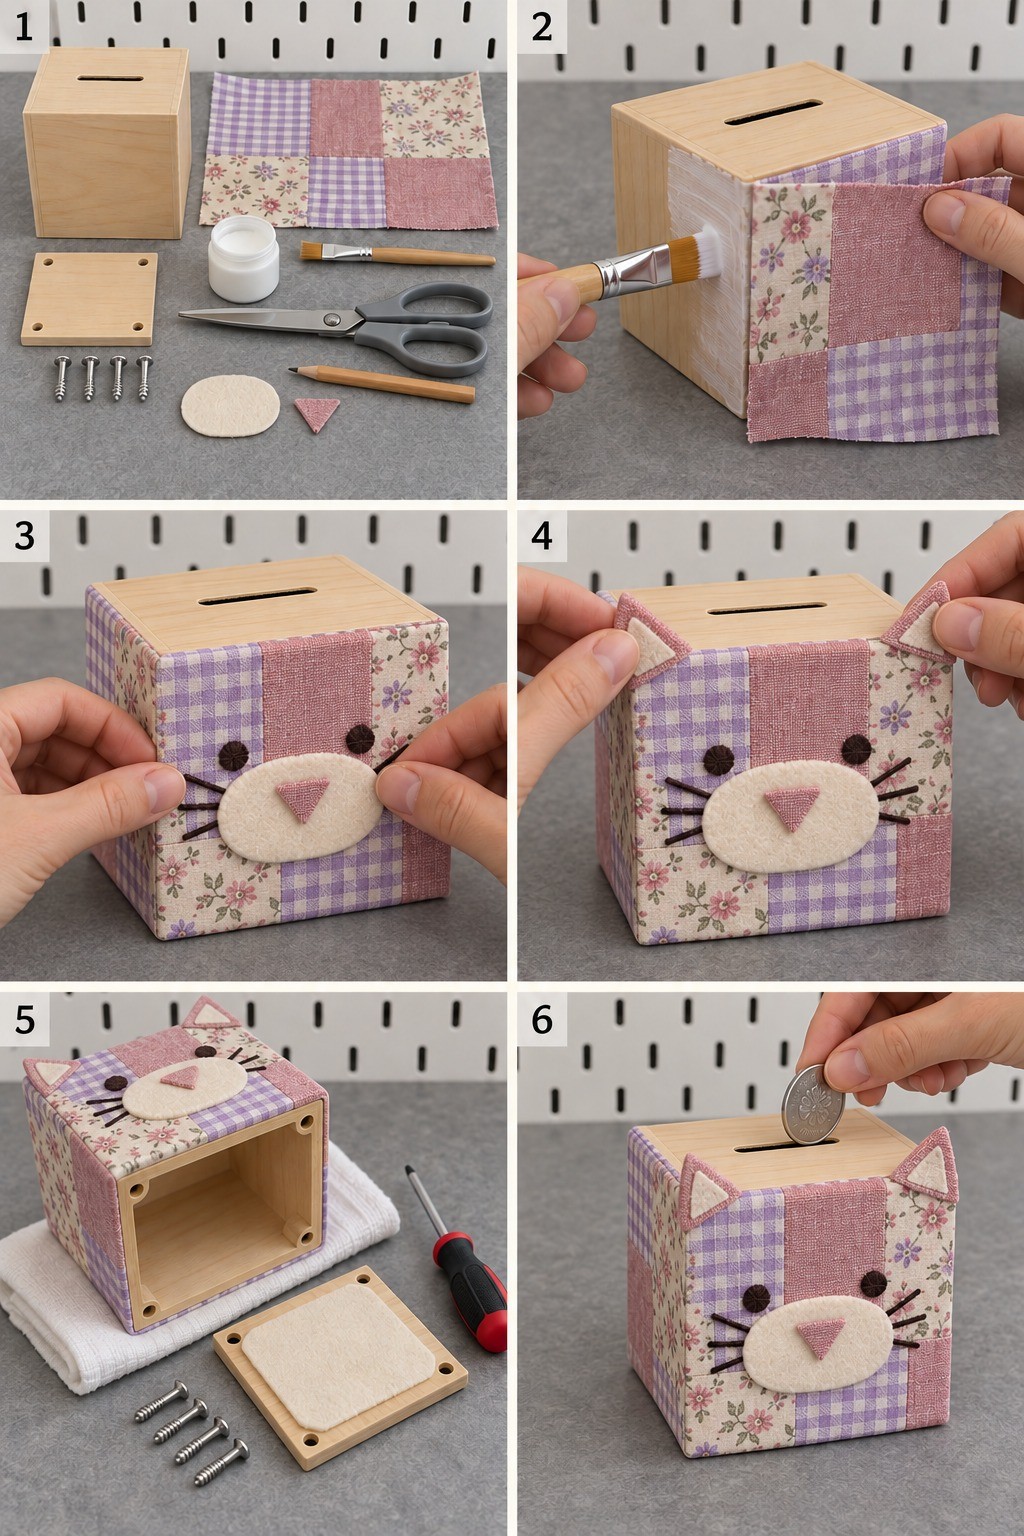
The collage uses a wooden cube with a fixed slotted top and a separate screw attached bottom. Its natural wood top stays uncovered throughout the project. Patchwork fabric decorates the four upright sides, while felt and embroidery create the face. For a similar small bank, gather the following supplies.
- An unfinished wooden cube money box, approximately 12 cm across, with a smooth coin slot and a removable bottom panel with its original four screws
- A piece of ready joined patchwork cotton, or a patchwork print, large enough to wrap the four vertical faces with a small overlap at the back
- Cream felt for an oval muzzle, inner ears, and a thin optional base liner
- Dusty rose fabric or felt for two ears and a small triangular nose
- Dark embroidery thread, a needle, fabric scissors, a ruler, and a pencil
- A thin fabric adhesive suitable for bonding the chosen cloth to wood, plus a small brush
- A screwdriver matching the supplied screws, fine abrasive paper for rough wooden edges, and a cloth to protect the finished face during assembly
- The largest and smallest coins you plan to use for the final checks
For a true 12 cm cube, a wrap about 49 cm long and 13 cm high allows a small rear overlap and narrow turned edges. Measure your own box before cutting, especially around projecting trim or a recessed bottom. Test the adhesive on spare cloth and wood first so you can check for staining, stiffness, or seepage.
How to Make the Patchwork Cat Bank in Six Stages
Follow the numbered collage from the upper left across each row. The wooden shell holds the coins; the cloth and felt supply the character. The ears sit at the front corners, clear of the slot, and the removable panel stays underneath.
1. Prepare the Wooden Box and Plan the Wrap
Remove the bottom panel and set its four screws aside. Check the box joints, smooth any rough edges, and wipe away dust. Drop a coin through the bare slot to confirm that it reaches the empty interior. Lay the patchwork around the four sides without adhesive, placing the join at the back. Mark the face position and the upper and lower edges, keeping the wood top and the bottom panel seating clear.
2. Cover the Four Vertical Sides
Embroider the eyes and whiskers onto the marked front area while the cloth is still flat. Turn narrow raw edges inward, then spread a thin, even layer of compatible adhesive over one wooden side at a time. Smooth the fabric from the center toward the edges and continue around the corners. Finish with the overlap at the rear. Keep thick folds off the bottom rim so its panel can seat correctly.
3. Attach the Muzzle and Nose
Cut a cream felt oval and a small dusty rose triangle. Stitch the nose to the oval before attaching it to the bank, then position the muzzle between the embroidered whiskers. Use a small amount of suitable adhesive on the back of the felt and press it flat against the front. Check the expression with the box upright before the bond sets.
4. Add Two Supported Ears
Make two matching triangular ears from doubled felt or fabric supported with a felt layer. Add smaller cream centers and stitch the layers together if desired. Leave a short flat attachment tab at the bottom of each ear. Fix those tabs to the vertical front corners, with the points rising just above the wood top. Keep the ears away from the coin opening and support them while the adhesive sets.
5. Refit the Removable Bottom
Once the decoration is ready to handle, rest the cat gently on a protective cloth. If you want a quieter landing surface, attach a thin felt square to the inside of the detached bottom panel, leaving its perimeter and all screw holes exposed. Refit the original panel and screws without trapping fabric in the joint. Tighten only enough to seat the panel; forcing small screws can damage the wood.
6. Let the Materials Cure and Check the Finished Bank
Allow the adhesive to reach the curing time stated on its label before adding coins. Check that the bank sits flat, the slot remains open, the ears stay attached, and the bottom can still be removed. Try the largest and smallest coins individually. If fabric catches a coin or a seam lifts during handling, correct that area before filling the bank.
Adapt the Method to Other Materials and Shapes
You can use the same sequence of planning access, preparing the shell, adding decoration, and checking the coin path for the ideas below. Change the construction where necessary: a wooden window bank needs a retained clear panel, a cardboard chute needs supported slopes, and a bottle bank needs a retrieval opening large enough for its coins. The six stage cat project is a starting method for covered boxes, rather than a cutting plan for every sculpted or curved design.
Choose glue, paint, primer, and finishes for the actual surfaces. A wood adhesive intended for bare timber is not automatically suitable for plastic, felt, or finished metal. Follow the product instructions for preparation, clamping, ventilation, and curing. For clay details, finish drying or curing before painting and attachment, using the clay maker's directions. Keep paper, fabric, plastic containers, and hardware out of any heating process unless that process specifically permits them.
Clamp work securely for cutting, use a cutting mat for cardboard, and wear appropriate eye protection when drilling or shaping rigid materials. Ask a suitably equipped maker to prepare metal slots or shaped wooden parts if those operations are outside your experience. Accumulated coins become heavy, so support the base independently of decorative feet and empty lightweight banks before their seams begin to distort.
For sculpted surface details, explore these whimsical clay decor ideas and choose a technique suited to your material.
The following 25 piggy bank ideas build on those practical choices. Pick a form that suits your tools and experience, then borrow its colors, texture, or character to make a savings bank that feels at home on your desk or shelf.
1. Repurpose a Moka Pot into a Coffee Fund Bank
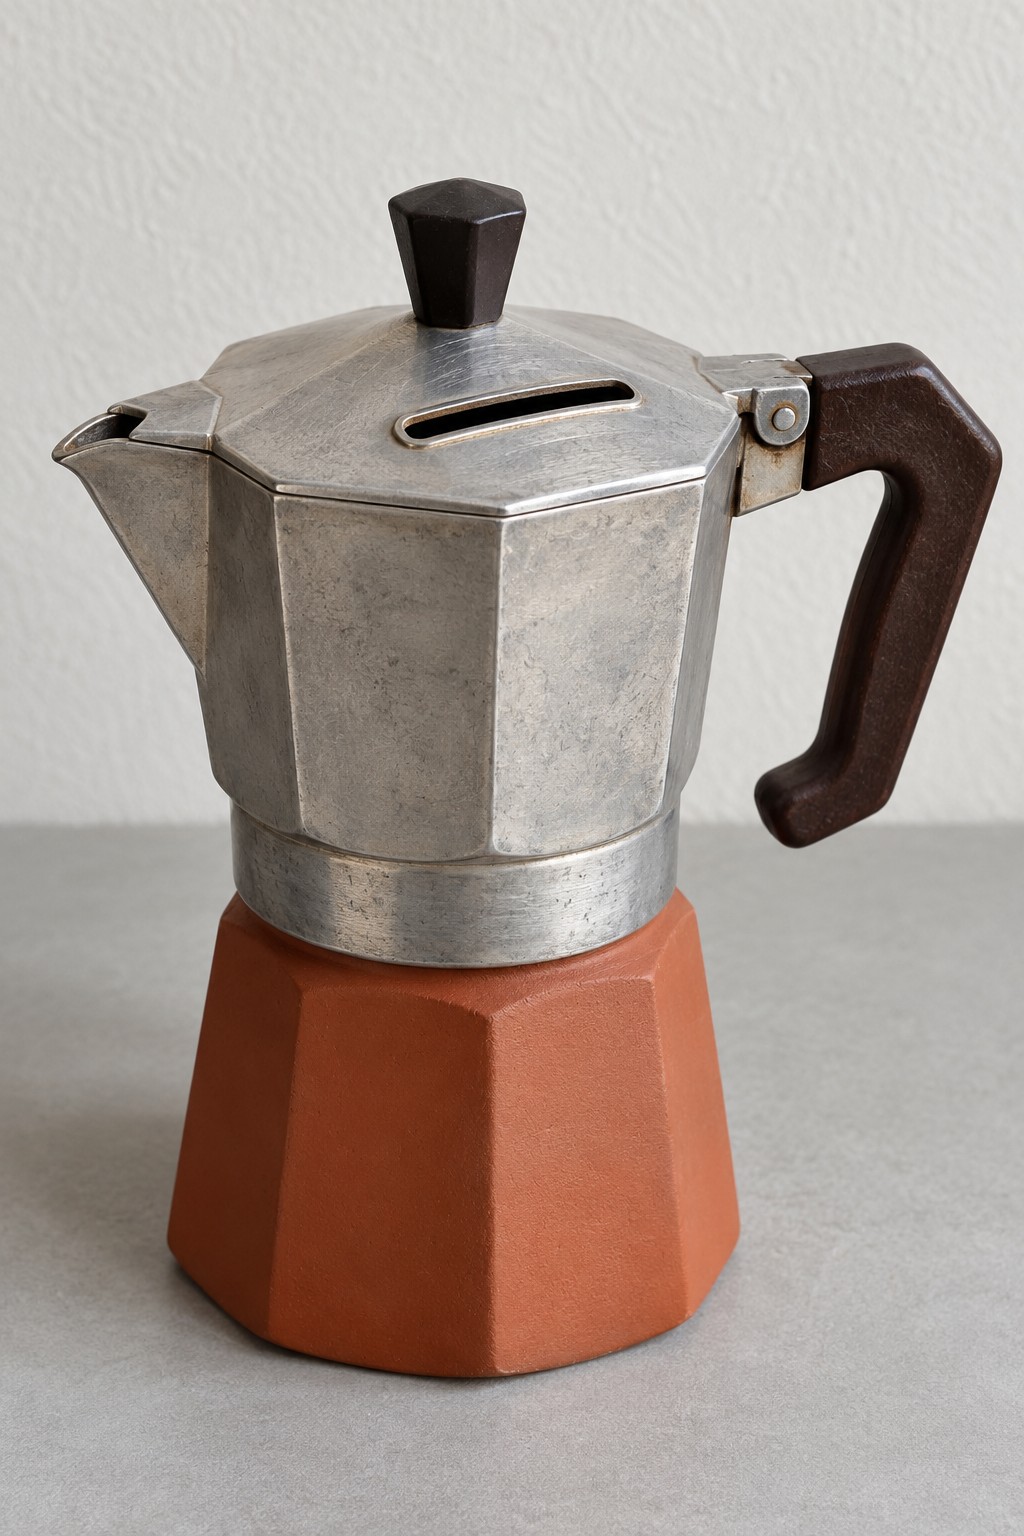
A retired moka pot gives a coffee fund a recognizable shape without needing a sculpted character. Keep the silver upper chamber and dark handle as the focal points, then use a compatible terracotta colored coating on the lower exterior. A carefully finished slot in the hinged lid provides access to the upper collecting chamber.
Use only a pot permanently retired from brewing. Have the lid slot cut and deburred with suitable metalworking tools, then check that the interior chimney does not block the drop. Retrieve coins through the opening lid, making sure they cannot become trapped around the internal parts. Do not heat the altered pot or use it for drinks again.
2. Build a Wooden Cabin Bank with a Forest Green Roof
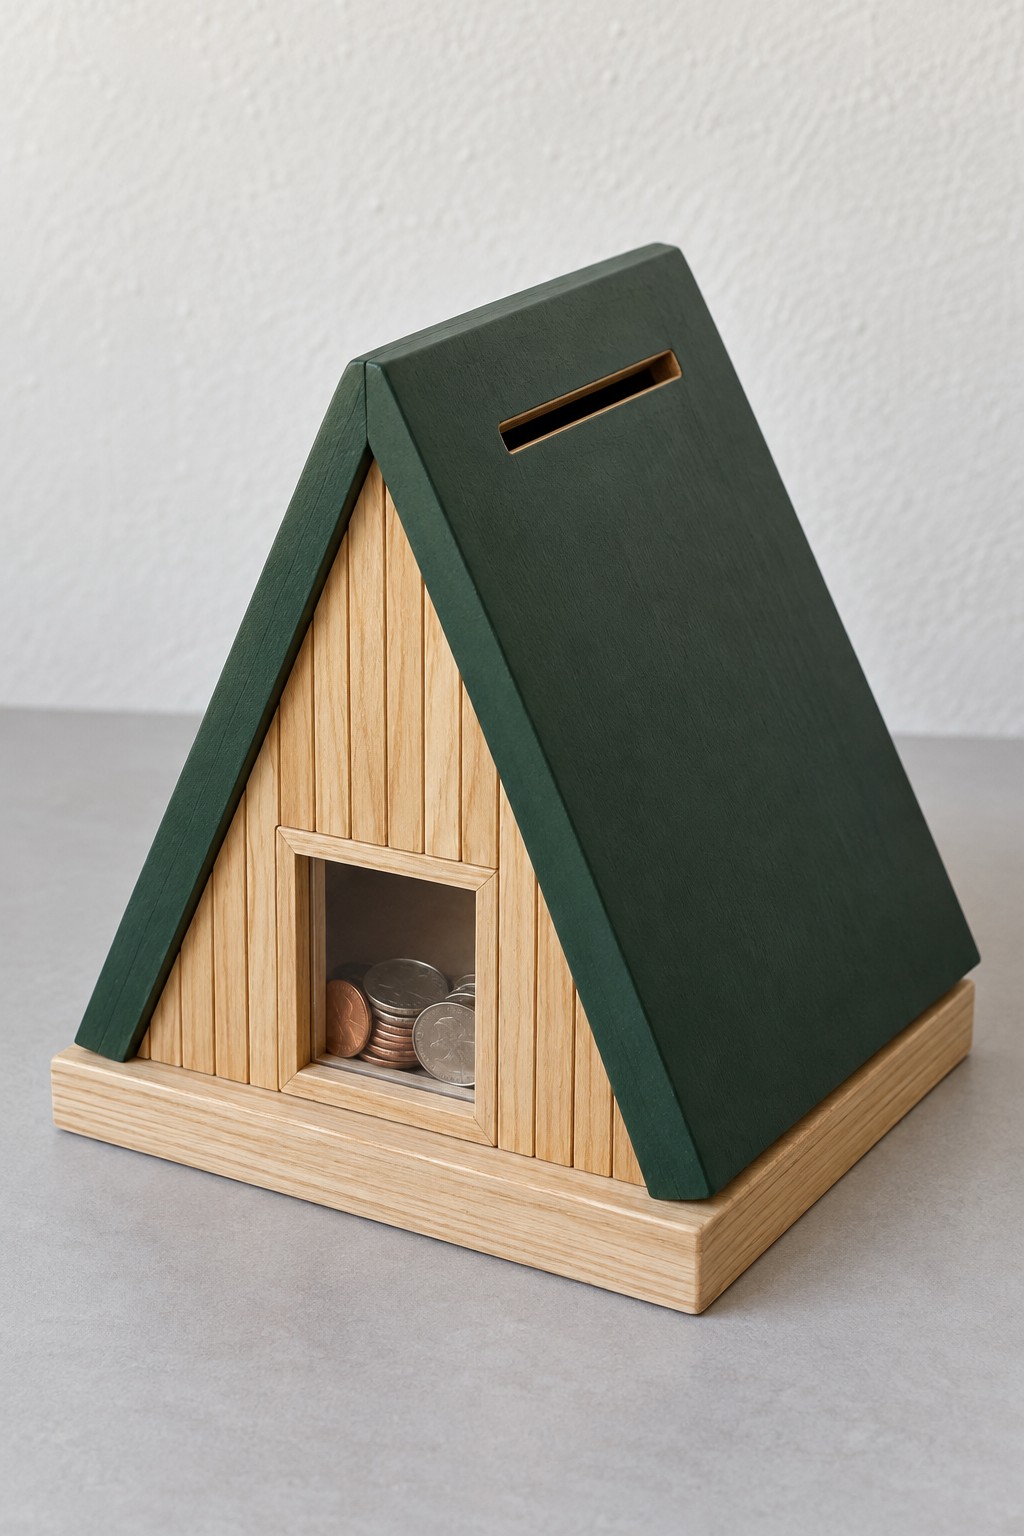
Two steep green roof panels and a pale timber front make this cabin a natural fit for a travel or future home fund. Begin with a hollow triangular wooden shell or a prepared cabin bank blank. Add narrow wooden strips to the front to suggest siding, keeping the small square viewing window clear.
Cut and smooth the roof slot before assembly, fit a retained transparent panel behind the window, and provide a screw attached rear panel for emptying. Dry fit the roof panels so their upper seam closes neatly. Paint them separately if that makes it easier to preserve the contrast between the dark roof and natural wood front.
3. Frame Your Savings in a Wooden Rain Cloud
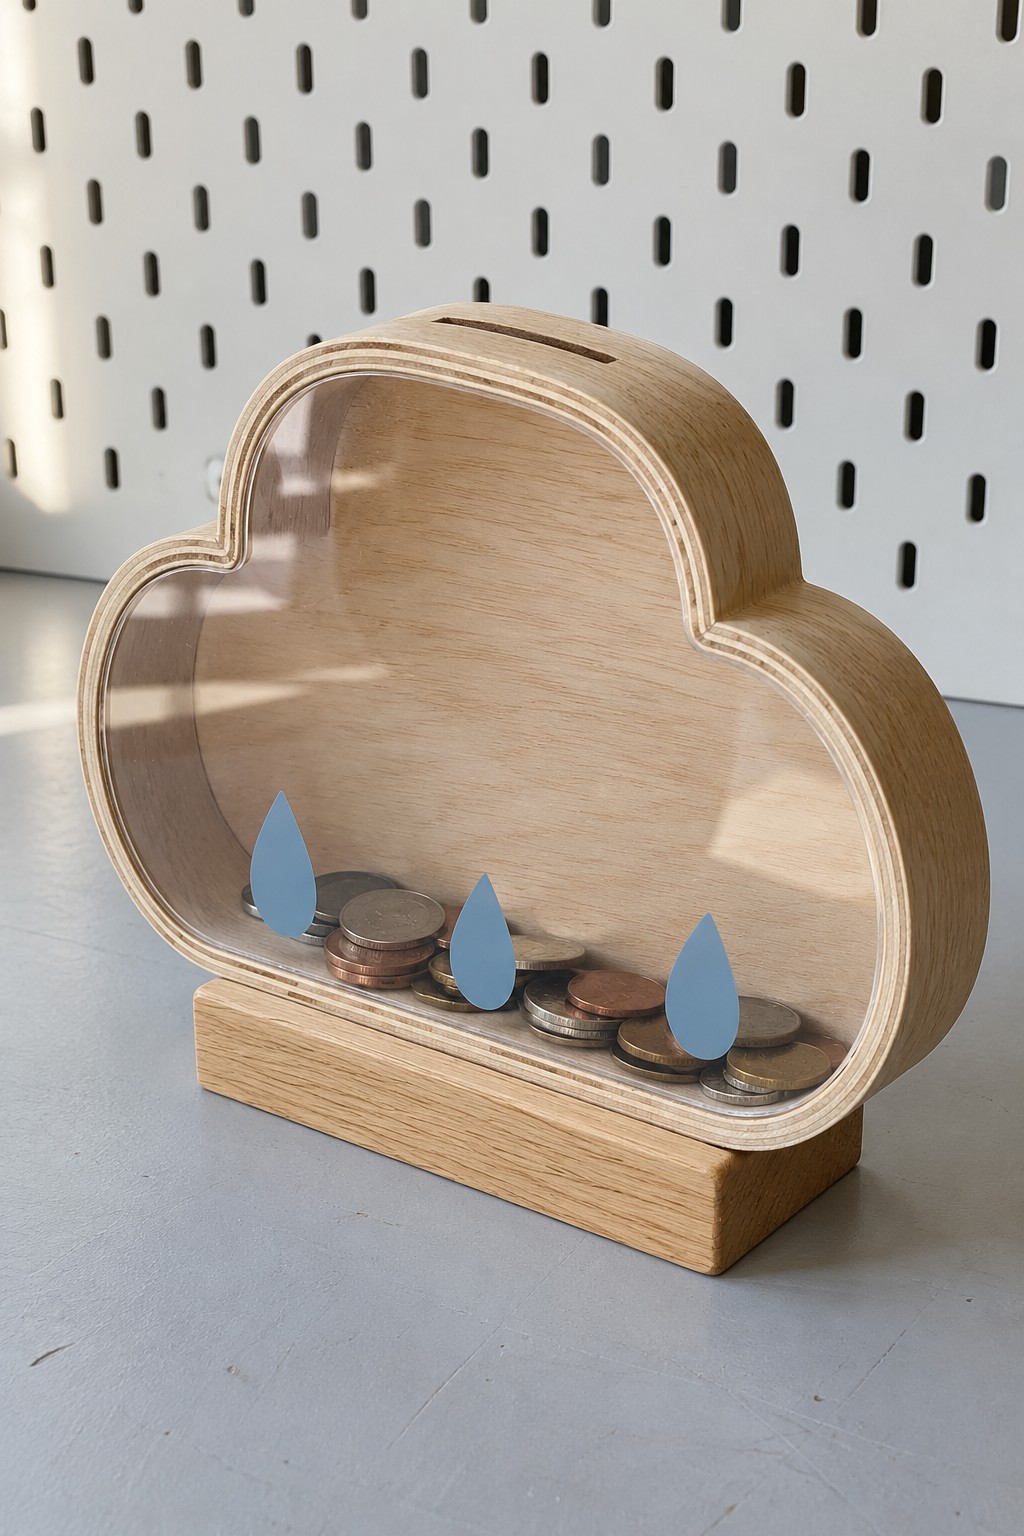
A broad cloud outline makes a clear front savings bank feel softer than an ordinary rectangular frame. Use a prepared hollow wooden cloud blank, a matching transparent front, blue adhesive vinyl or painted raindrops, and a flat wooden stand. Keep the raindrops along the lower edge so the growing collection remains easy to see.
Retain the clear panel within the frame rather than relying on a few small glue spots. Position the top slot over the hollow chamber and plan a removable rear panel. Sand the cloud curves before finishing, and secure the broad stand to the wooden shell so the bank stays upright as its contents accumulate.
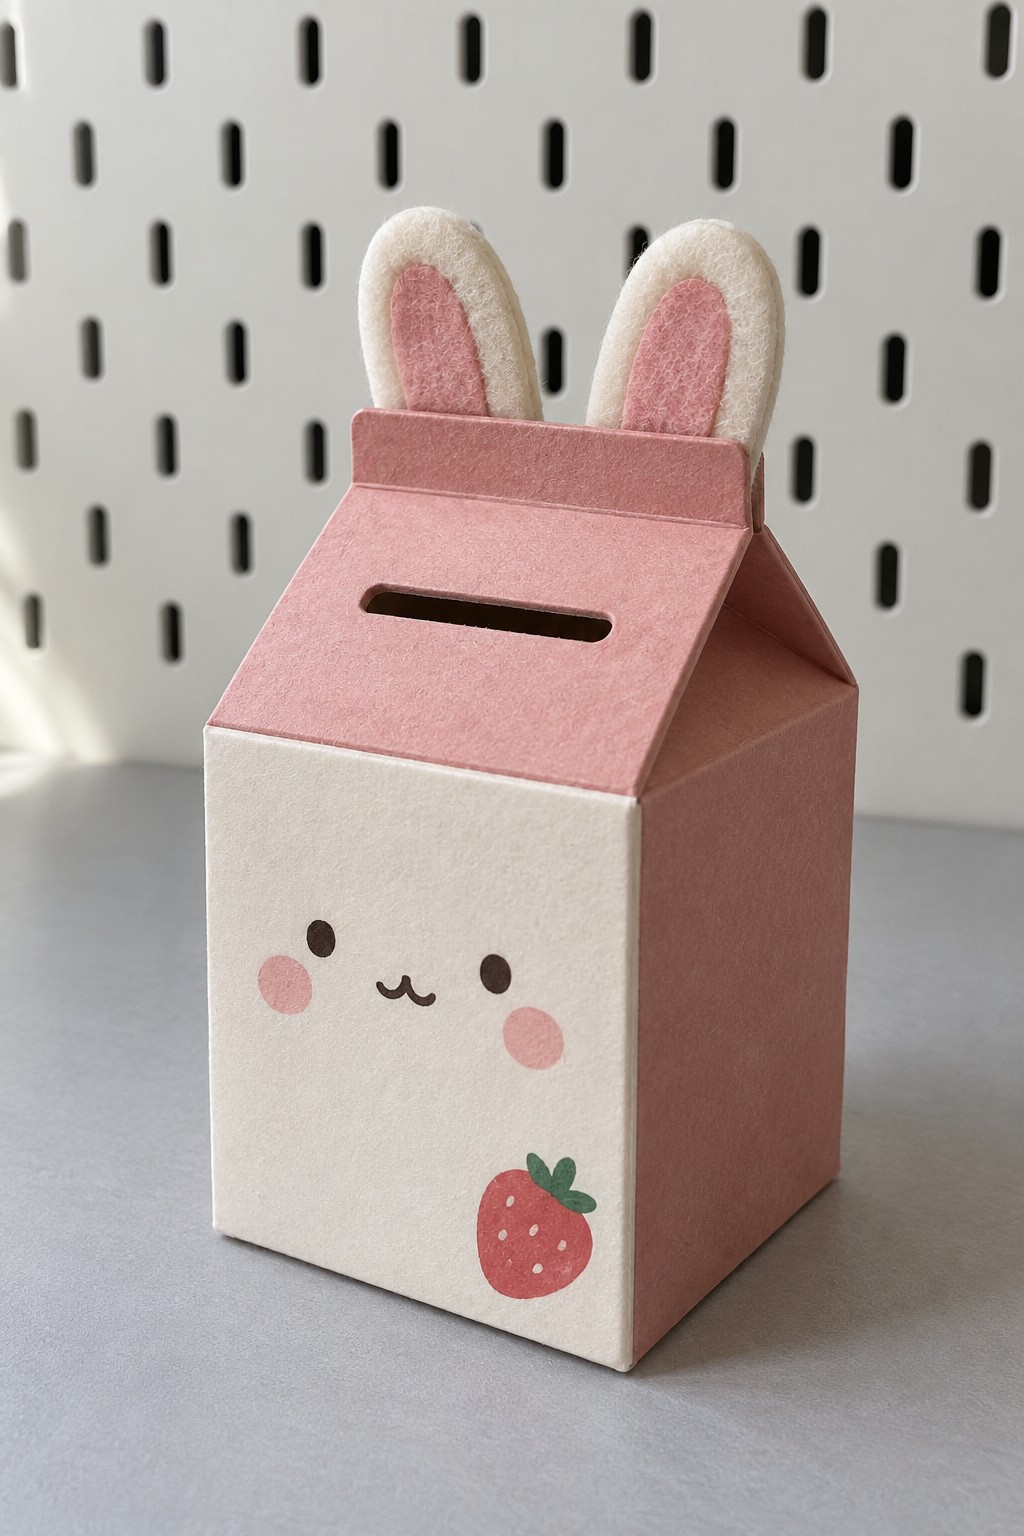
4. Fold a Strawberry Bunny Bank from Reinforced Cardboard
A carton silhouette becomes a cheerful bunny through two upright ears, a cream face, and a small strawberry accent. Make the body from clean rigid cardboard with reinforced corners and a doubled bottom. Form a pitched top from a measured template, then cut the coin slot into its forward sloping panel before covering it with pink paper.
Glue the ears to supported tabs at the rear of the folded top, away from the slot. Use paint or paper shapes for the face and strawberry. Leave one rear flap reopenable with a simple tab closure, and keep that seam free of permanent decoration. This is best treated as a compact bank that you empty regularly.
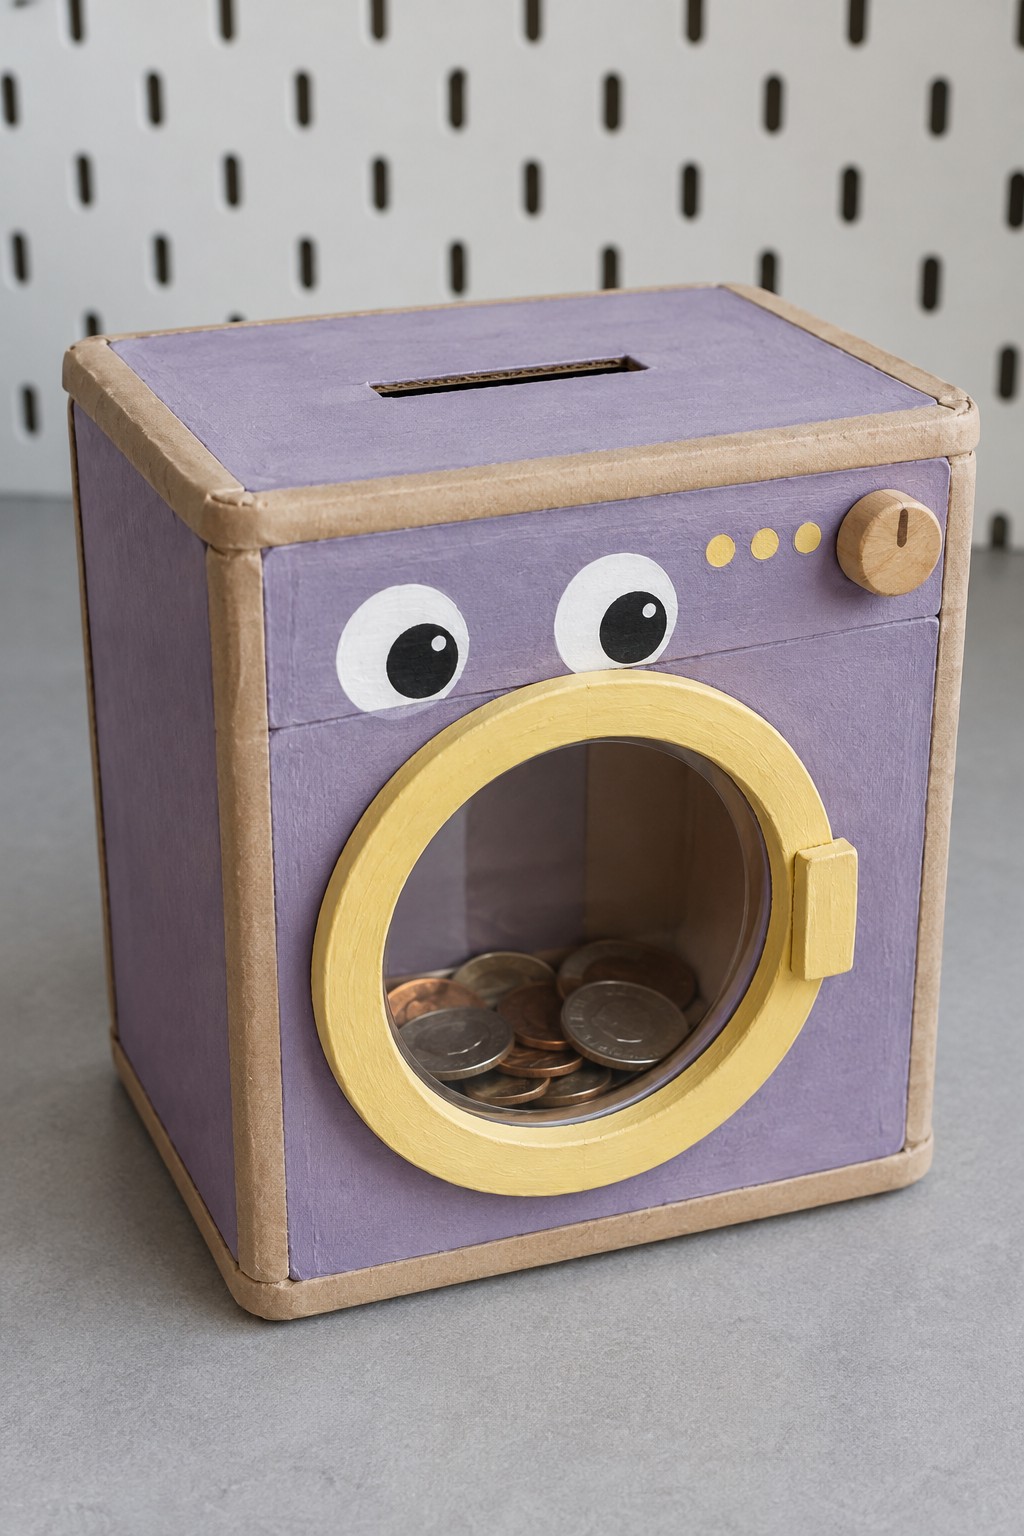
5. Make a Lavender Washing Machine Savings Box
Lavender panels and a yellow circular window give this miniature washing machine its personality. Start with a reinforced box, cut the top coin slot, and add a round front opening backed with a clear sheet. Build the yellow surround from layered card or a prepared wooden ring, then add simple eyes above the window.
The round window can stay fixed; an accessible rear flap is an easier way to retrieve coins than engineering a working circular door. Attach the small controls as decoration and keep glue off the transparent center. Reinforce the lower interior so coins land on the box base rather than pressing against the window joint.
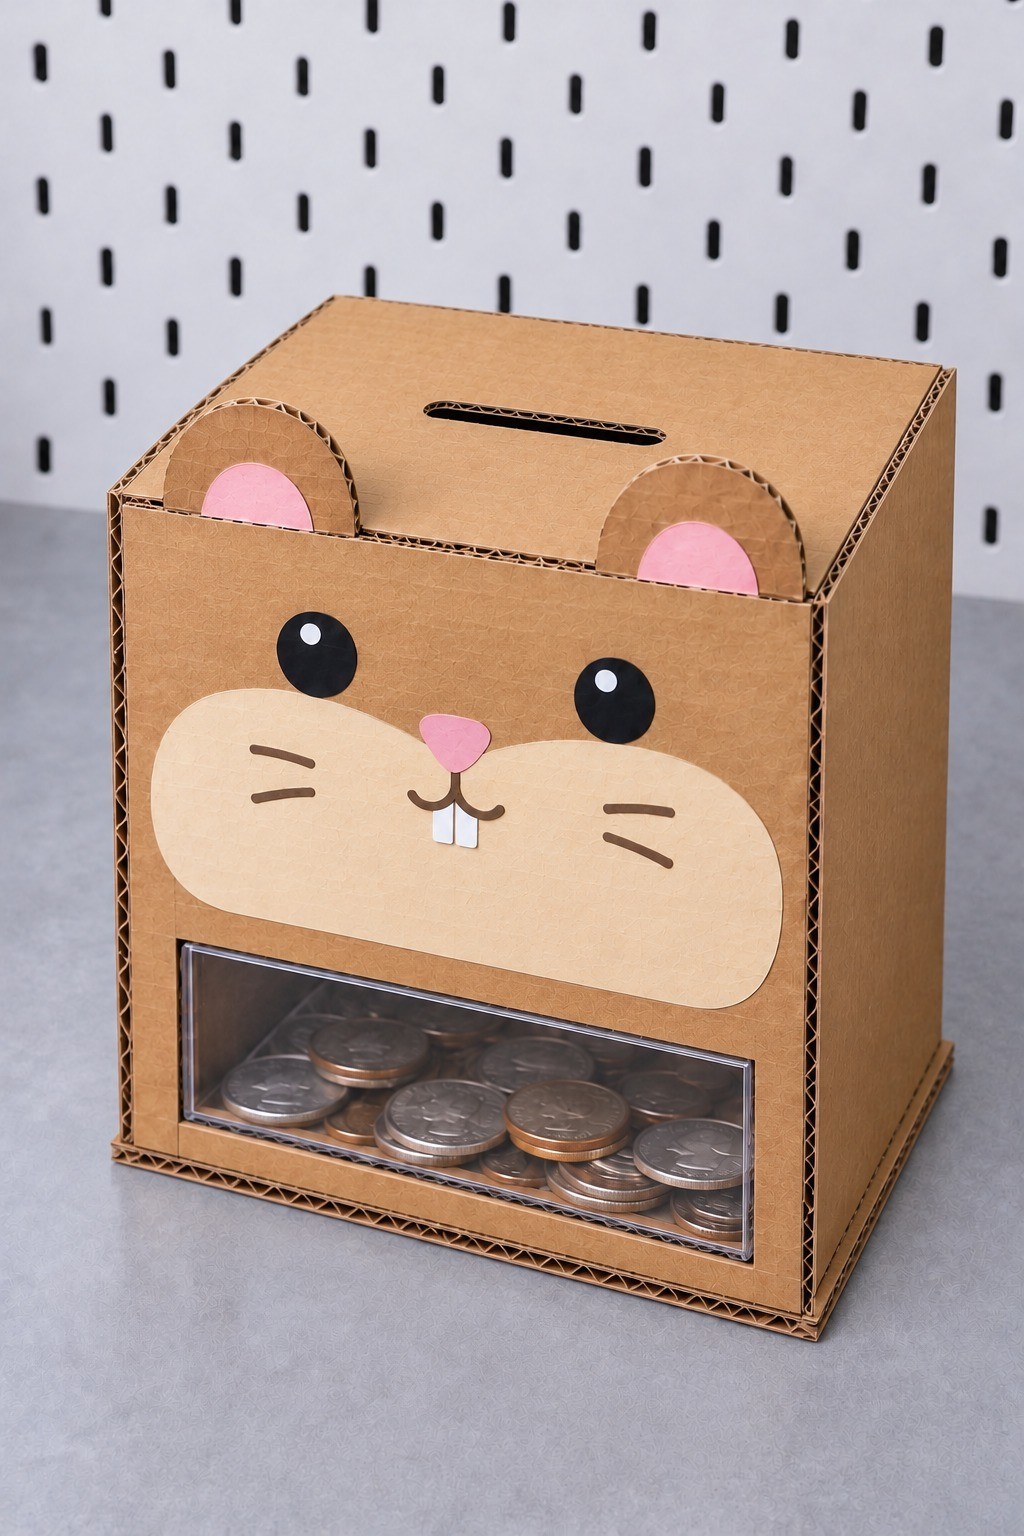
6. Make a Cardboard Hamster Bank with a Clear Coin Drawer
A simple enclosed box becomes a hamster bank with cream paper cheeks, pink inner ears, a small nose, and two white teeth. Use clean rigid cardboard, reinforce the corners and bottom, then cut a smooth coin slot in the flat top before closing the shell. Keep the face flat against the front so the decoration does not interfere with handling.
Fit a shallow removable collecting drawer at the bottom and retain a clear sheet behind its front window. The drawer base should carry the coins, with the transparent panel serving only as a viewing window. Leave the route from the top slot to the drawer open, provide a discreet finger recess or pull for retrieval, and test the largest intended coin before decorating the slot edges.
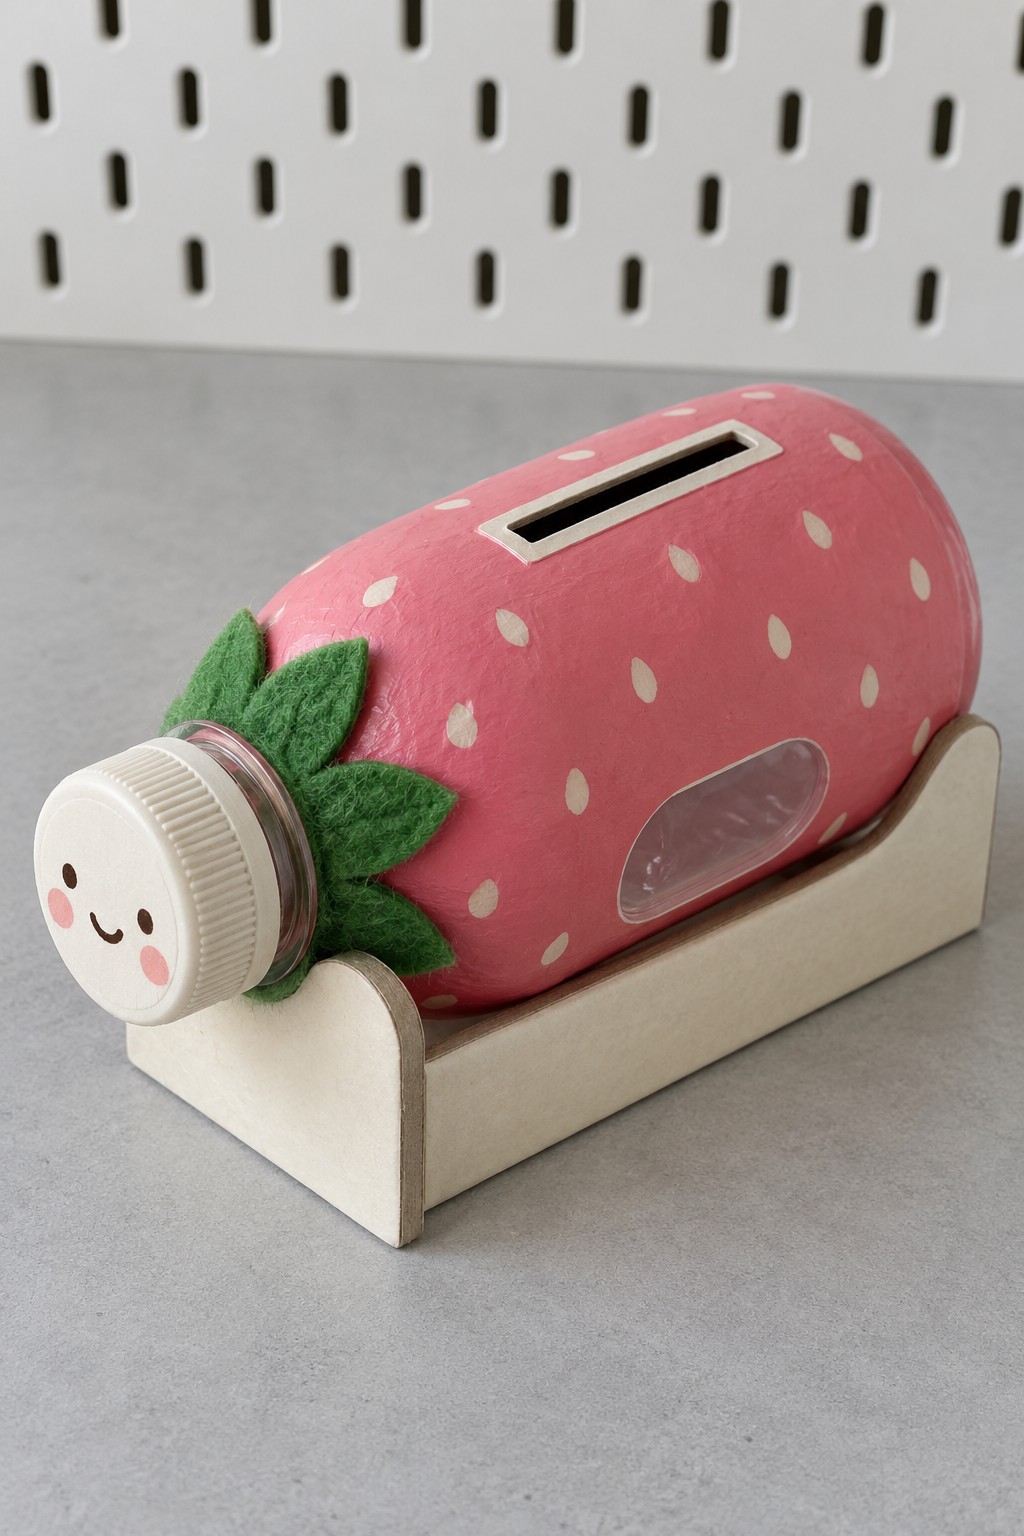
7. Turn a Wide Neck Bottle into a Strawberry Bank
A rounded plastic bottle can become a strawberry bank with pink paint, cream seed marks, green felt leaves, and a smiling screw cap. Choose a thoroughly cleaned bottle whose neck is wide enough to release every coin you intend to save. Mount it horizontally in a simple cradle so the top slot remains upright.
Prepare the plastic with a coating system suited to it, then add a smooth reinforced slot and leave a small side area transparent if you want a viewing window. Keep leaves clear of the cap threads. Make the cradle from two curved end supports joined by a bottom strip, and secure the bottle without preventing cap removal.
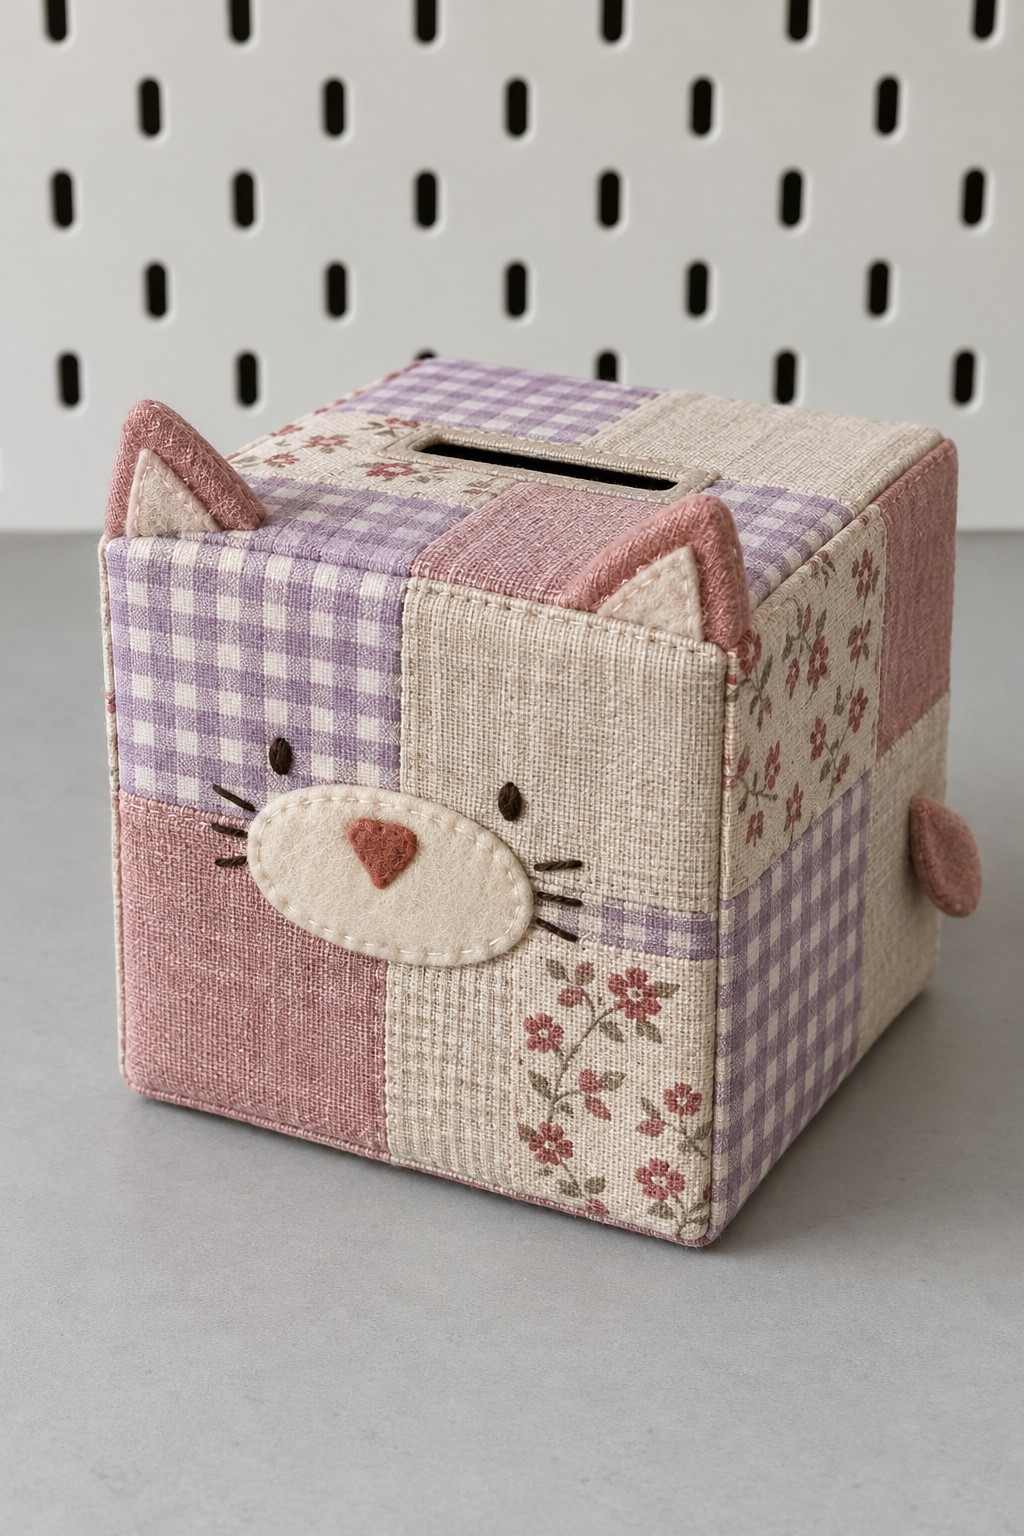
8. Cover a Cat Bank with Soft Patchwork Fabric
Lavender checks, faded rose fabric, and small floral sections give this cat bank a textile character. Use the illustrated wooden box method, arranging the patchwork so the face sits on a relatively quiet area. Add the cream felt muzzle, embroidered whiskers, triangular ears, and an optional short fabric tail fixed at the back.
For the fully covered top variation, prepare its fabric panel separately and turn a narrow allowance into the existing slot before attaching it. Avoid bulky joins near the opening and keep the removable bottom uncovered. You can also leave the wood top exposed, as in the tutorial, for a simpler finish that is easier to keep clear.
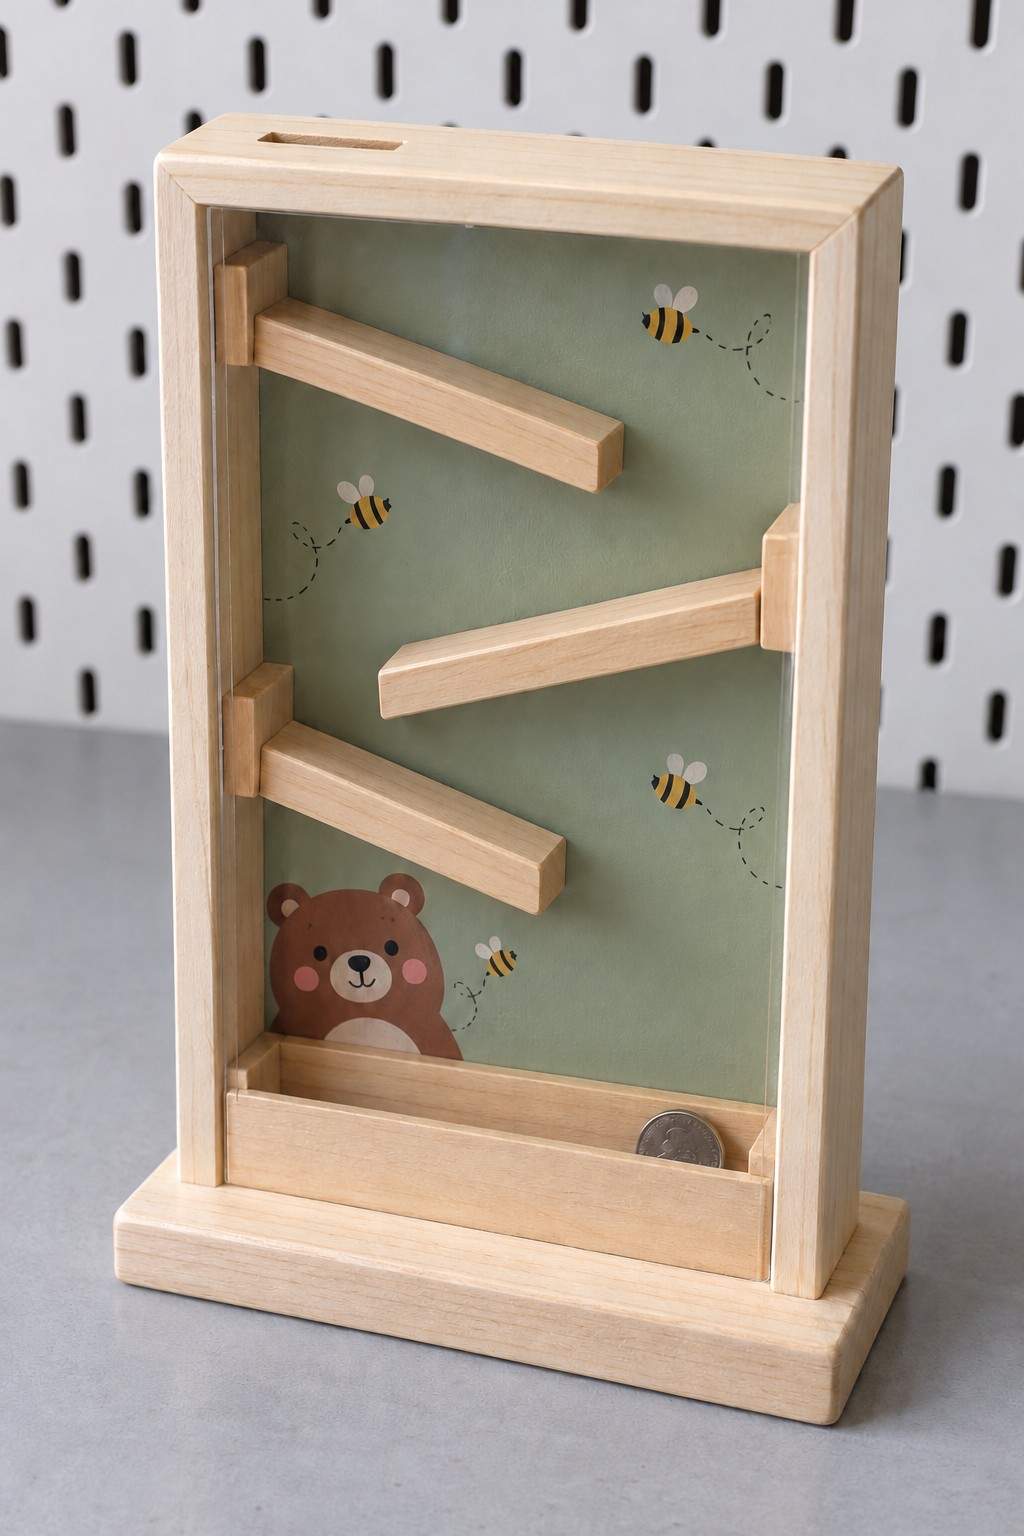
9. Create a Bear and Bee Coin Run in a Wooden Frame
Three alternating wooden ramps turn a tall savings frame into a visible coin run. Use a deep wooden shadow box, a transparent front, smooth narrow timber strips, and a painted backing with bees and a small bear. Position the entry slot above the first ramp, with each ramp dropping toward the start of the next.
Build a trial layout before attaching the strips. The chamber depth must let a coin roll on its edge without falling behind the ramps, while each end gap must release it cleanly onto the next level. Test different coin sizes with the clear front temporarily retained, then secure the ramps and leave the back removable for clearing jams and emptying.
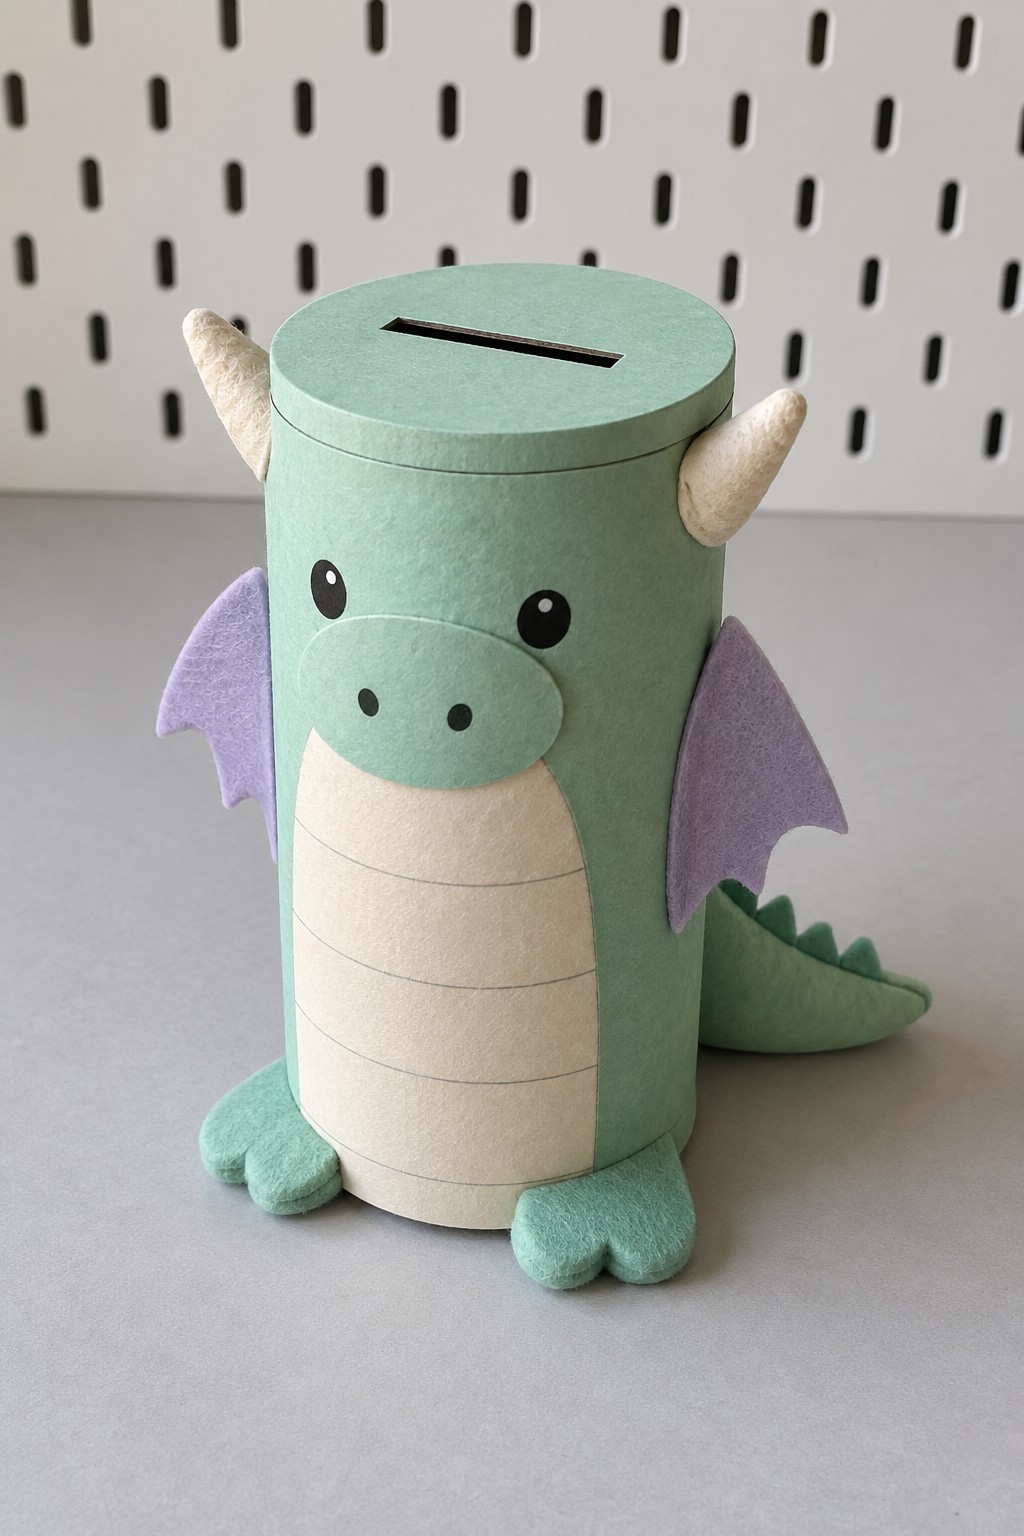
10. Dress a Lidded Cylinder as a Mint Dragon
A lidded cylinder provides a straightforward core for this mint dragon. Paint the container green, add a cream segmented belly, and make lavender wings from felt or sturdy card. Small rounded horns, broad feet, and a short tail establish the character without needing a heavy solid sculpture.
Place the coin slot in the removable lid before decorating it. Attach the wings and tail to the body rather than across the lid seam, and let the cylinder base carry the coin weight. Felt or lightweight clay can supply the raised details; if using clay, dry or cure it as directed before attaching it to the finished container.
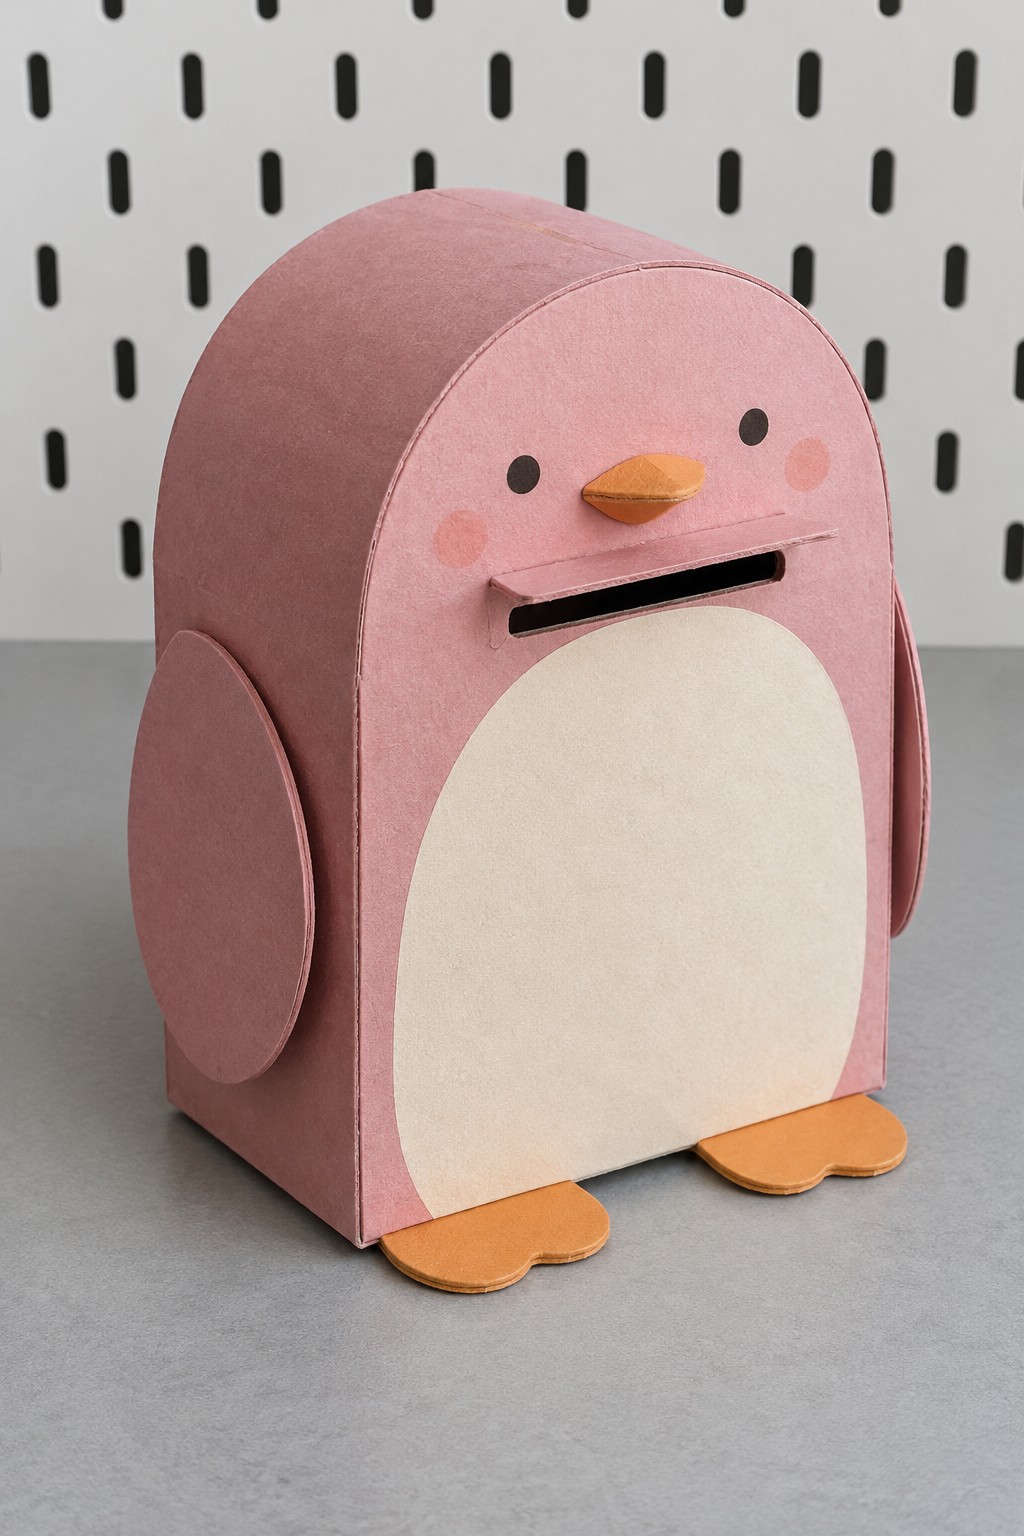
11. Shape a Pink Penguin Bank with a Beak Above the Slot
A rounded pink silhouette, cream belly, and short orange beak make this penguin easy to recognize. Begin with a hollow bank blank, or build a small rigid box and attach a shaped front panel. Paint the body before adding separate side wings and broad flat feet.
The horizontal front opening sits below the beak, so reserve enough room for a coin to enter vertically without catching its upper edge. Keep the beak shallow and the belly decoration beneath the slot. Provide a removable rear panel or base, and support the bank on its main bottom surface rather than on thin decorative toes.
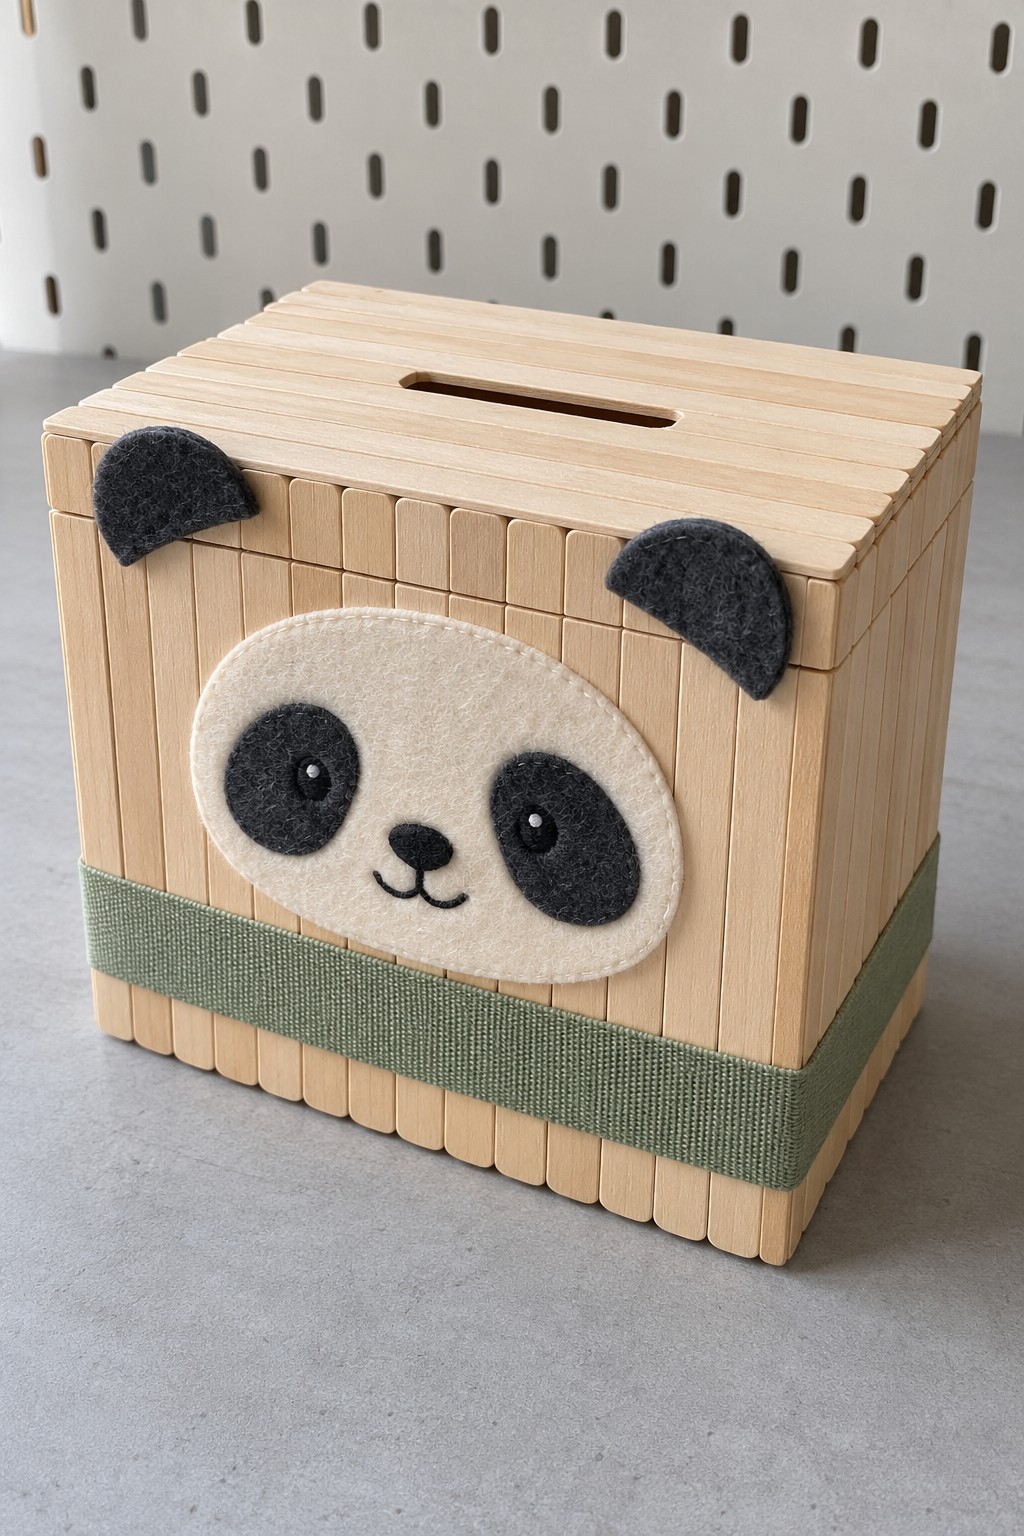
12. Add a Panda Face to a Wood Slat Savings Box
Narrow wooden slats give this panda bank a warm surface that works with a restrained black, cream, and sage palette. Cover the outside of a sound wooden money box with evenly spaced craft slats, trimming them so they sit flush with the box edges. Keep the slotted top accessible.
Build the face from cream and black felt, then add small ears near the upper corners and a sage band around the lower body. The slats are cladding, so attach them to the shell rather than expecting them to form a freestanding container. Leave the original retrieval panel and any screws exposed for future use.
13. Build a Blue Mouse Piano Coin Bank
A rectangular bank becomes a tiny upright piano when you add a shallow keyboard ledge and two front supports. Use a wooden money box or a reinforced card shell, painted muted blue. A printed or hand painted strip creates the black and white keys without introducing unnecessary moving parts.
Add rounded mouse ears above the corners and paint a small face on the upper front. Keep the keyboard ledge below the collection chamber and the top slot clear. A removable back is useful here because the front is decorative. Support the ledge securely, and treat both the keys and the ears as ornament rather than operating mechanisms.

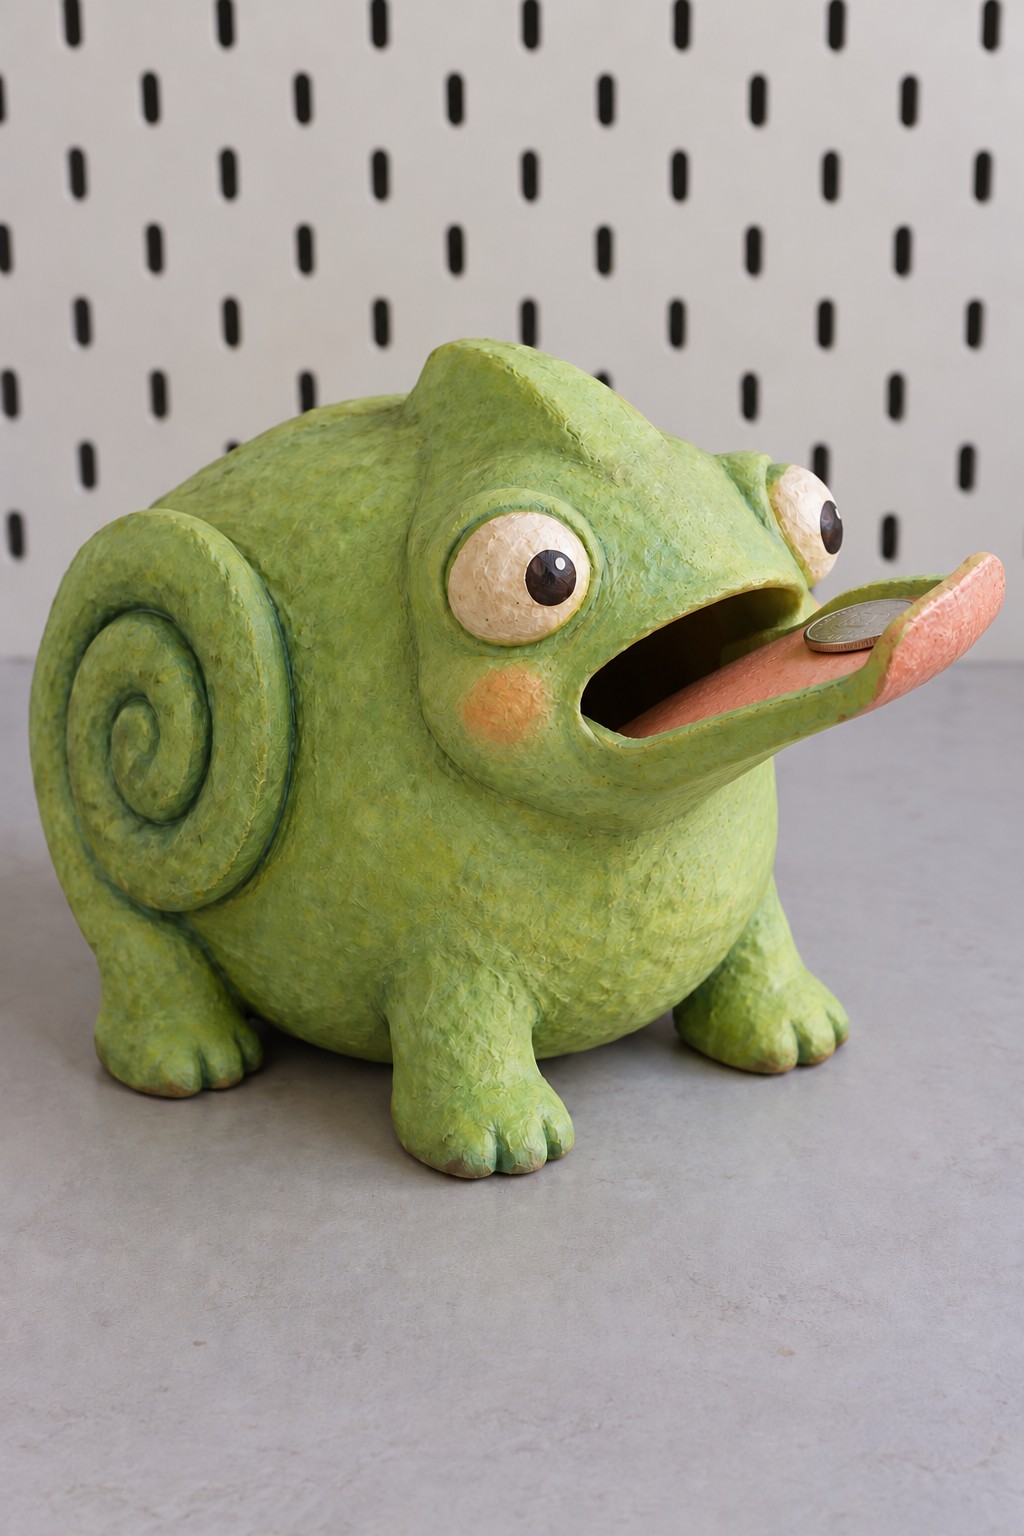
14. Sculpt a Chameleon Bank Around a Hollow Core
Raised eyes, a spiral tail, and a pink tongue give this chameleon a lively expression. Use a lightweight hollow papier mache bank core or a rigid container with a suitably positioned front opening. Build the rounded body and tail as light decorative forms rather than filling them with solid clay.
Fit the tongue as a short smooth chute that leads into the open mouth, leaving clearance for a coin to pass flat. Prepare its route before adding the cheeks and eyes. Keep a rear or bottom access panel available, let every layer dry thoroughly, and apply green paint in varied tones to emphasize the texture without narrowing the entrance.
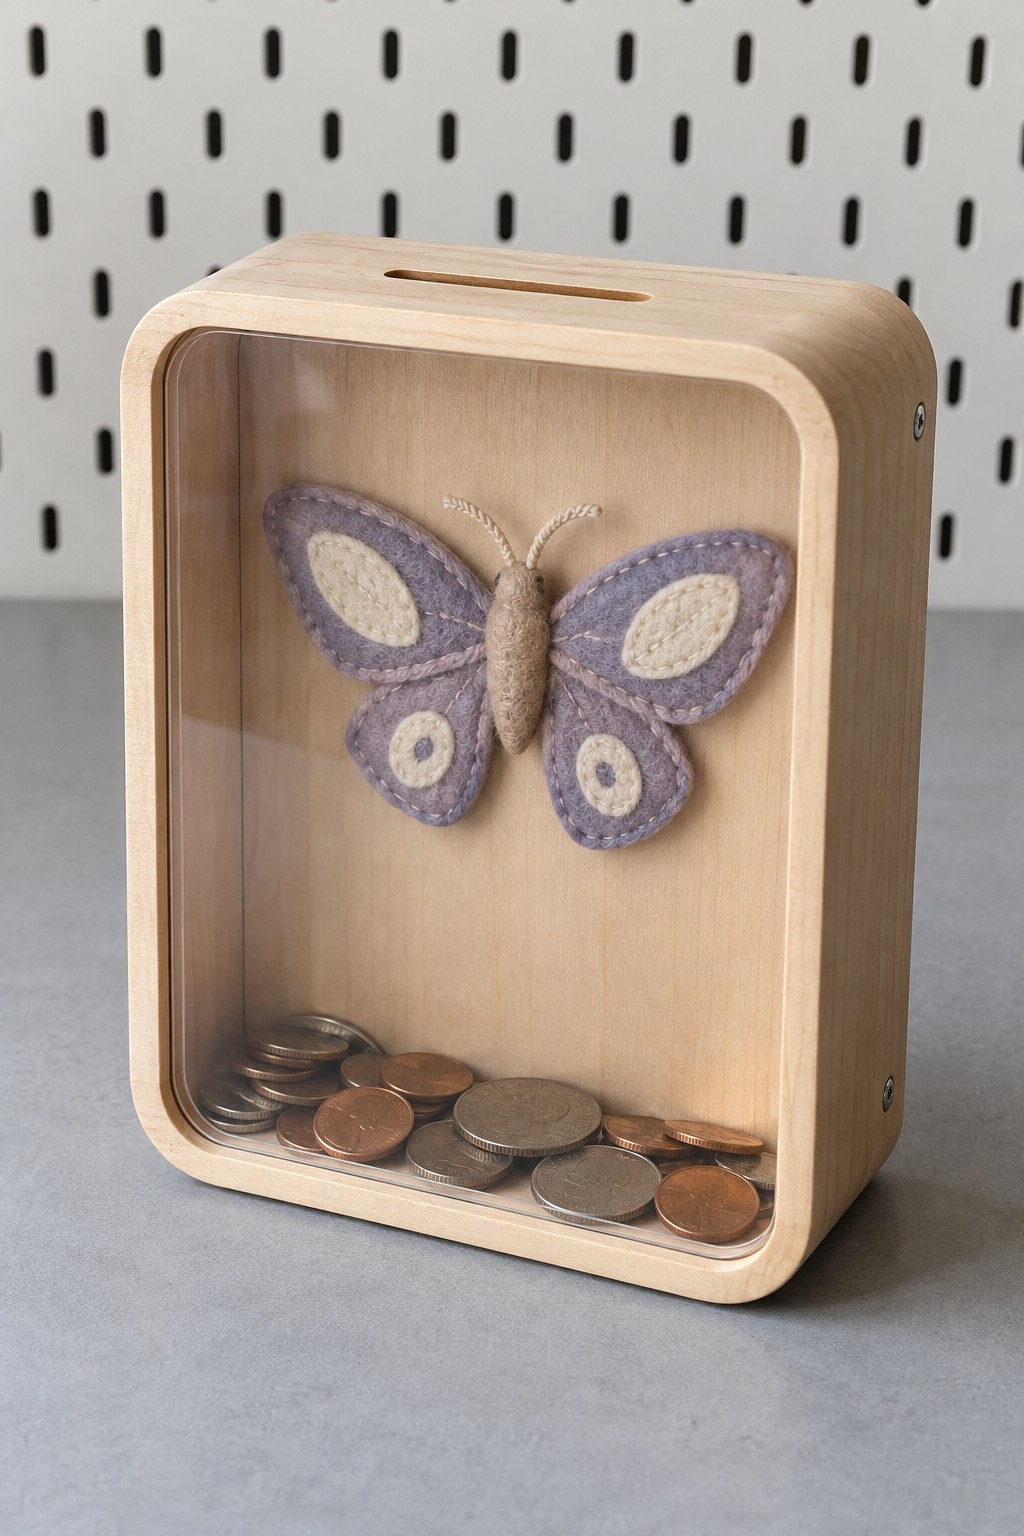
15. Place a Felt Butterfly inside a Clear Savings Frame
A stitched butterfly makes a simple savings frame feel personal without covering the coins. Choose a deep wooden bank frame with a top slot and a removable rear panel. Stitch lavender and cream felt wings, a narrow body, and short thread antennae before attaching the finished motif high on the backing.
Leave the space directly below the slot and the lower collection area unobstructed. A shallow felt motif works better than a thick stuffed butterfly that intrudes into the coin path. Fit the transparent front securely and keep the rear accessible so you can change the backing or remove coins without disturbing the stitching.
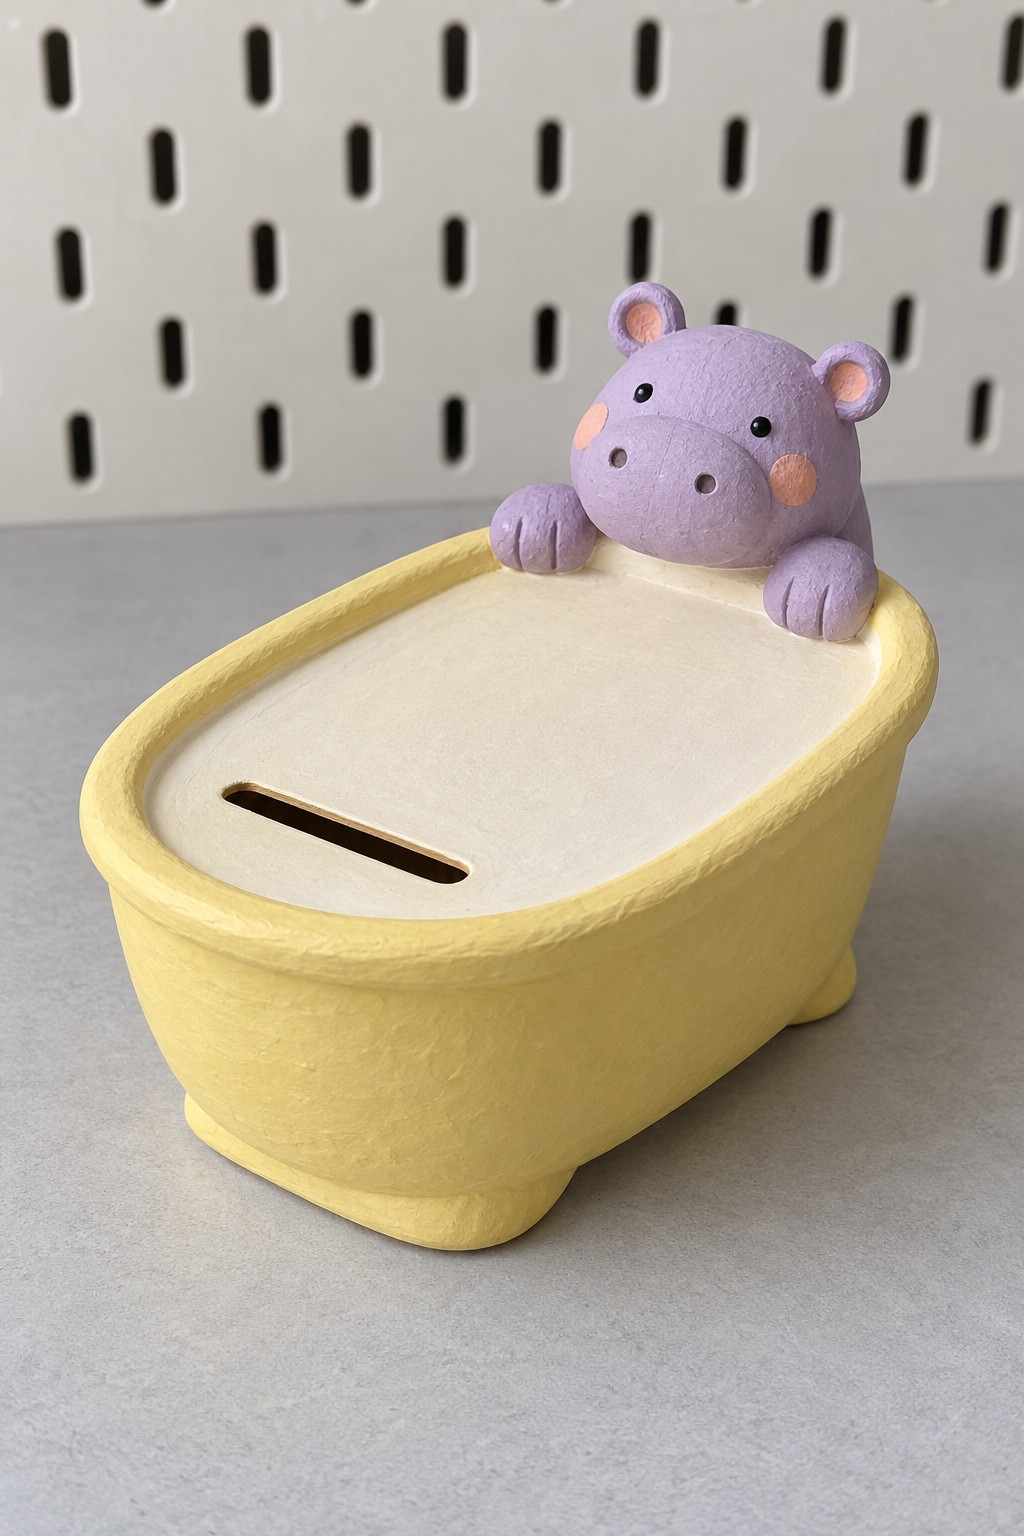
16. Make a Hippo Bathtub Bank with an Oval Container
An oval lidded container is the starting point for this yellow bathtub bank. Paint its sides warm yellow and keep the lid cream, then create a coin slot near the front. A small purple hippo head and two paws at the rear suggest a character peeking over the rim.
Use lightweight sculpted details and attach the hippo to one component only, so it does not glue the lid shut. A broad existing container base is more dependable than four tiny decorative feet. Check that the lid remains easy to lift after painting, and finish the object for dry indoor use rather than putting water inside the bathtub shape.
17. Sew a Sleepy Knit Cover for a Bottle Shaped Bank
A dusty blue knitted cover gives a rigid bottle shaped bank a softer bedside presence. Start with a suitable existing coin bank shell rather than a flexible bag. Knit a fitted sleeve, or adapt a sound piece of old knitwear, adding a cream ribbed collar and embroidered closed eyes with pink cheeks.
Finish the knitted opening with secure stitches or a worked buttonhole that aligns exactly with the shell's coin slot. Do not simply cut across loose knitting. Leave the cover removable and keep its collar clear of the retrieval cap or stopper. This decorative bank stays dry and unheated, regardless of its hot water bottle appearance.
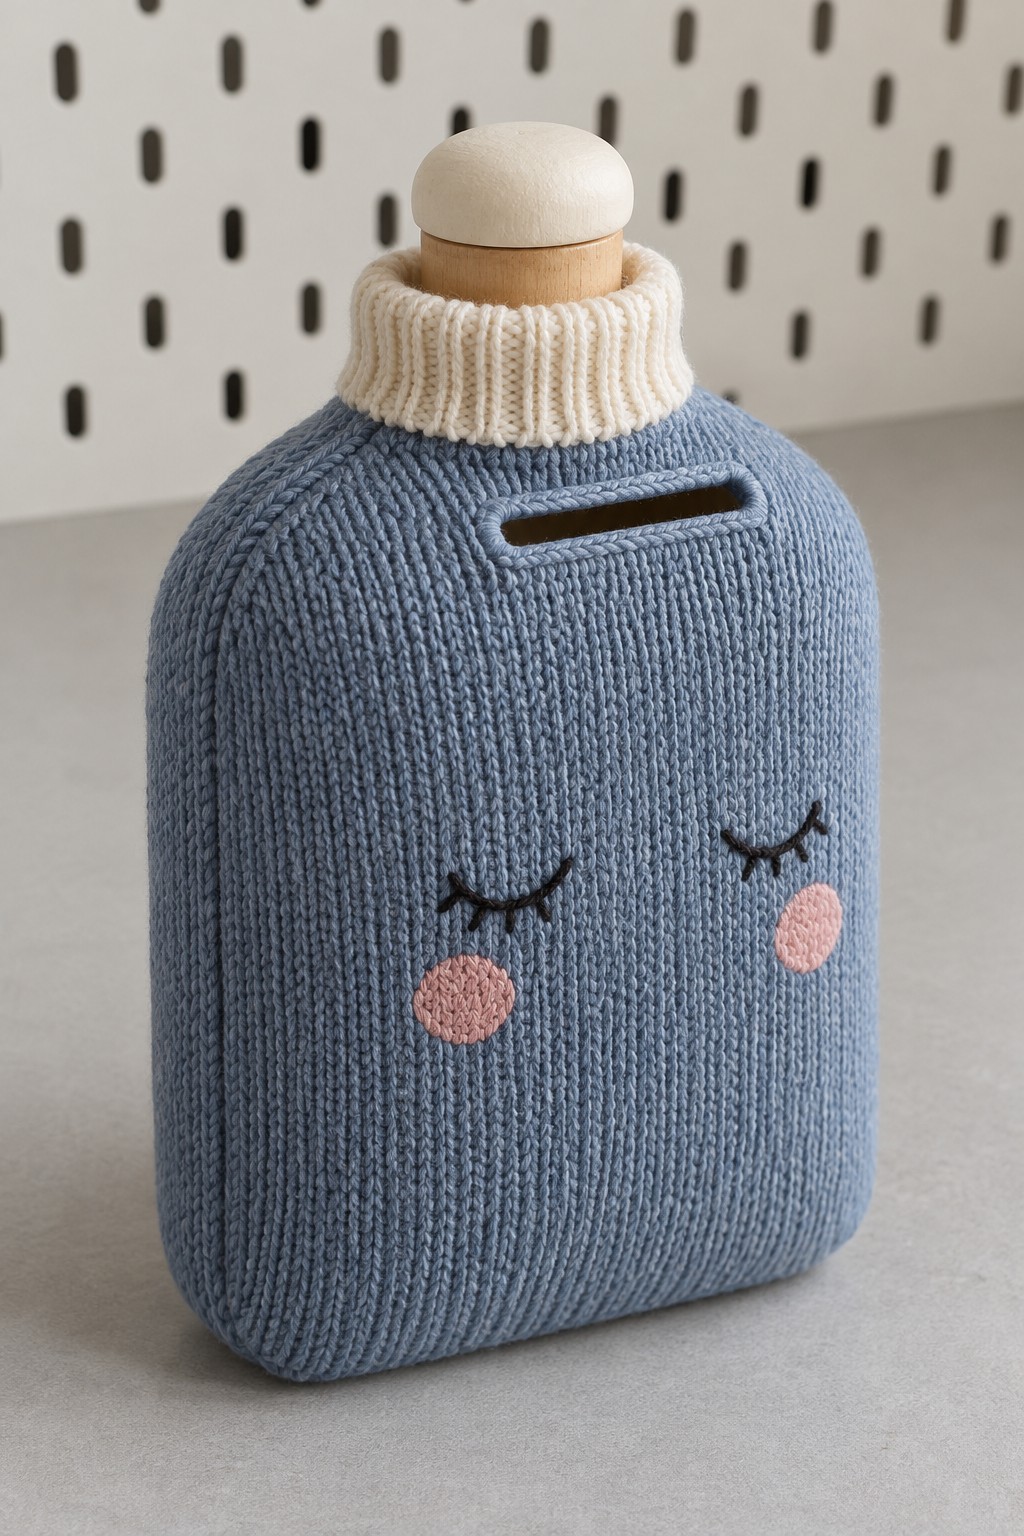
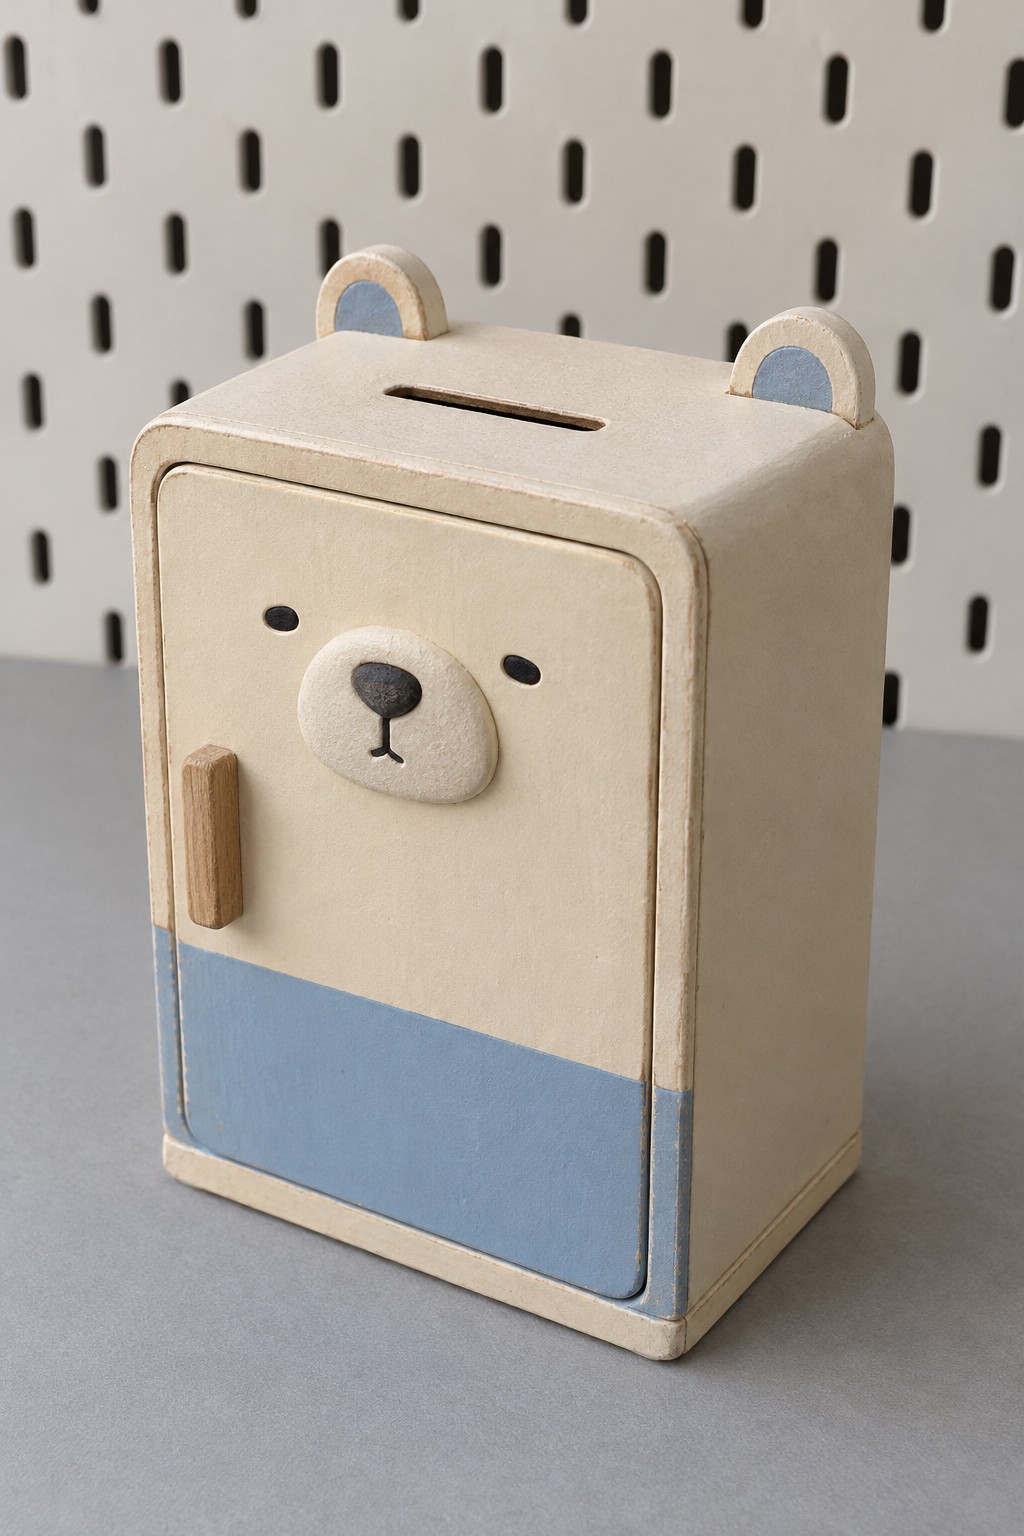
18. Turn a Small Box into a Polar Bear Refrigerator
Cream paint, a pale blue lower panel, and two small ears transform a narrow cabinet style box into a polar bear refrigerator. Use a rigid shell with a working front door, then add a smooth top slot. A small wooden handle and a shallow round muzzle create the appliance and animal details together.
Keep the door's working clearance while painting and add a simple catch if the box needs help staying closed. Mask the hinge and latch areas instead of filling them with thick paint. The front door provides the retrieval route, so do not attach the muzzle or color panels across its seam. No cooling components or electrical parts are needed.
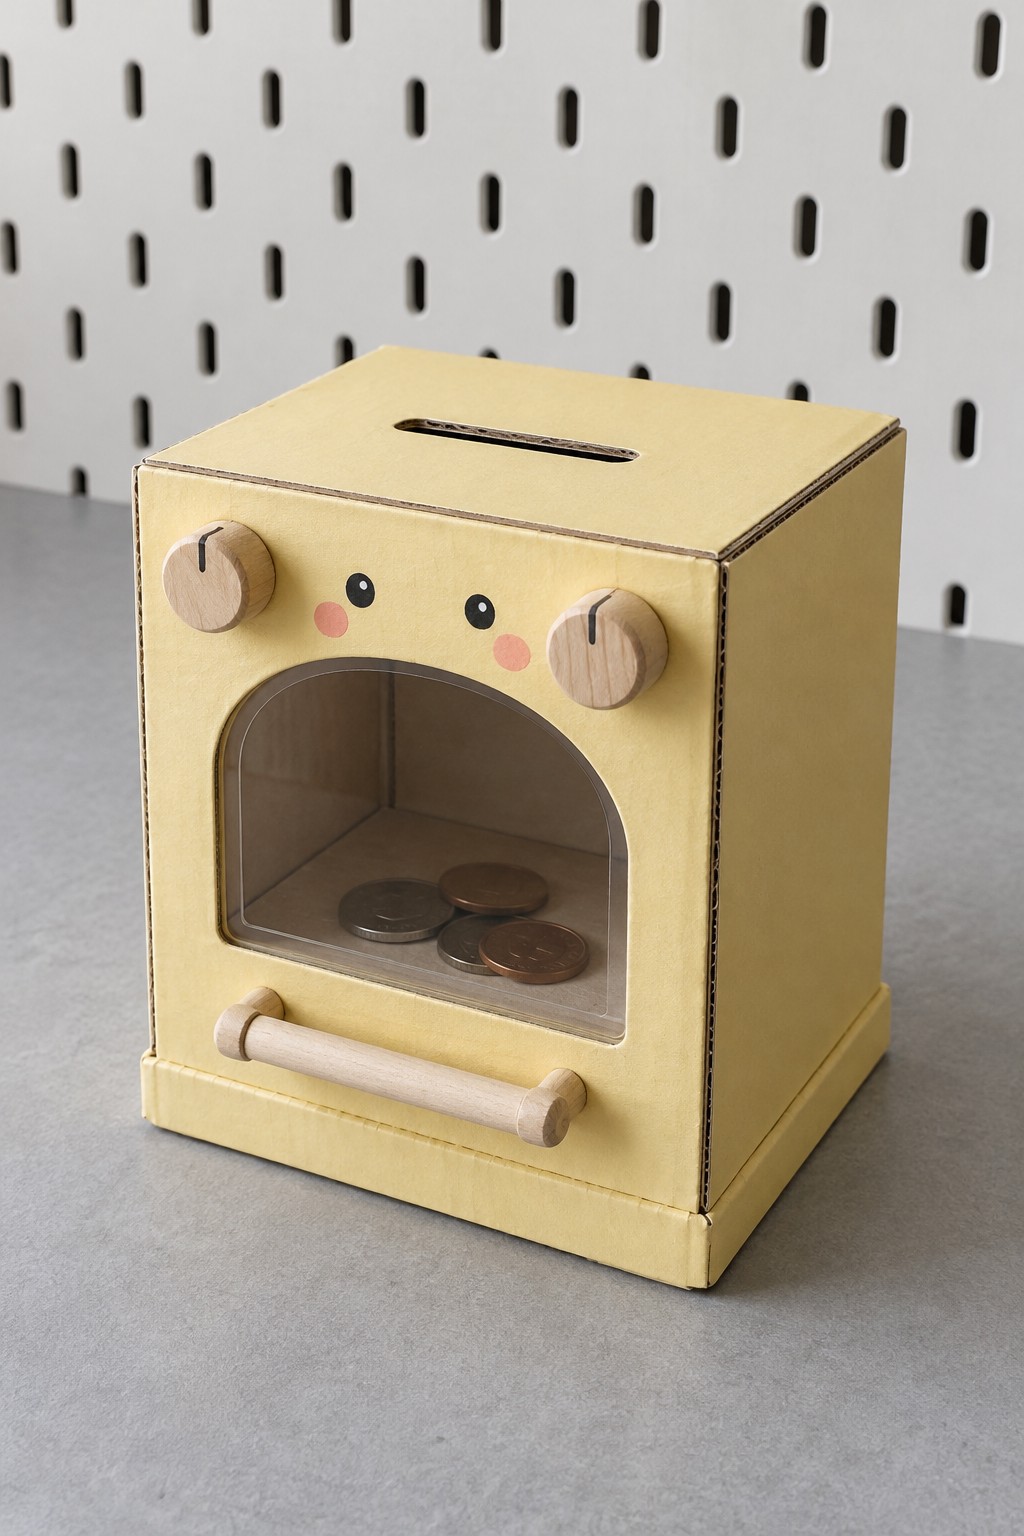
19. Assemble a Yellow Oven Bank with a Viewing Window
A yellow box with two wooden knobs and a broad arched window becomes a miniature oven for a kitchen themed savings corner. Cut the top slot and front window in a reinforced card shell, then retain a clear sheet behind the opening. Cover the box with yellow paper or use a paint system suited to the surface.
Add fixed wooden discs for the controls and a light dowel handle beneath the window. If you want a working front door, reinforce its edges and fit a suitable hinge and catch; otherwise keep the window fixed and use an opening rear panel. The handle is decorative unless its mounting is designed to operate the door.
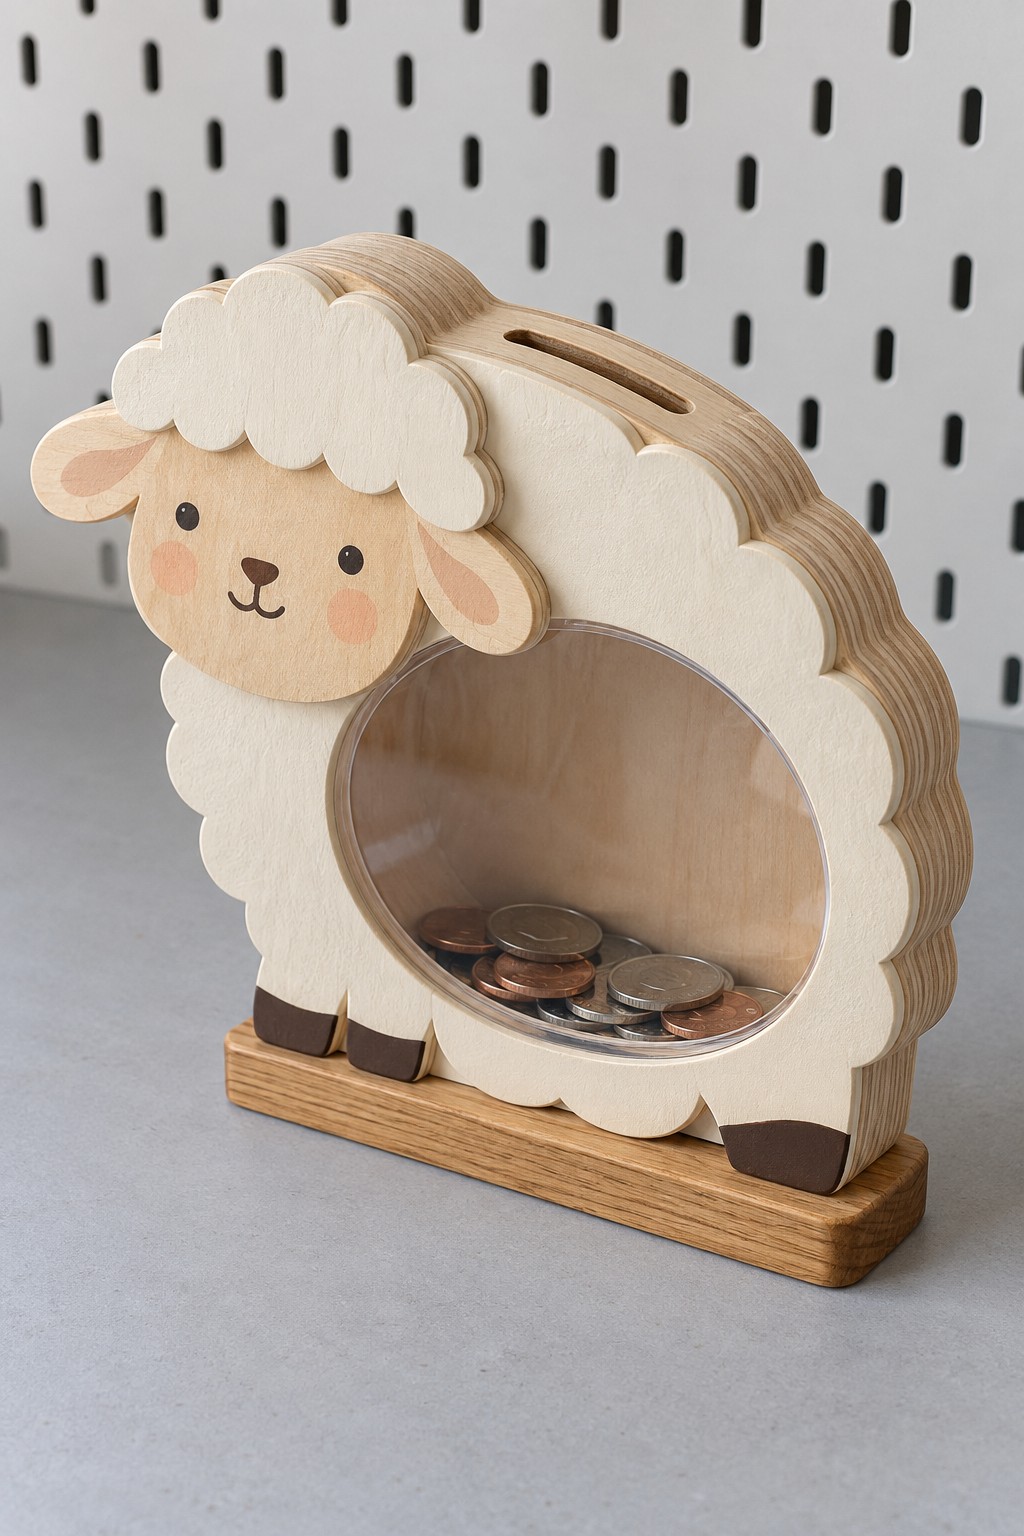
20. Make a Layered Wooden Sheep with a Clear Belly
A scalloped white outline and a natural wood face give this sheep bank a gentle handmade look. A prepared hollow sheep blank makes the detailed curves more manageable. Paint the front wool sections cream, add small facial marks and brown hooves, and retain a circular transparent panel over the collection chamber.
If making the wooden shell yourself, use matching front and rear profiles with a hollow spacer between them, ensuring the slot reaches that cavity. Round and sand the scalloped edges before painting. Secure a broad wooden stand beneath the shell, and keep the rear panel removable so the bank can be emptied without prying at its clear belly.
21. Cut a Mountain Bank with a Round Savings Window
A rounded mountain silhouette offers a quieter alternative to a detailed character. Use a hollow wooden bank blank or matching front and back panels separated by a shaped cavity. Paint the lower section dusty blue and add an irregular cream snowcap, with a small face positioned above the round viewing window.
Cut the slot into the broad summit area, where there is enough material around the opening. Fit the transparent panel behind the circular window and provide rear access. Give the bottom a broad flat edge so the shape stands reliably. The blue and cream palette also leaves room for a small travel destination label on the rear.
22. Create an Elephant Bank with a Transparent Tummy
Wide ears and a short curved trunk make this pale blue elephant expressive without many added pieces. Start with a prepared wooden elephant bank or build a layered hollow profile with a round front window. Paint the outer face softly, leaving some plywood edges visible, and add small eyes and blush marks.
Keep the trunk outside the collection window and leave a clear path from the top slot to the lower chamber. Retain the transparent sheet behind the front rim and use a removable back for emptying. The broad body and flat lower edge should support the bank; the projecting ears and trunk are decoration rather than handles for lifting it.
23. Build a Wishing Well Bank from a Round Box
A round lidded box becomes a wishing well with painted stonework, two wooden posts, and a dusty rose roof. Use a sturdy paperboard or wooden container, adding shallow paper texture or painted rounded stones around its sides. Make a slot in the lid and check that it opens without interference.
Attach the roof supports to the body exterior, then join two light roof panels above them. Leave enough space beneath the roof for a hand to reach the slot and remove the lid. The roof assembly should remain clear of the lid edge. Dry brush cream over the stone colors for depth instead of adding heavy real pebbles to a light shell.
24. Form a Pastel Rainbow Bank with Hollow Arch Storage
Soft bands of rose, peach, yellow, mint, and blue turn a rainbow into a small shelf accent. This shape needs an enclosed hollow arch, not a solid stack of decorative wooden rainbows. Use matching arch faces with closed outer and inner edges around a cavity, or choose a prepared rainbow money box.
Ensure the top slot opens into the hollow band and that the inner arch wall contains the coins rather than letting them fall through the center. Plan a removable rear panel or an access plug in a sufficiently wide foot. Add cream cloud fronts to the two flat feet after the bank stands evenly, then paint the curved color bands.
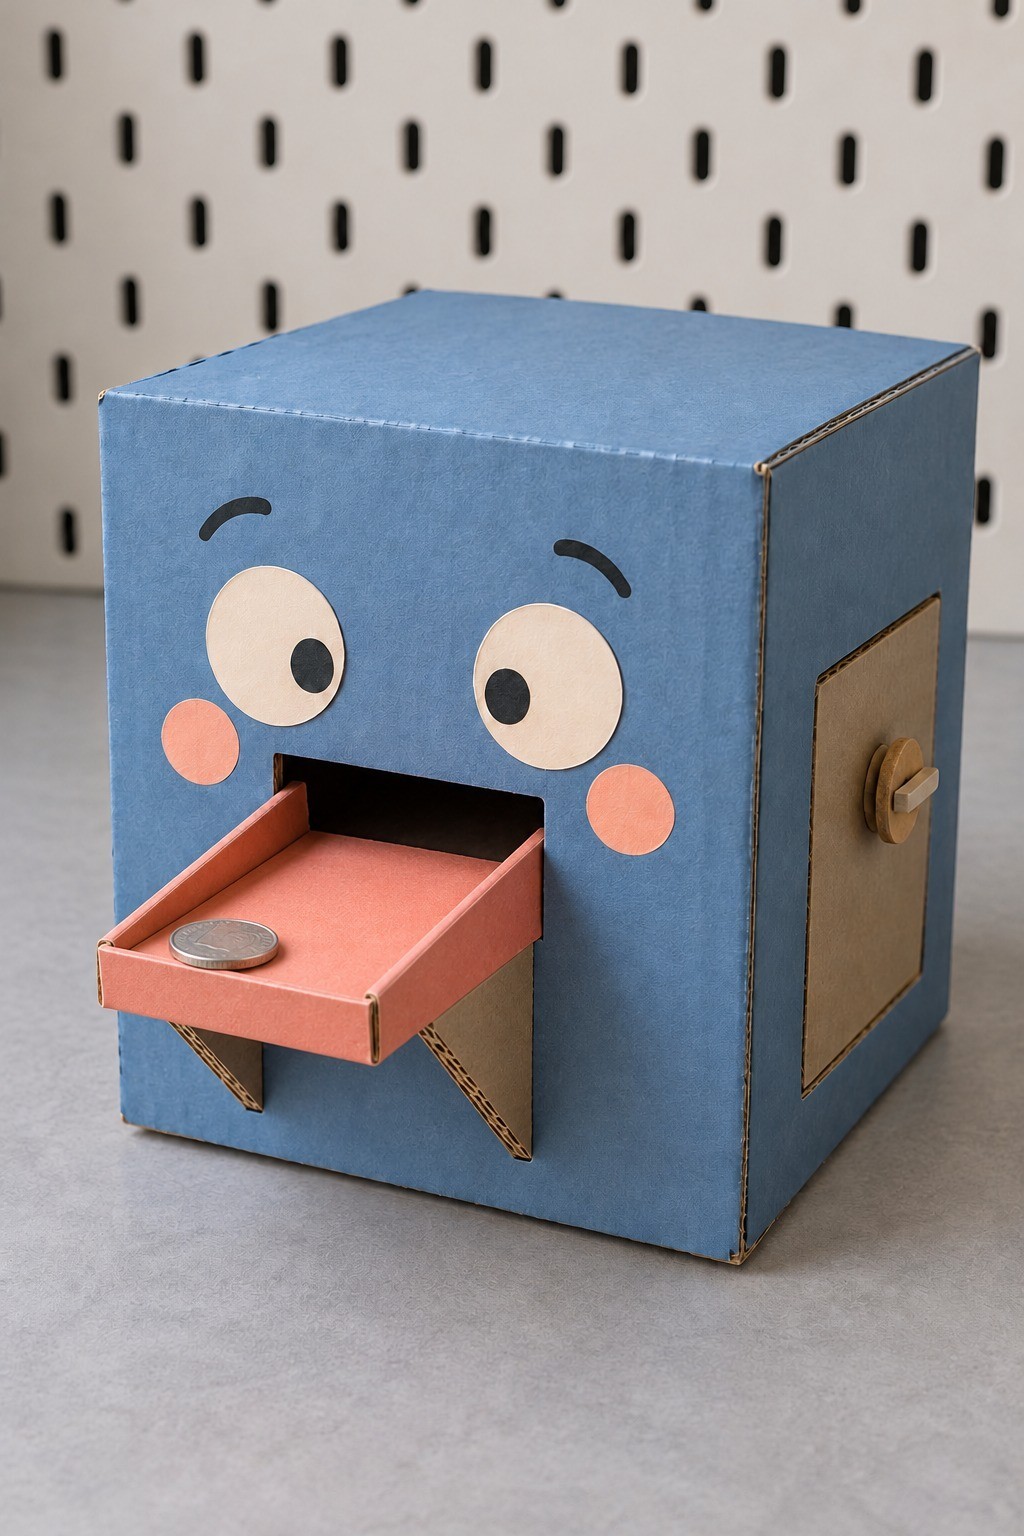
25. Give a Blue Monster Bank a Pink Feeding Tray
A blue cube and a short pink feeding tray make a friendly monster that suits a playful adult workspace. Reinforce a cardboard box, cut a wide mouth opening, and fit a smooth tray through it so the inner end reaches the collection space. Low side rails keep a coin from slipping off the edges.
Use the tray to guide a coin gently into the opening by hand. If you want gravity feeding, test a steeper inward slope before attaching the supports rather than assuming the shallow tray will slide every coin. Add paper eyes and cheeks, then fit a side door with a simple rotating card latch. Keep the latch accessible and clear the collection space regularly.
Choose a Finish You Can Live With and an Opening You Can Reach
A good handmade bank works comfortably before it looks finished. Choose the cat, panda, or simple covered box if you want to focus on textiles and surface details. Choose a cabin, mountain, or clear frame if you have access to prepared wooden parts. Save the chutes and coin runs for a project where you can spend more time checking the route.
Before putting the bank into daily use, confirm that the slot accepts your coins, the collection area is contained, and the retrieval opening works without pulling on decorations. Keep the finished piece on a stable dry surface and empty it before a lightweight shell becomes overloaded. A small savings goal written on the back can give even the simplest design a personal purpose.

Leave a Reply