
Empty milk cartons can become much more than painted containers. These 30 recycled milk carton projects include practical drawer dividers, ribbon storage, plant sleeves, tissue dispensers, miniature houses, and expressive characters for a desk or shelf. Each idea explains which extra materials create its shape, how to approach the assembly, and what to change so the finished piece suits everyday use.
Begin with the painted holder below, then adapt its preparation, cutting and reinforcement to the carton project you choose. Match the finished opening and lining to the objects it will hold.
Table of Contents
- Choose and Prepare a Milk Carton Before Crafting
- Materials for a Simple Painted Carton Holder
- Make a Painted Carton Holder in Six Clear Steps
- Adapt the Structure to What It Will Hold
- 30 Milk Carton Ideas to Adapt for Your Home
- 1. Sage Milk Carton Glasses Garage
- 2. House Shaped Wall Pockets for Everyday Essentials
- 3. Botanical Brush Cup and Resting Tray
- 4. Lavender Ribbon Dispenser With a Removable Dowel
- 5. Yellow Window House for Plant Cuttings
- 6. Leaf Printed Tea Sachet Dispenser
- 7. Mix and Match Drawer Dividers
- 8. Pastel Seedling Houses With Butterfly Details
- 9. Geometric Herb Pots in a Wooden Tray
- 10. Hedgehog Inspired Handled Caddy
- 11. Pocket Nature Journal With Carton Covers
- 12. Blue Whale Tissue Sleeve
- 13. Miniature Garden Train With Carton Carriages
- 14. Rainbow Roof Savings House
- 15. Chameleon Desk Organizer With a Comb Spine
- 16. Hanging Dragon Pocket for Garden Gloves
- 17. Crocodile Pencil Box With a Hinged Jaw
- 18. Painted Floral House With a Battery Light
- 19. Expressive Beetroot Planter Sleeve
- 20. Striped Sailor Storage House
- 21. Storybook Royal Tissue Dispenser
- 22. Moth Wing Cabinet for Small Paper Supplies
- 23. Pierrot Paper Cabinet With a Pleated Collar
- 24. Portrait Brush Holder With a Fabric Wrap
- 25. Cheeky Devil Pencil Cup
- 26. Angel Message Keeper With a Golden Halo
- 27. Emoji Carton Character Collection
- 28. Three Eyed Monster Sticky Note Station
- 29. Night Sky Miniature Staircase House
- 30. Cloud Angel Hanging Planter With a Supporting Cradle
- Keep Your Carton Projects Useful for Longer
Choose and Prepare a Milk Carton Before Crafting
Use a sound carton with a firm base and no sour smell, mold, or separating layers. Empty it, wash the inside with warm water and a little dishwashing liquid, rinse thoroughly, and leave it open until completely dry. Avoid prolonged soaking. A carton that still smells after cleaning is better left out of your craft supplies.
Milk cartons combine paperboard with protective layers, and their construction varies. Some have a metallic looking inner barrier while others do not. Keep the bonded layers intact rather than peeling the surface apart. The original liquid barrier does not make cut edges, glued joints, or painted surfaces weatherproof.
Materials for a Simple Painted Carton Holder
- One clean, dry milk carton with a stable square base
- A ruler, pencil, scissors, and a cutting mat
- Thin paper tape for covering the cut rim
- A water based bonding primer suitable for the carton coating
- Cream and blue acrylic craft paints with suitable brushes
- Optional decorative paper, felt lining, and adhesive compatible with the coated surface
An adult should make any starter cut that requires a craft knife, working on the mat and cutting away from the supporting hand. Scissors are easier to control once the opening is accessible. Trial paint and glue on an offcut first, and follow their instructions for ventilation, drying, and curing. A coating that beads up or lifts easily needs a different compatible preparation system.
Make a Painted Carton Holder in Six Clear Steps
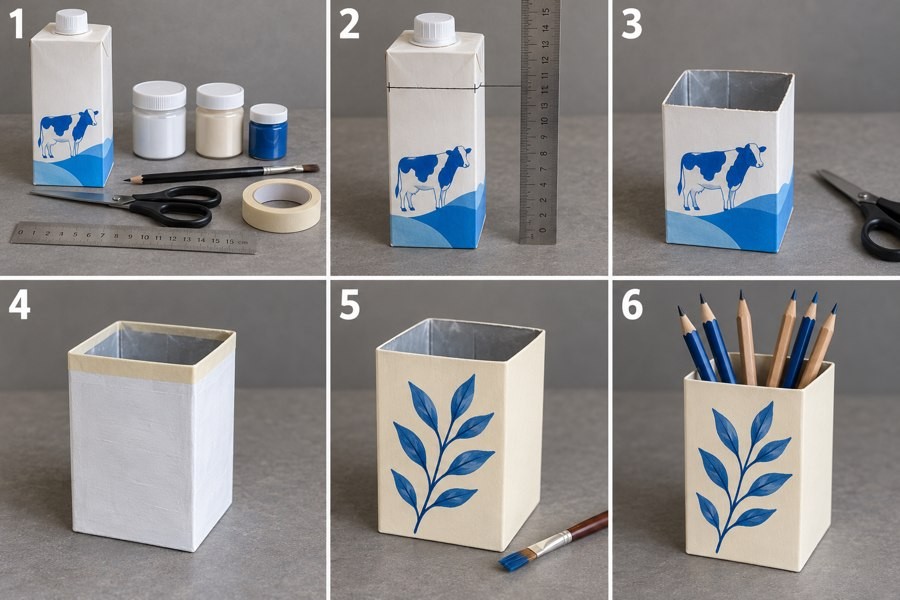 Six illustrated stages from a clean milk carton to a cream pencil holder with a blue leaf design.
- Clean and gather. Wash and completely dry the carton, then prepare the ruler, cutting tools, tape, primer, and paints.
- Mark one continuous line. Choose a practical holder height and measure the same distance above the base on all four faces. Join the marks with a ruler so the finished rim stays level.
- Remove the top. Cut around the marked line and retain the square base section. Trim uneven edges without peeling away the inner coating.
- Cover and prime. Fold thin paper tape over the cut rim in short overlapping lengths. Apply compatible primer to the exterior and let it dry as directed.
- Paint the design. Apply thin cream coats, allowing the required drying time. Add one blue leafy branch to the front once the background is ready.
- Cure and fill. Wait until the coating is ready for handling, then stand a few pencils inside. Check that the holder stays stable when you remove one.
This open cup method suits the brush holders and many of the low storage containers below. Retain the roof for houses and dispensers, cut a horizontal body for animal boxes, or add separate pockets after painting. Plan openings and supports before attaching decorative wings, tails, or collars.
Adapt the Structure to What It Will Hold
For plants, use a removable growing pot with drainage holes inside a separate waterproof catch container. Lift it out for watering, let it drain, and empty collected water before replacing it. Roots need room as they grow, so a small carton sleeve is often a temporary decorative home. Paint and varnish do not turn a cut carton into a permanent outdoor planter.
For hanging projects, let a rigid base or properly reinforced backing carry the contents. Decorative paper wings and handles do not establish a safe carrying capacity. Keep dry storage away from sinks and steam, use sealed tea sachets rather than loose food, and choose only battery powered LED lights for illuminated houses. Never use flame or a hot lamp inside paperboard.
If you enjoy arranging several little growing pots together, explore these terracotta fairy garden ideas for another way to combine miniature scenery with removable plants.
30 Milk Carton Ideas to Adapt for Your Home
Use the preparation sequence above as your starting point, then follow the material and assembly choices in each idea. Some designs need only cutting and painting, while moving doors, dispensers, and hanging planters need extra reinforcement or a removable insert.
1. Sage Milk Carton Glasses Garage
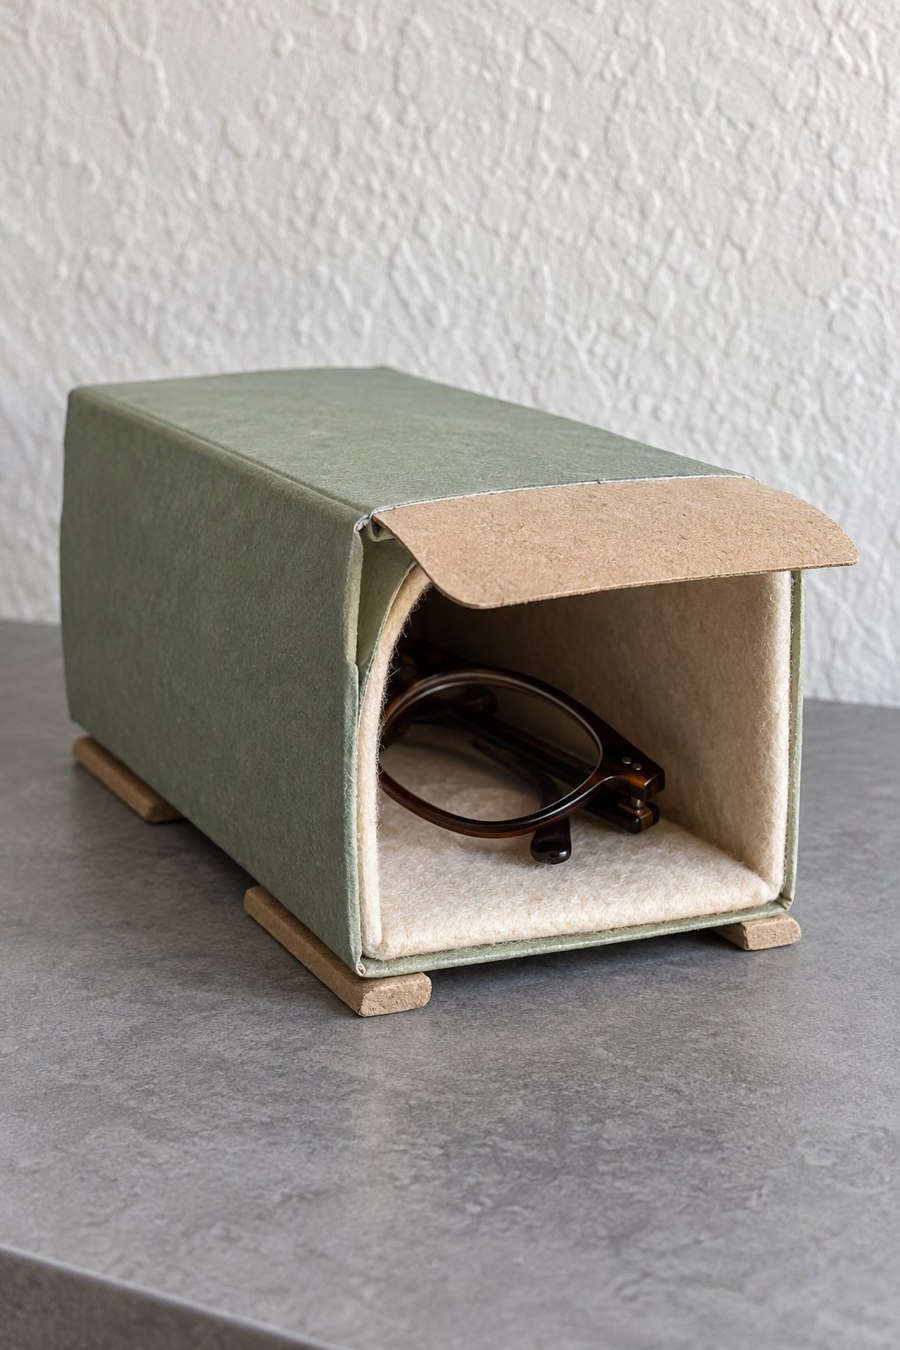
Turn a carton onto its side and open one end, keeping a top flap as a little canopy. Cover the exterior with sage paper or paint, line the floor with smooth felt, and glue two flat craft sticks beneath the body as runners. Measure your folded glasses first so the frames slide in without catching. Keep adhesive away from the lens contact area and allow it to cure before use.
2. House Shaped Wall Pockets for Everyday Essentials
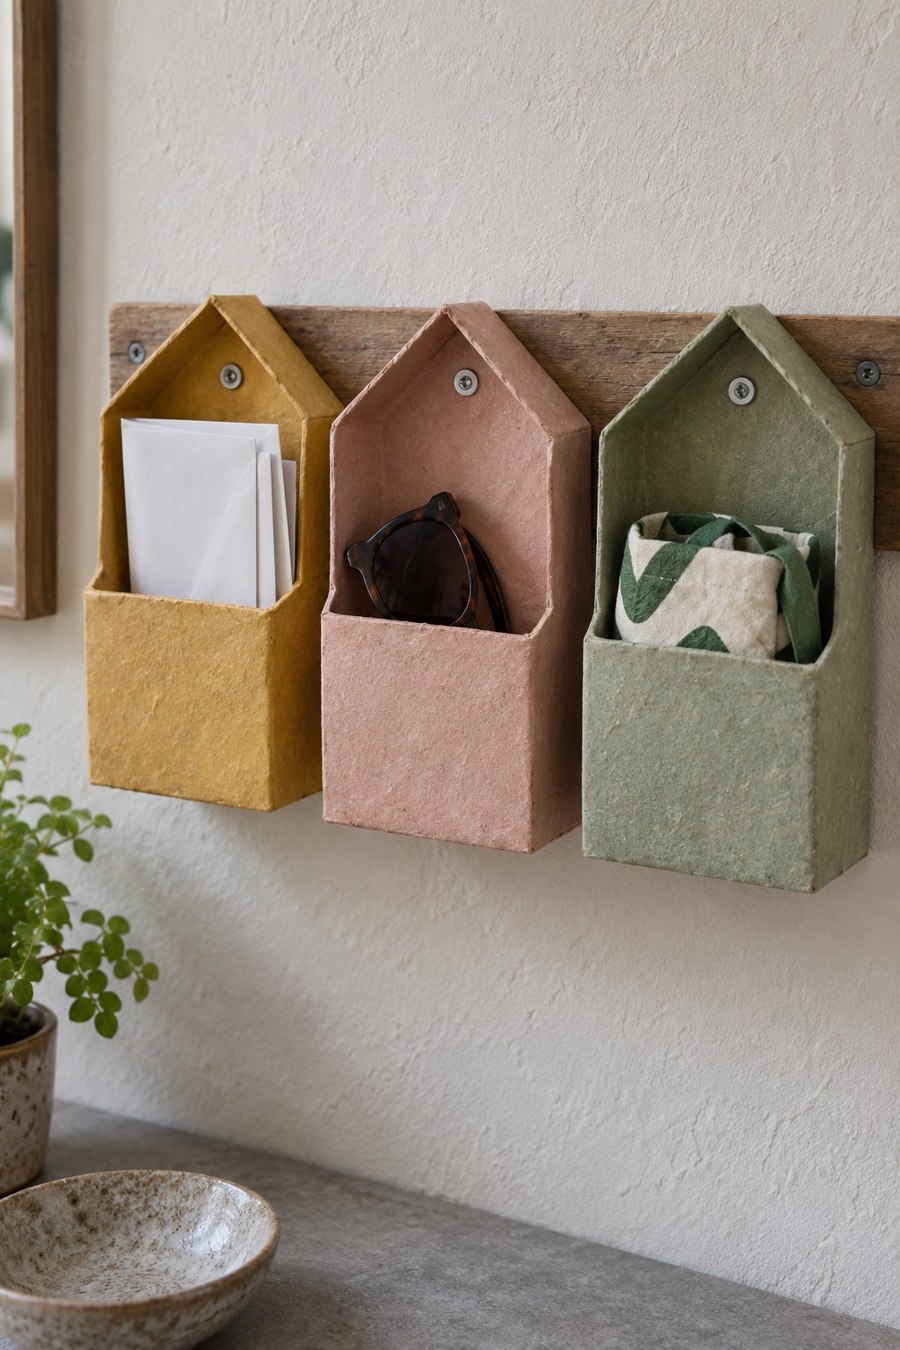
Use three matching cartons, a wooden rail, decorative paper, and small fixings to create an entryway sorting station. Cut the front walls lower than the backs, retaining pointed roof shapes behind the pockets. Wrap every cut edge before decorating. Attach the pockets to the rail through reinforced backing pieces, then mount the rail with fixings suited to the wall. Reserve them for light mail, fabric accessories, or sunglasses rather than heavy objects.
3. Botanical Brush Cup and Resting Tray
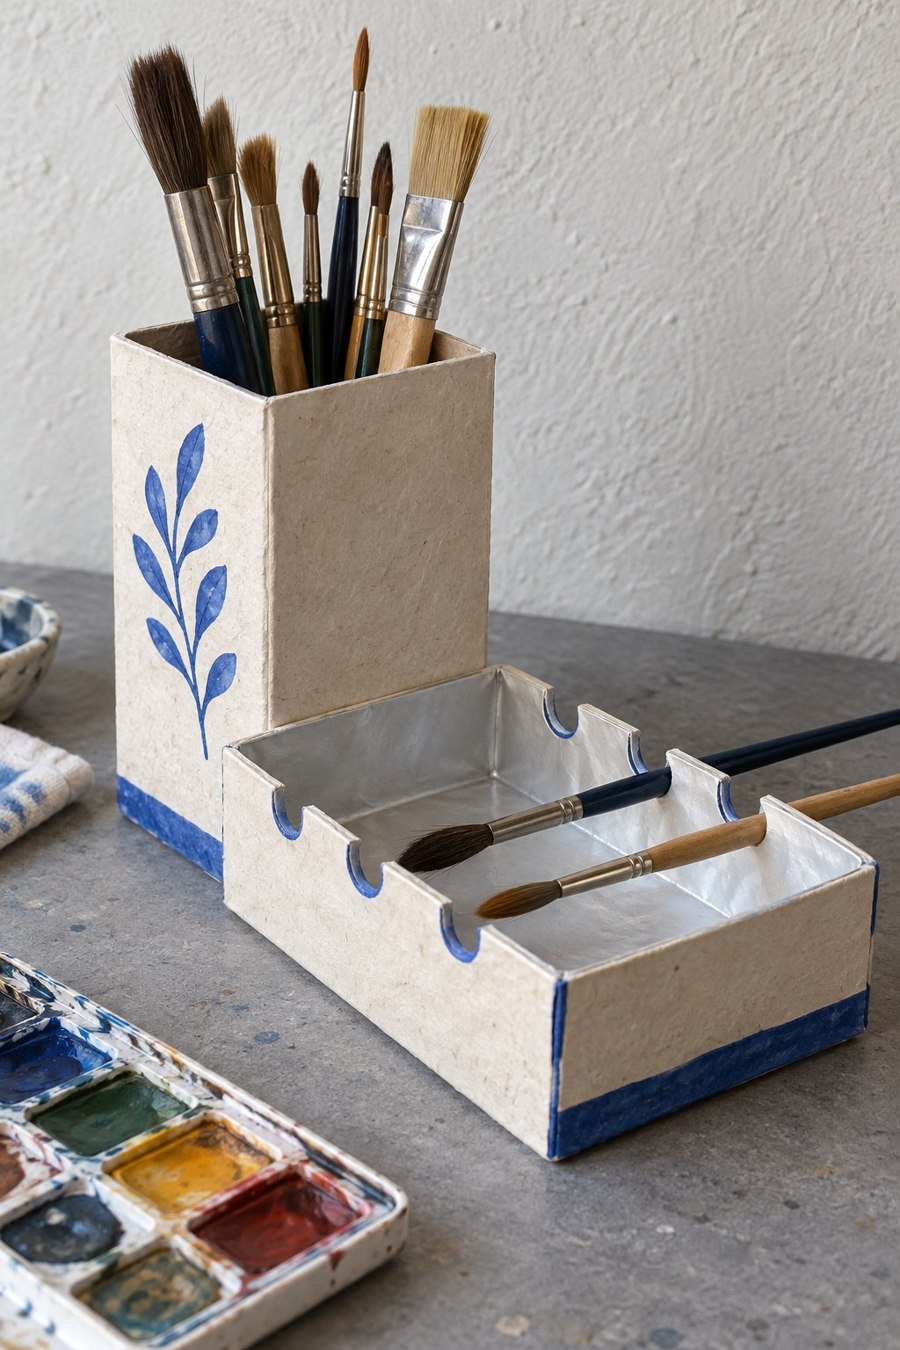
Make a coordinated painting station from one tall carton base and another cut lengthwise into a shallow tray. Mark paired semicircular notches along the tray sides before cutting, so brush handles rest at matching heights. Tape the rims, prime the outsides, and add cream paint with blue leaves. Place a removable washable liner beneath damp brushes. The cup stores dry handles upright; it should not become a soaking jar for brush water.
4. Lavender Ribbon Dispenser With a Removable Dowel
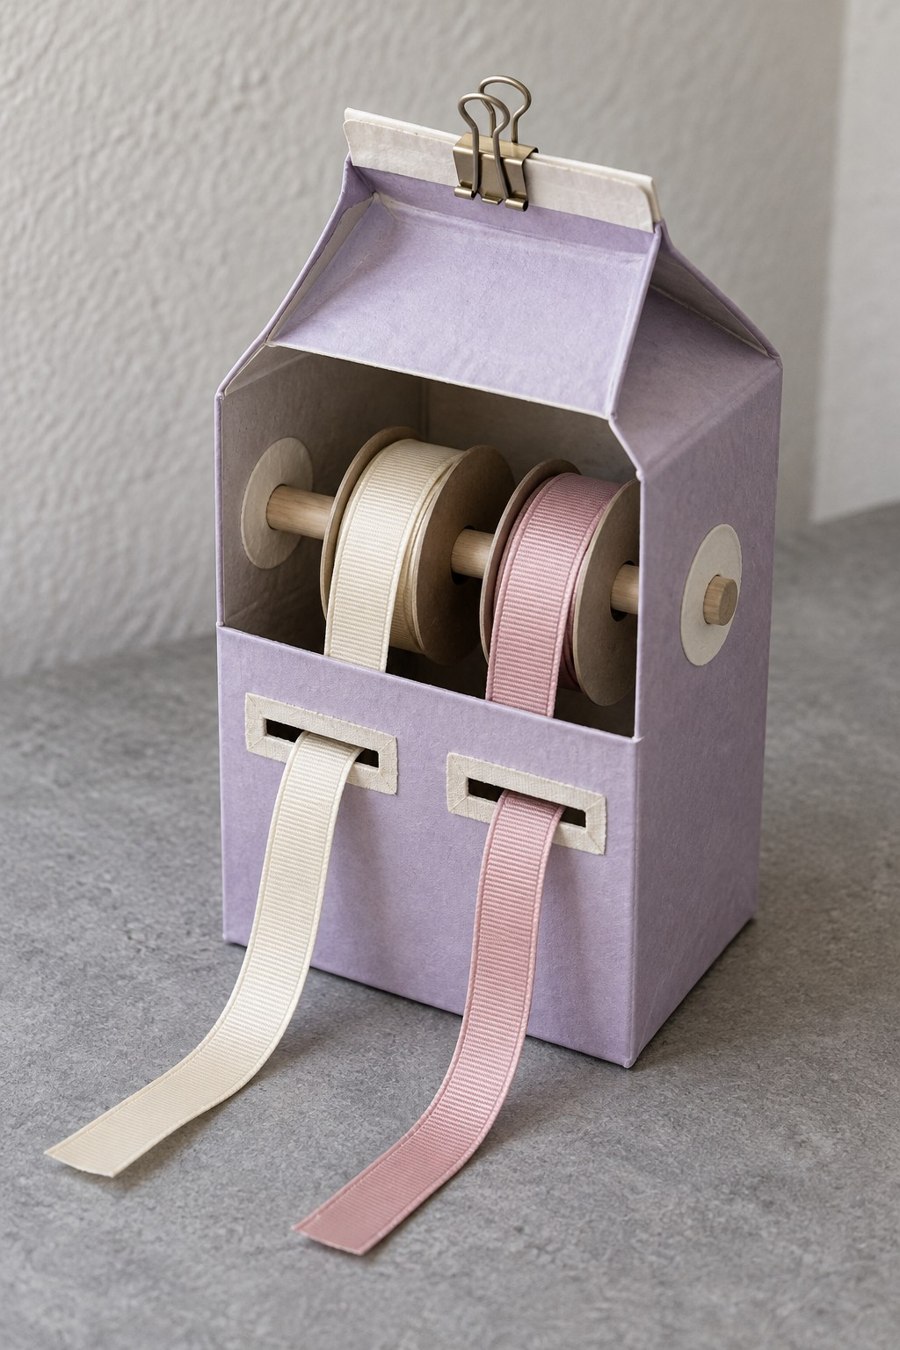
Retain the pitched top and cut a broad access window in the front. Make two aligned side holes for a removable wooden dowel, reinforcing each hole with an extra carton patch. Slide ribbon rolls onto the dowel and guide their ends through separate front slots. Paint the body lavender and close the folded top with a binder clip. Leave clearance around the rolls so they rotate freely, and cut ribbon with separate scissors.
5. Yellow Window House for Plant Cuttings
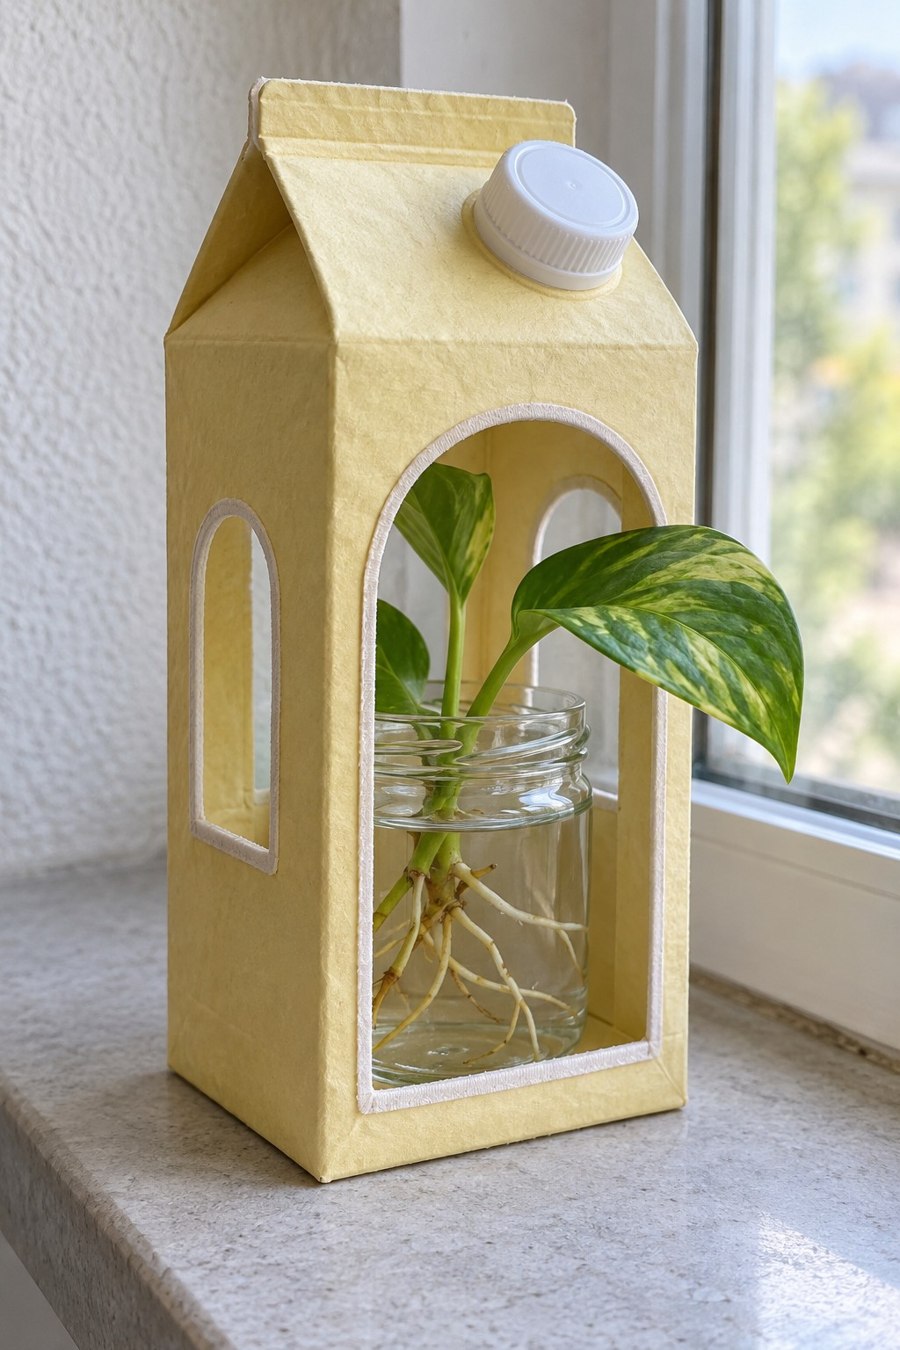
Cut tall arched windows in a clean carton while leaving generous corner posts and an intact base. Paint the frame pale yellow and place a small glass propagation jar inside. The jar, rather than the carton, holds the water. Check that it can pass through the opening before painting. Lift it out to refresh the water and wipe up spills immediately. Choose a bright position appropriate for your plant without trapping the frame against hot glass.
6. Leaf Printed Tea Sachet Dispenser
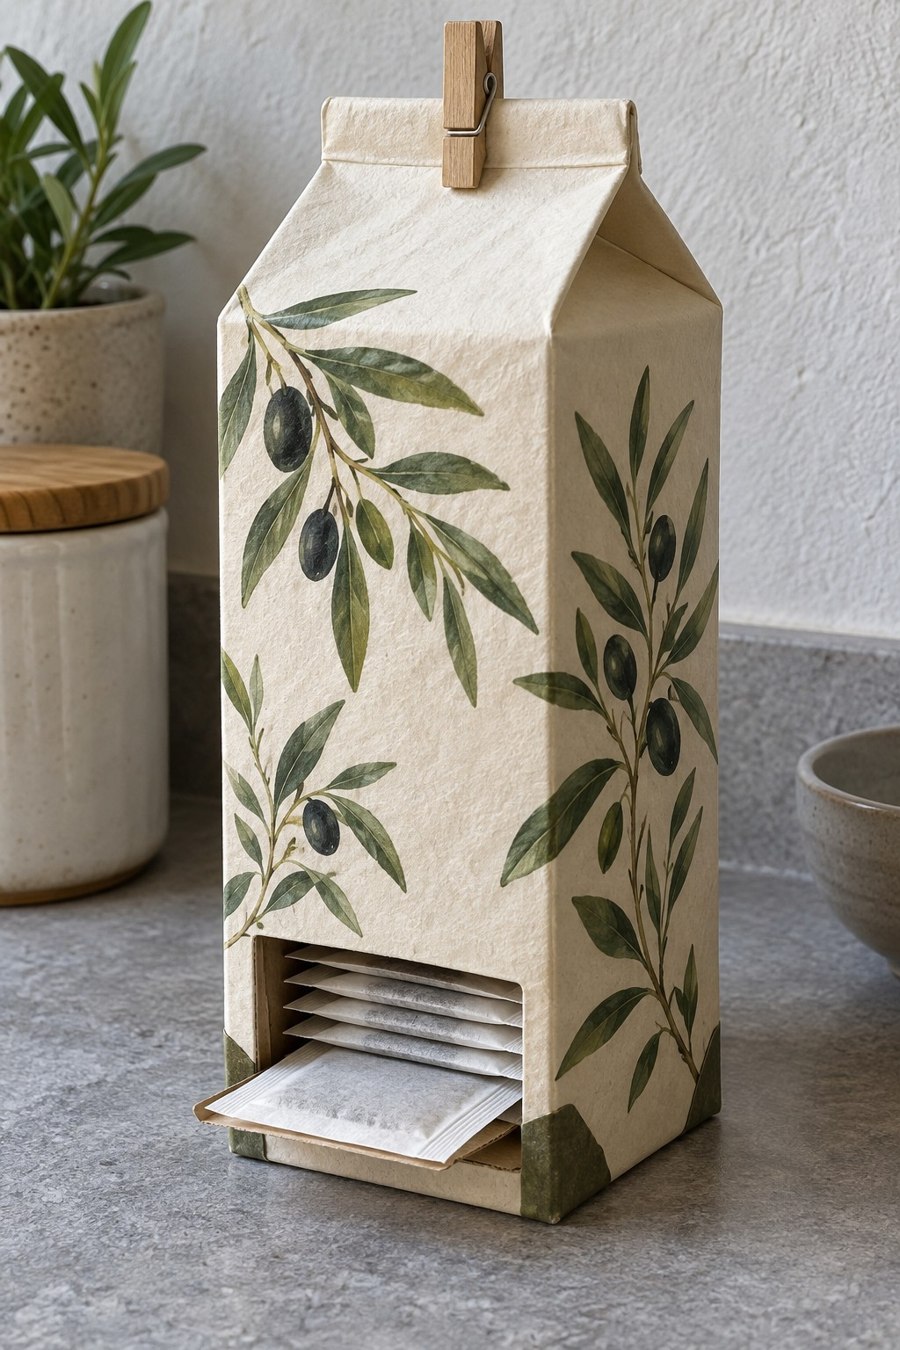
Keep a tall carton body and create a low front opening just large enough to pull out one individually wrapped tea sachet. Add a short folded carton ledge beneath the opening, then decorate the exterior with leaf patterned paper. Fill from the top and close it with a wooden clip. Test the stack with your actual sachets before cutting the final opening. Store only sealed packets and keep the dispenser away from steam or a wet kettle area.
7. Mix and Match Drawer Dividers
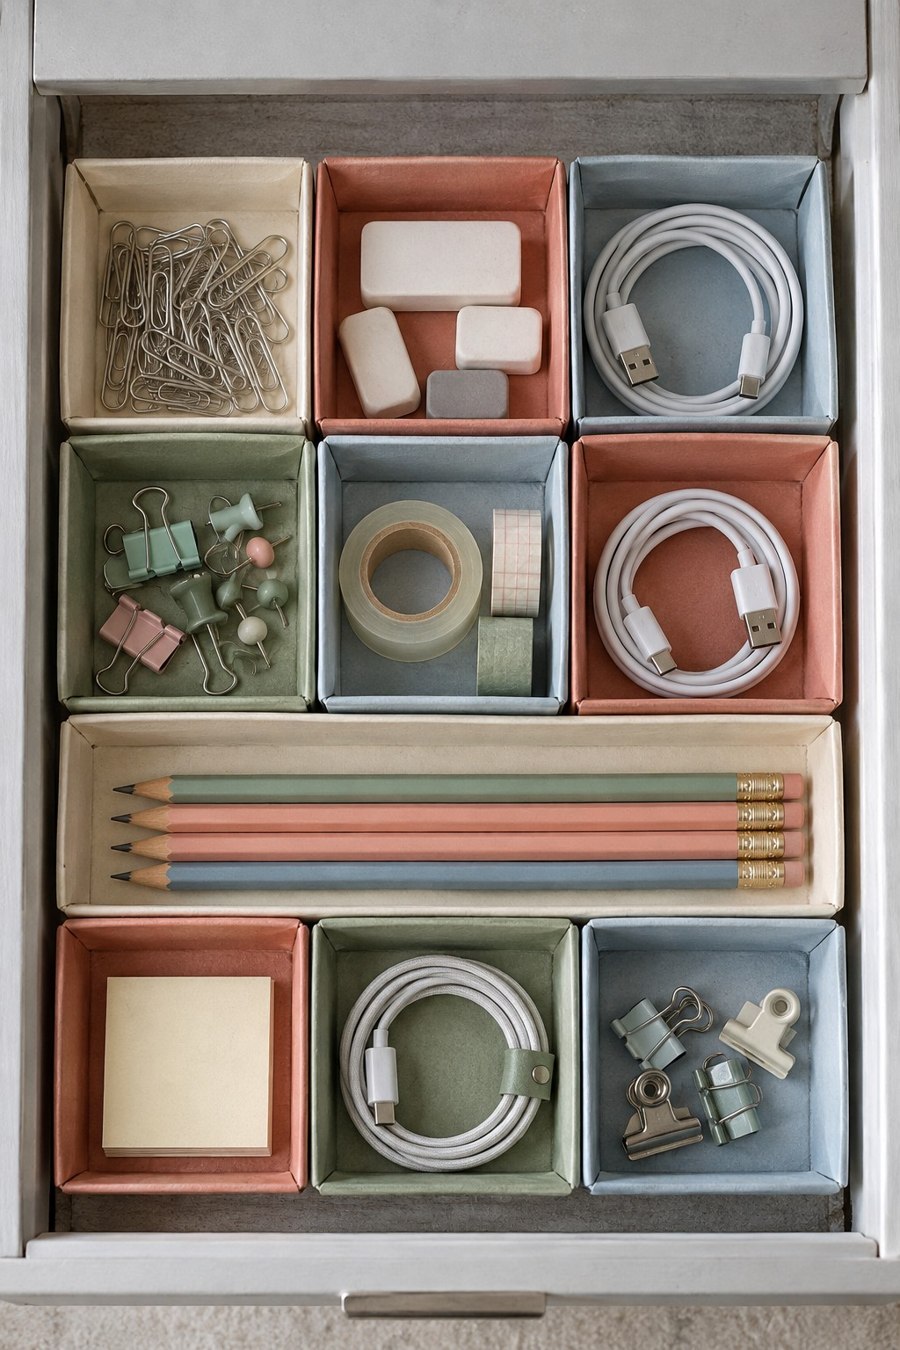
Cut carton bases to the usable depth of your drawer, then arrange them around the items you actually store. Several square cups can hold clips, erasers, and coiled cables; a long shallow carton section can hold pencils. Cover the rims and add colored paper to the outside of each compartment. Keep the cups removable for cleaning. Check that the drawer closes freely, and use the cable compartments for disconnected cables rather than powered chargers.
8. Pastel Seedling Houses With Butterfly Details
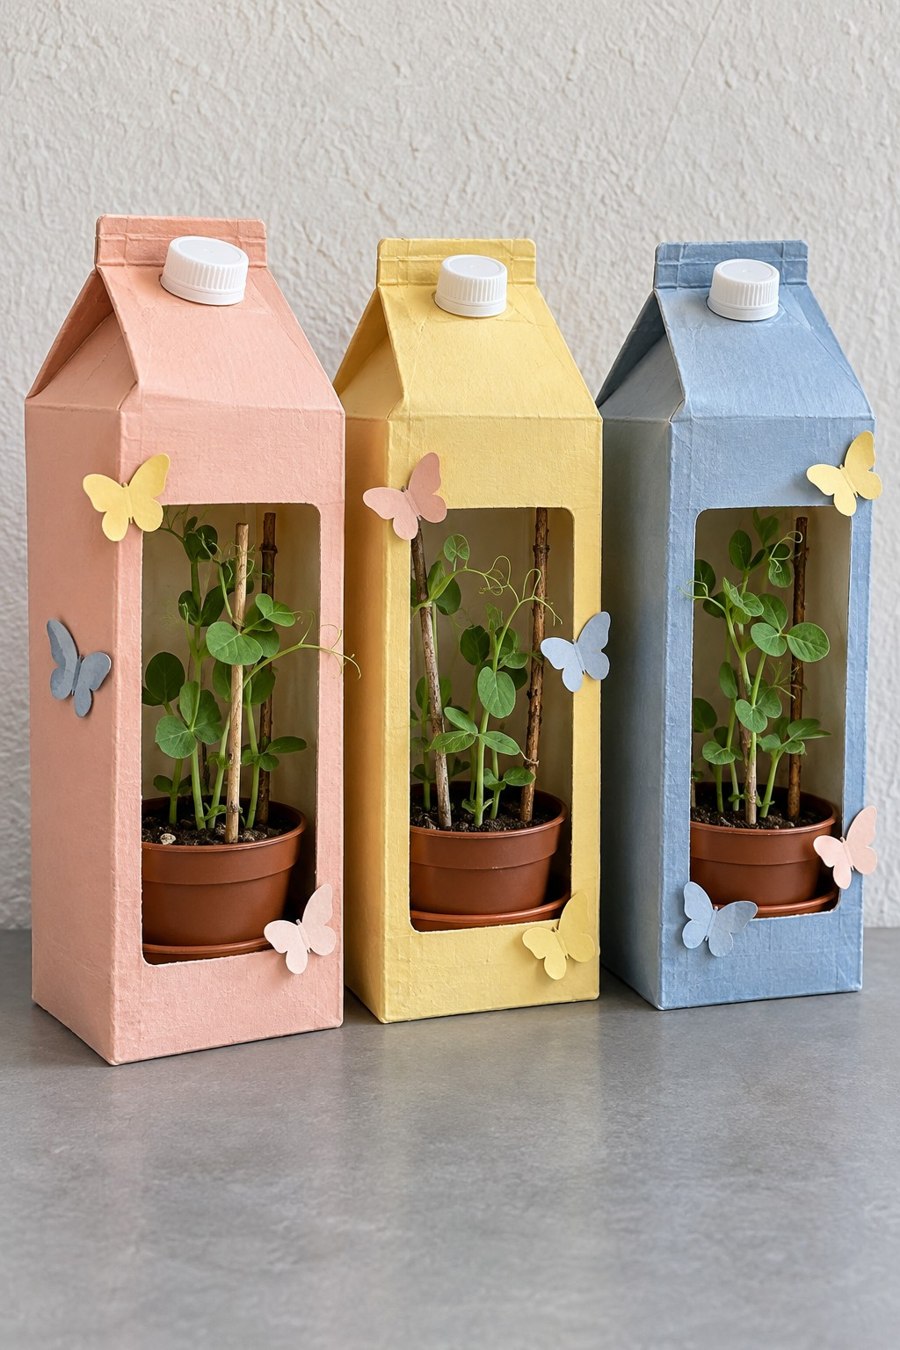
Cut large rectangular windows in peach, yellow, and blue carton shells, leaving enough material around the corners to maintain their shape. Place a small removable nursery pot and shallow waterproof saucer in each house. Add paper butterflies to the outer posts and fine twine supports for small climbing shoots. These open frames are decorative plant sleeves, not sealed greenhouses. Take the pots out for watering and move growing plants into larger containers when needed.
9. Geometric Herb Pots in a Wooden Tray
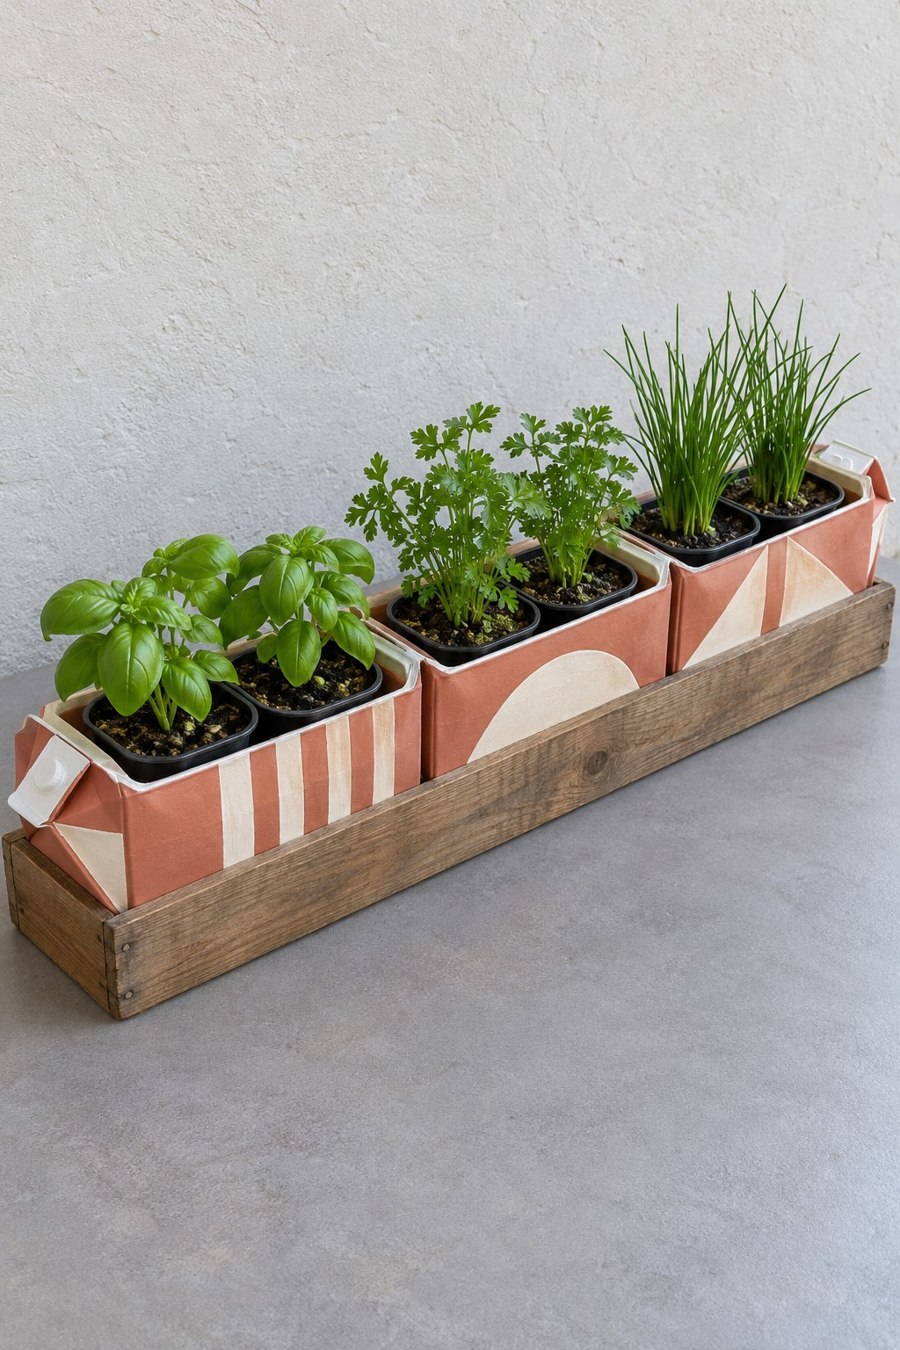
Cut four carton bases to the same height and paint a shared palette of terracotta, cream, and muted pink. Use masking tape to separate simple stripes, arches, and diagonal blocks. Fit each sleeve around a nursery pot with a waterproof catch container beneath it. Arrange the group inside a shallow wooden tray. Match each herb to suitable light and watering conditions; remove the growing pots to water so neither the carton sleeves nor the wooden tray remain wet.
10. Hedgehog Inspired Handled Caddy
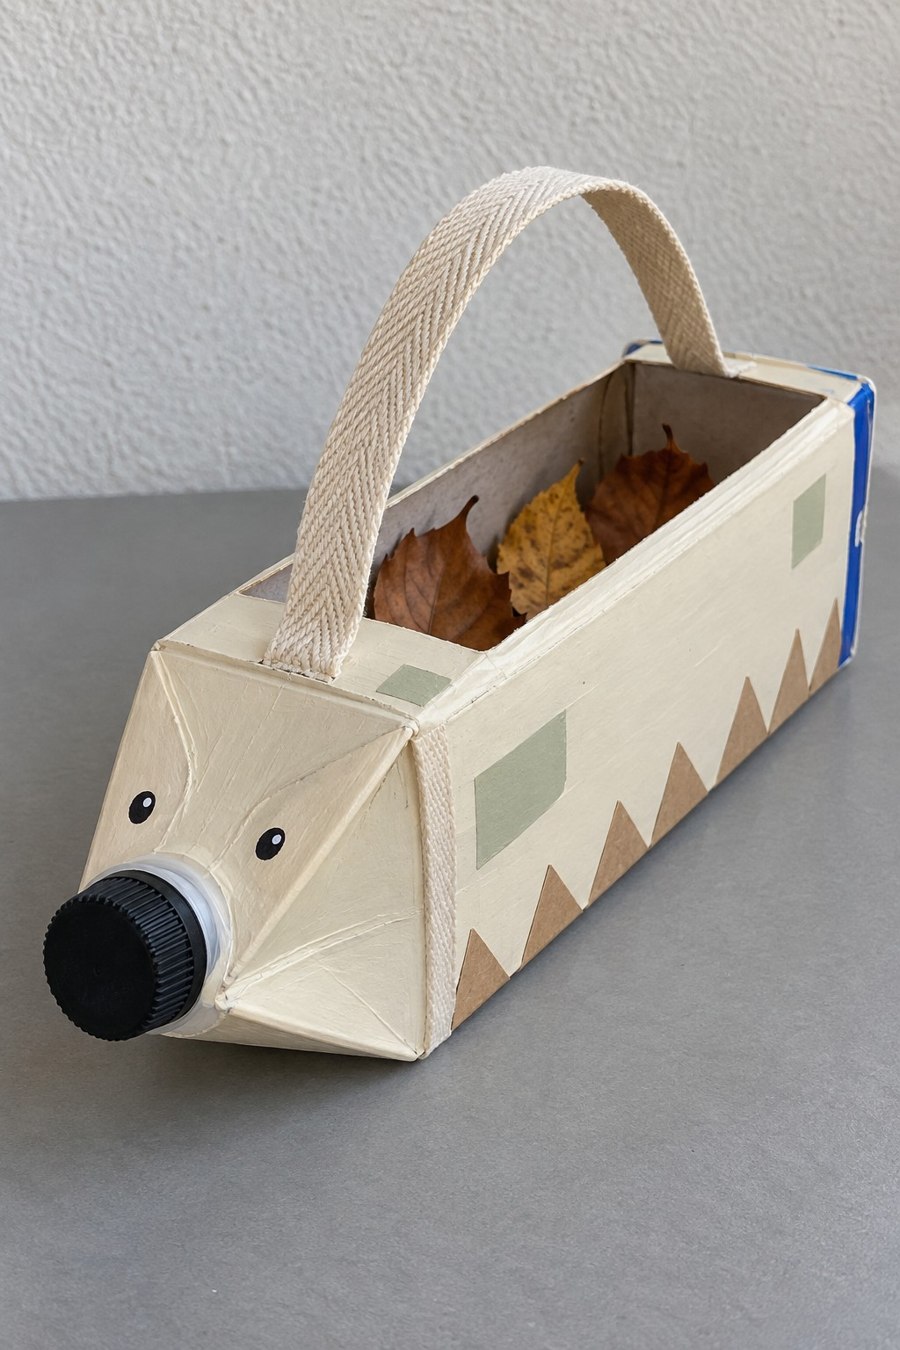
Lay a carton horizontally and remove a broad upper panel while preserving the folded end and screw cap as the hedgehog nose. Cover the body with cream paper, add painted geometric patches, and draw small eyes near the front. A fabric tape handle needs broad reinforced attachment tabs inside both ends. Use the caddy for dry craft scraps or light accessories. Carry it from beneath when filled, since a decorated carton handle has limited strength.
11. Pocket Nature Journal With Carton Covers
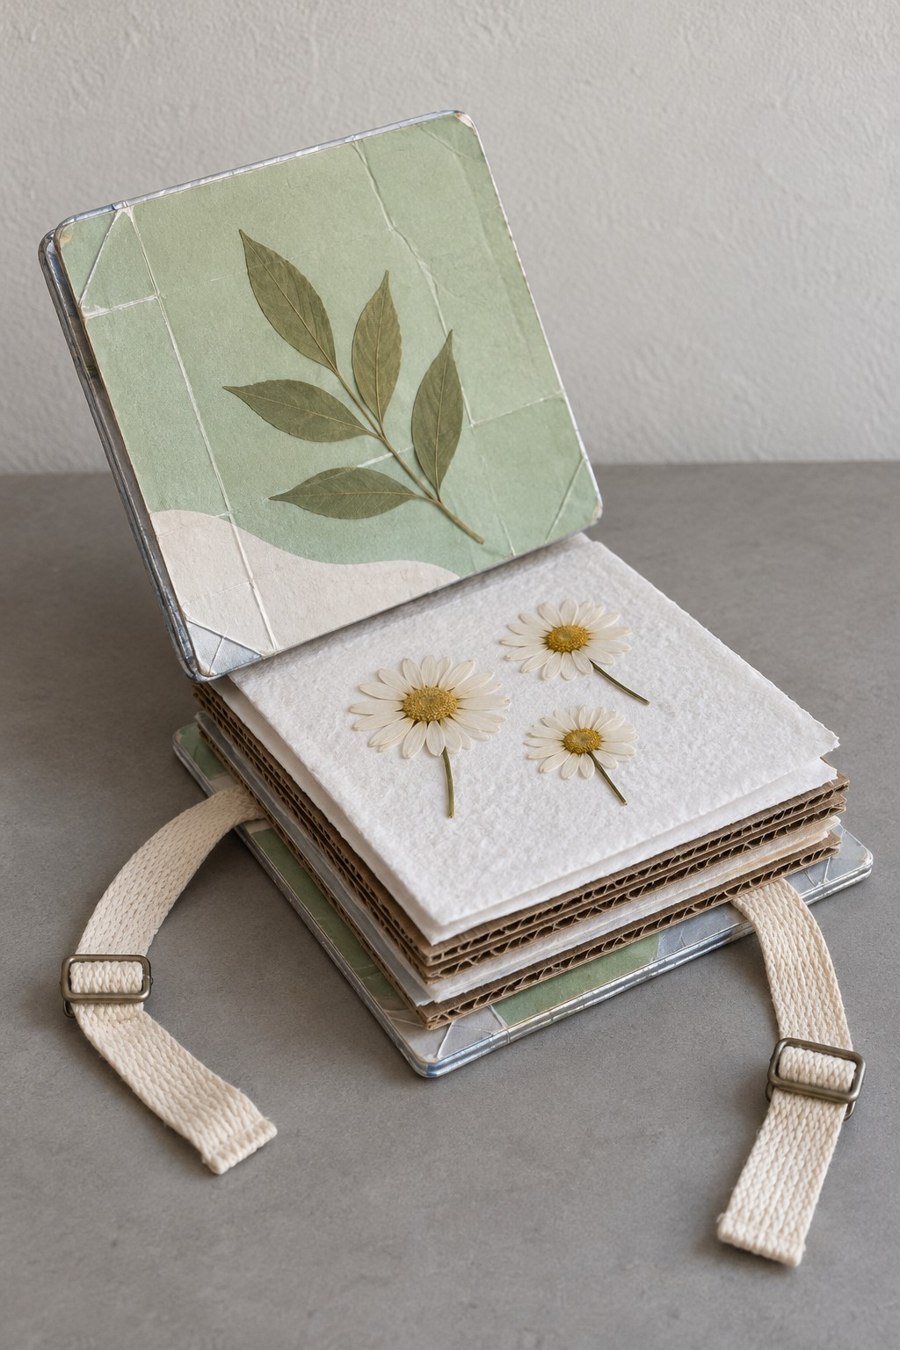
Flatten a clean carton and cut two matching cover panels. Wrap their edges with paper tape, decorate the outsides with botanical paper, and line the insides. Cut a small stack of drawing paper slightly smaller than the covers, then bind it with a simple stitched spine through reinforced holes. Attach ribbon ties before adding the inner lining. Keep the booklet dry and use pressed specimens only when fully dried, rather than enclosing damp leaves between the pages.
12. Blue Whale Tissue Sleeve
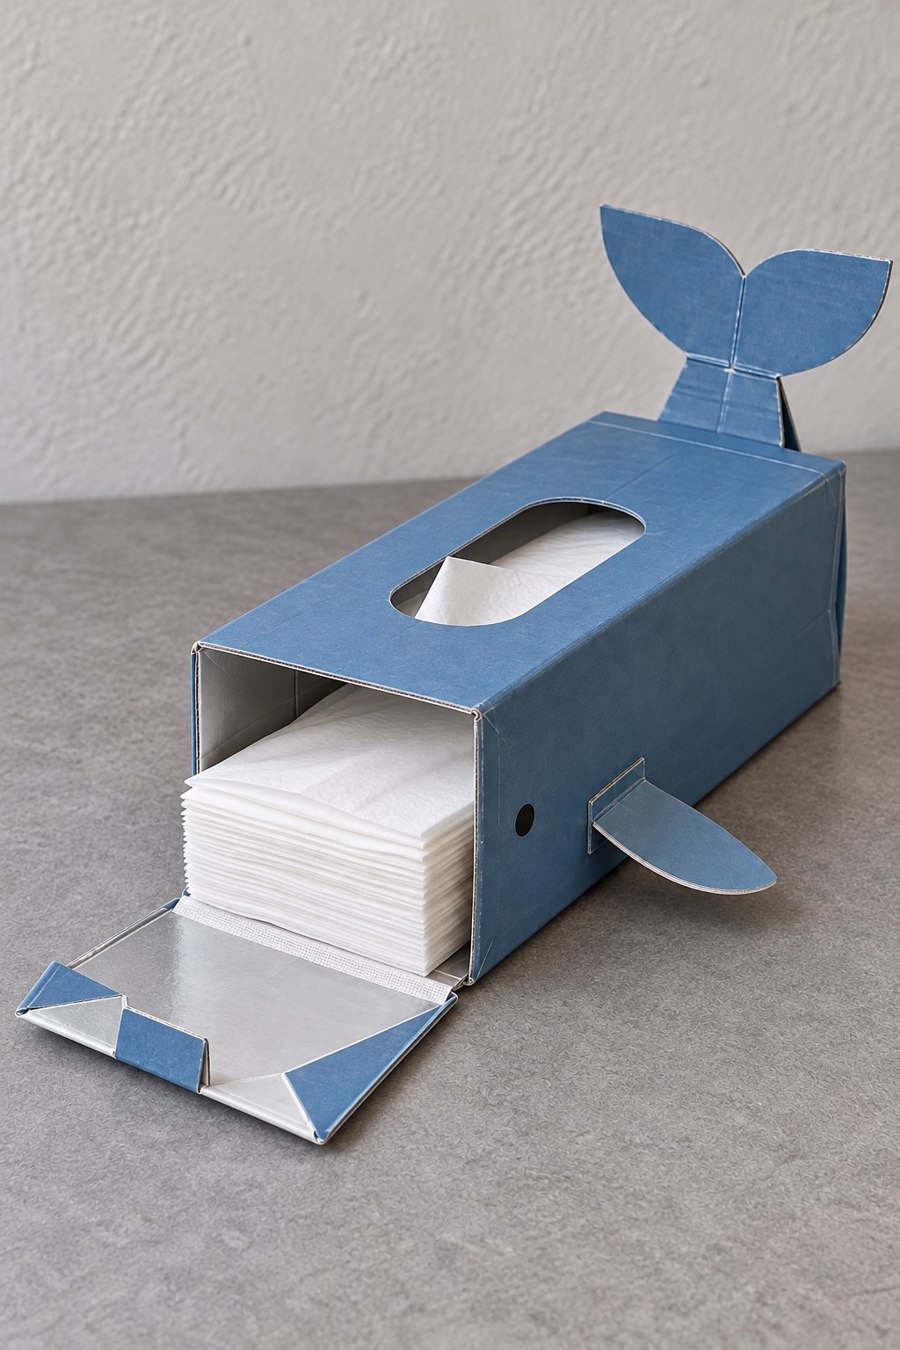
Use a long carton body as a sleeve around a compatible small tissue pack. Make an oval dispensing hole on top and a broad access opening at the front. Add a flat tail to the far end, side fins, and a painted eye. Cover every dispensing edge with smooth tape so tissues do not snag. Fit the tissue pack before securing the decorative parts, and leave an accessible refill flap instead of permanently sealing the carton.
13. Miniature Garden Train With Carton Carriages
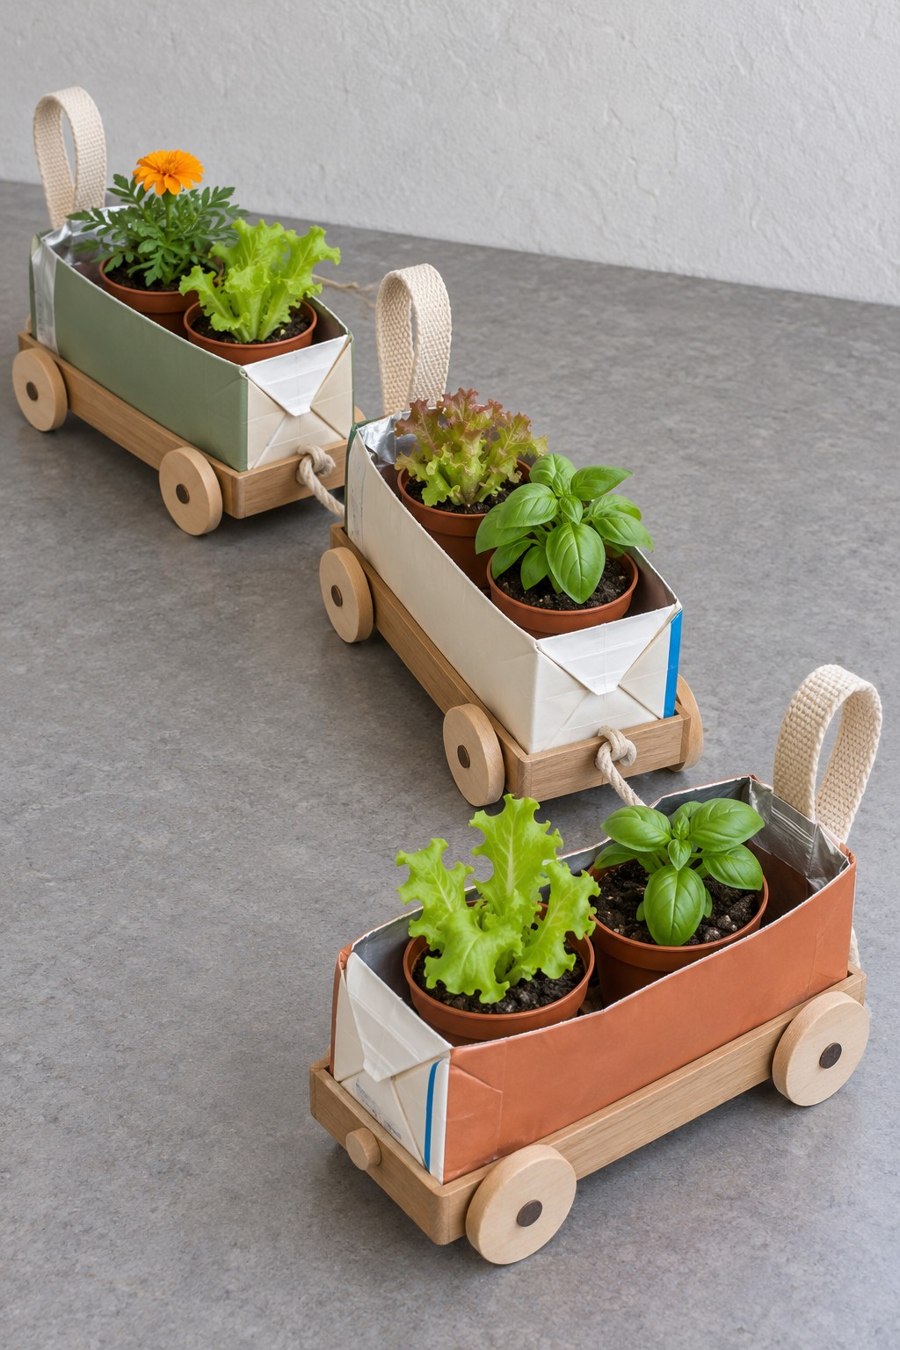
Build low carriage bodies from carton bases and glue them onto craft stick platforms. Add wooden discs as decorative wheels and short fabric loops at the ends. Set individual growing pots inside waterproof liners, with taller plants in the rear carriage and lower plants toward the front. Keep the train stationary on a level surface. The wheels and loops create the train character; they should not be relied on to transport wet soil or pull the connected planters.
14. Rainbow Roof Savings House
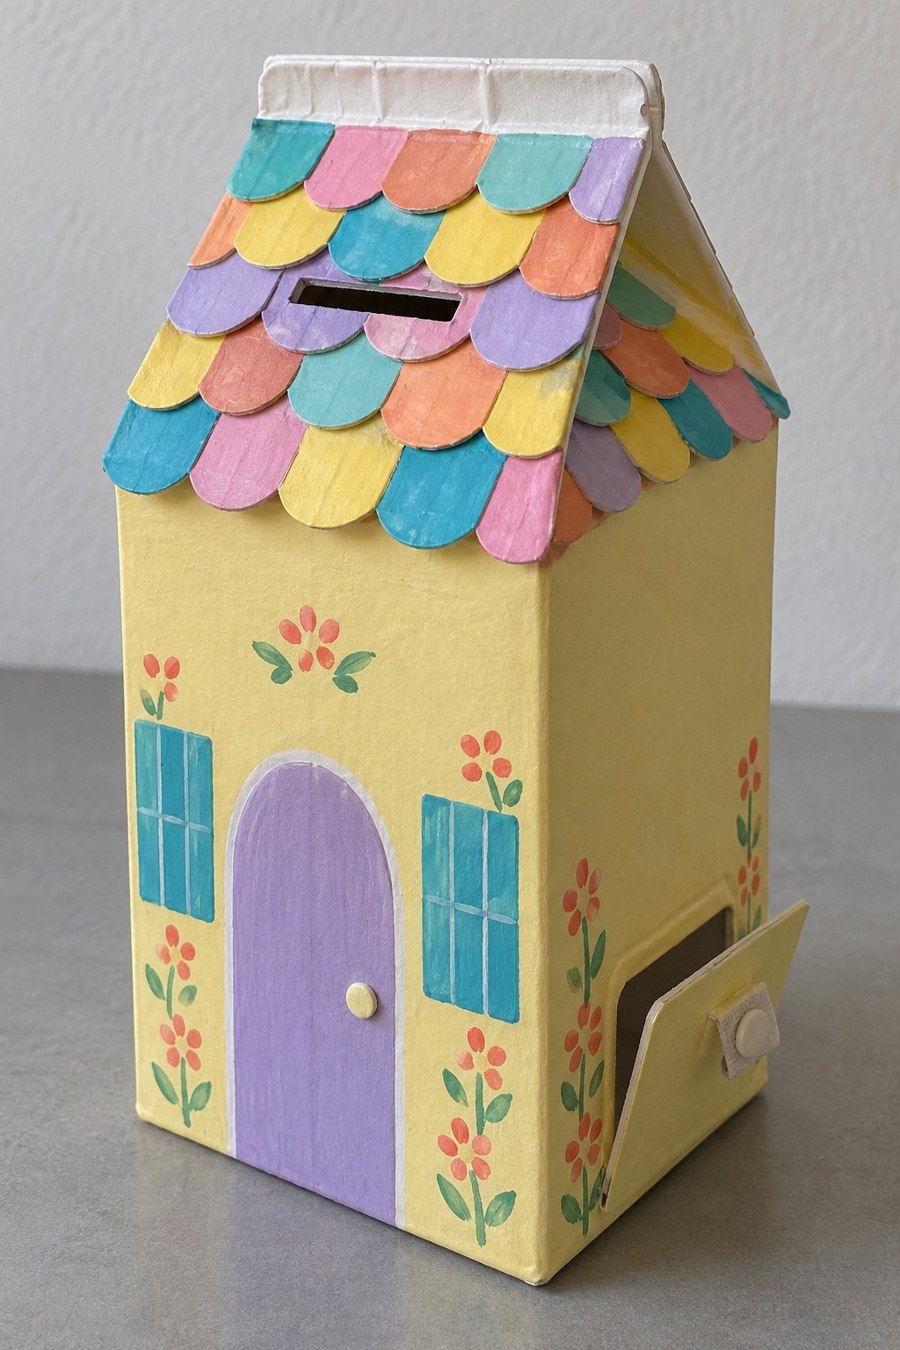
Keep the carton roof shape and cover it with overlapping rows of colored paper scallops, working upward from the eaves. Paint a door and flower details on the front. Cut a coin slot through the roof face below the ridge and add a reinforced retrieval flap near the base. Tape the slot edges so coins slide in smoothly. Empty the house regularly before the contents become heavy enough to distort the base.
15. Chameleon Desk Organizer With a Comb Spine
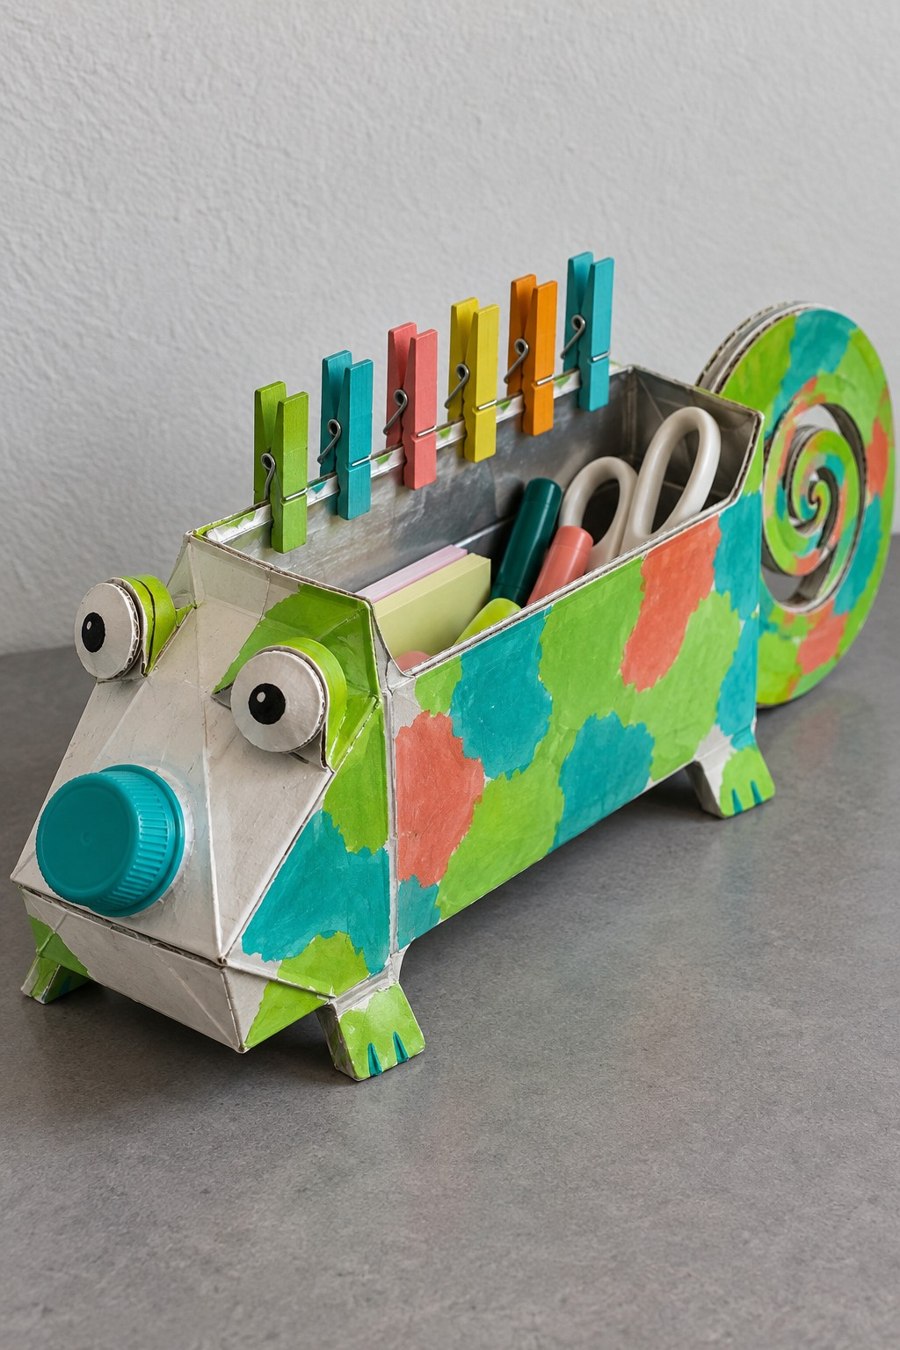
Use a horizontal carton with a wide top opening as the body. Add reinforced internal dividers for pens and scissors, then decorate the exterior with irregular bright patches. A curled cardboard tail and flat folded feet provide the silhouette; upright colored tabs form the back crest. Use lightweight contents and keep scissors with their handles above the rim. Reinforce the floor beneath pointed tools and make the decorative crest blunt rather than sharp.
16. Hanging Dragon Pocket for Garden Gloves
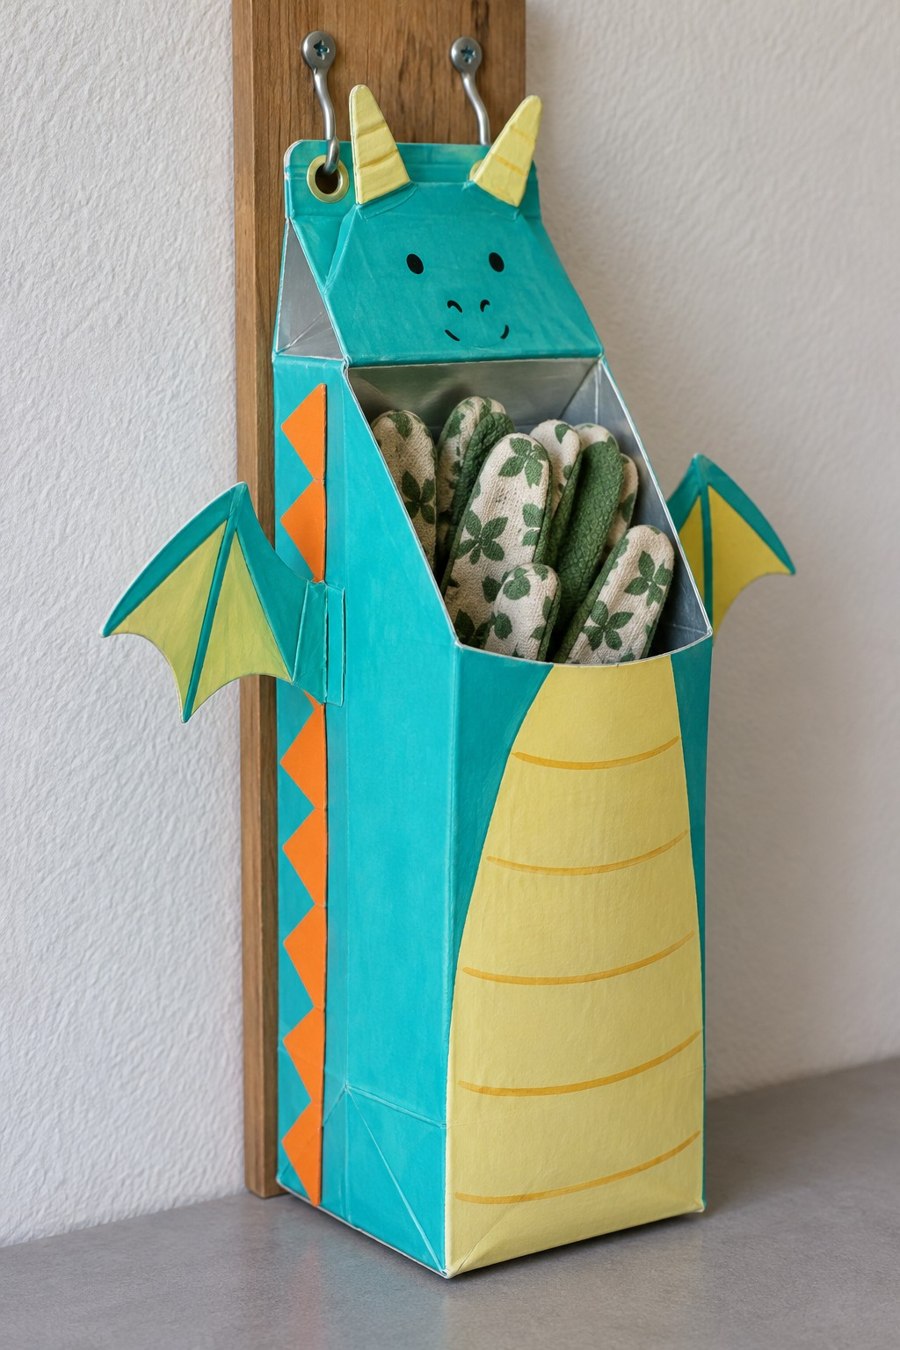
Cut a deep front pocket beneath a retained dragon head, then add flat wings, small horns, and a yellow belly panel. Reinforce the upper back with a second carton layer and fit two eyelets for hanging. Mount it on two secure hooks in a sheltered dry location. It suits clean dry gardening gloves or soft cloths. Let damp gloves dry elsewhere first, and avoid loading the pocket with heavy metal tools.
17. Crocodile Pencil Box With a Hinged Jaw
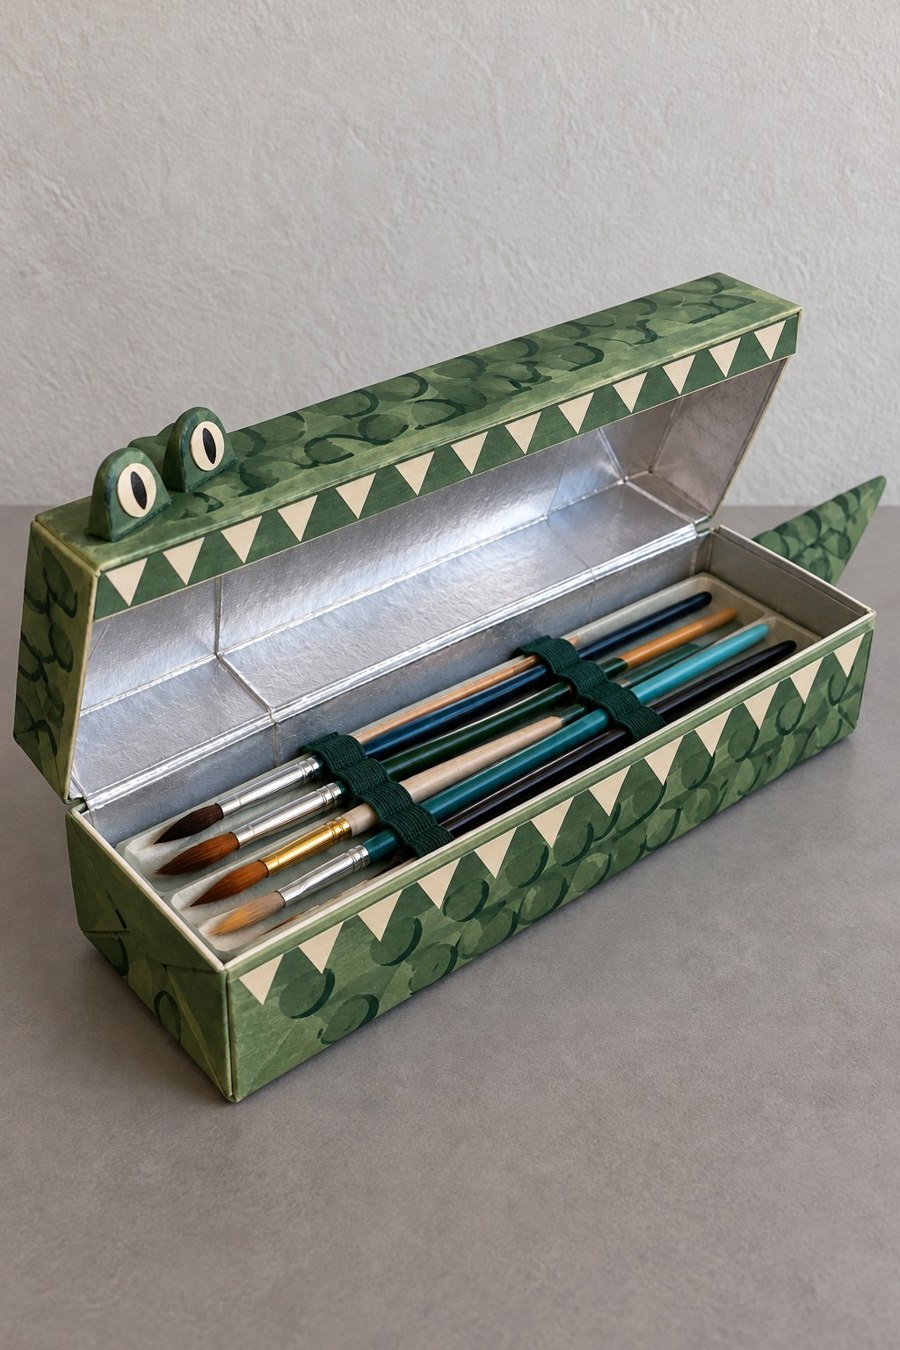
Cut a long horizontal opening while leaving one long edge available for a tape hinge. Line the base with paper or felt, then paint the body with layered green scales. Attach rounded eye shapes near one end and paper teeth around the opening. Keep the teeth clear of the hinge and use thin decorations that do not prevent the lid closing. Test the box with your longest pencils before fixing the end panels.
18. Painted Floral House With a Battery Light
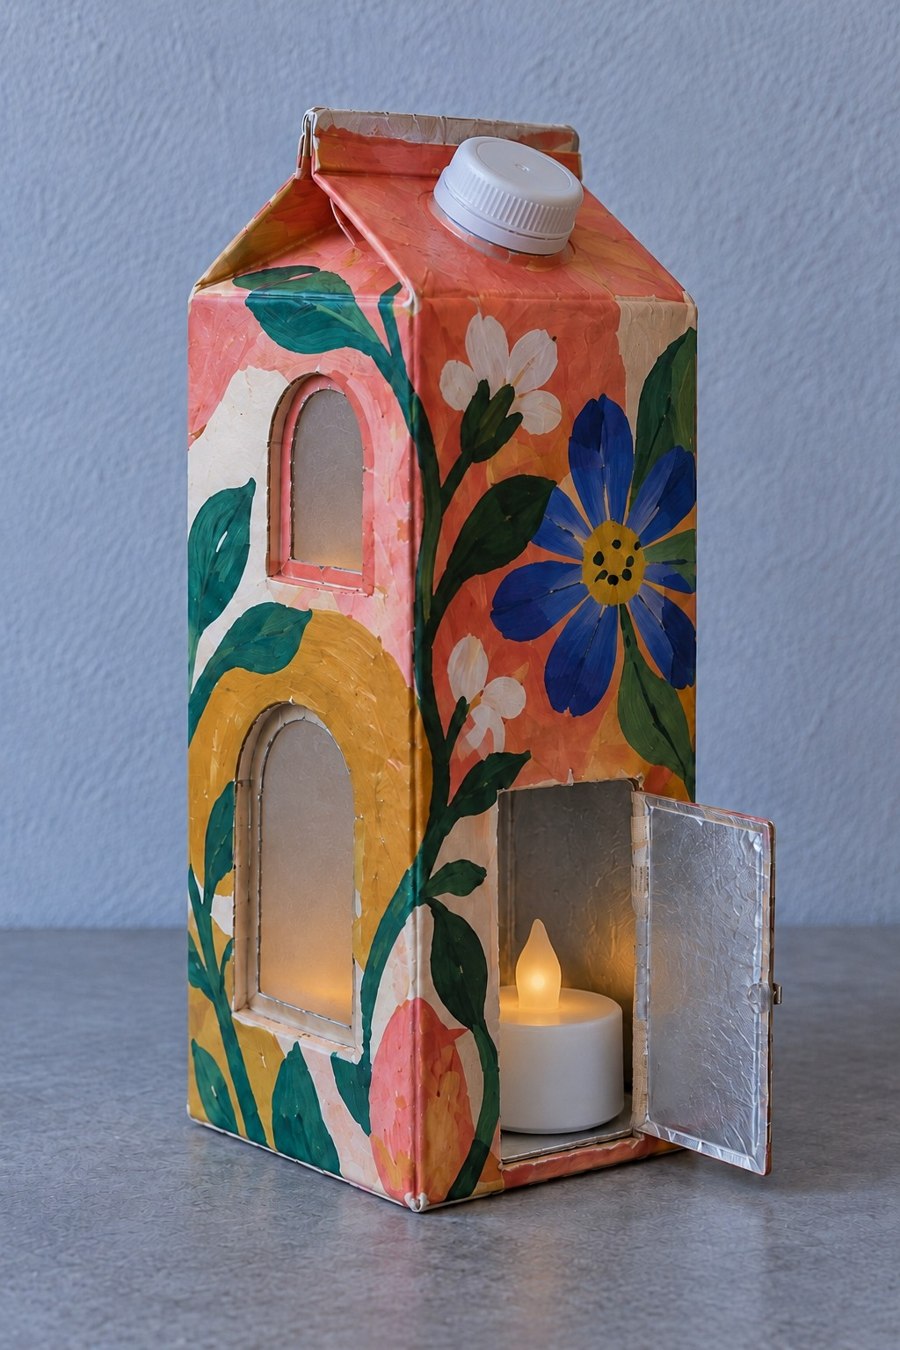
Retain the pitched roof and create an arched side window plus a lower access door. Paint oversized flowers and warm colored arches across the exterior, leaving the cut edges neat. Set a small battery powered LED candle inside, with its switch and battery compartment reachable through the door. Use a unit with a secure battery compartment and keep it away from young children. Never put a real candle, incense, or any hot bulb inside a carton.
19. Expressive Beetroot Planter Sleeve
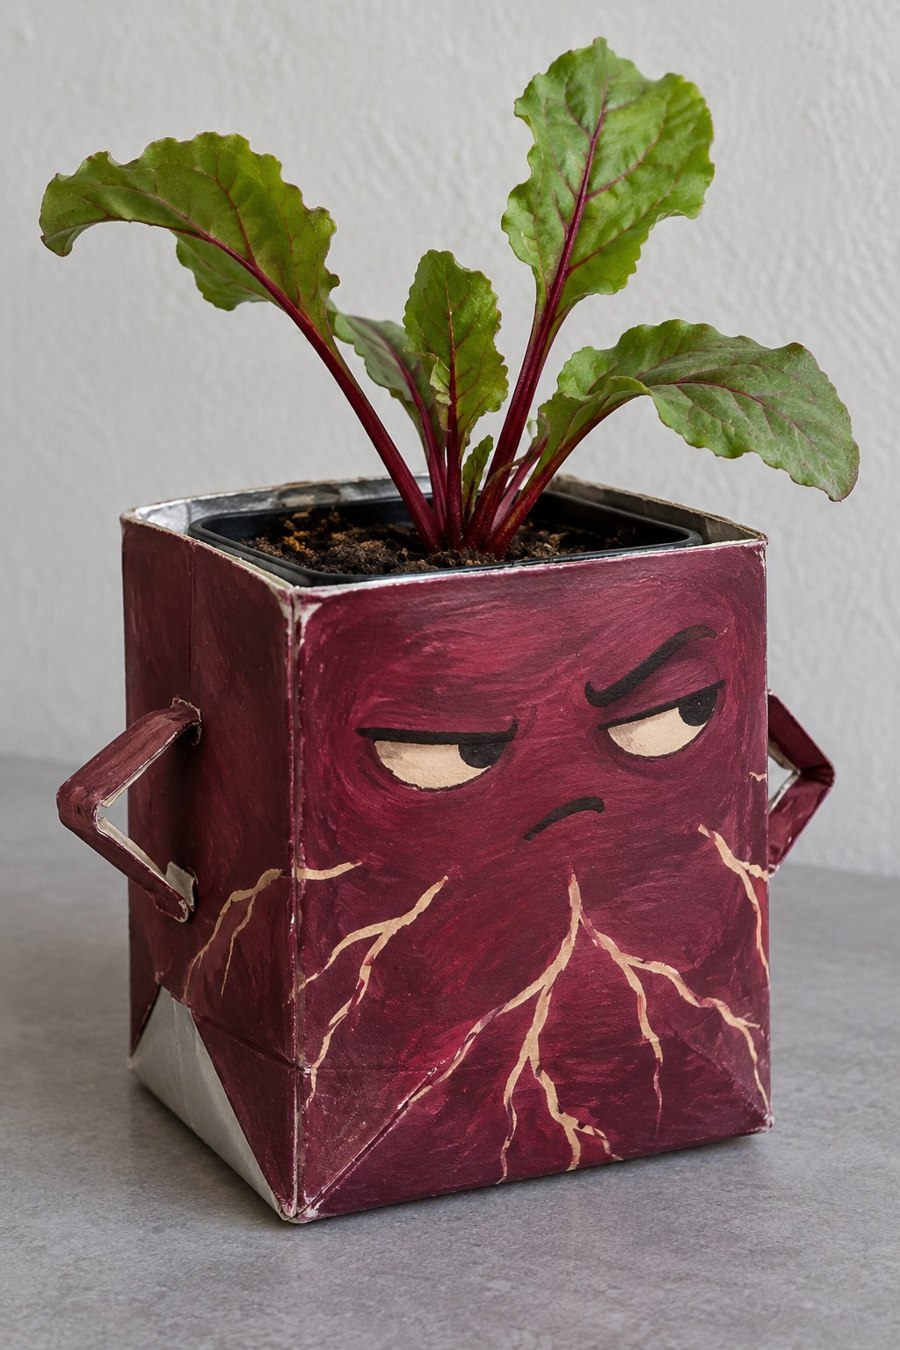
Cut the top off a carton, paint it deep beet red, and add cream root lines across the lower face. Half closed eyes and angled brows give the planter its unimpressed expression. Fold narrow carton strips into angular arms and attach them to the sides. Place a small nursery pot of suitable red stemmed foliage inside a waterproof liner. Keep the leaf stems free of the rim and remove the inner pot for watering.
20. Striped Sailor Storage House
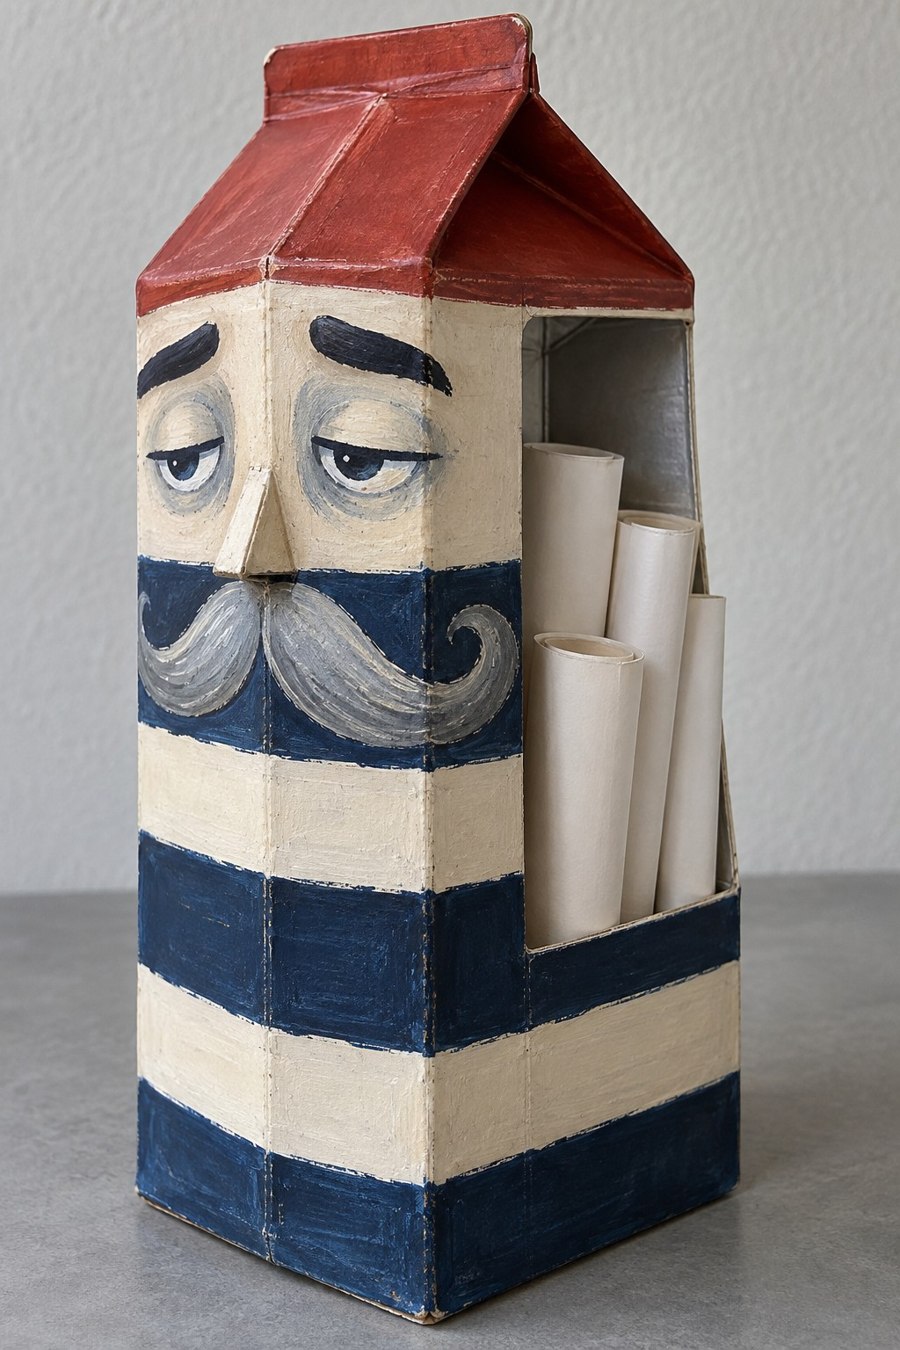
Paint a tall roofed carton with alternating cream and navy bands, then add a sleepy face, long nose, and curled moustache. Cut a tall opening in one side to hold rolled paper or lightweight drawing supplies. Reinforce the opening perimeter and leave the opposite wall whole to preserve stiffness. The red roof finishes the character without a separate lid mechanism. Position the organizer against a wall if taller paper rolls make it feel unbalanced.
21. Storybook Royal Tissue Dispenser
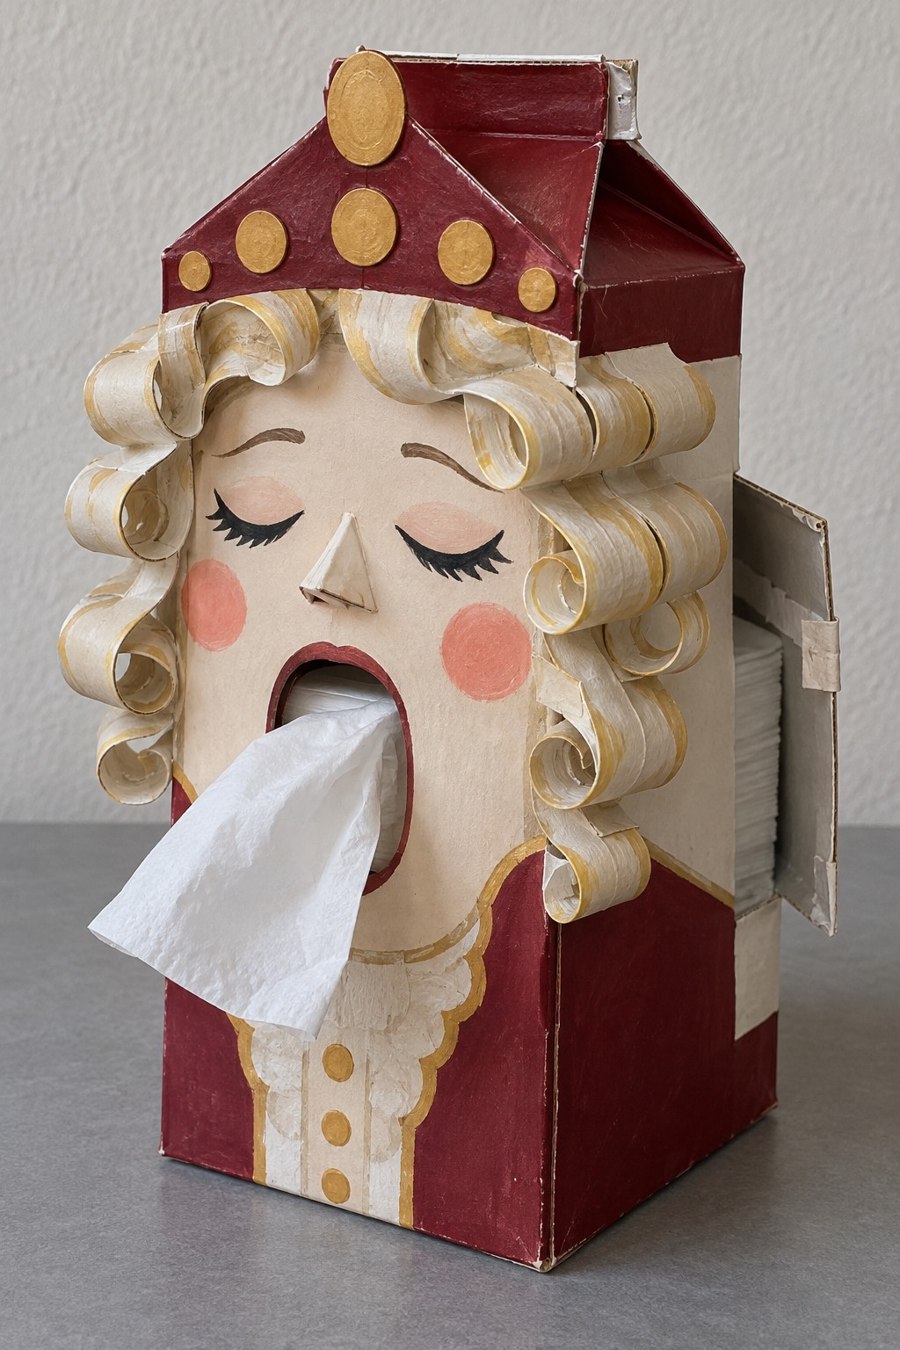
Use a tall carton body that comfortably fits a tissue refill, then cut a rounded mouth opening in the face. Add cream paper curls to each side, a red crown shaped roof, and painted cheeks and eyelids. Form the curls around a pencil and attach only their upper ends once the paint is dry. Line the mouth edge with smooth paper tape and keep a rear or side refill door. Avoid gluing decorations where they could catch the tissues.
22. Moth Wing Cabinet for Small Paper Supplies
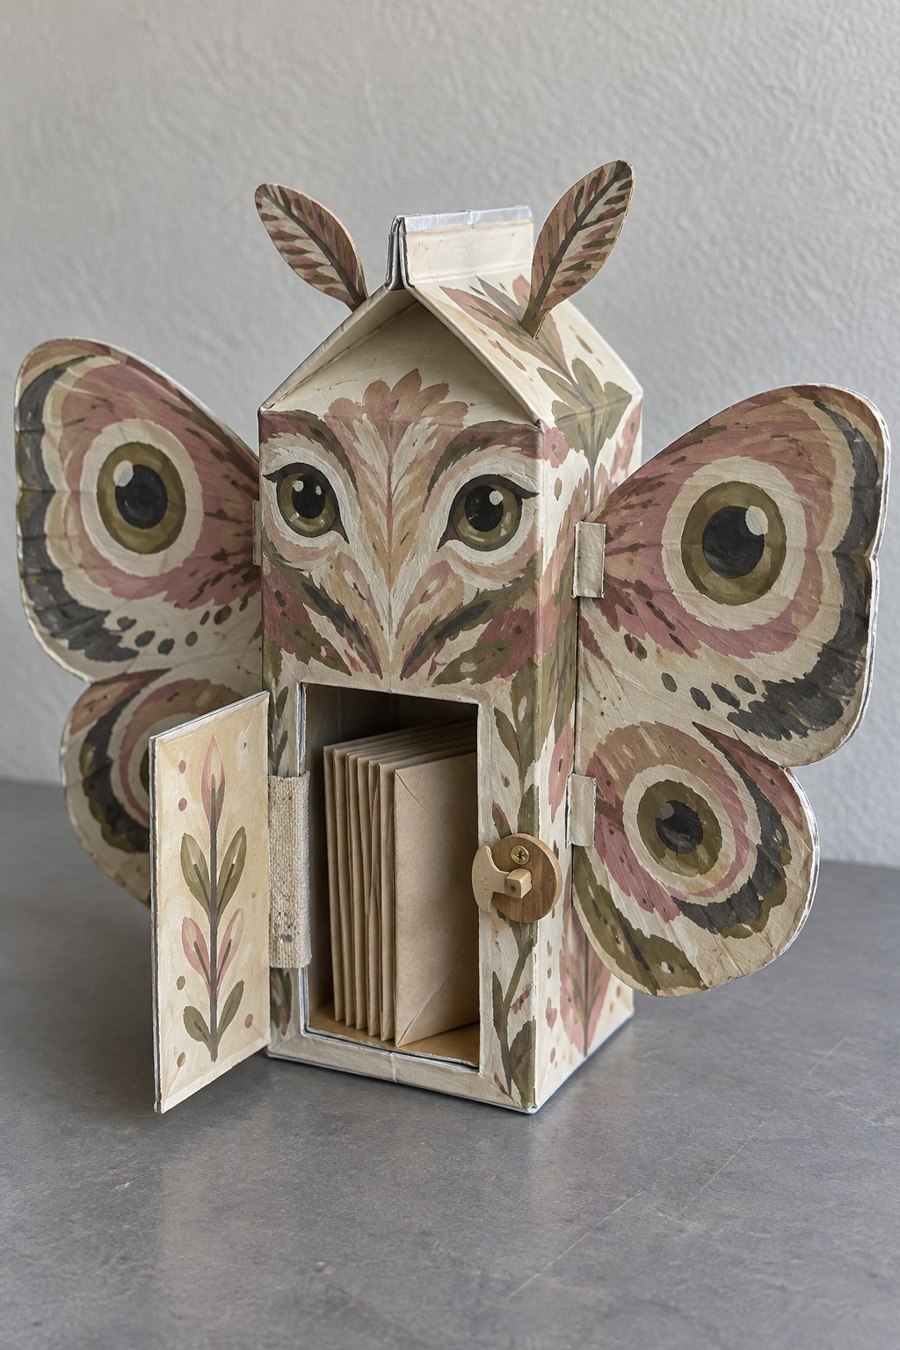
Turn the carton front into a small hinged door and line the inside for folded cards or paper packets. Attach two broad illustrated wings to the back, using overlapping tabs rather than narrow edge joints. Add antenna shapes and paint a symmetrical moth face beneath the roof. The wings work best as decorative extensions on a shelf, with the cabinet supported by its own base. Leave the door swing clear of the wings and store only light dry contents.
23. Pierrot Paper Cabinet With a Pleated Collar
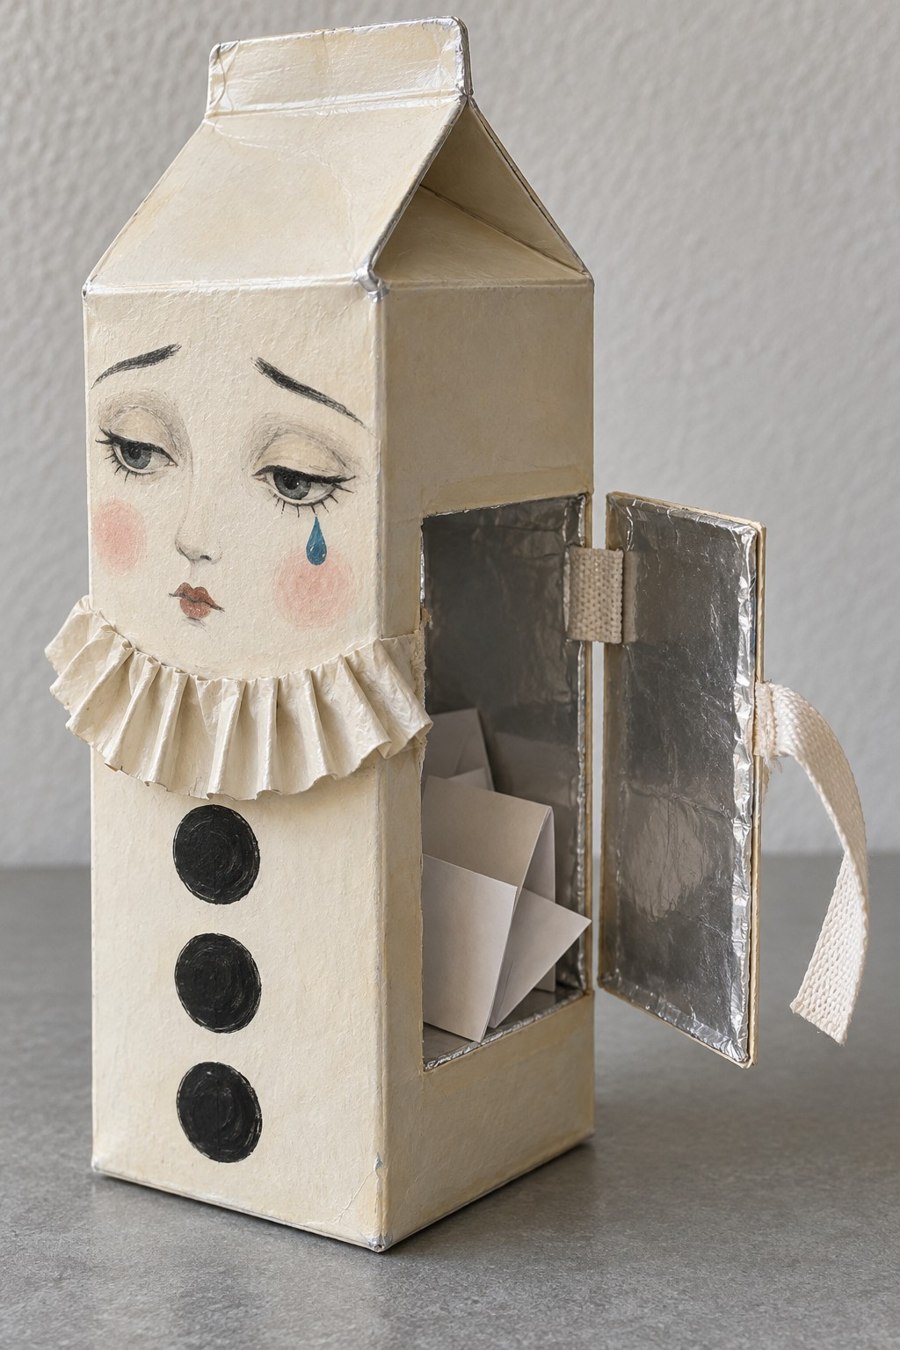
Preserve the tall milk carton silhouette and cut an access door into one side. Paint a quiet face on the front and add two dark circular buttons. Fold a strip of thin paper into a pleated collar, then glue its upper edge below the face without wrapping it across the door. A fabric ribbon can provide a simple pull. Reinforce the door hinge with cloth tape and use the compartment for folded notes or other lightweight paper supplies.
24. Portrait Brush Holder With a Fabric Wrap
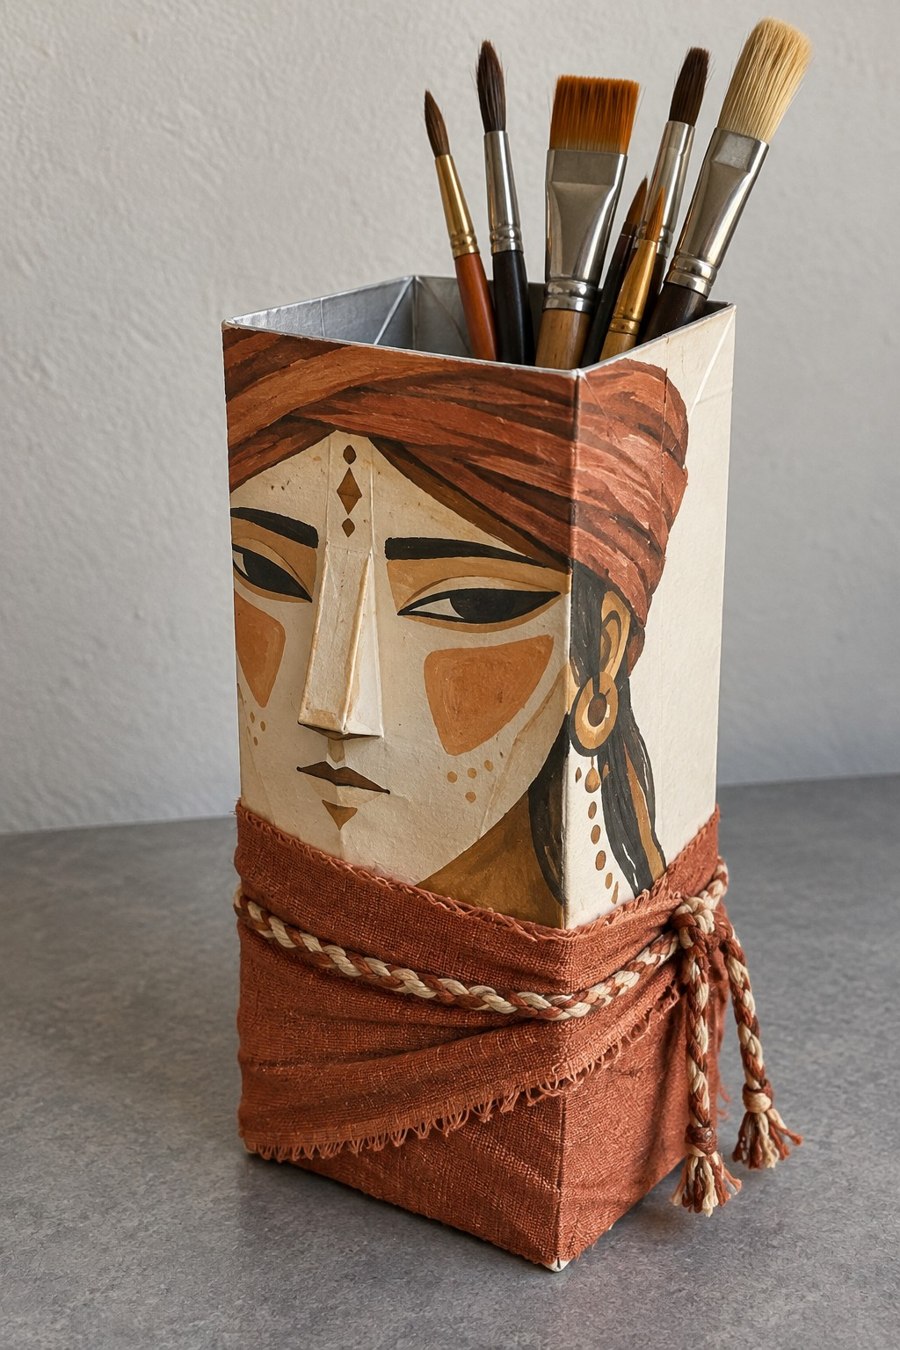
Cut a clean carton into a tall open cup and paint an expressive portrait across the front and side panels. Keep the eye line level as it crosses the fold. Wrap the lower section with a small terracotta fabric offcut and tie a braided cord around it, securing the knot so it does not slip. Line the rim and add a removable inner cup for brushes. Store brushes dry with bristles upright; wash them in a separate container.
25. Cheeky Devil Pencil Cup
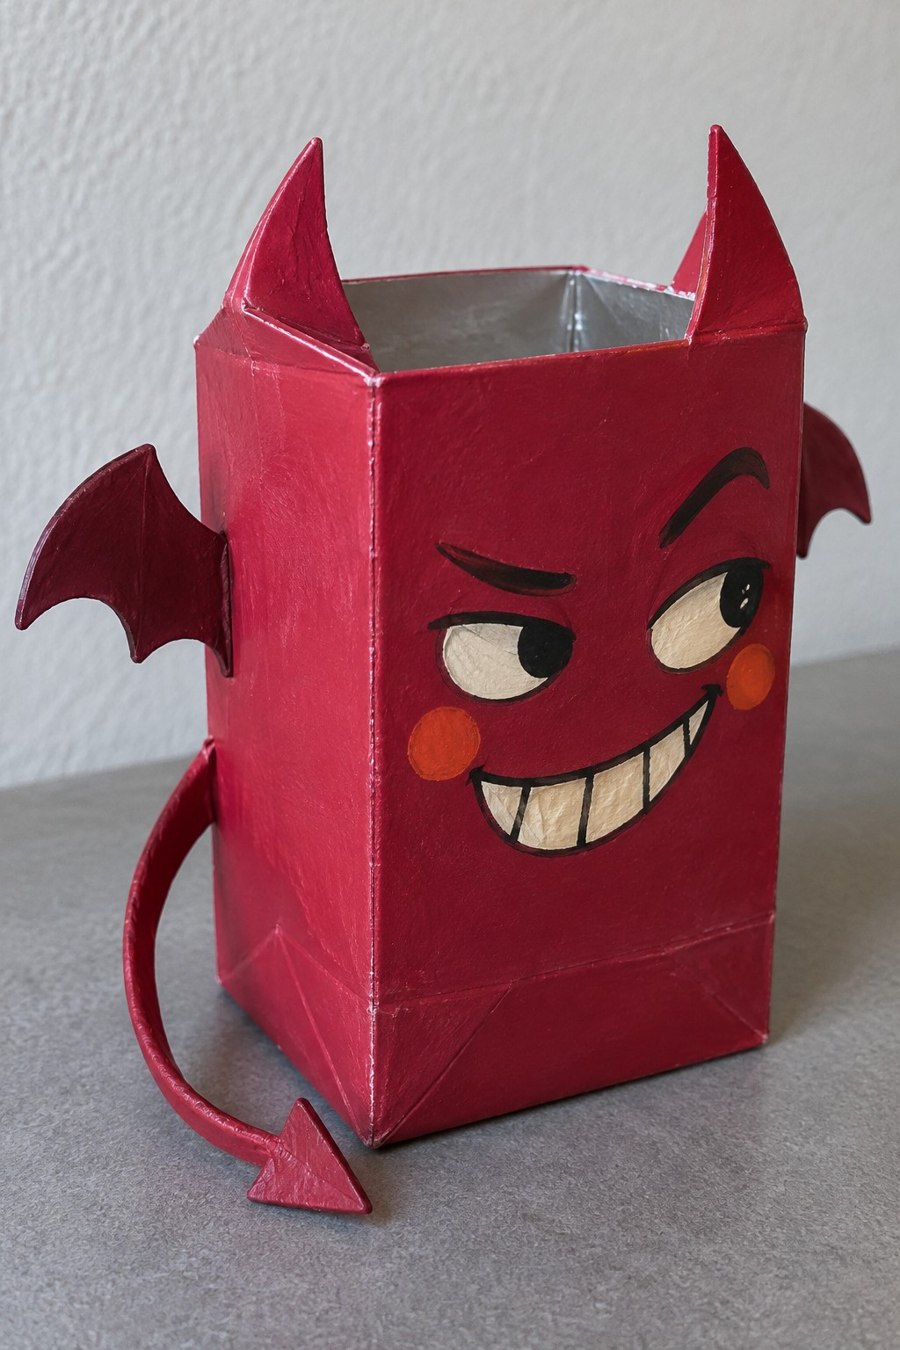
Shape two horns from the upper front edge of a carton base, then add separate flat wings and a curled tail cut from spare carton. Paint the body crimson and build the face with angled brows, a broad grin, and small blush circles. Reinforce the horn bases from inside before decorating. Keep the cup for light stationery and position the tail where it cannot catch on a drawer or sleeve. Round the decorative points for easier handling.
26. Angel Message Keeper With a Golden Halo
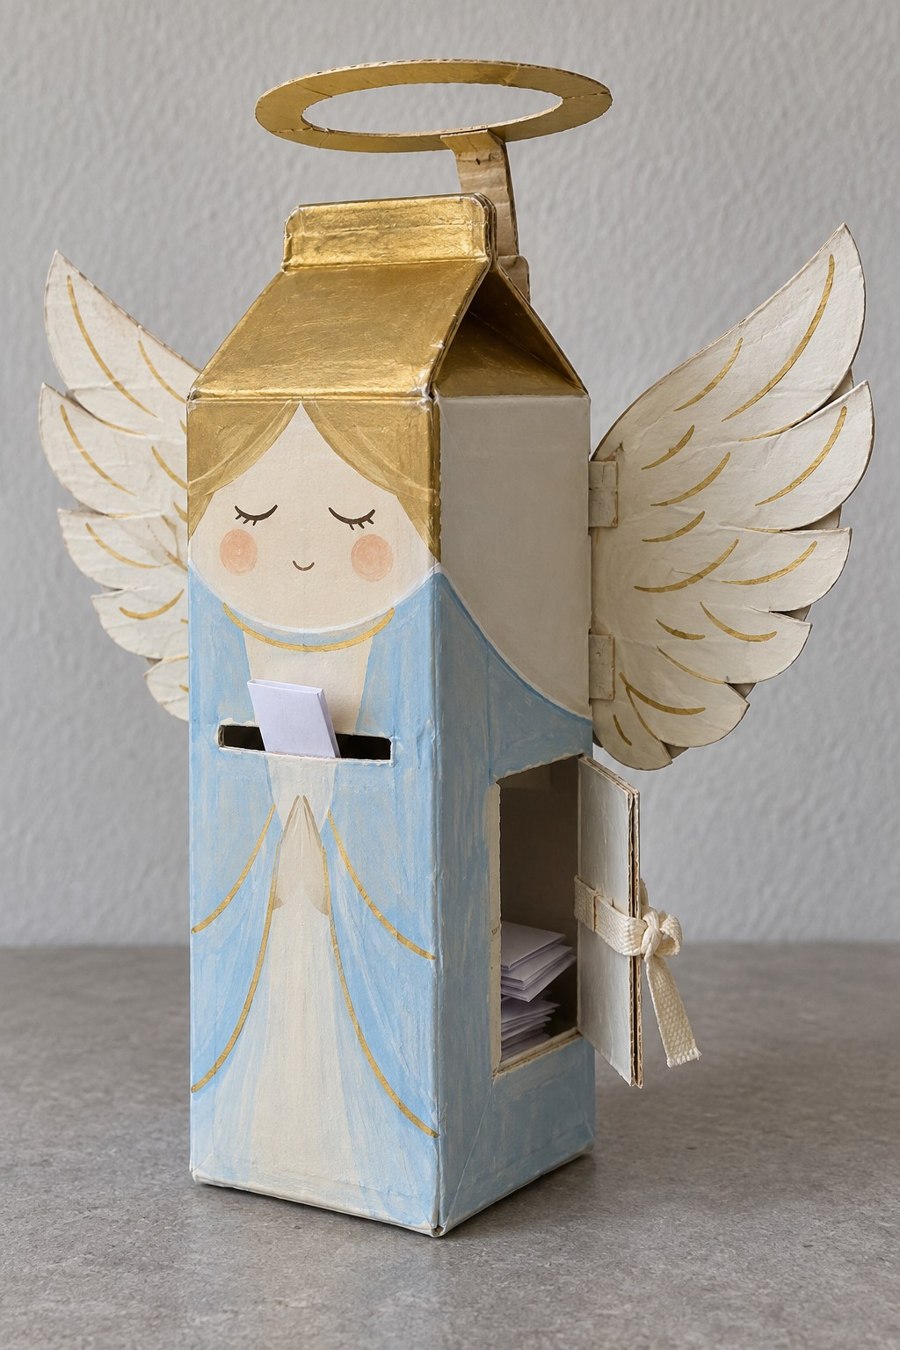
Keep the roofed carton body and paint a calm face above a pale blue robe. Add a shallow folded front pocket for notes, with its bottom and side tabs glued firmly to the body. Cut two feather patterned wings and attach broad tabs to the rear so the wings appear to emerge from behind the carton. Support a lightweight halo on a short reinforced rear tab. This is a tabletop message keeper; the decorative wings are not hanging supports.
27. Emoji Carton Character Collection
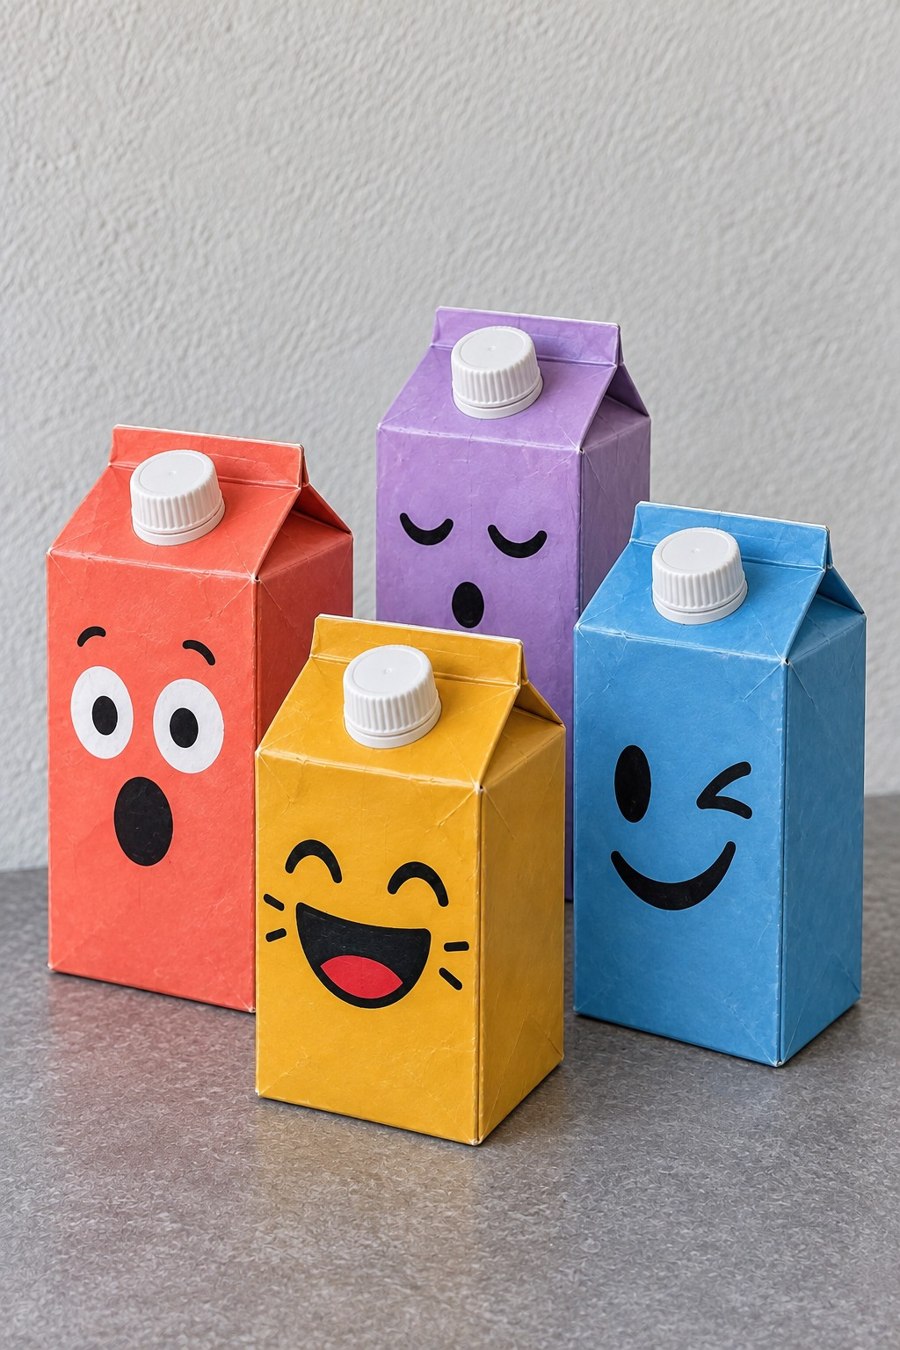
Keep the original caps and roof folds for a recognizable carton silhouette. Prime the exteriors and paint each body a different solid color before adding laughing, surprised, sleepy, and winking faces. Draw the features lightly in pencil so their spacing feels deliberate. Leave these cartons closed as a playful shelf collection, or plan a separate access flap before painting if you want lightweight storage. Do not return decorated containers to use for milk or other drinks.
28. Three Eyed Monster Sticky Note Station
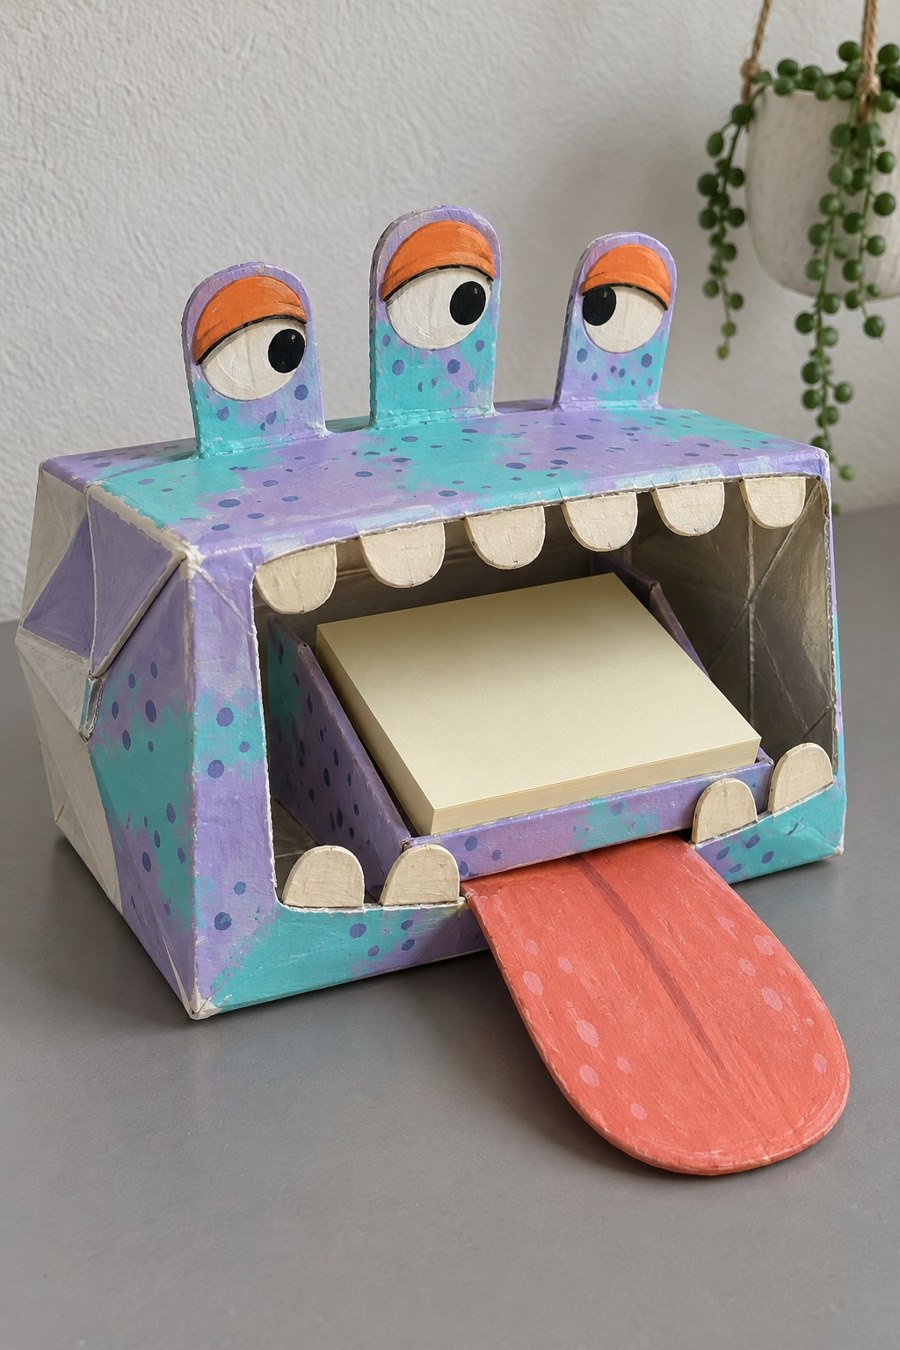
Set a wide carton section horizontally and cut a mouth opening large enough for a sticky note pad. Make a gently sloping support inside from folded spare carton so the pad stays visible and reachable. Add three reinforced eye stalks, blunt cream teeth, and a red tongue flap below the opening. Keep the tongue decorative rather than using it as a load bearing shelf. Measure the actual pad first, allowing space to peel off individual sheets.
29. Night Sky Miniature Staircase House
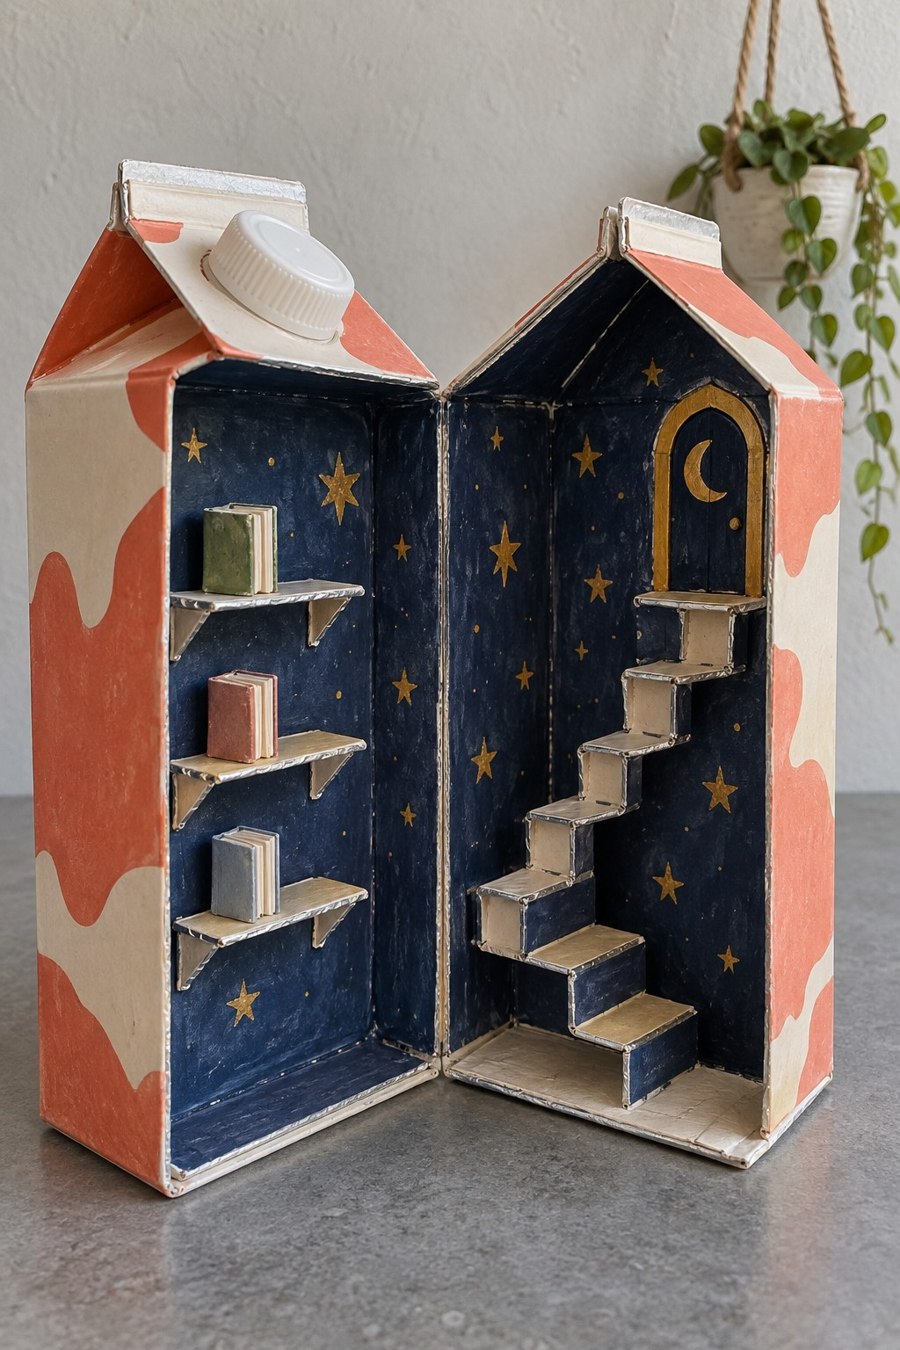
Open a tall carton along a planned vertical seam and use reinforced cloth tape to create a book style hinge. Paint the inner walls navy with small stars and a crescent moon. Add tiny folded stair treads and ledges with broad glue tabs, spacing them before attachment so they form a deliberate path. Keep this as a dry miniature display with paper props. The stairs and shelves are decorative and cannot support real pots, candles, or household objects.
30. Cloud Angel Hanging Planter With a Supporting Cradle
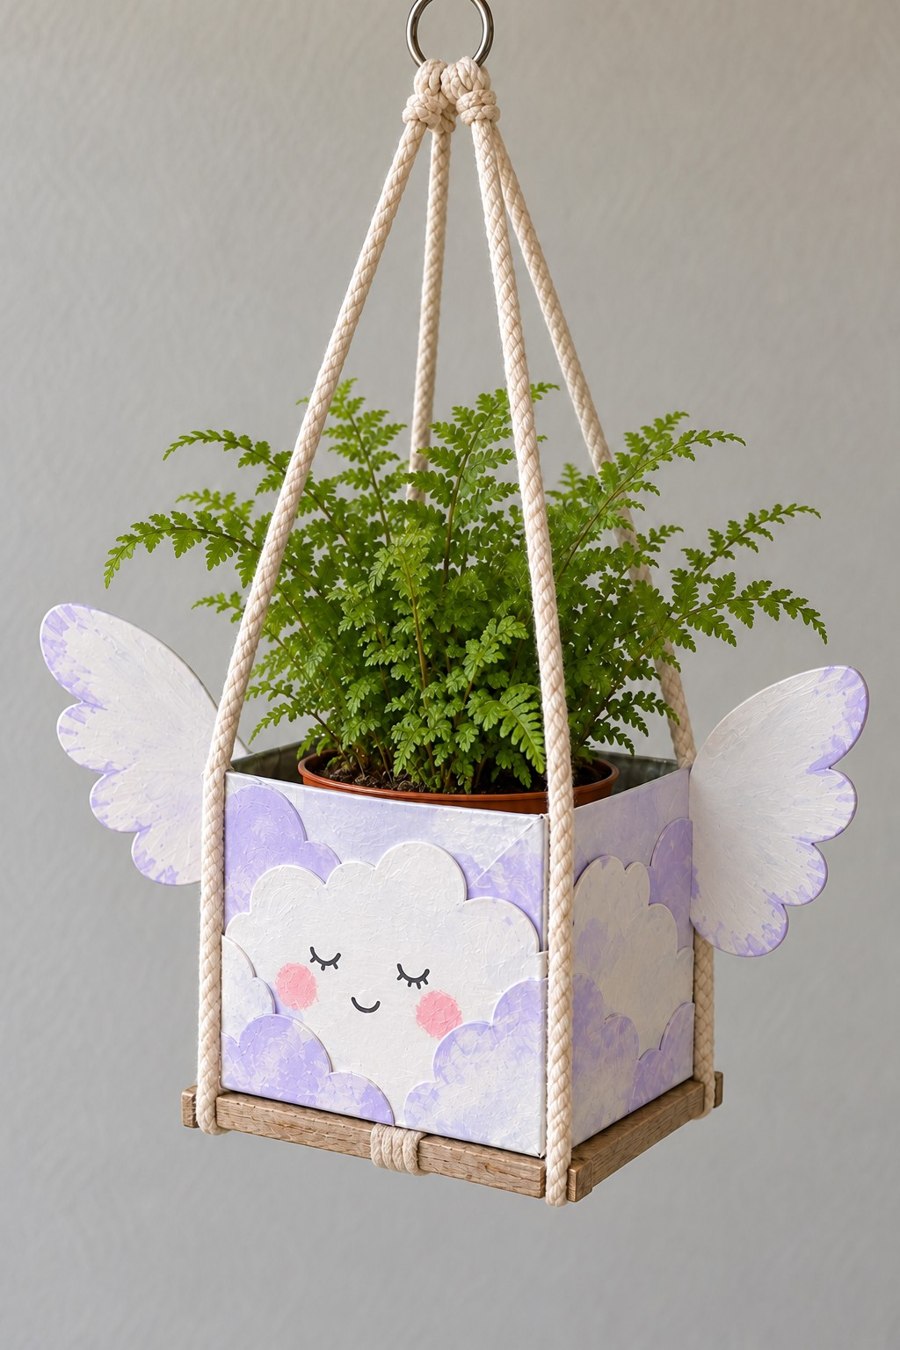
Cut a low square carton sleeve, paint a lavender cloud face, and attach lightweight wings behind it. Place the sleeve on a small rigid wooden base, with four cords running beneath or securely through the base corners and meeting at a suitable hanging ring. The cradle carries the load instead of holes in the carton rim. Use a small nursery pot inside a waterproof catch container, hang from a fixing rated for the full wet weight, and remove the pot for watering.
Keep Your Carton Projects Useful for Longer
Check the rim, base seams, hanging points, and glued tabs during use. Retire a piece if the board softens, layers lift, or its support becomes loose. Dust painted surfaces gently and remove liners for separate cleaning instead of washing the decorated carton under a tap. Keep spare paint and a few matching paper scraps for small cosmetic repairs.
Choose the project around something you already need to organize. A fitted drawer cup, accessible tissue sleeve, or small brush holder earns its place through daily use. For larger storage projects, these ways to repurpose a wine rack for everyday storage offer ideas for grouping supplies in more substantial structures.


Leave a Reply