
Decide whether your piñata will hang as decoration, open with pull ribbons or become a striking game. That choice determines its body, filling opening and hanger. The 19 designs below range from animals and fruit to retro and space themes; a rainbow fringe video introduces a surface technique that can carry across different shapes.
Table of Contents
- Choose How Your Piñata Will Be Used
- Materials and Tools
- Plan the Hollow Body Before Covering It
- Make a Working Ribbon Release
- Fill and Finish for the Participants
- Video Reference: Decorate a Rainbow Form
- Find a Party Shape
- 19 Designs to Adapt to Your Celebration
- 1. Rainbow Cloud Piñata
- 2. Retro Roller Skate Piñata
- 3. Flowering Cactus Piñata
- 4. Disco Ball Piñata
- 5. Colorful Butterfly Piñata
- 6. Ice Cream Cone Piñata
- 7. Colorful Rocket Piñata
- 8. Colorful Owl Piñata
- 9. Jellyfish Piñata
- 10. Mushroom Piñata
- 11. Friendly Robot Piñata
- 12. Strawberry Milk Carton Piñata
- 13. Beehive Piñata with Flying Bees
- 14. Watermelon Slice Piñata
- 15. Floral Watering Can Piñata
- 16. Storm Cloud Piñata
- 17. Ringed Planet Piñata
- 18. Jeweled Crown Piñata
- 19. Ferris Wheel Party Display and Piñata Adaptation
- Set Up the Activity Before Guests Arrive
Choose How Your Piñata Will Be Used
A decorative piñata needs a recognizable outline and balanced display support; it can remain empty. For a striking game, the filled body must hang securely while its paper shell can open under controlled use. Strengthening the hanger is different from making the whole shell difficult to break. A ribbon operated version needs a filling compartment above an opening flap, with an operating ribbon connected to that flap. Hanging decorative ribbons alone do not create the mechanism.
Materials and Tools
For a flat silhouette, gather lightweight cardboard, tissue or crepe paper, paper tape, a compatible craft adhesive, hanging cord, a ruler, pencil, and scissors. Two matching faces joined by an edge strip can create a hollow body. Rounded forms can use papier mache over a removable form instead. These are adaptation methods, not a confirmed description of the hidden structure in each photo. Keep outer details light and flexible, without glass gems or rigid sharp decorations.
An adult should handle knife cuts on a cutting mat and any hot glue work, following the tool and adhesive instructions. Paper adhesive may suit the decorative layers where compatible. Make a small trial for your chosen cardboard, glue, and paper before committing to the complete design. Select the shape around the space available: broad wings, a planet ring, or a long spout need more clearance than a compact body.
Plan the Hollow Body Before Covering It
Mark four things on the drawing: the filling space, the filling opening, the hanging connection, and the release point. Put treats in the main compartment rather than narrow ears, fins, or decorative appendages. Connect the hanger to a suitable internal support that spreads the full filled weight, keeping the filling opening clear of it. Check the assembly at a controlled low height away from people before installation. A decorative loop attached only to tissue paper is not a supporting connection.
With papier mache, let the shell dry thoroughly before removing its form or adding contents, then complete the access opening and decoration. Drying depends on material, layer thickness, and conditions. If a balloon is used, an adult should remove it and promptly collect every fragment, keeping uninflated balloons and pieces away from children. Avoid assuming one layer count or overnight wait works for all shapes.
Make a Working Ribbon Release
A ribbon release uses a flap beneath the filling compartment. The functional ribbon is attached to the flap so pulling it opens a route for the contents; other ribbons may be decorative or part of the guessing game. Keep the opening path free of the surrounding fringe. A compatible conversion kit provides its own flap and connection instructions. Follow those specifications instead of assigning one flap size to every body. Check the action before the party with a small amount of suitable filling.
Fill and Finish for the Participants
Choose contents for the participants’ ages and allergies, keeping the total load within the supporting design. For food, use sealed products with ingredient information families can review; miniature versions may differ from larger packages, so check each label. Unlabeled mixed sweets are harder to assess. Nonfood favors also need age suitability, and toys with small parts should be kept away from children under three. Match the opening to the contents so they can release without wedging.
Apply fringe in overlapping rows, leaving the uncut edge available for bonding. Finish large color areas before adding small details, and keep access to the filling and release points. Let adhesive dry or cure as instructed before filling or handling. The project can act as a backdrop accent, themed centerpiece, or party activity; choosing that role early prevents elaborate decoration from obstructing its actual use.
Video Reference: Decorate a Rainbow Form
The clip starts with stacked cardboard arches, colored paper strips, cloud pieces, cord, and raindrop shapes. The paper is cut into fringe, adhesive is applied before the strips are pressed onto the arch, and the bands build outward around the curve. Clouds and hanging drops finish the silhouette. It shows how repetition and light decoration make a plain form recognizable, a process you can use for wings, crowns, fruit wedges, and other surfaces below.
For a playable rainbow piñata, construct the hollow body, filling hatch, hanger and release opening before adding fringe. Shape loose lightweight tissue for the cloud ends. Keep the hanging connection independent of the decoration and let each glued layer set before adding another.
19 Designs to Adapt to Your Celebration
The ideas below pair a recognizable party shape with a practical building decision. Use the video’s fringe technique where appropriate, then choose the hollow construction, hanger, and release for the role you selected. Finished photos provide visual inspiration rather than proof of hidden cavities or load capacity. Decorative appendages should stay separate from the parts that hold and release the contents.
1. Rainbow Cloud Piñata
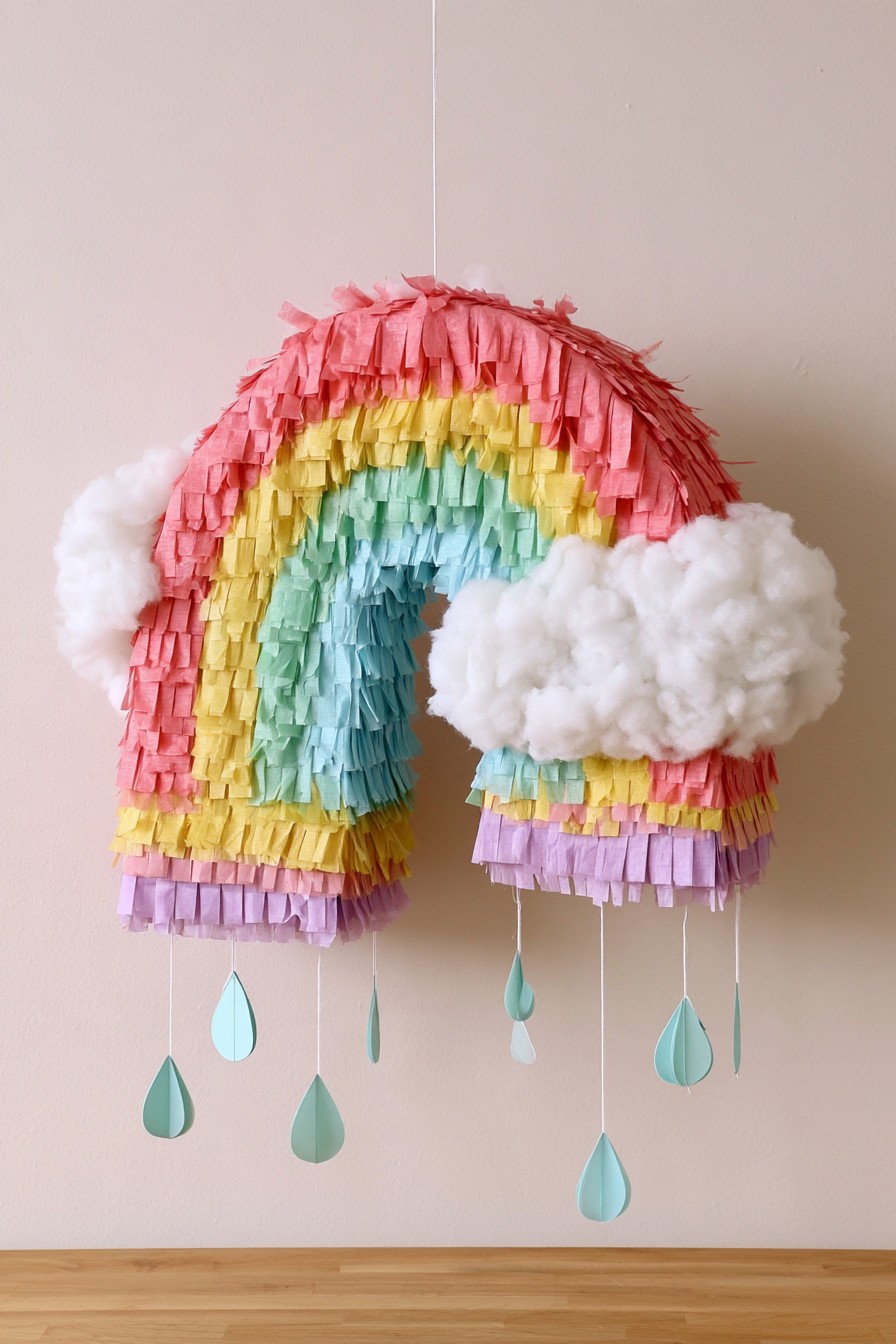
Pastel bands follow an open rainbow arch, with bulky white clouds at the ends and blue raindrops below. The repeating colors make the outline easy to recognize, while the clouds give a softer finish than fringe alone. It suits a party backdrop as well as a themed activity when a separate functional body is planned. Compare pastel gender reveal party themes for coordinating cloud and star decorations.
Use the video’s fringe sequence for the visible bands. Shape lightweight tissue into loose cloud clusters if recreating their volume with paper, without claiming that is the photographed material. For a filled version, create a hollow arch with an accessible compartment and planned release, not just stacked solid faces. Keep droplets decorative and clear of the operating ribbon if choosing a ribbon release.
2. Retro Roller Skate Piñata
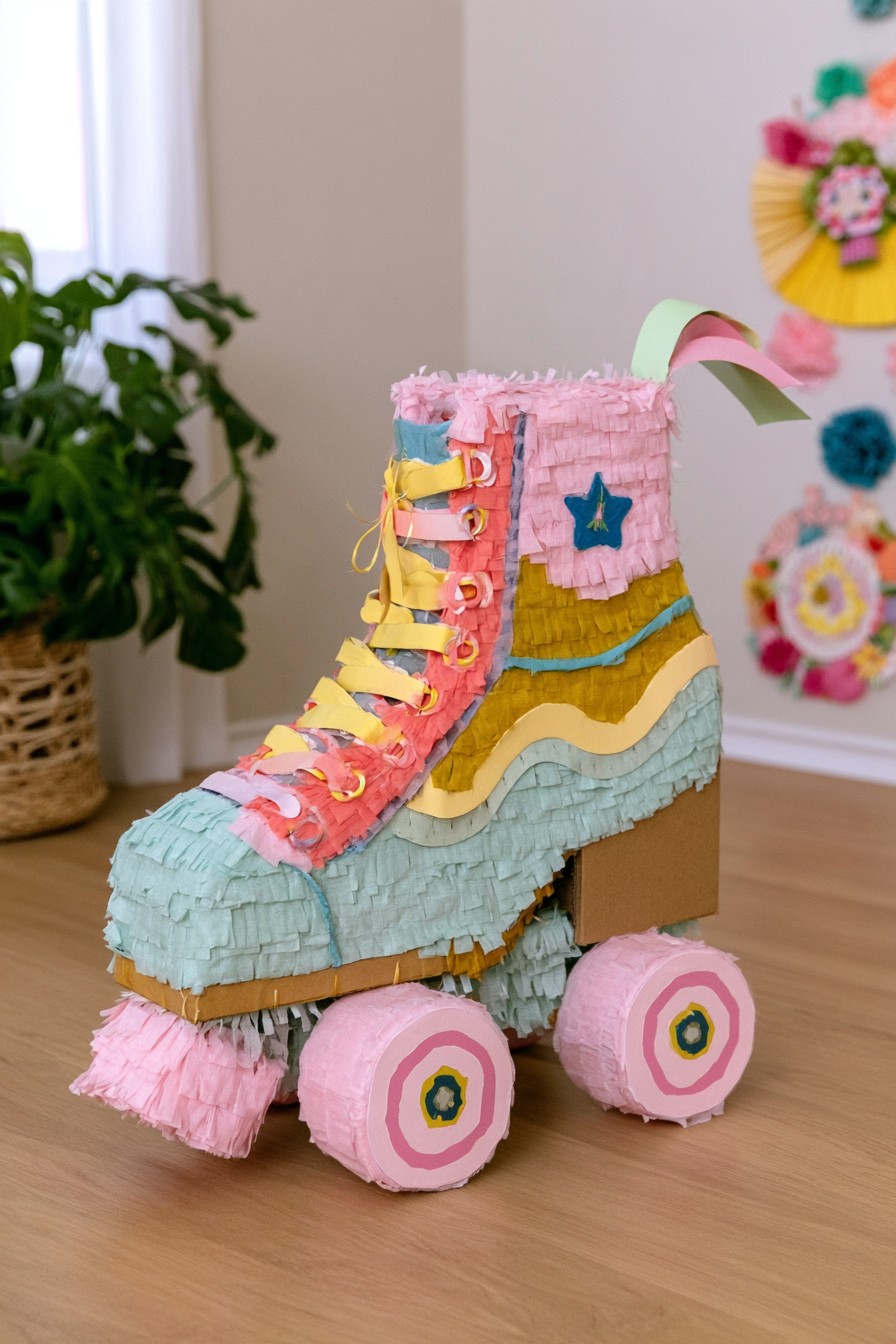
Pink boot panels, yellow laces, blue fringe, and layered round wheels create a roller skate with a strong retro outline. The details are concentrated where they identify the object, so it can read clearly across a party room. This shape is useful beside a skating themed dessert display, where the wheels and sole can remain visible without needing realistic moving parts.
A pair of boot silhouettes joined by an edge strip offers a hollow adaptation. Plan the filling in the main boot area and retain access away from the hanger. Make wheels from light paperboard layers as decoration, not heavy rolling hardware. Support their attachment where they meet the sole, keeping the body’s release area separate. Cover the larger color panels first and add laces afterward, leaving the opening method unobstructed.
3. Flowering Cactus Piñata
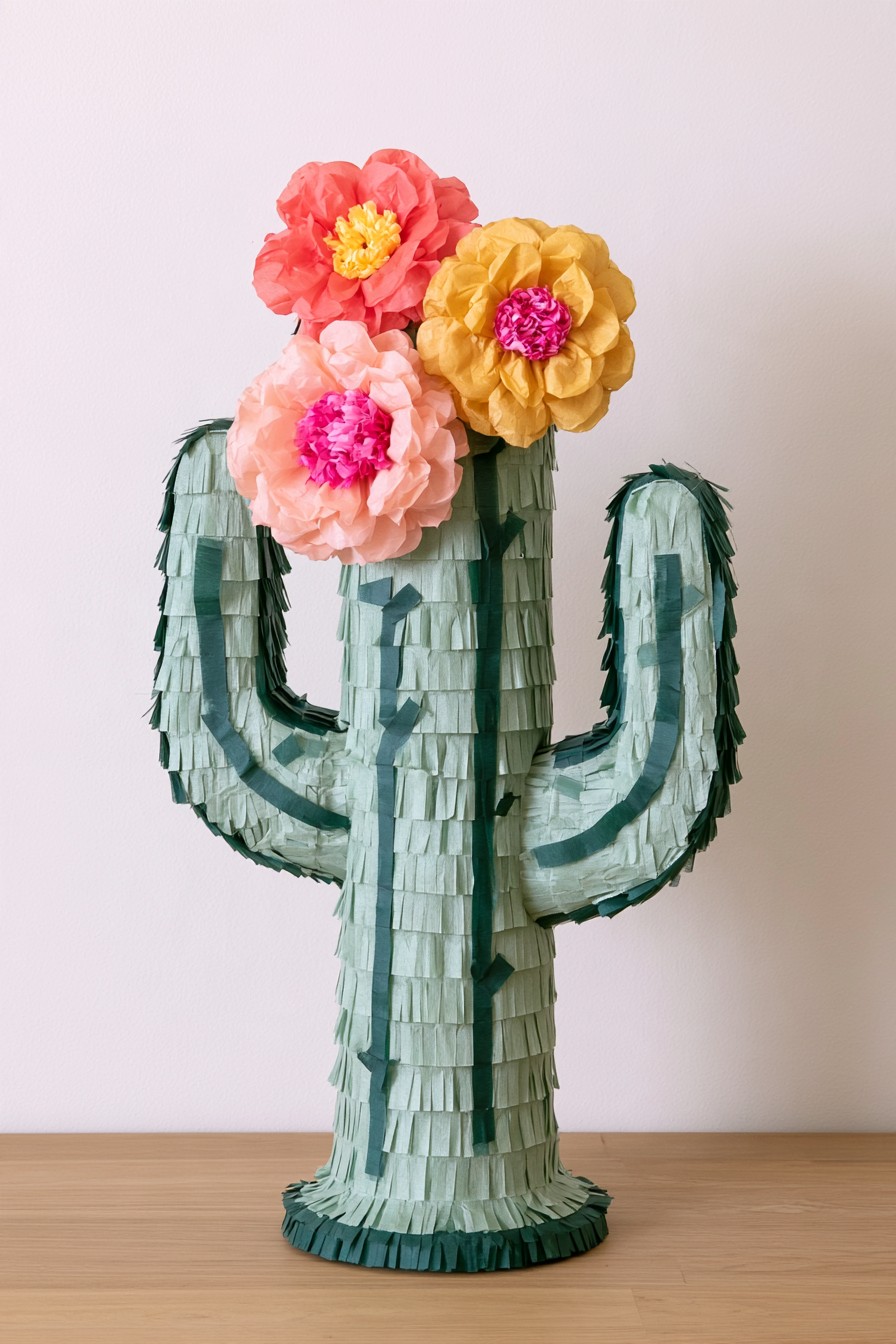
Green fringe follows the ribs of a tall cactus, with curved arms and a concentrated cluster of pink and yellow flowers above. The restrained body color makes the flowers the focal point. It fits a botanical or summer display without requiring an elaborate printed background, and the standing silhouette can be used as an empty centerpiece.
For a hollow version, keep the filling in the main trunk and make the arms lightweight additions. Join them before surface decoration, placing the hanger on the trunk’s supporting connection rather than an arm. A decorative standing version needs a base matched to its height; that is a different task from hanging it for play. Build paper flowers separately and attach them after the fringe. Keep floral layers clear of the filling hatch and the chosen release route.
4. Disco Ball Piñata
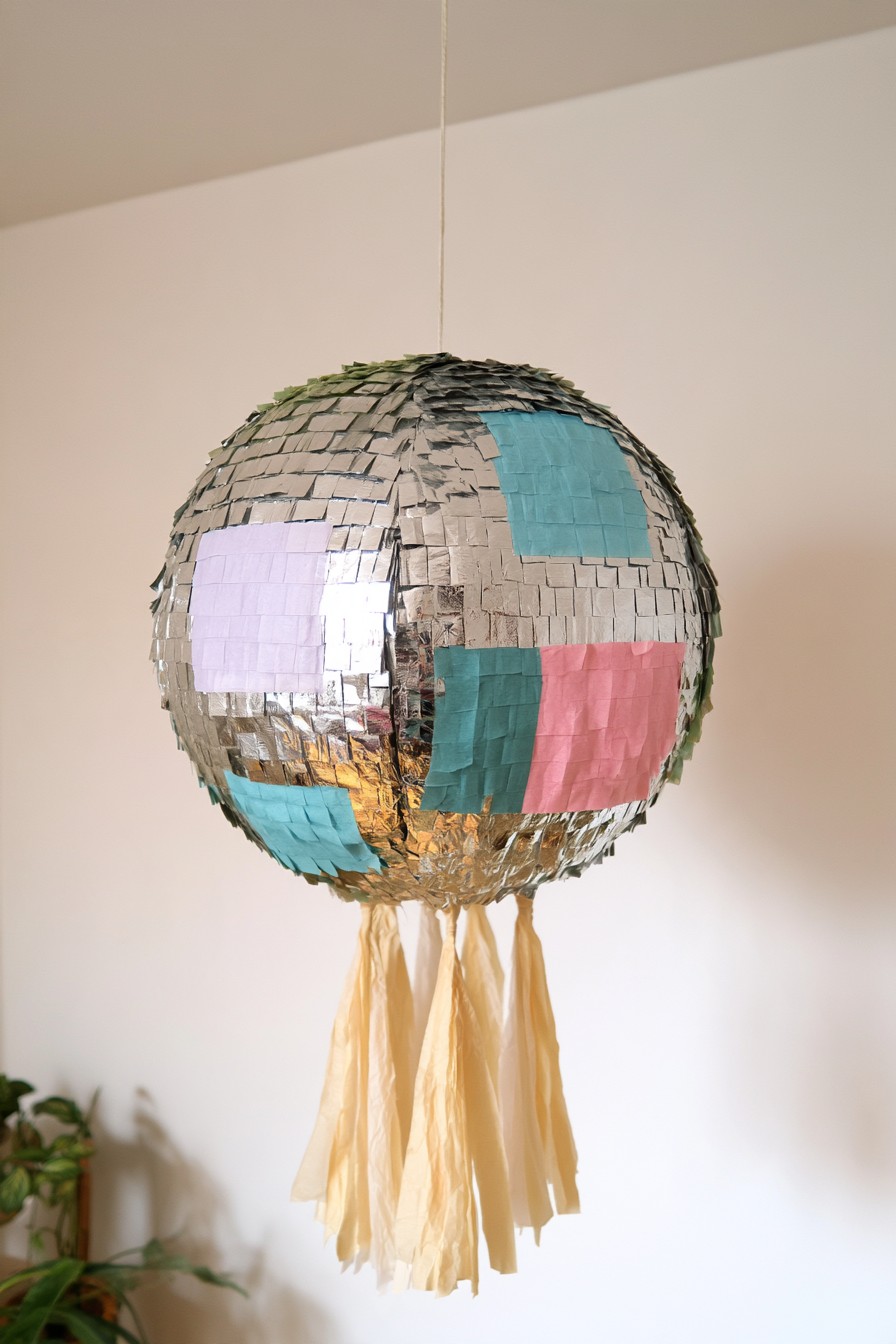
Reflective silver squares cover a round body, interrupted by pastel color patches and long yellow tassels below. The tiled appearance makes it a disco theme without using real mirror pieces. The tassels stretch the compact shape vertically, which works well in a photo area or above a party display. Coordinate it with colorful graduation party ideas when planning a retro celebration.
Use flexible reflective paper on a lightweight rounded shell. Keep the hanger aligned with the filled body, and plan the filling hatch before adding tiles. Real glass or rigid sharp squares have no place on a striking piñata. The lower tassels are decoration; a ribbon release would need its own connected flap beneath the compartment.
5. Colorful Butterfly Piñata
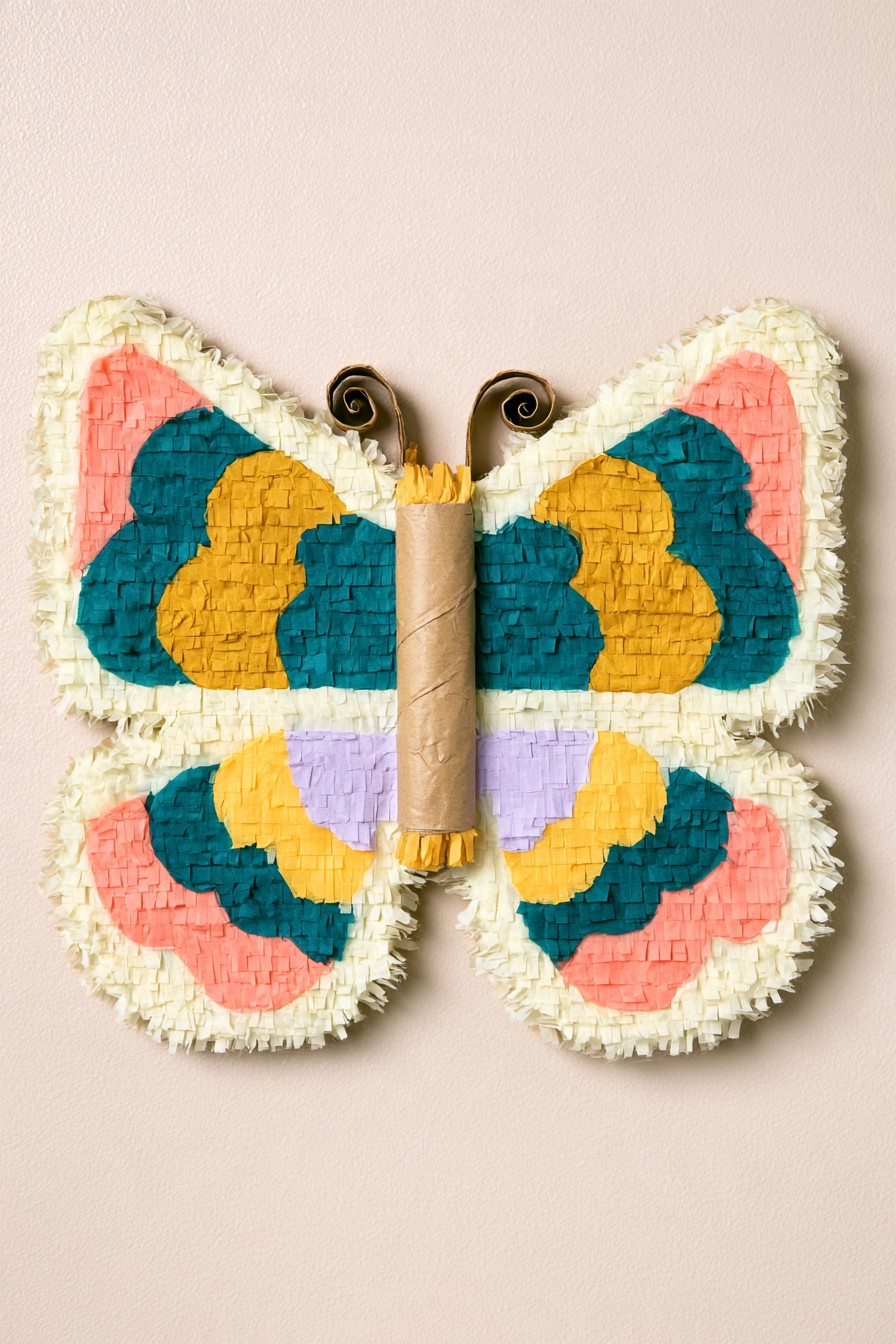
Cream borders outline broad butterfly wings filled with teal, coral, mustard, and lavender shapes. A slim center and curled antennae keep the wing pattern dominant. The nearly mirrored arrangement makes the decoration feel deliberate, even with small differences between the two sides. It is a broad visual piece for a backdrop or a party theme that needs a large flat silhouette.
Draw both wings from one paper template, then map the major color areas before applying fringe. A hollow wing or central body adaptation needs a filling space that is reachable and does not leave treats trapped in narrow tips. Join projecting wings securely at the body while keeping them light. Make antennae from flexible paper and keep them decorative. Choose display or ribbon release use when preserving the wide wing pattern is more important than striking it.
6. Ice Cream Cone Piñata
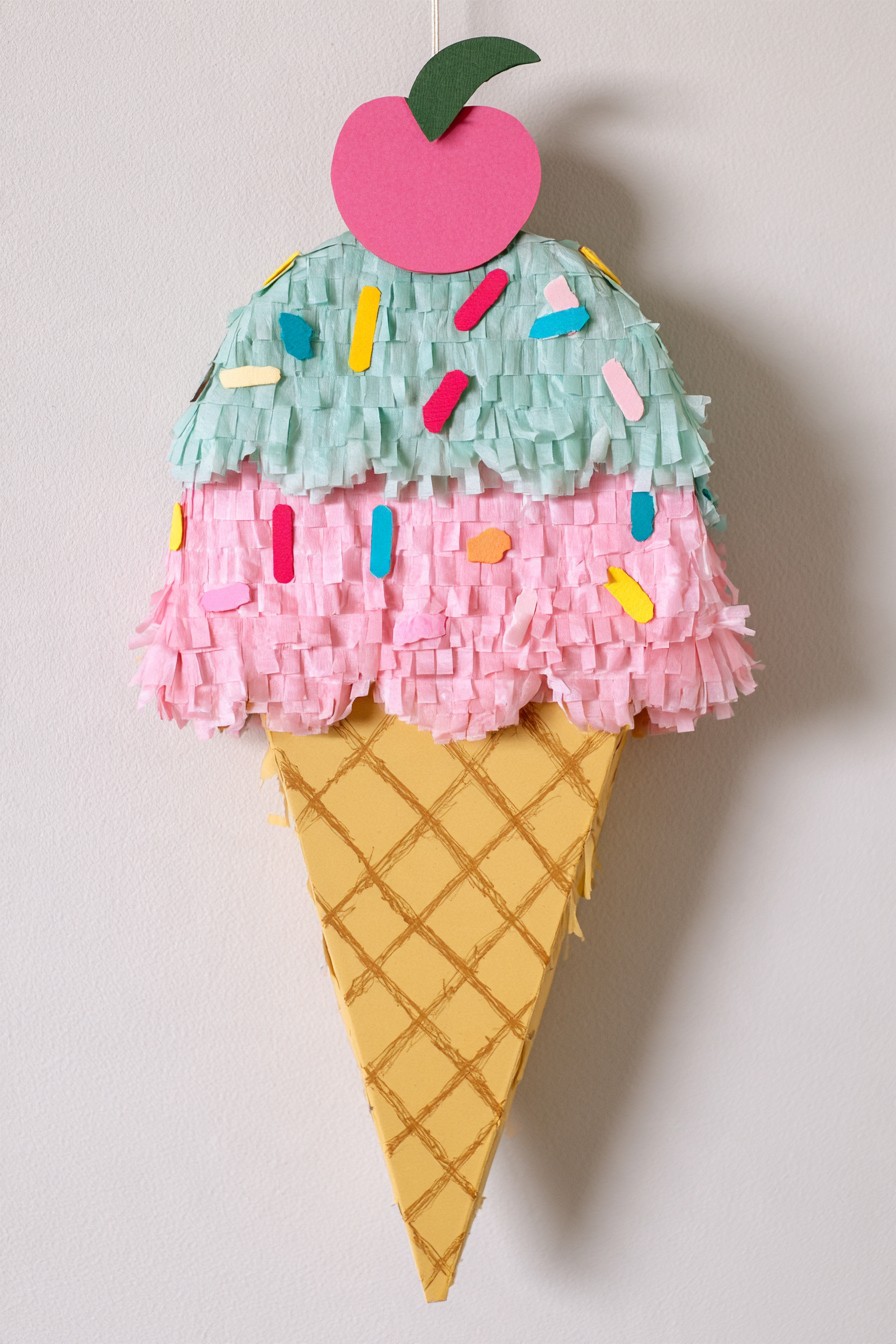
Mint and pink fringe form the rounded scoop above a pointed yellow cone, with paper sprinkles and a red cherry at the top. The waffle pattern on the cone adds recognition without the thickness of another fringe layer. This design relates directly to a dessert table and can remain a decorative sweet shape even when it holds no treats.
Keep a filled adaptation’s main compartment in the scoop or another planned hollow section, with access away from the cherry and hanger. Connect the scoop and cone before decoration so their join is not carried by tissue paper. Avoid making a narrow cone tip the only release route for contents that cannot pass through it. Apply sprinkle shapes after the broad fringe fields, using light paper details. Check the complete body’s balance before hanging it.
7. Colorful Rocket Piñata
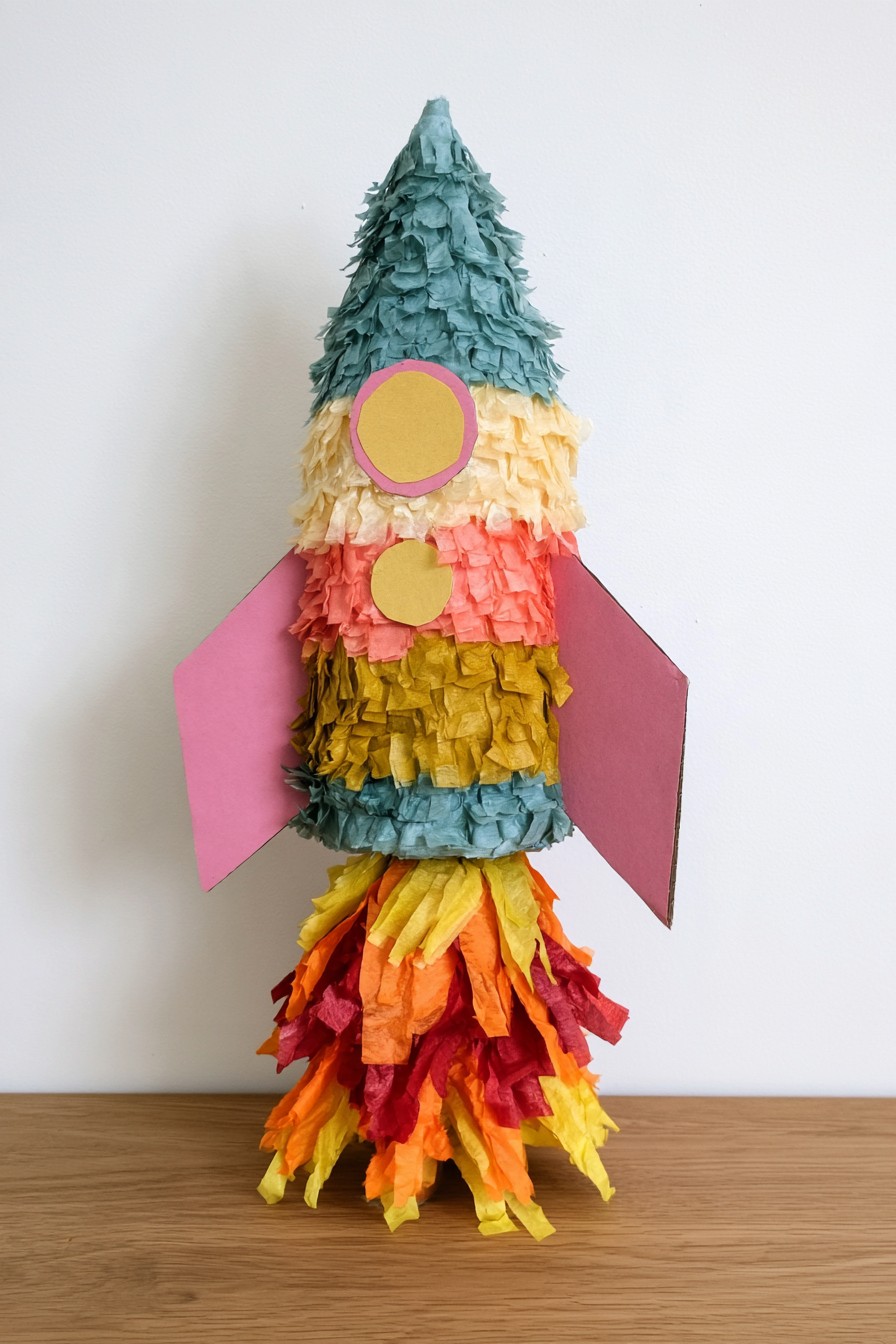
A tapered blue nose, banded body, pink fins, and warm paper flames create a rocket with a clear vertical direction. Circular windows give it recognizable details without complex drawing. It suits a space celebration where the rocket can be paired with planets or stars, and the contrasting bands make each section distinct from the room background.
A light tube or joined cardboard faces can provide a hollow adaptation, with filling in the main body rather than the nose or fins. Plan a hatch and hanger within that body before covering it. Attach the fins as light extensions and keep flame streamers clear of a bottom release. A ribbon operated version needs a dedicated opening beneath the filling space; the flame strips alone cannot operate it. Check the full hanging length against the activity area before adding long streamers.
8. Colorful Owl Piñata
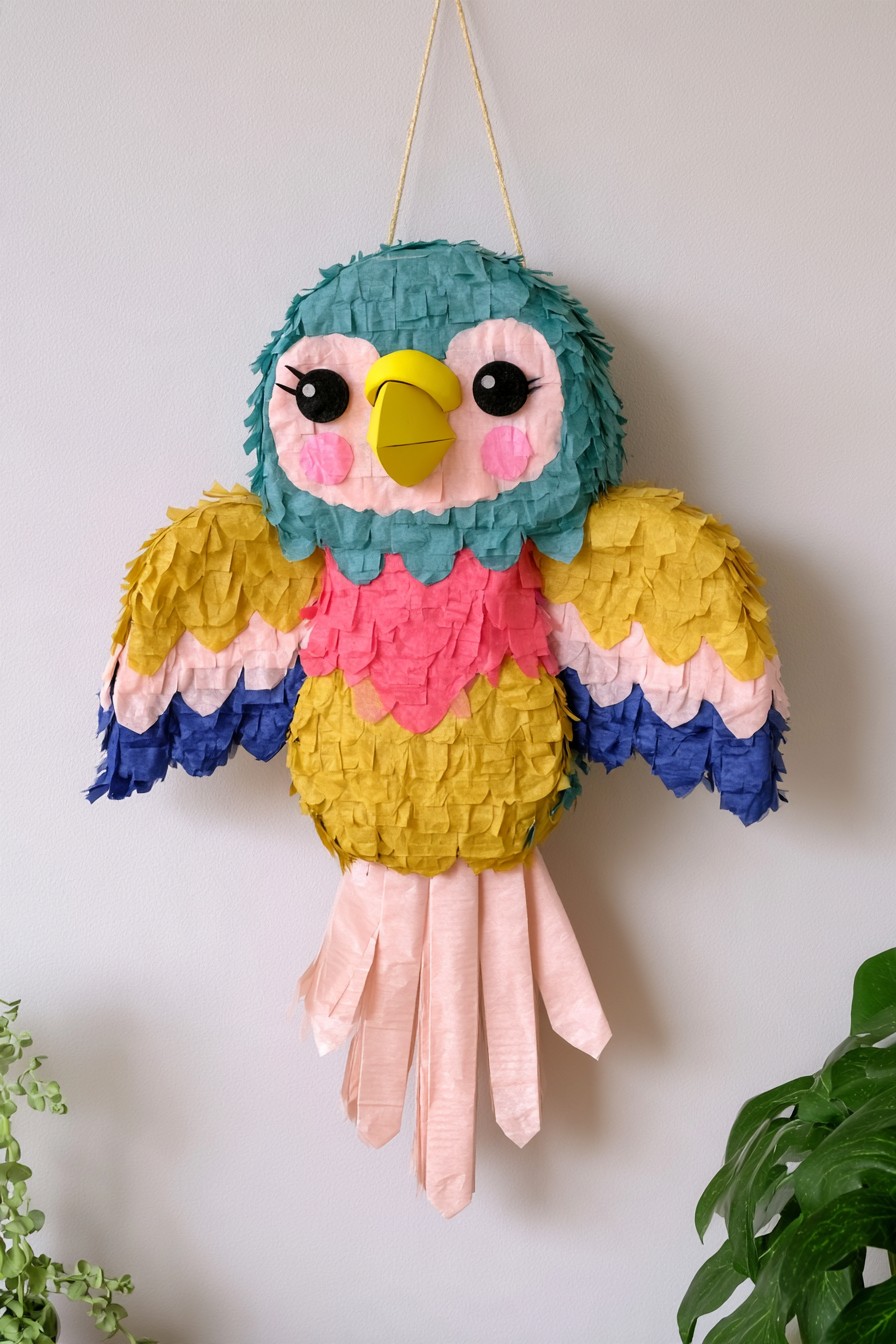
Large eyes and a yellow beak establish the owl’s expression, while short colored fringe rows suggest feathers across its body and wings. Teal frames the head and pink, yellow, and dark blue separate the lower areas. This is a useful animal design when surface texture can do most of the work, with relatively few flat facial shapes added afterward.
Plan the face first so its eyes do not become lost behind thick fringe. For a playable adaptation, use a hollow central body with lightweight wings rather than storing filling in the projecting edges. Add the face after the feather rows are complete and keep the filling opening accessible. Secure the hanger to the supporting body, not the beak or decorative crown. Reserve long lower paper strips for decoration and separate them clearly from any ribbon that operates an opening flap.
9. Jellyfish Piñata
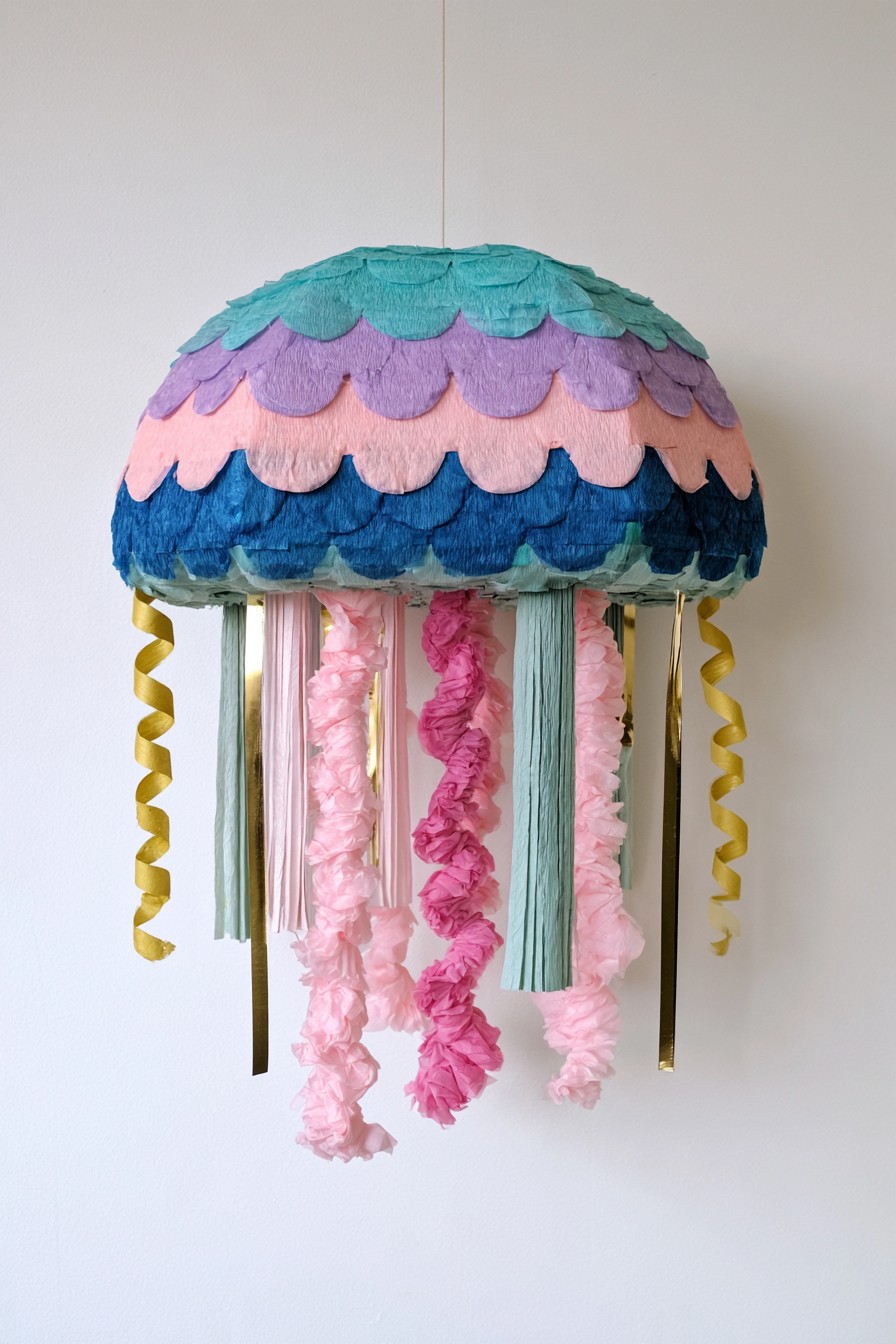
Scalloped colored layers cover a rounded jellyfish dome, with straight, curled, and ruffled strips hanging below it. Their varied lengths give movement without changing the compact upper shape. This design makes a strong suspended decoration where the long lower elements have clearance from furniture and people. The dome supplies the body; the trailing pieces give the underwater character.
Choose a lightweight rounded shell and plan its internal compartment if it will hold filling. A lower flap can work only if its opening is not blocked by attached tentacles. Keep the functional ribbon identified during construction and arrange decorative strands elsewhere. The tentacles are not automatically pull cords. For a striking format, shorten or omit extensions that complicate the activity space. Center the suspension on the dome’s supporting connection so the strands do not make it lean.
10. Mushroom Piñata
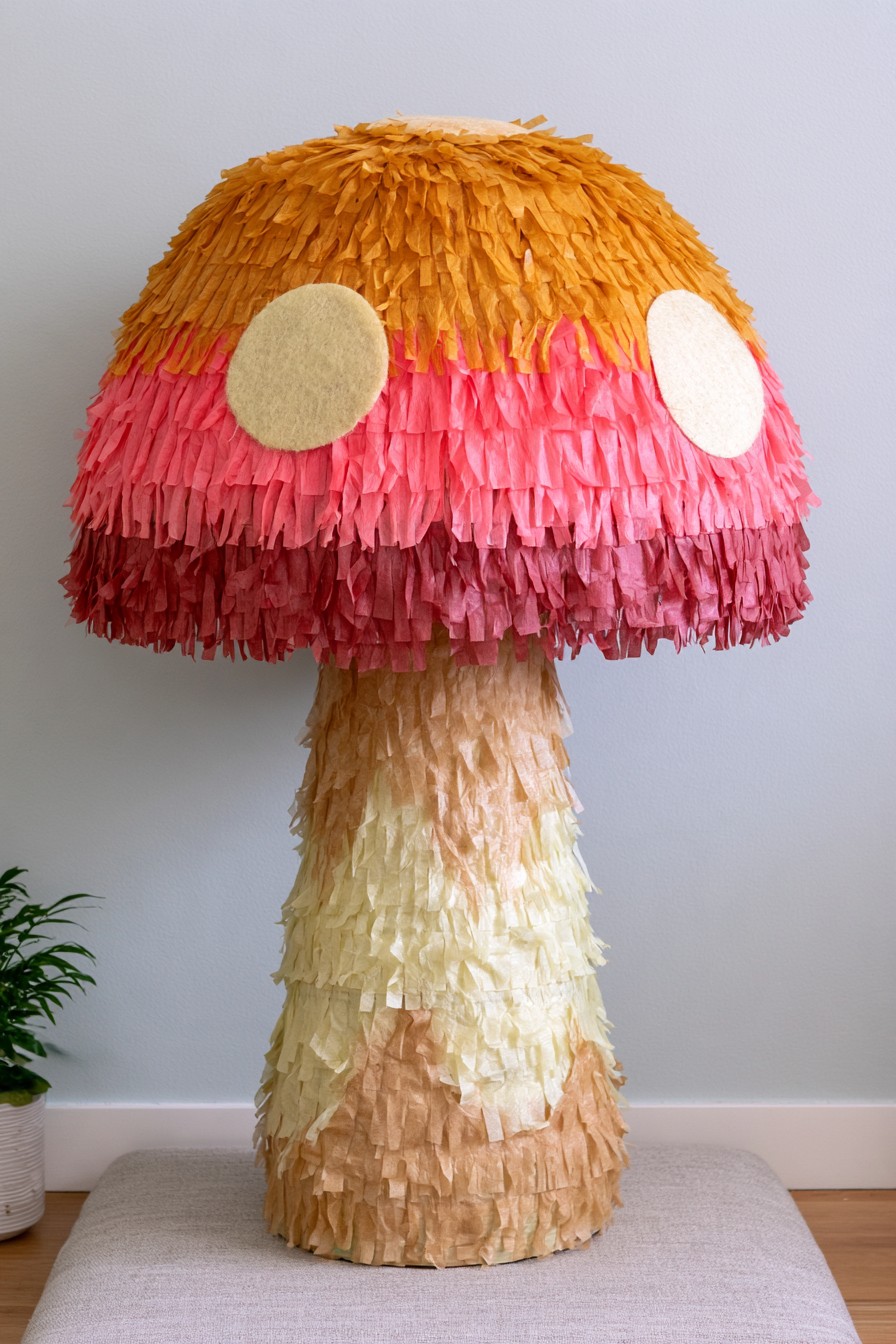
Orange, coral, and deep pink bands cover a broad mushroom cap, with large cream spots and a lighter stem beneath. The cap’s width supplies the main visual impact, while the stem keeps the object recognizable. For a first birthday setting, use it as a decorative woodland centerpiece and compare woodland birthday party setups for the surrounding display.
Keep the cap light and establish its connection to the stem before decoration. A tabletop version needs a stable footprint, whereas a suspended game needs a hanger connected to the main supporting body. Put filling in a planned compartment with its own access and release, not an uncertain space created by the cap shape. Add large spots after the fringe so their outlines remain clear.
11. Friendly Robot Piñata
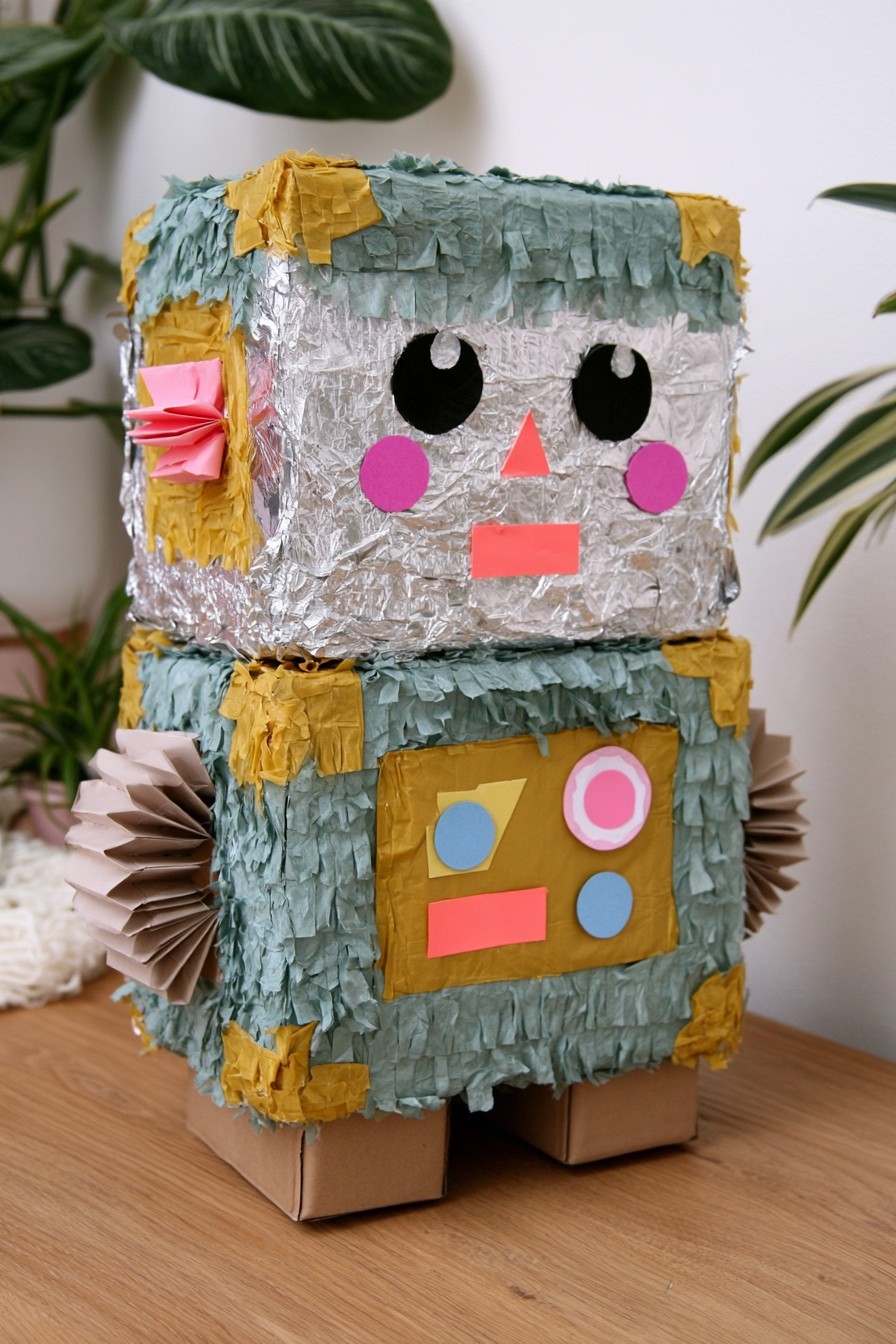
Two box forms become a robot through a silver face, bright cheeks, a simple mouth, and a small control panel. Folded paper arms soften the mechanical shape, while teal fringe and mustard corners link the head and body. It is a practical design for working with straightforward geometric pieces, letting surface details create the character.
Use a hollow body as the main filling compartment and treat the head, arms, and feet as lighter appendages where possible. Connect the hanger to the body’s planned internal support rather than a decorative antenna or thin upper flap. Provide filling access before attaching the face and fringe. A release beneath the body should remain free of feet and paper folds. Keep metallic details flexible and light, and inspect the head connection separately from the shell’s intended opening point.
12. Strawberry Milk Carton Piñata
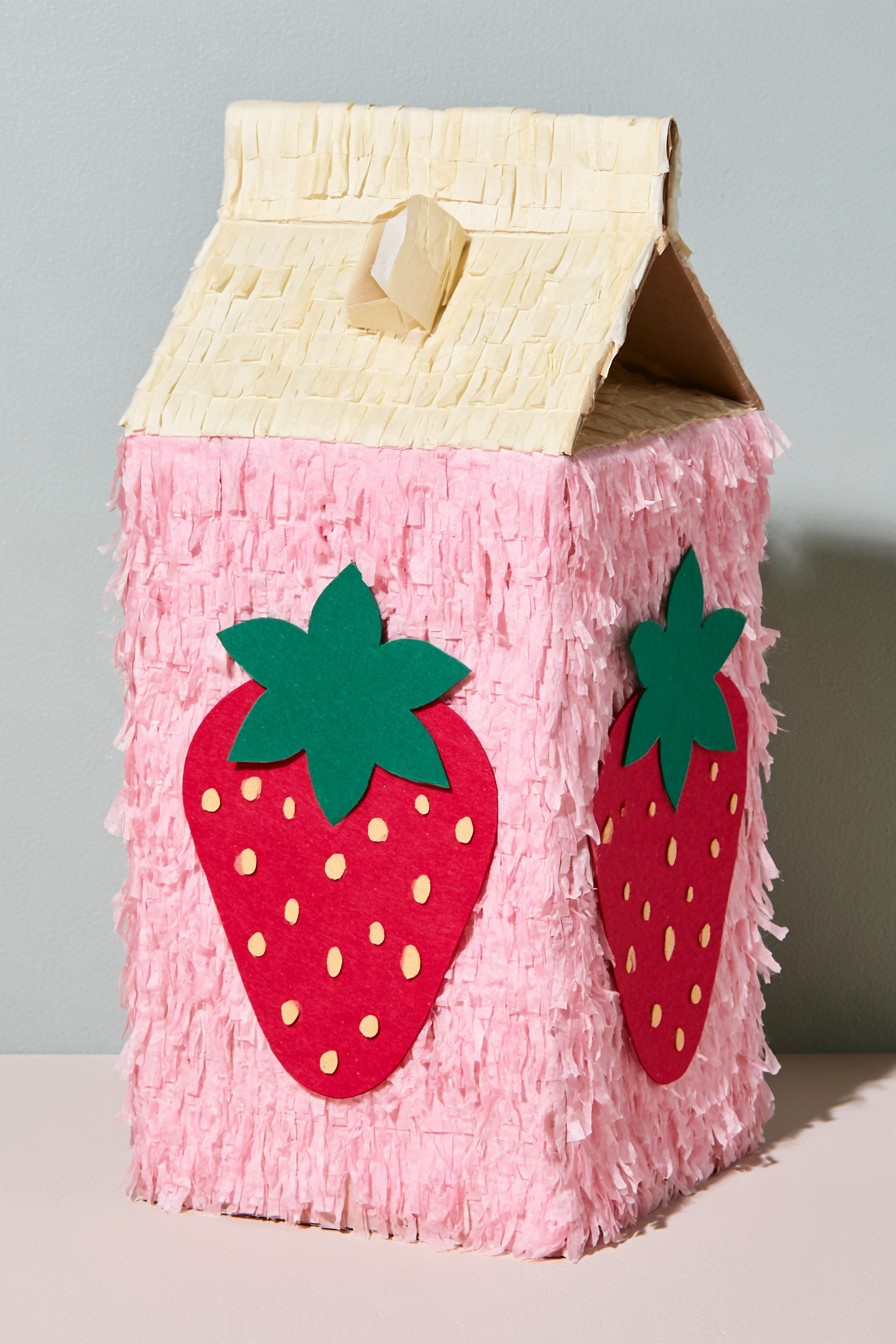
Pink fringe covers a tall box, with cream roof folds and large red strawberry motifs identifying the milk carton theme. The familiar packaging silhouette is the main feature; the fruit shapes supply enough detail without covering every panel. This is useful for a dessert party where the body can carry a clear front and back design.
Make the rectangular compartment first and plan a fill hatch on a side or rear panel below the roof folds, clear of the hanger’s supporting area. Make a secure filling closure and a suspension point connected to the pinata's supporting structure before decorating the gable opening. Keep the hanging connection on an appropriate internal support instead of relying on the folded ridge alone. Add strawberries after the fringe and leave access to the hatch. A bottom ribbon release can be planned independently of the decorative roof.
13. Beehive Piñata with Flying Bees
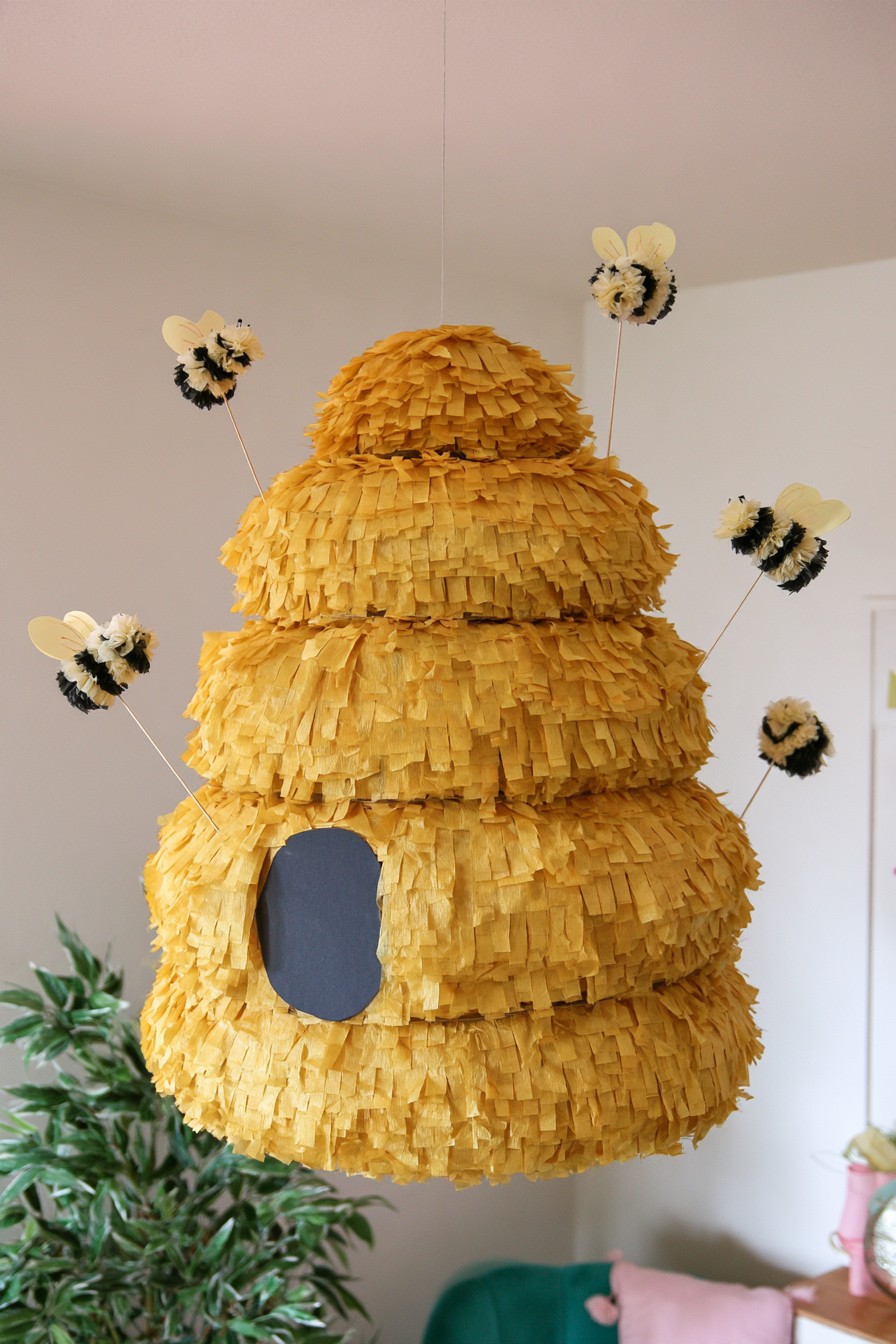
Rounded tiers narrow upward into a mustard hive, with a dark entrance motif and small bees around it. Repeated horizontal fringe rows reinforce the tiered outline. The bees extend the theme into the surrounding space, while the simple dark entrance gives the front a focal point. This suits a garden celebration where one strongly colored form can anchor the display.
A rounded papier mache shell is one possible adaptation, with additional light paper contours for the tiers. Let the shell dry thoroughly before removing its form, creating filling access, or adding contents. If using a balloon form, remove and collect its fragments immediately. Keep the entrance motif decorative unless it is deliberately designed as an access opening. Add bees as light flexible paper details, leaving the hanger and release unobstructed. Avoid assigning one drying period or layer count to every hive.
14. Watermelon Slice Piñata
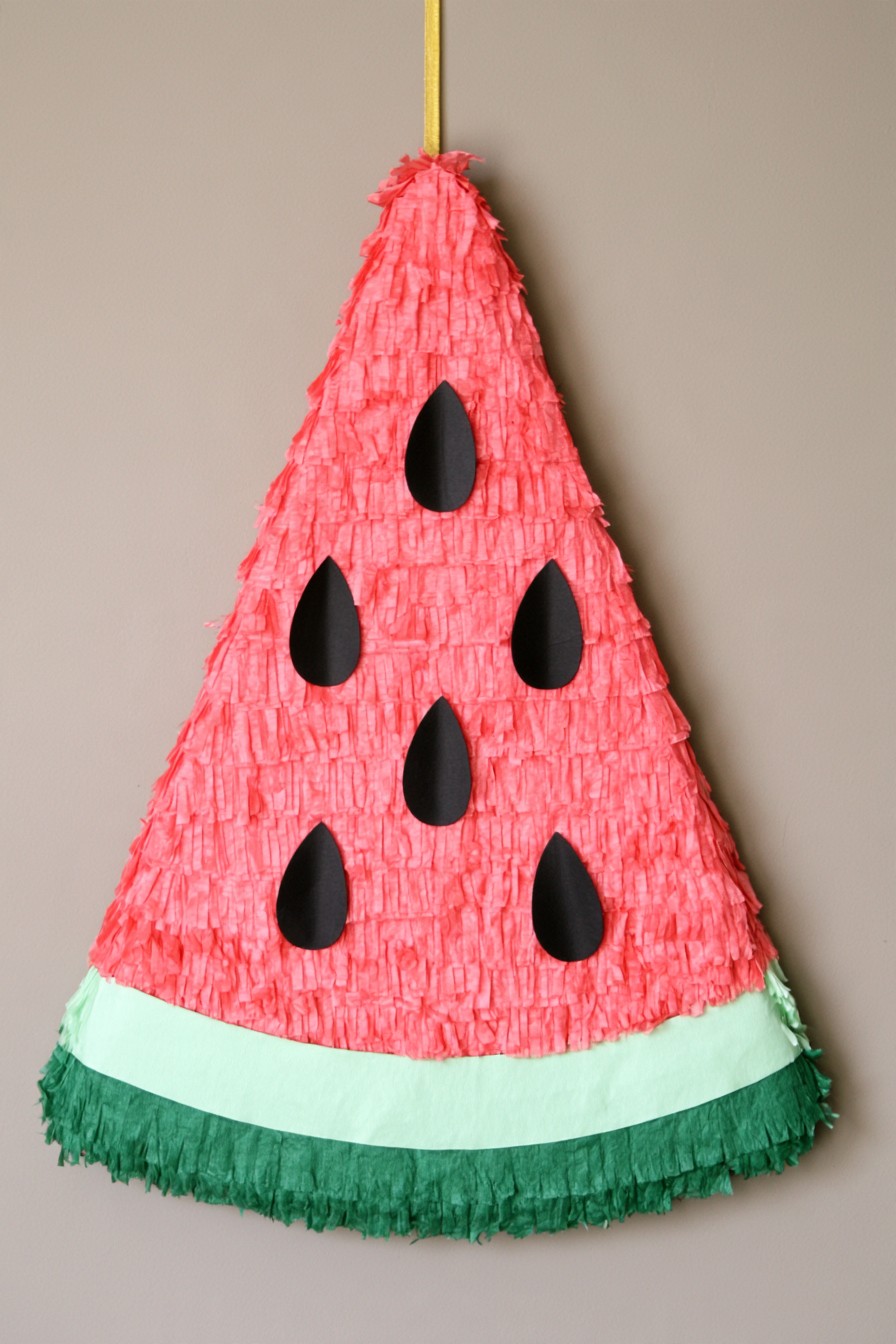
A red triangular fruit section sits above pale and dark green rind bands, with spaced black seeds across its face. The clear palette makes the watermelon recognizable without many extra ornaments. It is a compact choice for summer parties and picnics, where the wedge can relate to the table colors as well as the food theme.
Join two matching faces with a narrow edge strip to create a hollow wedge. Plan the hanger’s supporting connection away from a fragile tip, and leave a fill hatch on an accessible side or rear area. Keep the red field broad enough for the seeds to remain separate. A lower release needs enough opening width for the chosen contents to fall out. Strengthen the suspension area for the filled weight without thickening the entire shell so much that a striking version cannot open.
15. Floral Watering Can Piñata
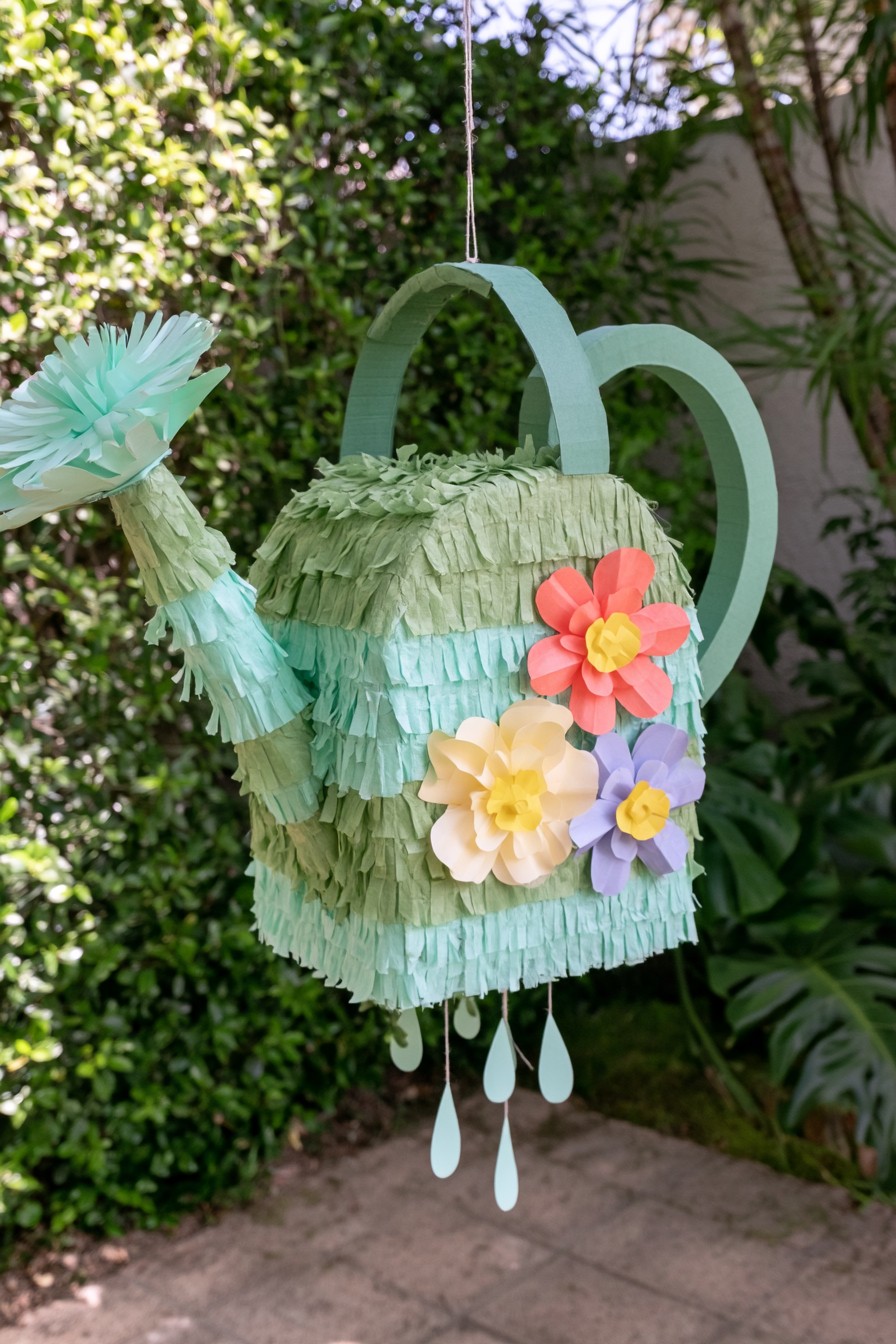
A green watering can carries layered flowers at the front, with a long spout, curved handle, and a few hanging droplets. The floral cluster gives the otherwise simple body a garden party identity. The projecting parts make its silhouette clear but also change its balance, so the design is particularly appealing as a displayed object where those details can remain intact.
Keep filling inside the main hollow can, not its handle or spout. Attach the suspension to a suitable connection on that body; the visible carrying handle should remain decorative unless separately designed for the full load. Join the lightweight spout and handle before fringe, then add the flowers at the front. Keep droplets away from the planned release. In a ribbon version, place a working flap below the compartment instead of treating the hanging droplets as the opening mechanism.
16. Storm Cloud Piñata
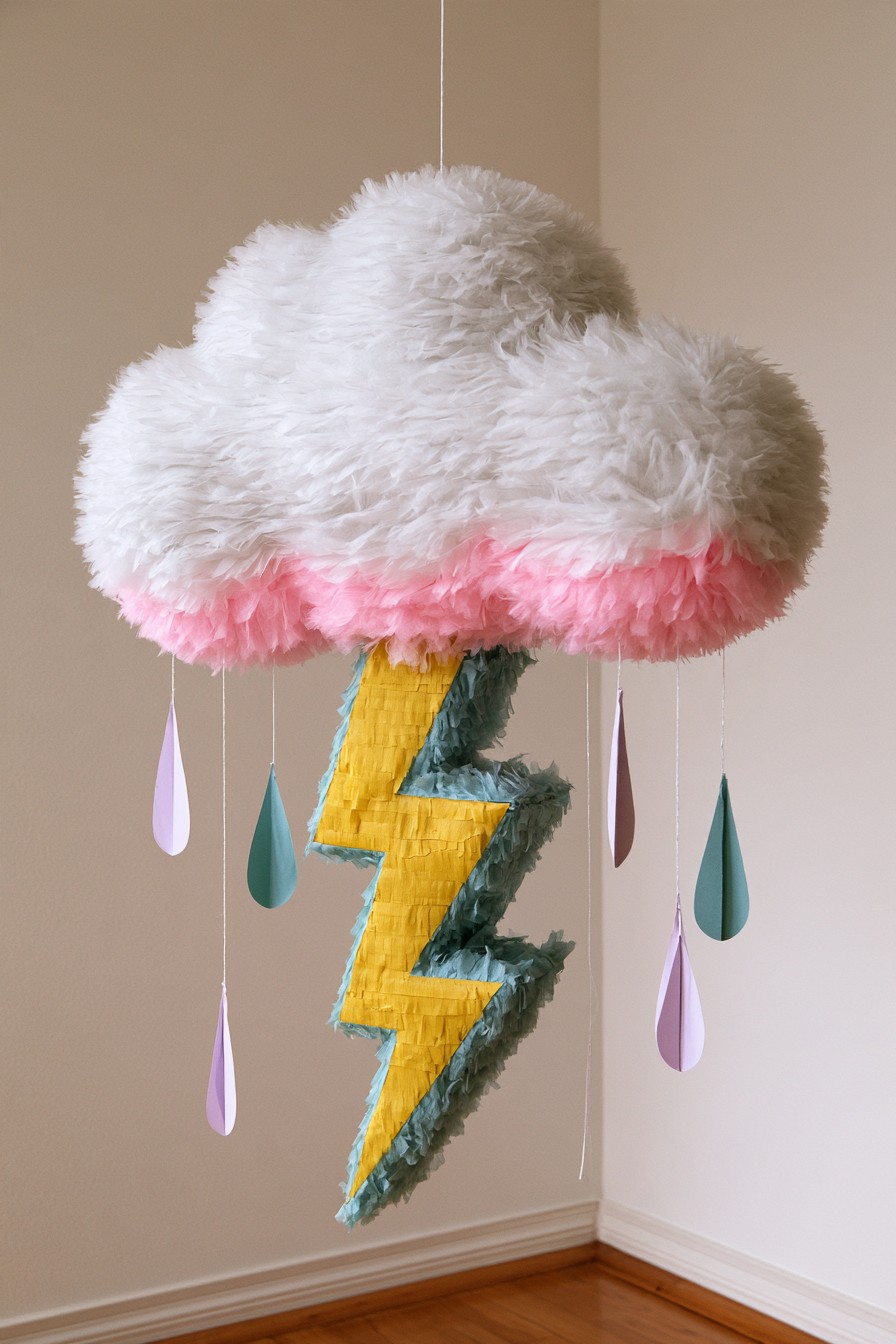
A bulky white cloud with a pink lower edge sits above a strong yellow lightning bolt and small hanging raindrops. The contrast makes the design recognizable with fewer colors than the rainbow. It works as a suspended statement where the bolt can stay visible against the wall. The uneven cloud silhouette creates softness, while the sharp graphic direction belongs to the light paper bolt.
Form the cloud from a light hollow shell for a working version, or use a decorative backing if it will stay empty. A textured tissue surface can reproduce a soft appearance without assuming the photo’s exact material. Attach the bolt and drops as lightweight ornaments, keeping the body’s fill hatch and release separate. Plan the hanging connection around the filled cloud rather than the bolt. Check the full vertical extent when deciding whether to display it or use it in an activity area.
17. Ringed Planet Piñata
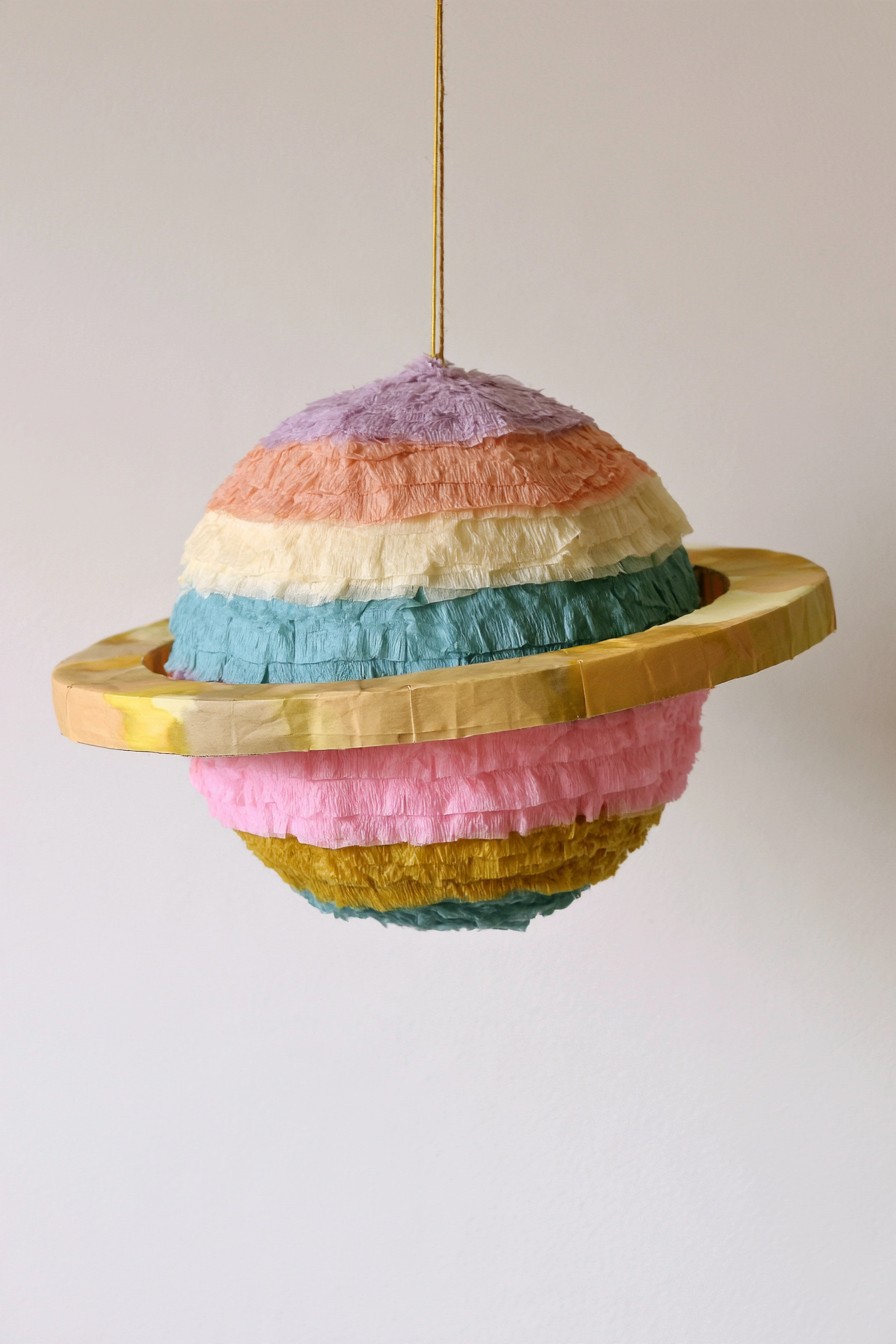
Horizontal pastel bands wrap a round planet, with a wide golden ring projecting around its center. The ring makes the space theme unmistakable and provides contrast against the soft paper texture. Its reach beyond the body favors a decorative display or ribbon opening when the outline needs to remain intact throughout the party.
Keep the filling compartment inside the sphere and make the ring a separate lightweight attachment. For a ribbon operated adaptation, plan a flap beneath the sphere and connect the operating ribbon to it. Leave a clear path below for the contents; the ring must not obstruct the flap or ribbon travel. Decorative fringe and the ring do not operate the release. Check the filled sphere’s suspension before attaching the ring, then compare the full width with the available party space.
18. Jeweled Crown Piñata
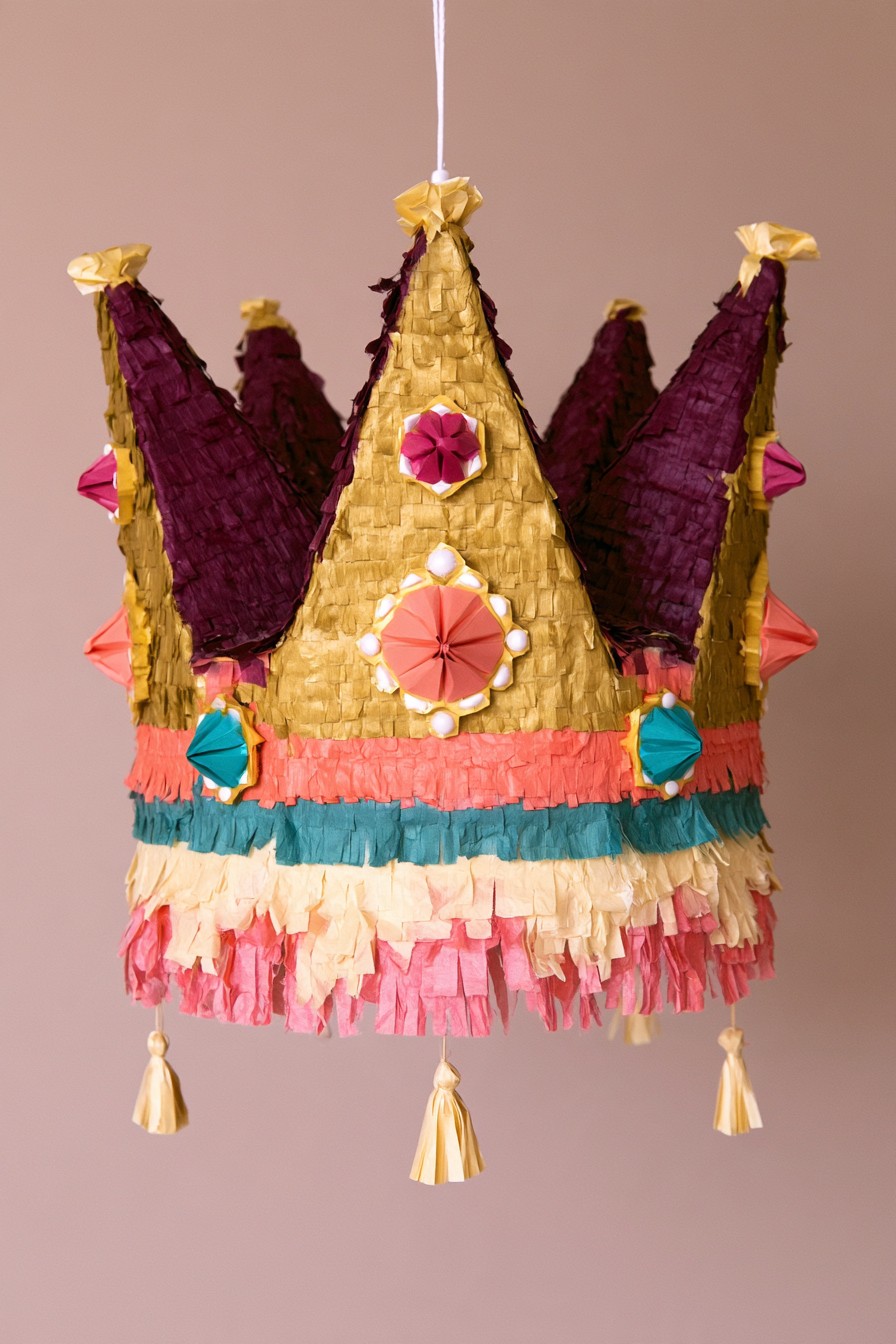
Burgundy points rise above bright lower bands, with golden borders, folded medallions, and angular colored gem shapes across the crown. The contrast gives it a royal theme without relying on one metallic color. Light tassels below finish the lower outline and make the suspended crown feel more complete.
Build the hollow lower band as the main compartment and attach tall points as lightweight extensions, with their connections supported before decoration. Use folded paper for the gems and medallions; hard stones, glass, and heavy ornaments would change the activity’s risks and the hanging load. Place the hanger on the supporting body rather than a narrow point. Keep filling access discreet but reachable, and plan a separate lower opening for a ribbon version. Distribute accents across the front so the crown retains a balanced silhouette.
19. Ferris Wheel Party Display and Piñata Adaptation
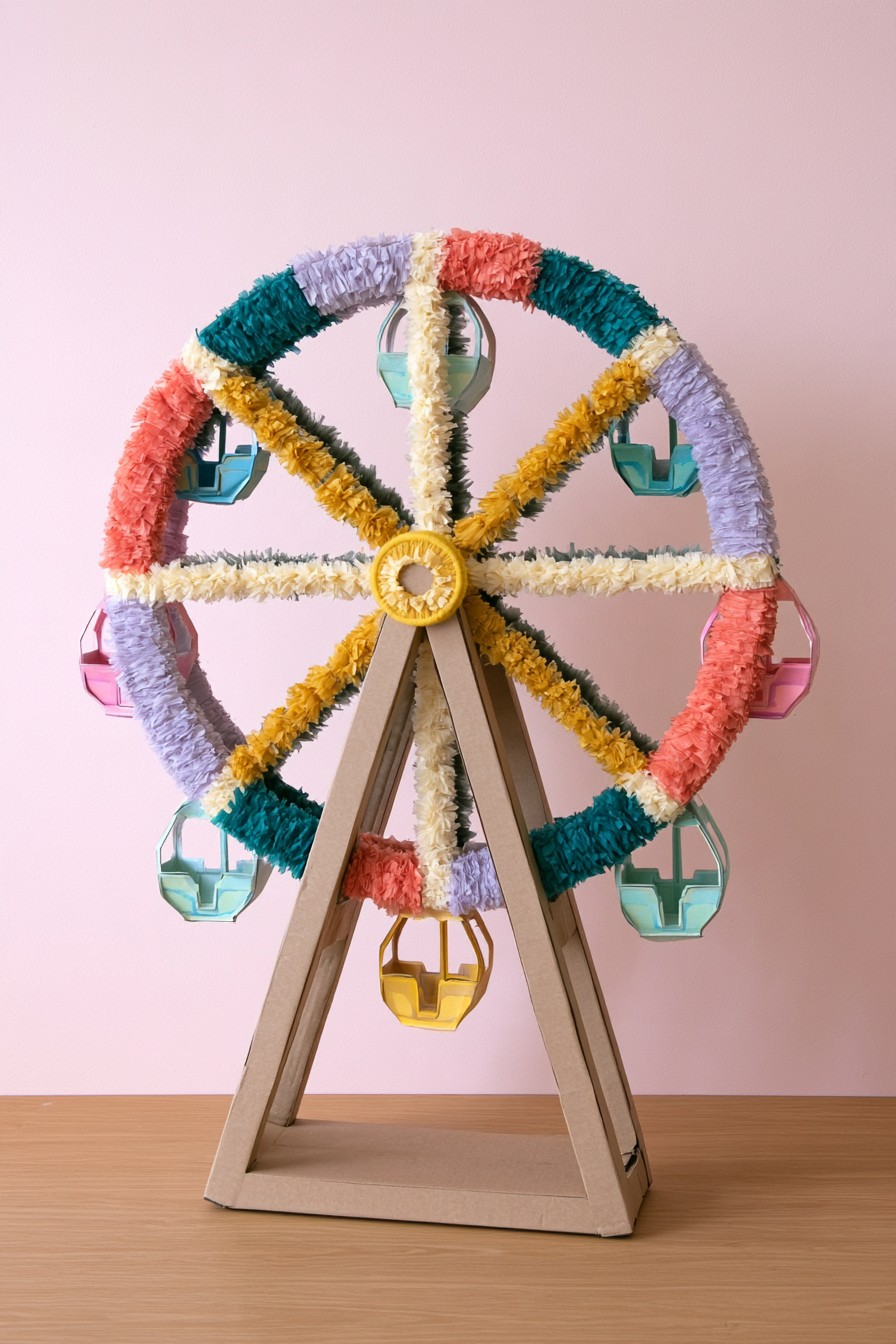
A colorful open wheel with spokes and small gondolas stands on a triangular support. It reads primarily as a tabletop carnival decoration: the open center does not show a closed compartment for filling or any release mechanism. The alternating colors around the rim create movement even if the wheel itself remains fixed. This makes a distinctive centerpiece for a fairground theme without needing to function as a game.
Build a stable decorative stand and keep the rim and gondolas lightweight, securing them without assuming the structure rotates. If adding a ribbon game, use a separate closed compartment behind the wheel or within a deliberately enlarged hub, with its own filling hatch and lower flap. Its hanger or supporting stand must suit the full contents. Keep that release independent of the spokes and decorative gondolas; an open wheel alone cannot hold or dispense filling.
Set Up the Activity Before Guests Arrive
Check the filled piñata, suspension, opening, and activity clearance in advance. For striking play, an adult controls the turns with only one participant inside the activity area. Keep other guests outside the swing path. Once contents fall, stop all striking and put the implement aside before anyone begins collecting. Check food labels and age suitability before contents are eaten or used.
For a ribbon release, separate the decorative strands from the planned operating ribbons during construction and confirm the flap can open without catching. Keep the support and filling checks even though the activity involves no striking. Choose an empty display if the venue, participants, or construction do not suit a game. That lets the handmade shape contribute to the celebration without forcing it into an unsuitable function.

Leave a Reply