
These 17 egg carton crafts use molded paper cups, peaks, and dividers to create textured decorations and useful organizers. The collection includes garlands, floral details, a tissue box cover, desk storage, and playful display pieces. A making guide and video show how to fit the paper texture around a supporting core. Choose a project for its intended use, then match the backing, finish, and placement to what it needs to hold. Keep the finished paper pieces dry and accessible for gentle cleaning.
Table of Contents
- Choose an Egg Carton Project
- Choose an Idea for Your Purpose
- Choose and Prepare an Egg Carton Craft
- Select the Carton and the Intended Use
- Choose a First Project by the Construction It Needs
- Tools and Preparation
- Attach the Texture to a Dependable Core
- Video Example: Build a Textured Tissue Box Cover
- 17 Egg Carton Designs and Their Making Choices
- 1. Painted Egg Carton Tassel Garland
- 2. Sculptural Egg Carton Table Lantern
- 3. Layered Egg Carton Sunburst Mirror
- 4. Color Blocked Egg Carton Shade Design
- 5. Egg Carton Tissue Box Cover
- 6. Floral Egg Carton Curtain Tiebacks
- 7. Egg Carton Wall Pocket Organizers
- 8. Egg Carton Pedestal Display Stands
- 9. Egg Carton Sunglasses Organizer
- 10. Egg Carton Test Tube Flower Display
- 11. Egg Carton Book and Magazine Holder
- 12. Egg Carton Vanity Organizer
- 13. Egg Carton Charging Station Organizer
- 14. Egg Carton Animal Face Wall Art
- 15. Egg Carton Toy Car Parking Garage
- 16. Egg Carton Crayon and Craft Supply Organizer
- 17. Egg Carton Caterpillar Shelf Decor
- Finish and Maintain Paper Crafts
Choose an Egg Carton Project
Choose an Idea for Your Purpose
For light decoration, explore the tassel garland and animal portraits. For dry desk storage, compare the glasses organizer, the paper holder, and crayon sorting. The tissue cover demonstrates texture on an existing core; pedestals and stacked parking trays need more supporting structure.
Choose and Prepare an Egg Carton Craft
Select the Carton and the Intended Use
These ideas use molded paper cartons, whose cups, peaks, and flat edges offer different shapes. Choose dry material without residue, grease, damaged fibers, or mold. For a clean craft base, choose a new unused carton or a suitable fresh craft material. For children’s activities or projects touching personal belongings, consider new molded paper cartons that have never carried eggs. This precaution reflects research showing that transfer between eggshells and packaging is possible under tested conditions; it does not mean every used carton is contaminated.
Paint and protective coatings are decorative treatments, not a way to disinfect packaging. Avoid home sterilization recipes for a material whose history is uncertain. Decide whether the project will hang, sit on a desk, move frequently, or meet liquids. The carton’s texture and low weight suit dry decoration and light sorting. Heavy storage, wet growing pots, electrical housings, and frequently loaded structures need a different supporting system.
Choose a First Project by the Construction It Needs
A garland, animal portrait, or cover on a ready made box lets you practice cutting and arranging without designing a loaded stand. A desktop organizer needs compartments matched to the contents and a stable base. Pedestals and stacked levels require a supporting core; their height should not suggest strength that the paper cannot provide. Select the project from its actual use, then choose which carton section provides the useful decorative shape. If you want to compare the molded texture with a different packaging shape, explore these milk carton craft projects before selecting your next project.
Measure the existing object before cutting. Include the space needed for removal, opening a lid, or lifting out the contents. Paint and covering layers change the final fit, so a sample assembly is more useful than measuring the bare base alone. Keep the main outline simple at first and repeat a shape or color to make the reused material look deliberate.
Tools and Preparation
Gather a ruler, pencil, craft scissors, small brushes, a protected work surface, and an adhesive compatible with paper and the chosen backing. Trim large sections first, then refine individual cups and dividers. A craft knife may help with openings in a rigid core; an adult should handle cutting that requires it, using a cutting mat and a secured piece. Use age appropriate tools and labeled craft materials when children participate.
Make a trial with an offcut before applying paint, glue, or finish to the full project. Porous cartons vary in how they absorb liquid. Apply controlled layers instead of flooding the fibers, and leave them to dry as the product requires. An acrylic craft paint can color the raised sections, while unpainted areas retain the gray paper texture. A stiff backing should be fitted before decoration wherever the object needs one.
Attach the Texture to a Dependable Core
Dry fit the carton pieces, keeping thicker contact edges against the base. Apply glue to the hidden joining surfaces, press the sections into position, and hold them without crushing the molded relief. Work in sections if the shape is curved or tall. Allow the bond to develop fully before moving the object or adding contents. A cord wrap or painted surface may disguise a seam, but it does not make a weak core stronger.
Place wall hangers through the backing. For glasses, papers, or craft supplies, keep handled edges smooth and let the core carry the load. Use separate watertight containers for flowers, removing them to fill and dry their exteriors. Cardboard is combustible: lamp or lantern decoration requires the light manufacturer’s approval for the materials, ventilation, and clearances. An LED label alone does not validate an added paper covering. Keep uncertain lighting interpretations as objects without illumination.
Video Example: Build a Textured Tissue Box Cover
The video starts with a box cover, molded carton sections, scissors, adhesive, brushes, and pastel paints. Carton pieces are cut, glue is applied to the supporting box, and the sections are pressed into place around a clear tissue opening. Selected raised areas are then painted mint, yellow, and pink. The unpainted gray fibers remain visible between them. This is a useful general method for the collection: make the supporting form first, fit the molded texture, and finish selected details with color.
Adapt that sequence to a mirror backing, organizer exterior, or decorative panel, choosing the core for each use. On a tissue cover, check the final fit after the paint and covering layers are dry and align the opening with the actual tissue exit. Keep a removable lid or sleeve accessible. Allow the adhesive and paint to reach their specified full cure before pulling tissues through the opening or handling the cover regularly.
17 Egg Carton Designs and Their Making Choices
Use the molded parts as petals, relief panels, shallow compartments, or a texture around a stronger core. The following ideas explain their visible form and a practical construction route. Use the carton as a lightweight decorative layer over a separate support whenever the object needs to hold weight. The decoration should suit the contents and handling it will actually receive.
1. Painted Egg Carton Tassel Garland
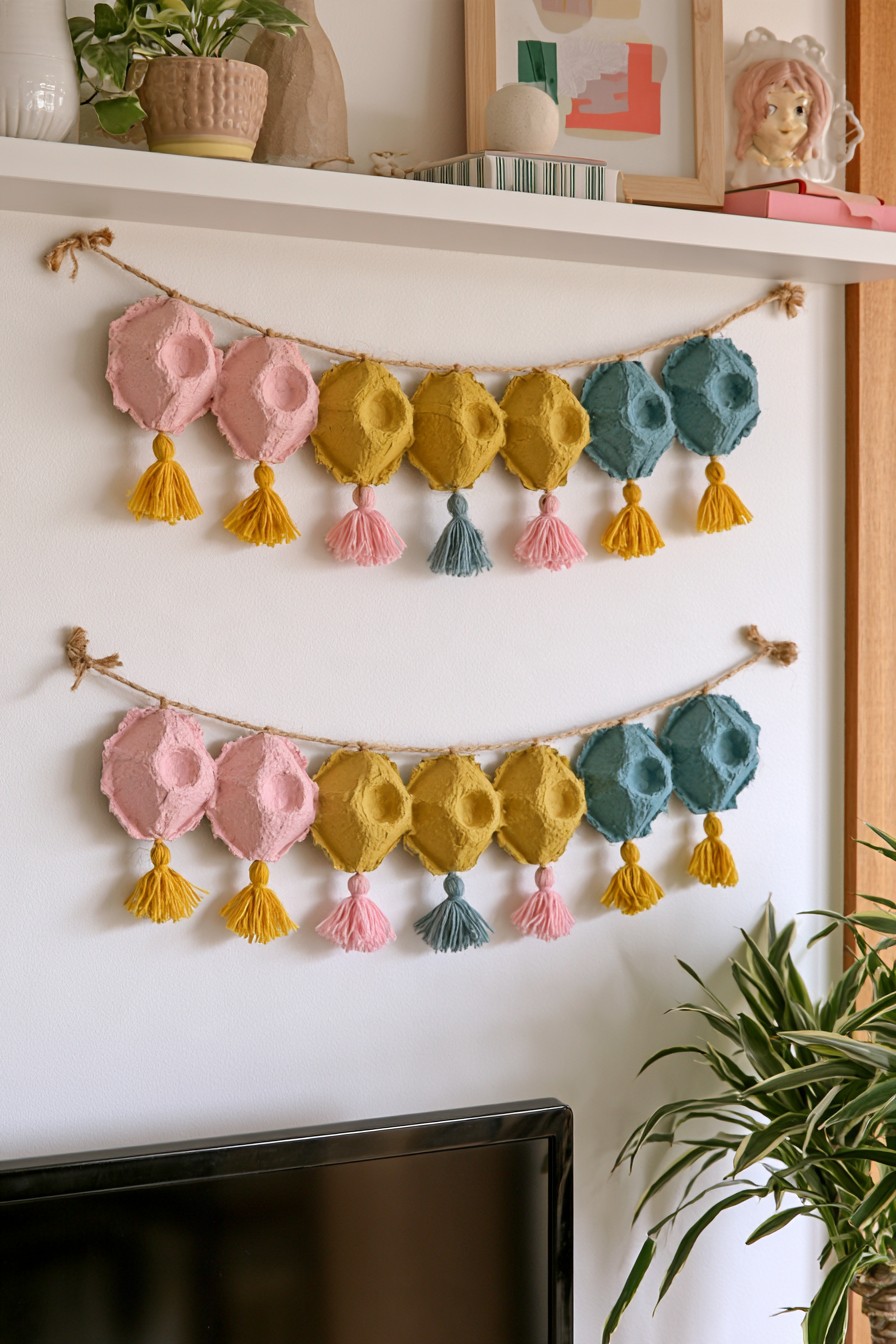
Shallow carton cups hang in repeated pink, yellow, and blue groups, with contrasting tassels below. The rough paper surface remains visible, giving the garland more texture than flat cut paper. Two strands create a coordinated wall display, but one can fill a narrower space above a desk or shelf. The recognizable molded shape is the decorative feature, so extensive reshaping is unnecessary.
Cut a set of cups with similar outlines and compare their spacing before painting. Pierce or reinforce hanging positions without tearing a thin edge, then thread the cord after the paint dries. Secure the spacing with knots and attach tassels through their own ties. Use supports appropriate to the finished strand and the wall surface, even for a light ornament. Keep the cords out of reach of young children and store the garland flat enough that its cups are not crushed.
2. Sculptural Egg Carton Table Lantern
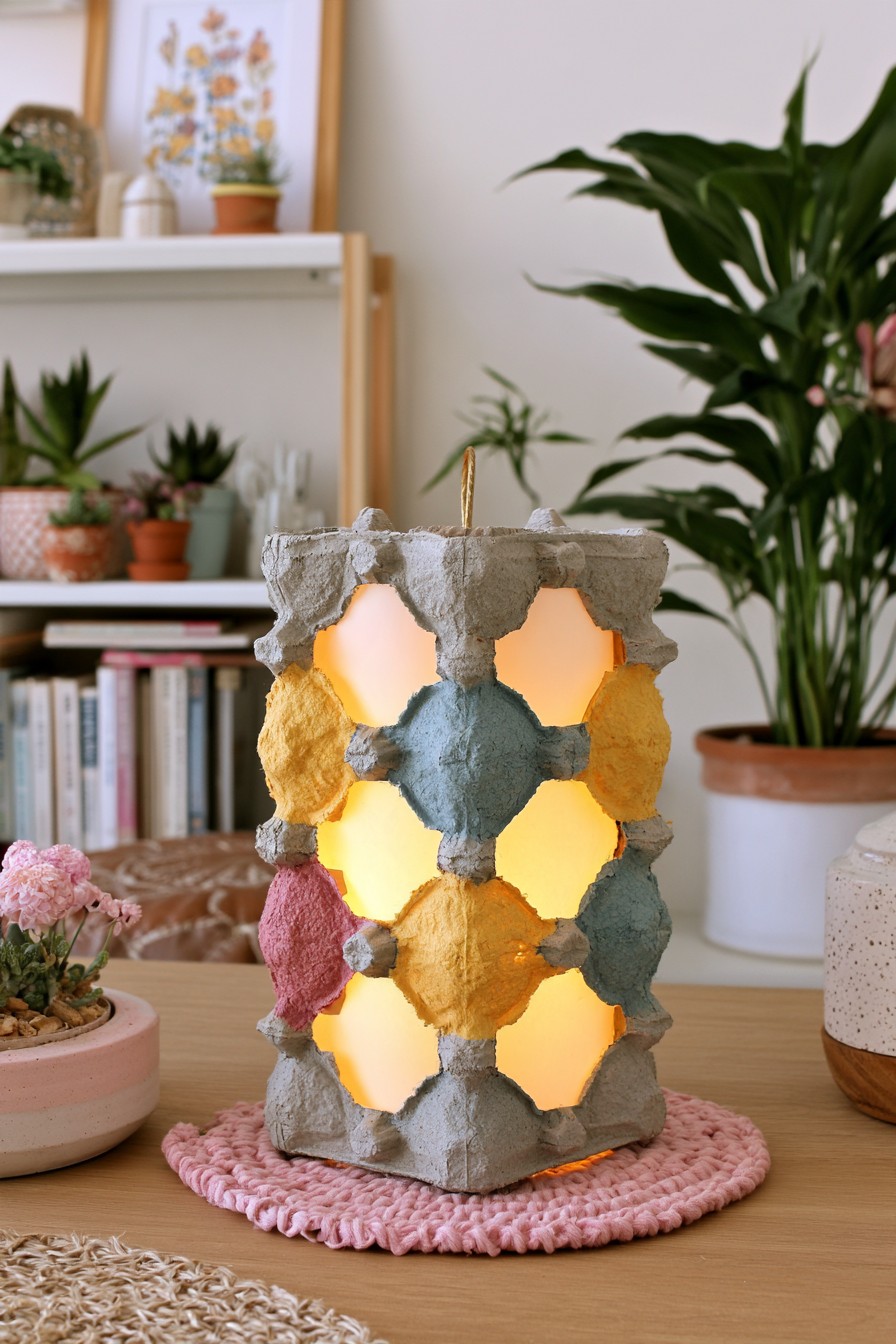
Alternating carton peaks and open recesses form a tall geometric cylinder, with pastel sections interrupting the natural gray. The glowing interior emphasizes its openings, while the repeated peaks give the surface structure. This design can also work without illumination as a sculptural tabletop object. The light effect is a separate decision from the paper assembly, not an automatic consequence of completing the frame.
Build the decorative cylinder on a firm base, joining dependable contact edges in stages and allowing the adhesive to set. For illumination, use only a lighting arrangement whose instructions permit the surrounding materials and required spacing, airflow, and access. A battery powered LED is not sufficient approval on its own, and its warm components must remain clear of the paper. Keep candles and exposed heat sources away. If the working conditions cannot be established, display the completed form without a light inside it.
3. Layered Egg Carton Sunburst Mirror
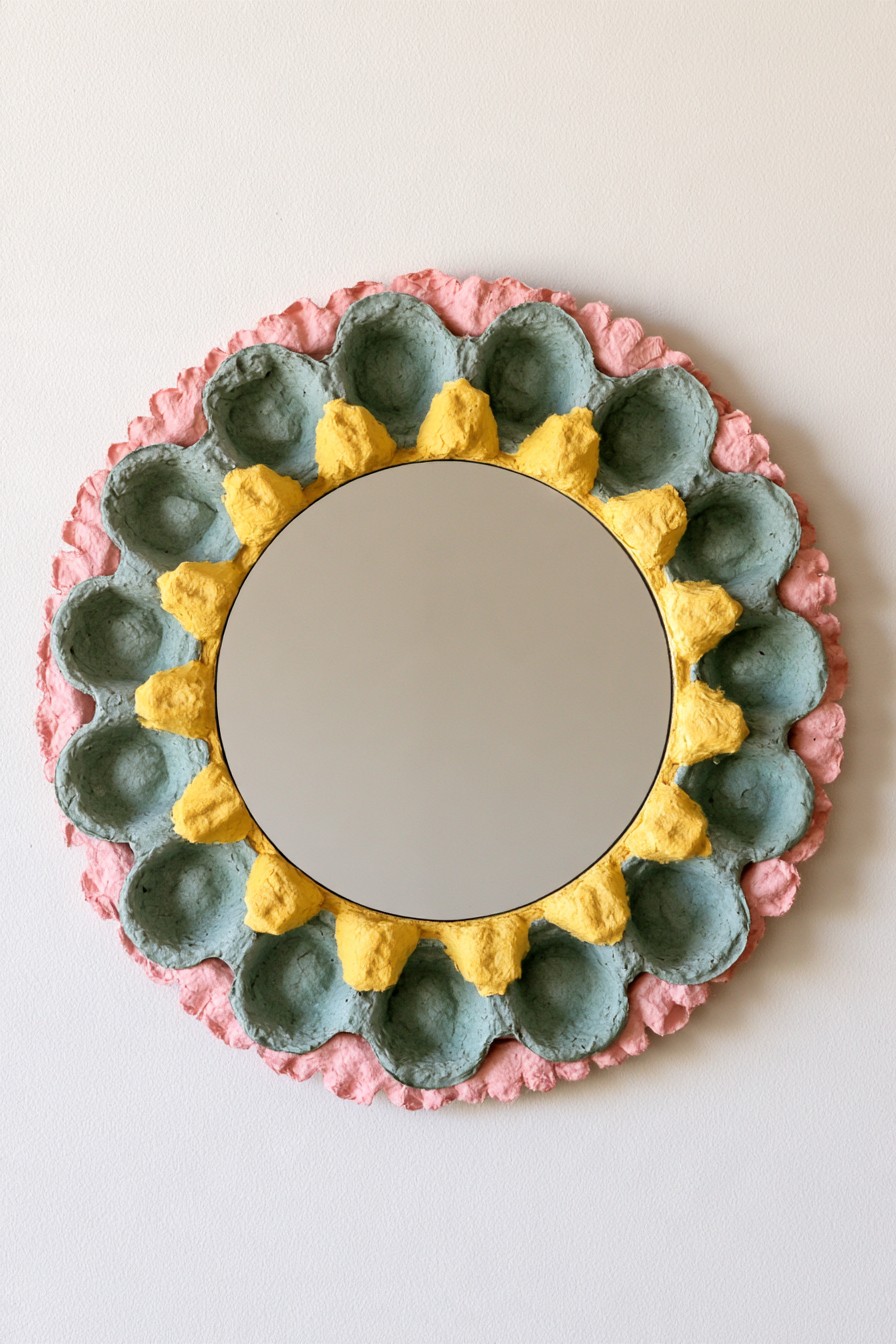
A round mirror is surrounded by shorter yellow rays, a ring of blue cups, and pink outer details. The repeated cup shapes create depth while the separate colors make the rings easy to read. The reflective center stays clear, so the decoration enlarges the mirror’s visual presence without changing its useful area. It suits a dry wall where the fragile border can remain out of frequent contact.
Plan all rings on a rigid surround before attaching the carton parts. Retain the mirror’s own secure support and use a mounting system suitable for the complete assembly; decorative paper cannot support the glass. Paint the individual pieces before joining them if crisp color separation matters. Choose a sound existing frame as the starting surround and leave its original mounting points accessible. Keep the glass, existing fixings, and cleaning area clear of adhesive and paper edges.
4. Color Blocked Egg Carton Shade Design
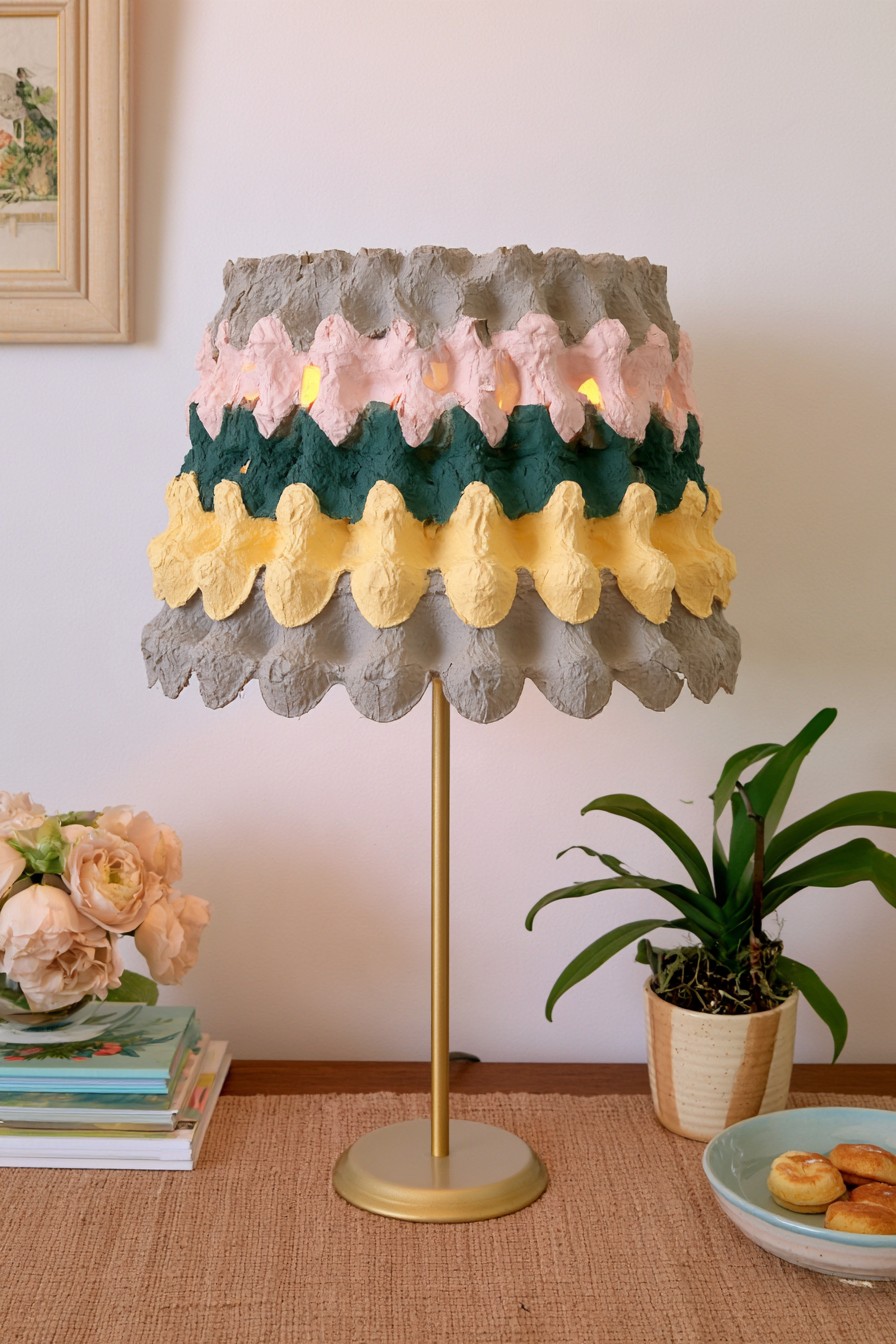
Broad gray, pink, dark green, and yellow bands wrap a cylindrical shade form, with downward scalloped edges giving each row depth. The layering is the distinctive feature: molded carton strips create a surface that changes around the whole object. It can be made as a decorative shade sculpture, while use on a working lamp requires a separate assessment of the fixture and covering.
Trim repeated strips and arrange their overlap around a firm form without blocking its intended openings. An existing shade frame provides shape, but it does not approve newly added paper material for lighting. Follow the fixture manufacturer’s requirements for shade materials, clearance, airflow, weight, and lamp selection. Lower heat from an LED does not settle those questions. Avoid altering electrical parts. Where the full configuration cannot be verified, retain the striped carton treatment as a decorative object without illumination, allowing the pattern to provide the effect.
5. Egg Carton Tissue Box Cover
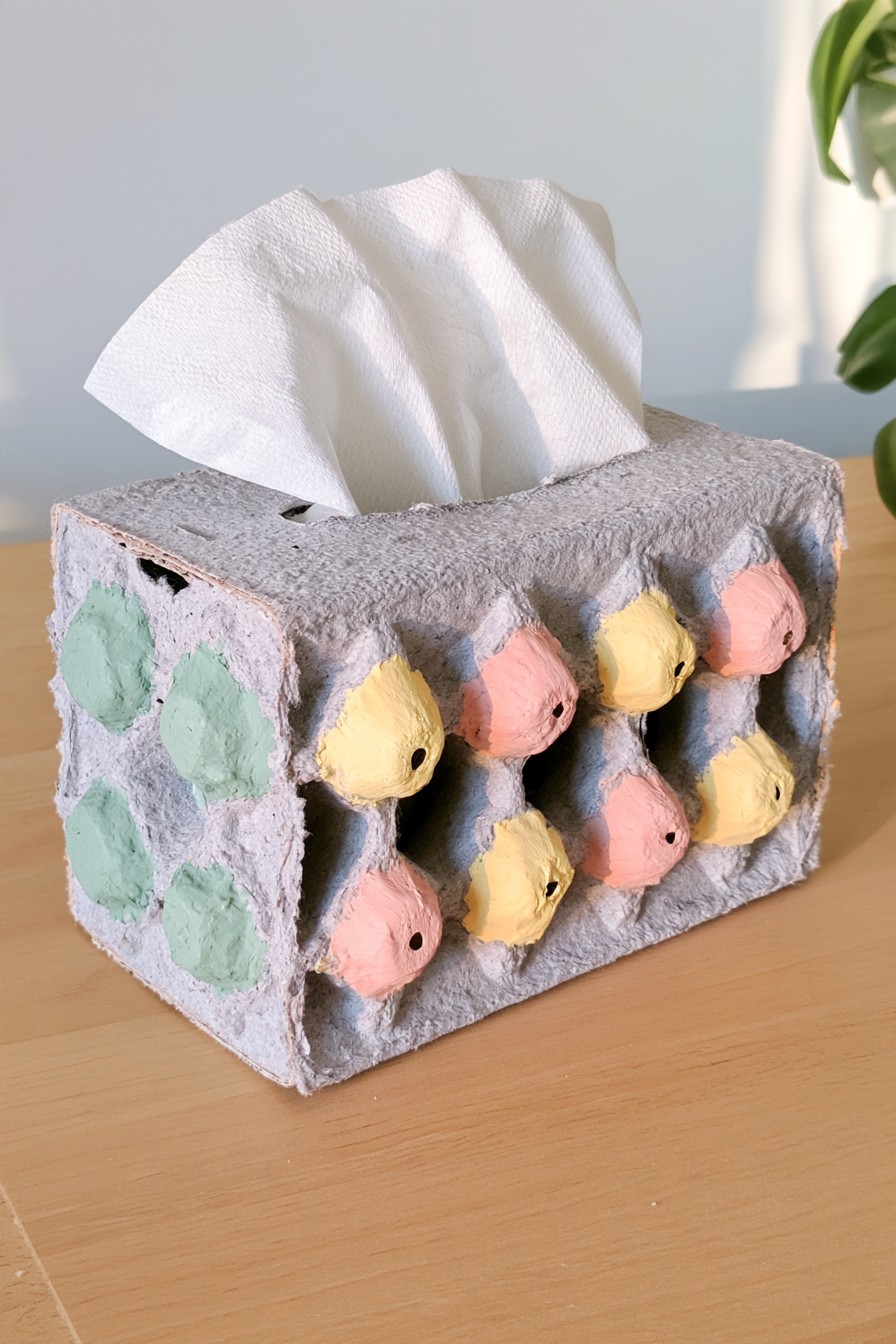
Gray carton texture covers a rectangular tissue box form, with mint, yellow, and pink raised sections across the sides. The top remains broadly flat around the tissue slot, so the relief decorates the cover without obstructing its purpose. This is the collection’s closest match to the video and a useful first project for fitting textured pieces to an existing core.
Measure the intended tissue box and make a removable cover with enough room for its final coated thickness. Dry fit the carton sections before gluing, and align the top slot with the actual exit rather than the center of the cover alone. Keep the slot edge smooth so tissues do not catch. Let the adhesive and paint reach their stated handling stage before checking the fit again. A protective craft finish does not automatically make this cover washable or waterproof; keep it dry and replace a worn exterior section when necessary.
6. Floral Egg Carton Curtain Tiebacks
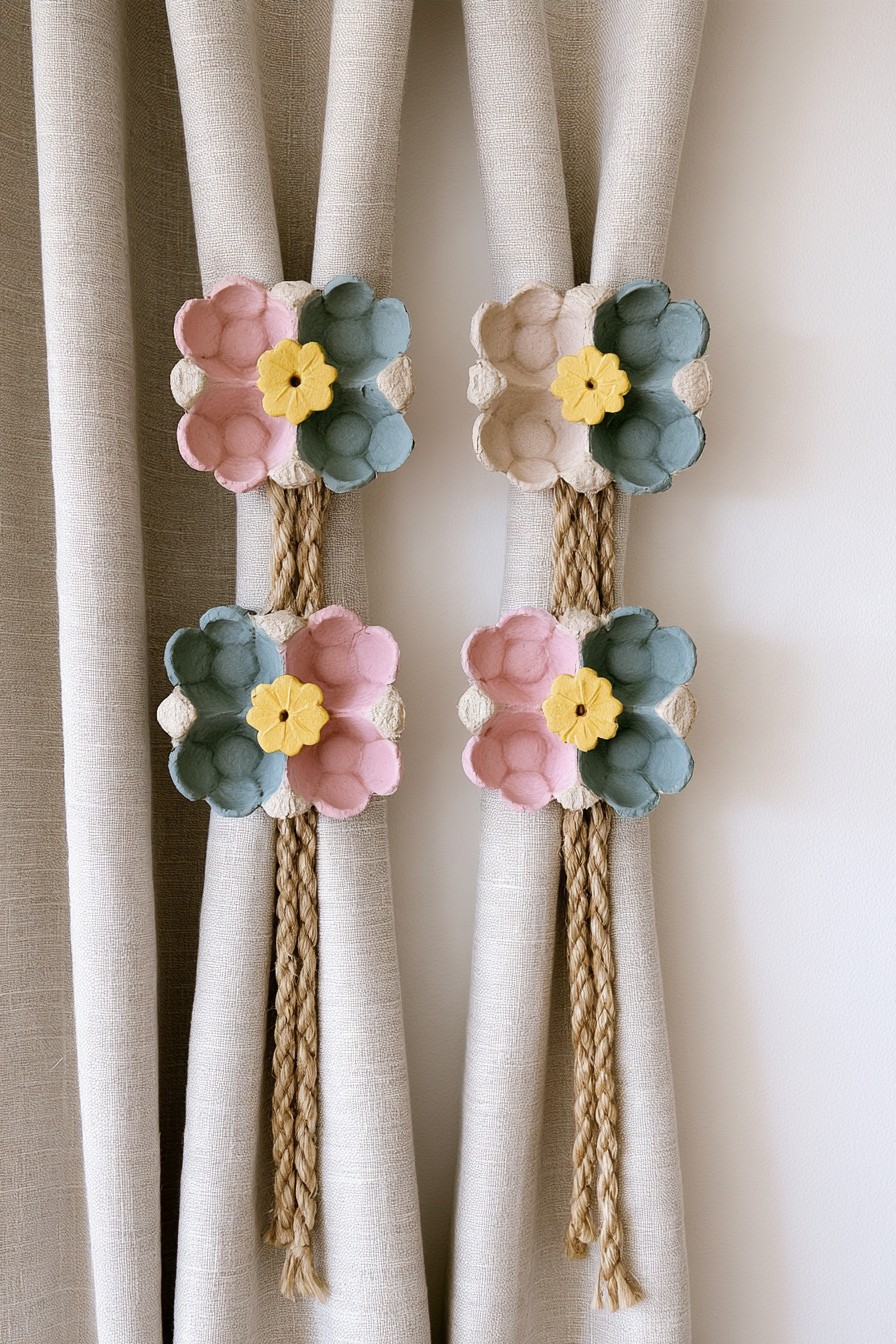
Layered flowers in muted pink, cream, and blue sit on braided cords, with small yellow centers connecting the palette. Two floral clusters decorate each curtain tie, giving the arrangement a repeated vertical rhythm. Carton cups suit the flower shape because their existing curve provides depth. The cord and its fittings perform the tying function, while the paper petals supply the ornament.
Trim matching petal outlines and layer smaller pieces at the centers after painting. Assemble each flower on a small backing disc, then attach the disc to the tie without weakening the cord. Place it where fingers can adjust the curtain without pressing directly on thin petal edges. Keep the paper clear of fabric snags and make the ornament removable for curtain cleaning. In homes with young children, consider accessible looped cords before choosing this placement. Frequent use may call for a sturdier tie with a detachable paper decoration.
7. Egg Carton Wall Pocket Organizers
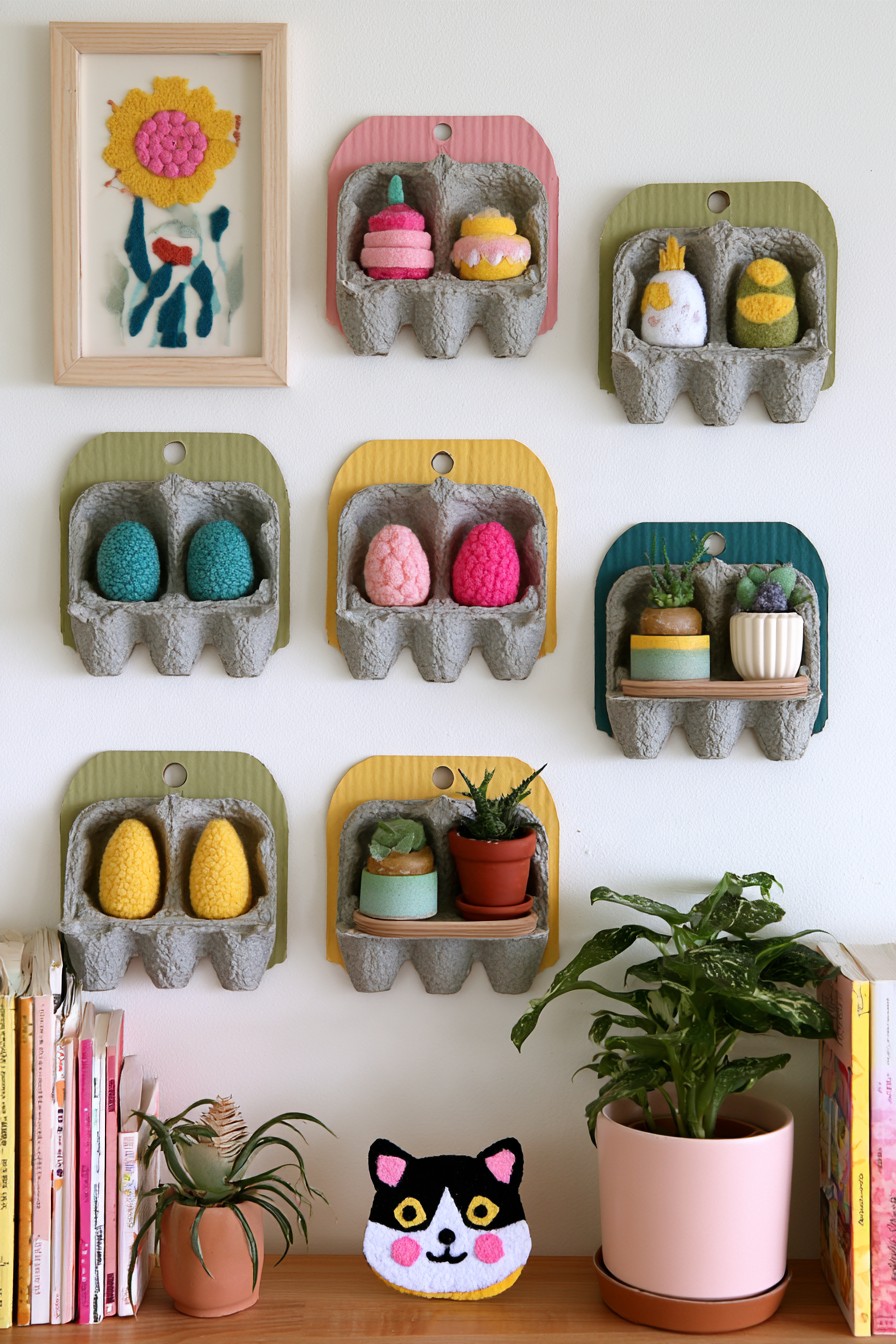
Small backed carton sections form a group of shallow wall pockets in pastel colors. Some hold egg shaped forms, while others contain small pot shaped objects and greenery. Those objects give the arrangement variety, but their material and weight cannot be established from the photo. The repeated pocket outline is the transferable construction feature, rather than proof that a paper compartment can hold a growing pot.
Recreate the display with lightweight paper ornaments or light artificial stems supported by a firm backing. Keep the carton as the decorative pocket surface and install the hanger through the backing. If a real pot is desired, its weight needs an independent support designed for it, with water kept away from the carton. Compare the depth with the chosen dry contents so they do not lean outward. Keep delicate objects low enough for careful removal, and check pocket edges for tearing during use.
8. Egg Carton Pedestal Display Stands
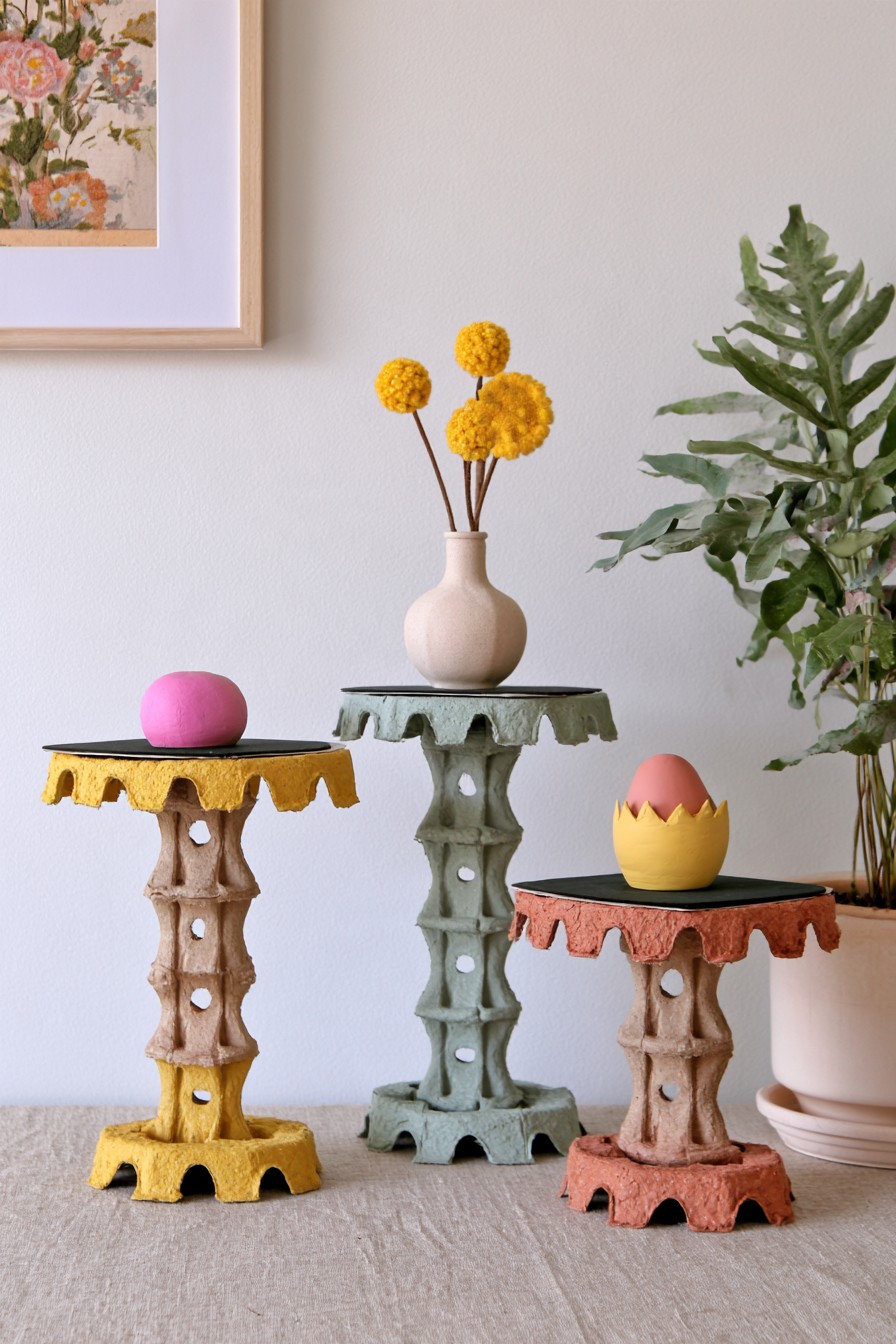
Three small pedestals use stacked molded sections beneath flat tops, with yellow, green, and pink accents defining each level. Their differing heights create a layered display. Choose lightweight decorative vases and rounded ornaments, and check the supported weight of each stand before arranging them. The molded sections are most useful here as architectural texture around a supporting core.
Align the sections around a firm tube or another core appropriate to the intended object. Fit a rigid top and broad base so contact is not concentrated on soft peaks. For a simple decorative version, use light paper forms or empty lightweight accessories above, keeping the highest stand from becoming top heavy. Heavy glass, pottery, or valuable breakable pieces belong on a support designed for them. Compare the completed stands on their display surface and remove anything that causes rocking or compression.
9. Egg Carton Sunglasses Organizer
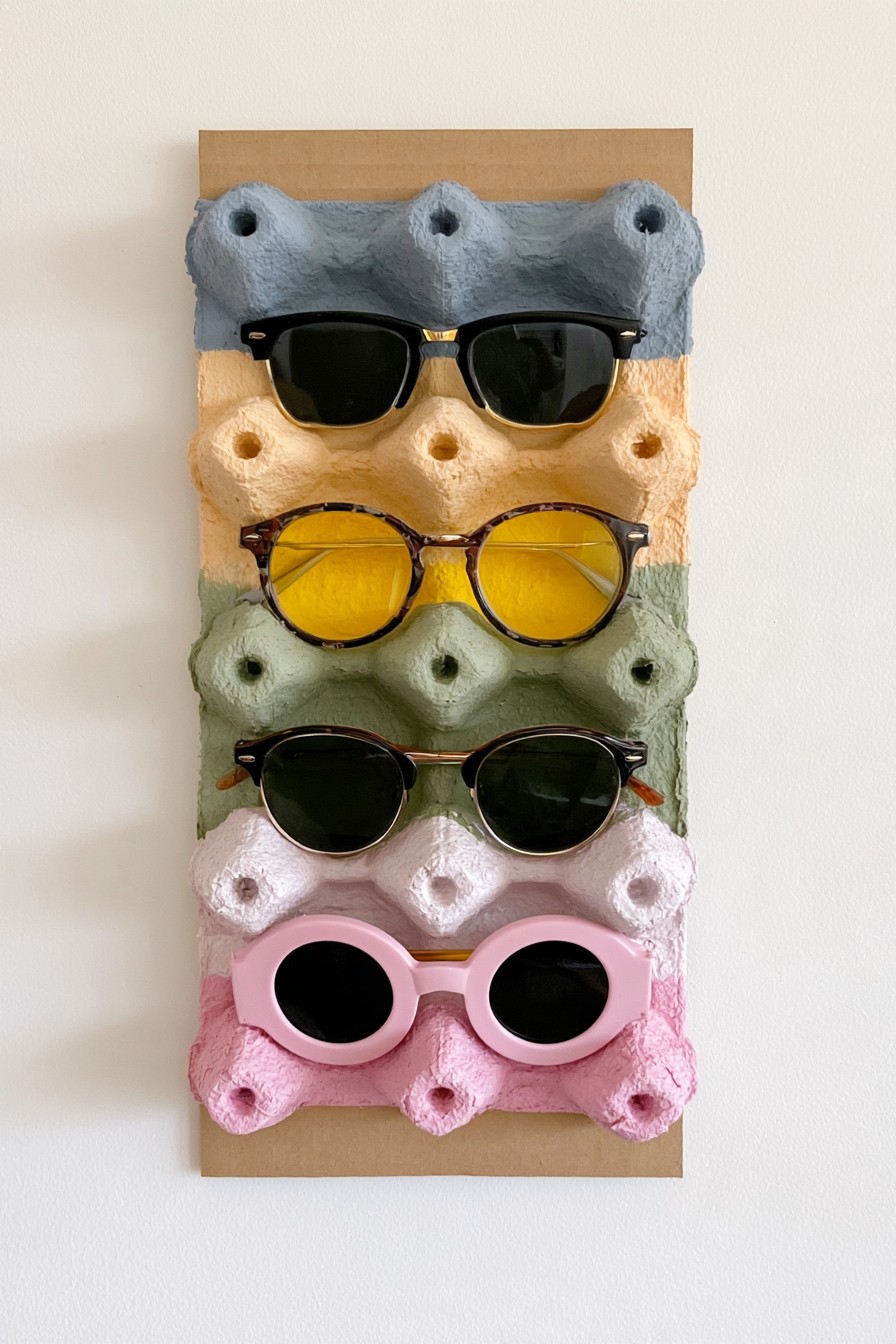
Colored horizontal carton strips sit on a wooden backing, holding one pair of sunglasses per row. The molded peaks divide the space naturally, while the pale yellow, blue, and pink make the organizer easy to scan. This is a practical sorting idea for a small collection, provided each pair can be lifted out without rubbing against the row above.
Dry fit the strips using the largest frames you plan to store, then let the rigid backing provide the structure. Arrange contact around the frames rather than the lenses. Add a smooth compatible protective layer where rough paper could rub a lens, without creating a bulky ledge. Let coatings cure before placing personal items on them. Keep the organizer dry and check the molded supports for compression over time. Replace worn strips instead of stacking additional glue onto a weakened contact area.
10. Egg Carton Test Tube Flower Display
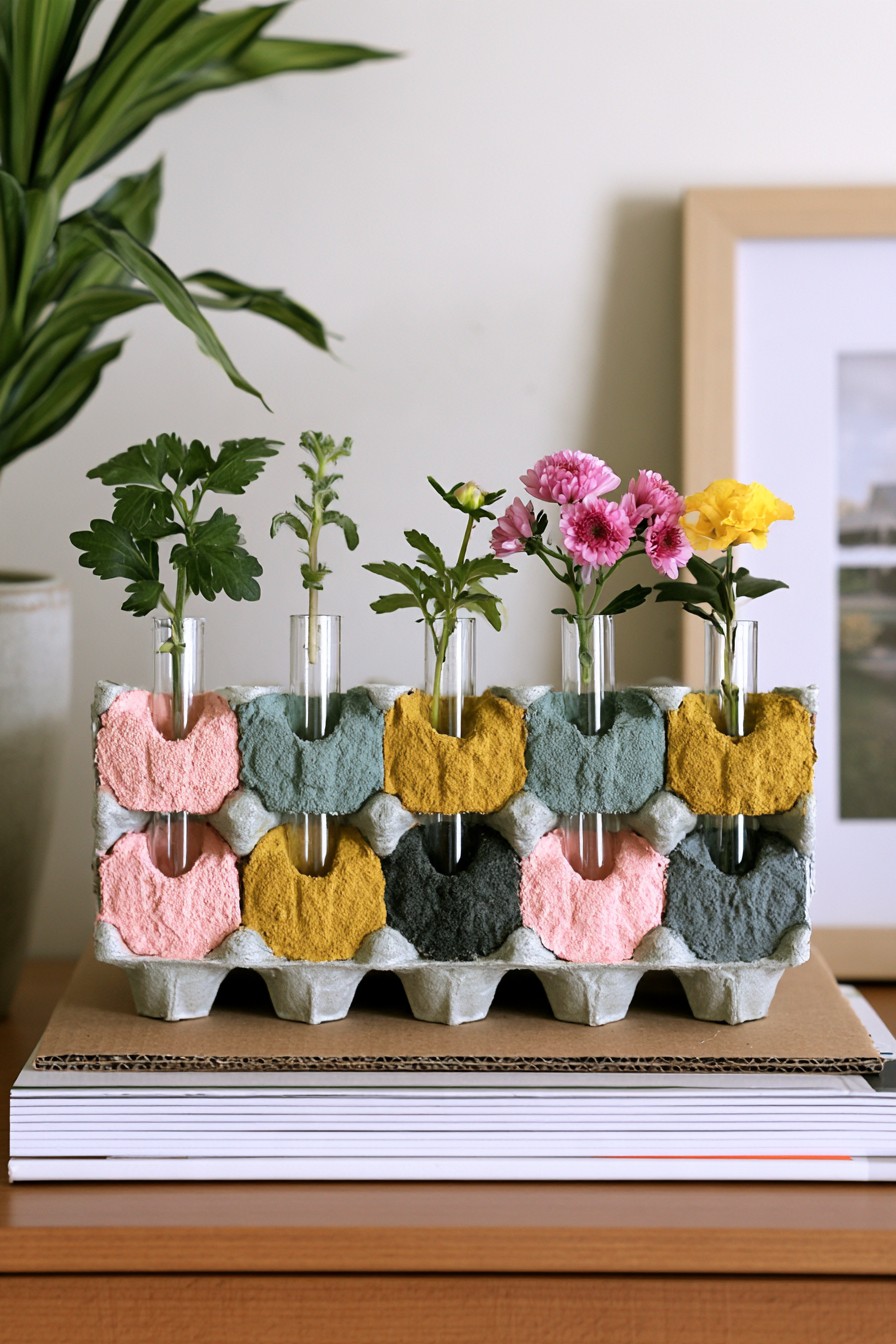
Narrow flower tubes rise through a colorful grid of molded carton sections, with individual stems at slightly different heights. The gray base keeps the repeated cups visible between the pink, mustard, and blue areas. This makes the carton a positioning grid around separate vessels, not a container intended to hold water itself. The display is compact enough for a desk or sideboard where each tube can be reached.
Fit the grid on a rigid base and check every tube upright and removable before adding flowers. Provide lower support if a tube could slip through its opening. Fill the tubes elsewhere and dry their outside surfaces before replacing them. A book beneath the photographed arrangement is not a spill protective base; use an appropriate separate surface or tray for the location. Remove the tubes to refresh the water, and keep spills from reaching the paper. Dry flowers offer an alternative when managing water is impractical.
11. Egg Carton Book and Magazine Holder
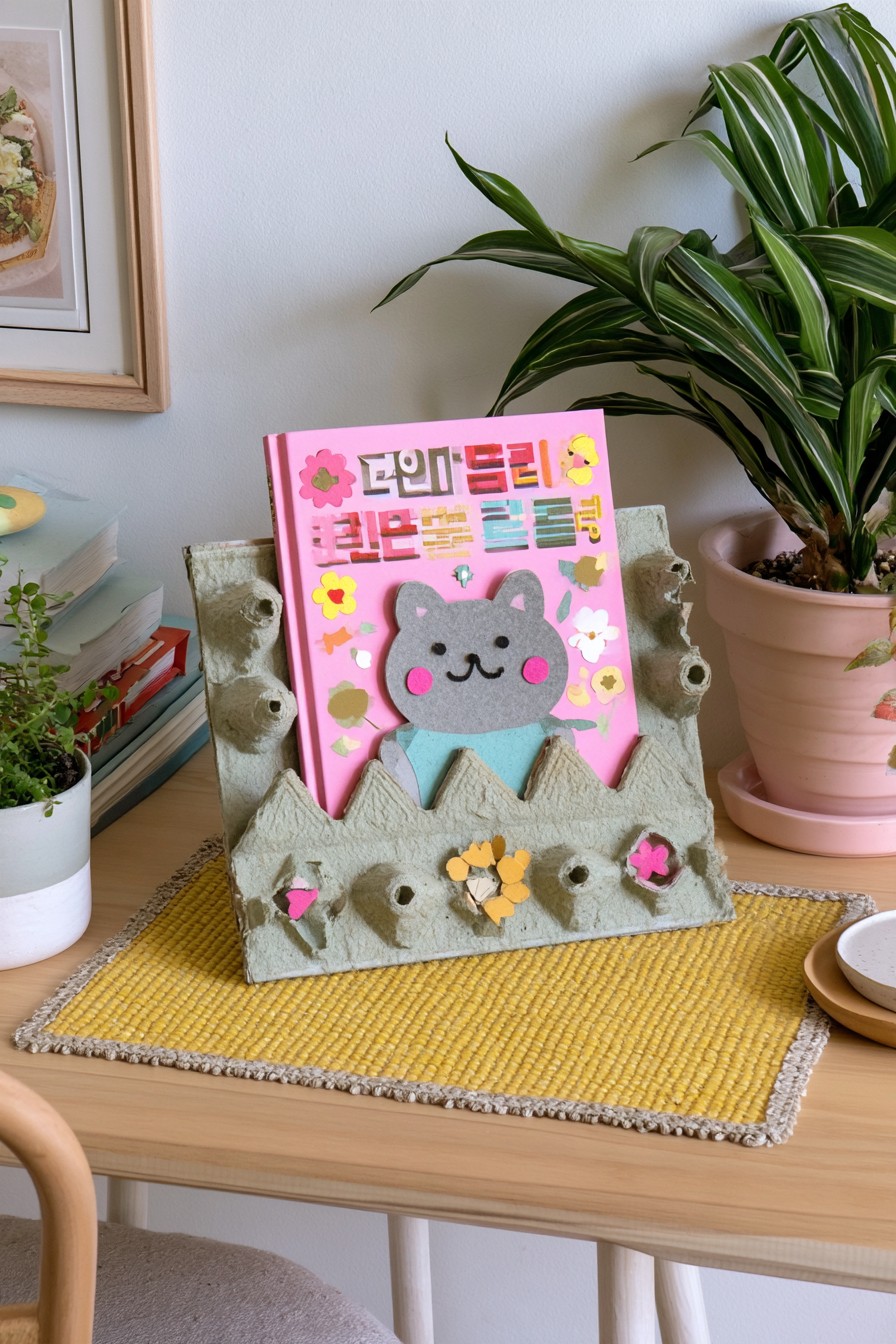
Gray molded side pieces and pale blue front details create a desktop holder for a thin publication. Small flowers finish the front without covering its opening. The carton texture makes the file distinctive, while the contents demonstrate its narrow organizing role. It is better suited to loose papers, slim notebooks, or a small number of magazines than a collection of heavy books.
Build the base and supporting core first, then add carton sections where their texture is visible. Keep interior contact surfaces smooth so paper edges slide in without catching. Test the holder with the intended contents and allow space for fingers to lift them out. For heavier storage, explore wooden organizer ideas and select a stronger construction. The paper covering can still supply a decorative finish, but it should not carry a load that distorts its sides.
12. Egg Carton Vanity Organizer
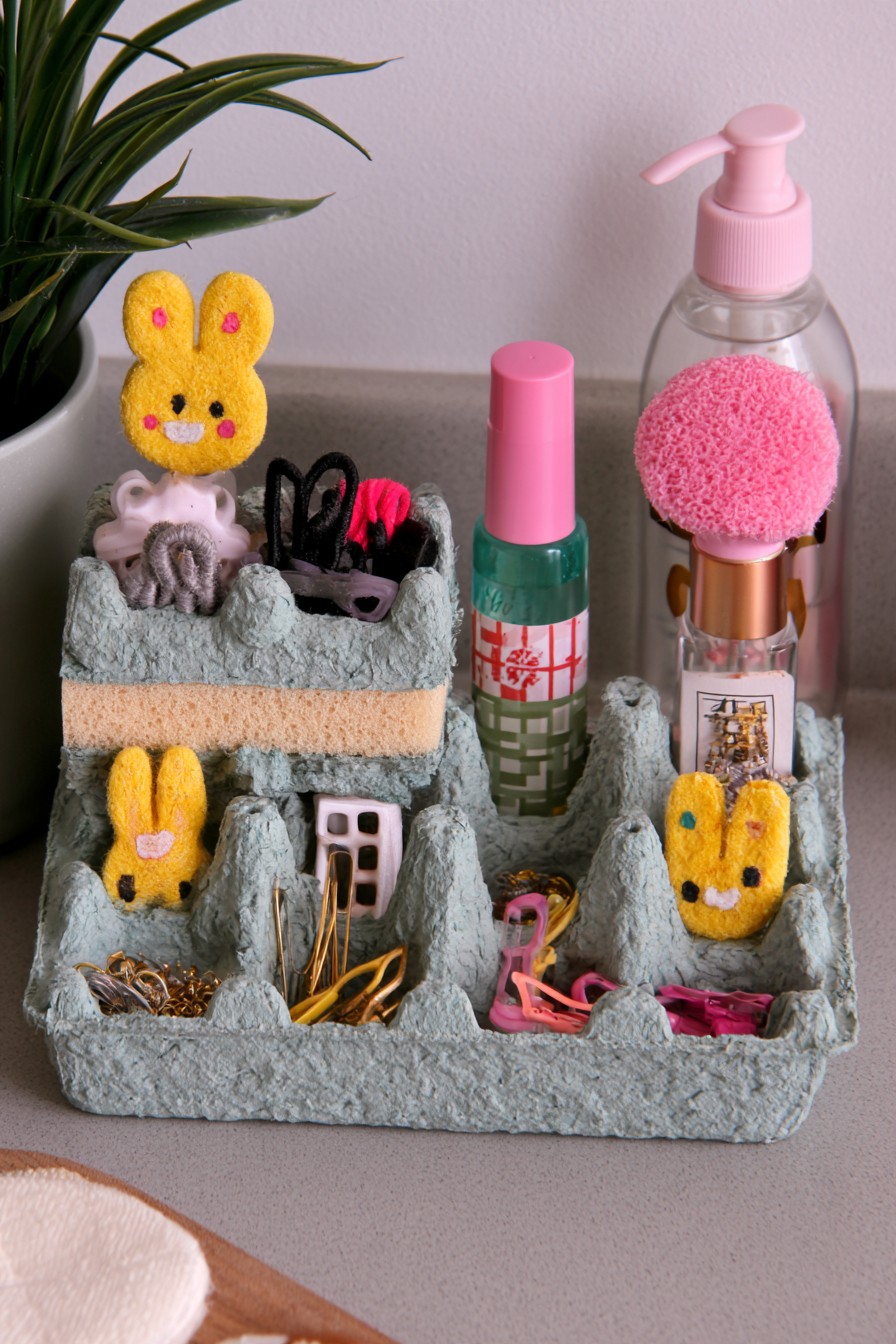
Raised rear compartments sit above a row of shallow cups, with rabbit motifs and small flowers linking the separate areas. Hair accessories, small tools, and tall bottles illustrate the proposed vanity use. Their differing heights matter: an upright bottle in a low recess can be much less stable than a clip resting at the bottom. The organizer needs to be chosen around its actual contents rather than the decorative layout alone.
Use new molded paper stock for a project holding personal accessories and place it on a firm base. Check bottle stability before assigning compartments; heavy or tall containers may need a separate rigid section or storage elsewhere. Keep liquid products closed and remove them before use, protecting the carton from spills. The decorated cups suit light dry items with easy access. Keep contact edges smooth and replace a softened section promptly rather than treating paint or sealer as a remedy for water damage.
13. Egg Carton Charging Station Organizer
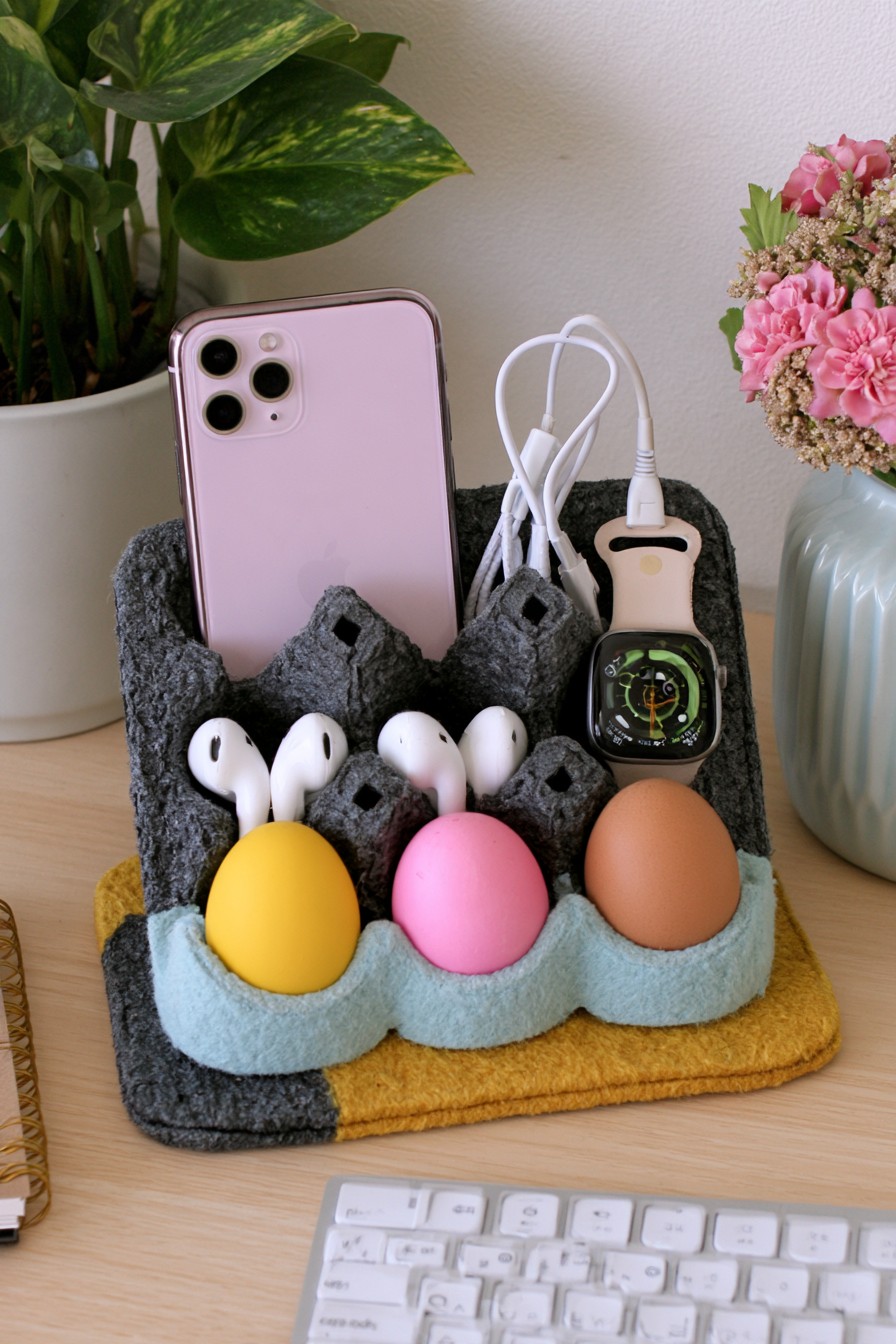
A phone and watch sit in the taller rear section, while earbuds and colored egg shaped objects occupy the front cups. Dark gray and pale blue distinguish the storage levels. The front forms are decorative examples, not a suggestion to store food beside charging equipment. The carton can organize items on a desk, but it is not an electrical enclosure or a way to manage heat.
Choose a firm supporting base and set the phone angle so it can be removed without tipping the organizer. Use the compartments for cable sorting and dry accessories. Keep adapters, plugs, power strips, and electrical connections outside the cardboard, with devices retaining their normal ventilation. Do not cover devices or bend leads tightly through slots. If a product’s charging instructions conflict with the arrangement, store it here only when it is not charging. Keep the paper clear of cable connectors and inspect worn routing edges.
14. Egg Carton Animal Face Wall Art
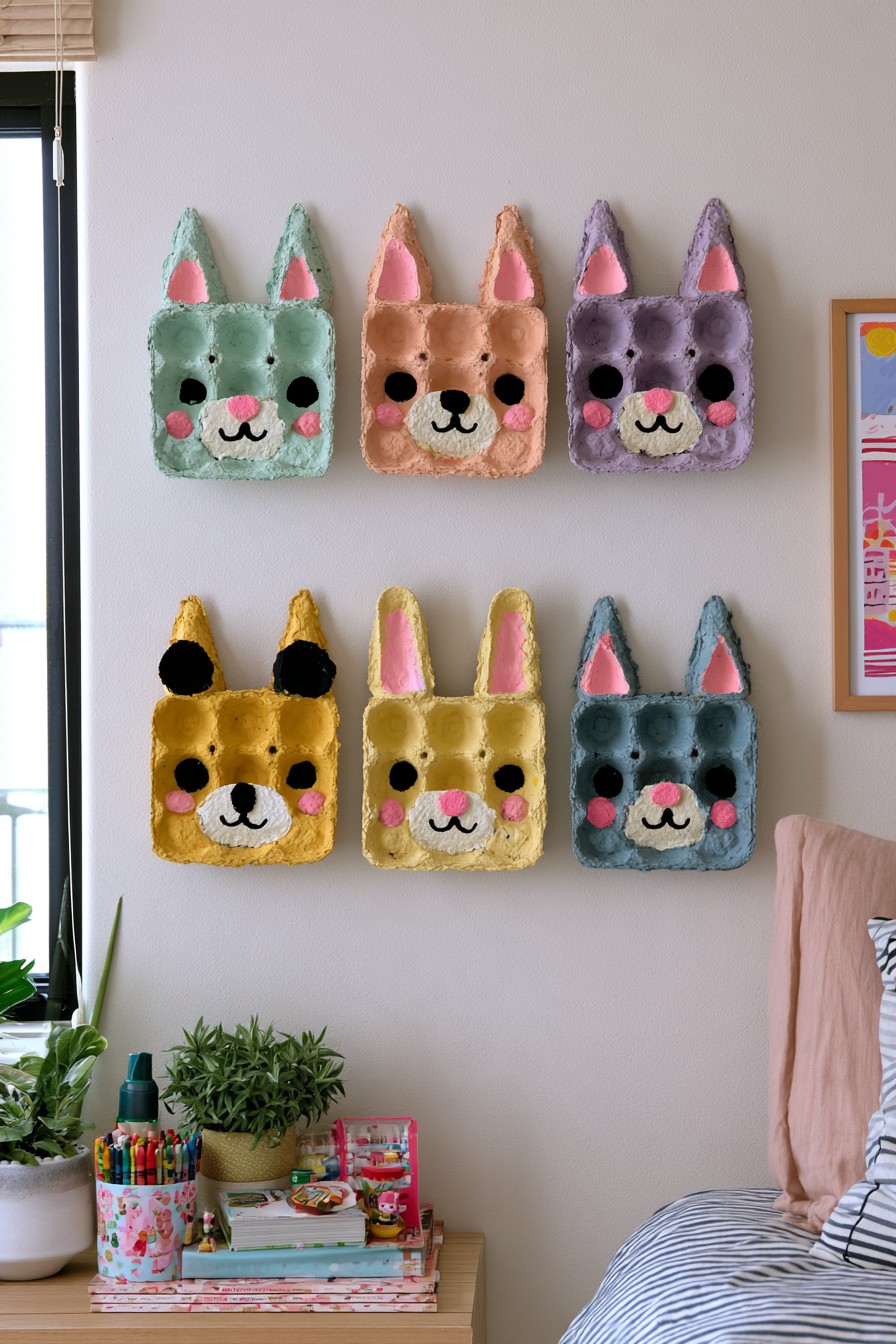
Pastel animal faces use molded noses, raised cheeks, pointed ears, and painted expressions. The same compact face outline produces several characters through changes in ear height, colors, and muzzle details. This makes the set useful for a dry wall display where small forms can be grouped together, with each face remaining easy to distinguish.
Begin with new carton pieces for children’s participation, let an adult prepare demanding cuts, and select labeled materials appropriate to the activity. Plan the ears and facial features before gluing so their positions are consistent. Paint the larger areas first, then add eyes and expressions after drying. Mount each face on a rigid backing with the hanging point behind it. For more ways to turn packaging into character compositions, see recycled animal art projects. Keep detached small details from becoming loose play pieces.
15. Egg Carton Toy Car Parking Garage
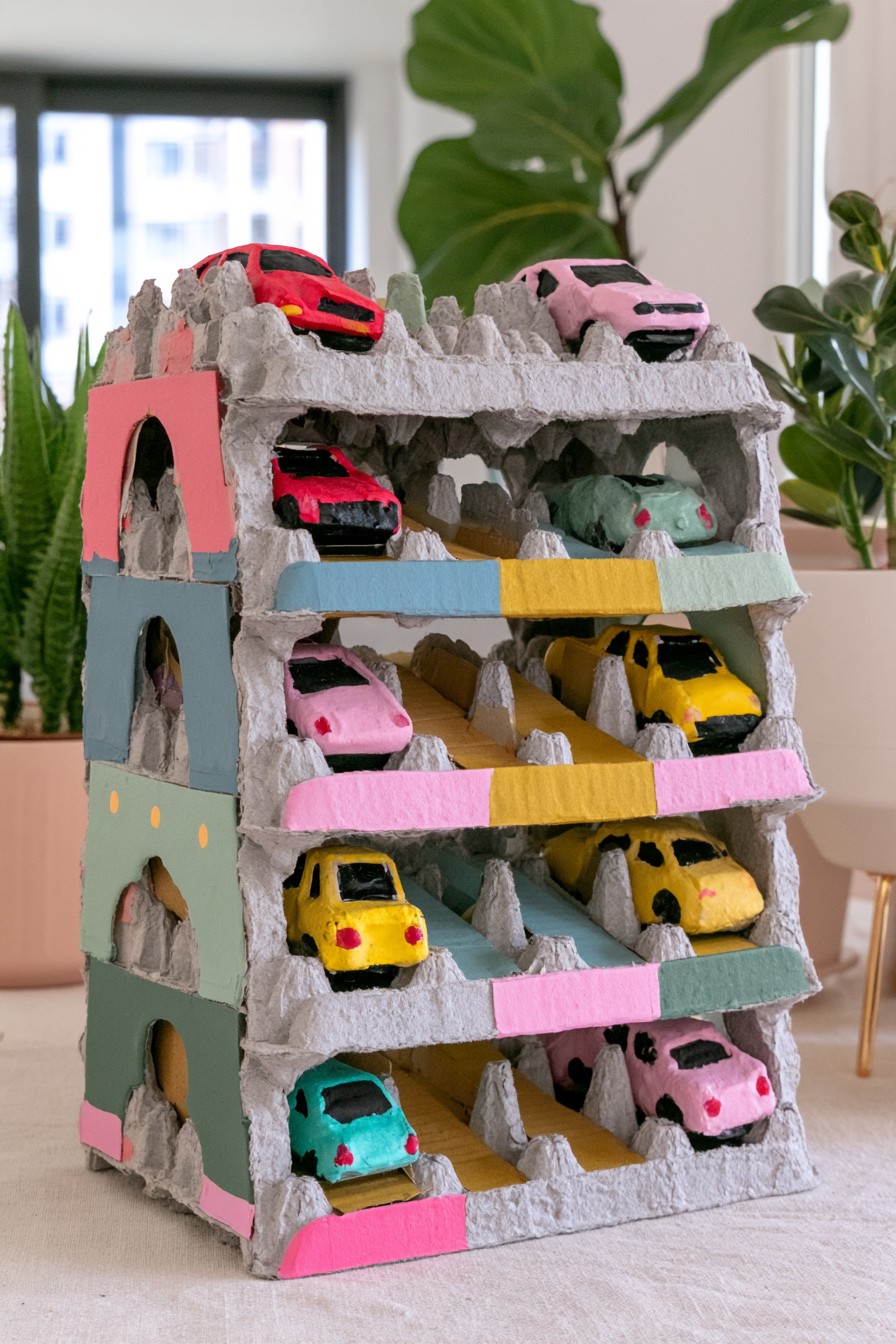
Several carton trays form parking levels for small cars, with colored front edges distinguishing the tiers. Side panels connect the levels into one tall garage, and the molded dividers create individual bays. This is useful for displaying or gently sorting lightweight toy vehicles. The number of tiers increases the need for a firm base and stable connections, even though the vehicles are small.
Construct the side supports and lower base before fitting the trays. Let those supports carry the levels, with carton dividers defining the bays. Check vehicle clearance and access at each level rather than adding a tier that cannot be reached easily. Any ramp needs a supported driving surface independent of the rough cups. Keep the garage for the intended small vehicles and avoid climbing or leaning on it. Inspect joints and edges after handling, replacing loose pieces before the display returns to use.
16. Egg Carton Crayon and Craft Supply Organizer
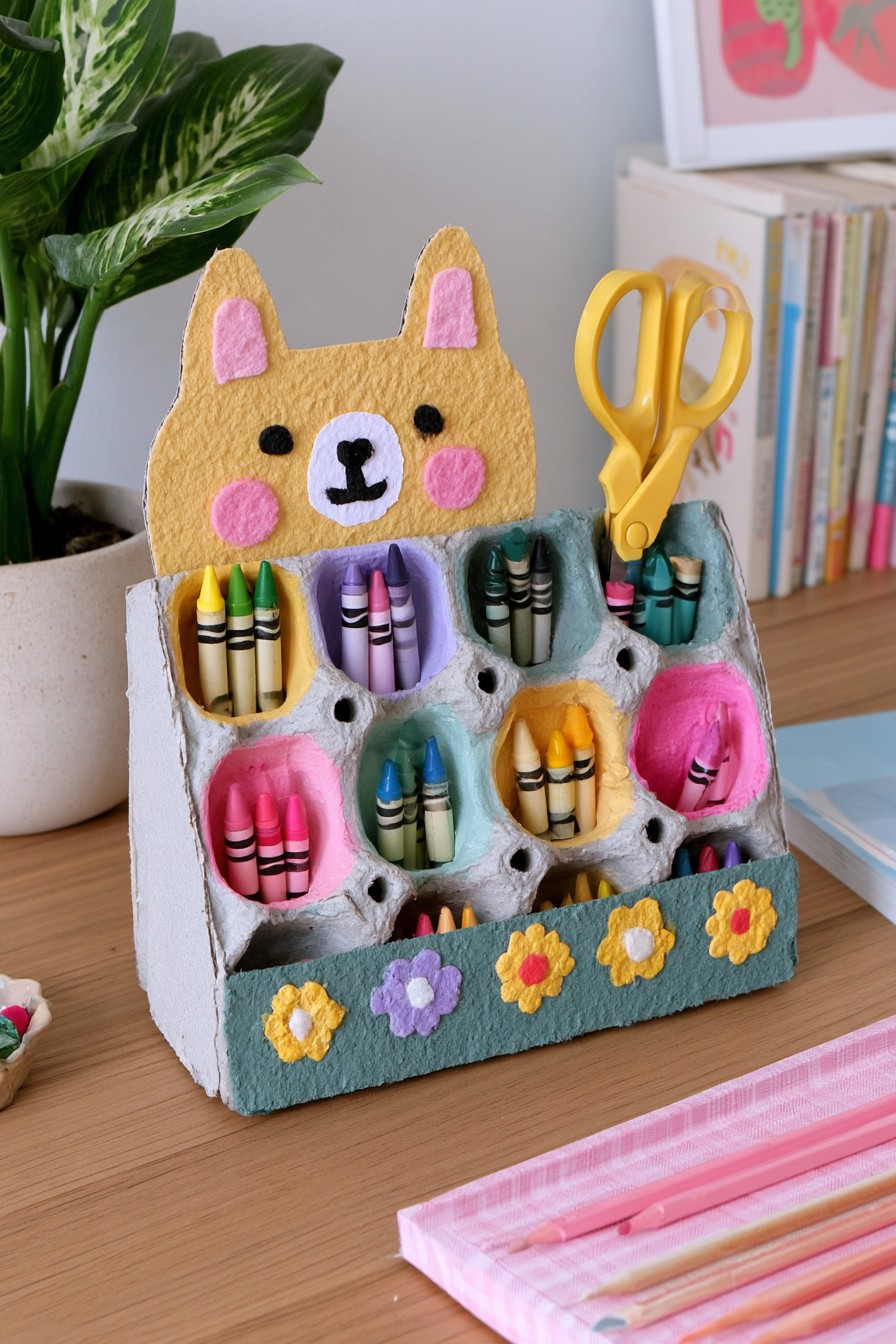
A tilted carton tray holds crayons in colored compartments beneath a large yellow animal face. Small flowers decorate the lower front strip, while taller tools occupy the rear area. The molded cups give a quick visual sorting system without many extra dividers. Its inclined position makes the contents visible, but also means the whole tray needs support instead of relying on a folded carton edge.
Fit the tray to a firm base with side supports that keep the angle stable. Place short crayons in front and taller supplies where they will not pull the organizer forward. Heavy tools and scissors need a properly supported compartment and placement appropriate to the users. Use new paper cartons for children’s supplies and keep paints or wet brushes separate. Check that each tool can be removed without scraping through a cup edge. The decorative face should attach behind the storage area without narrowing access.
17. Egg Carton Caterpillar Shelf Decor
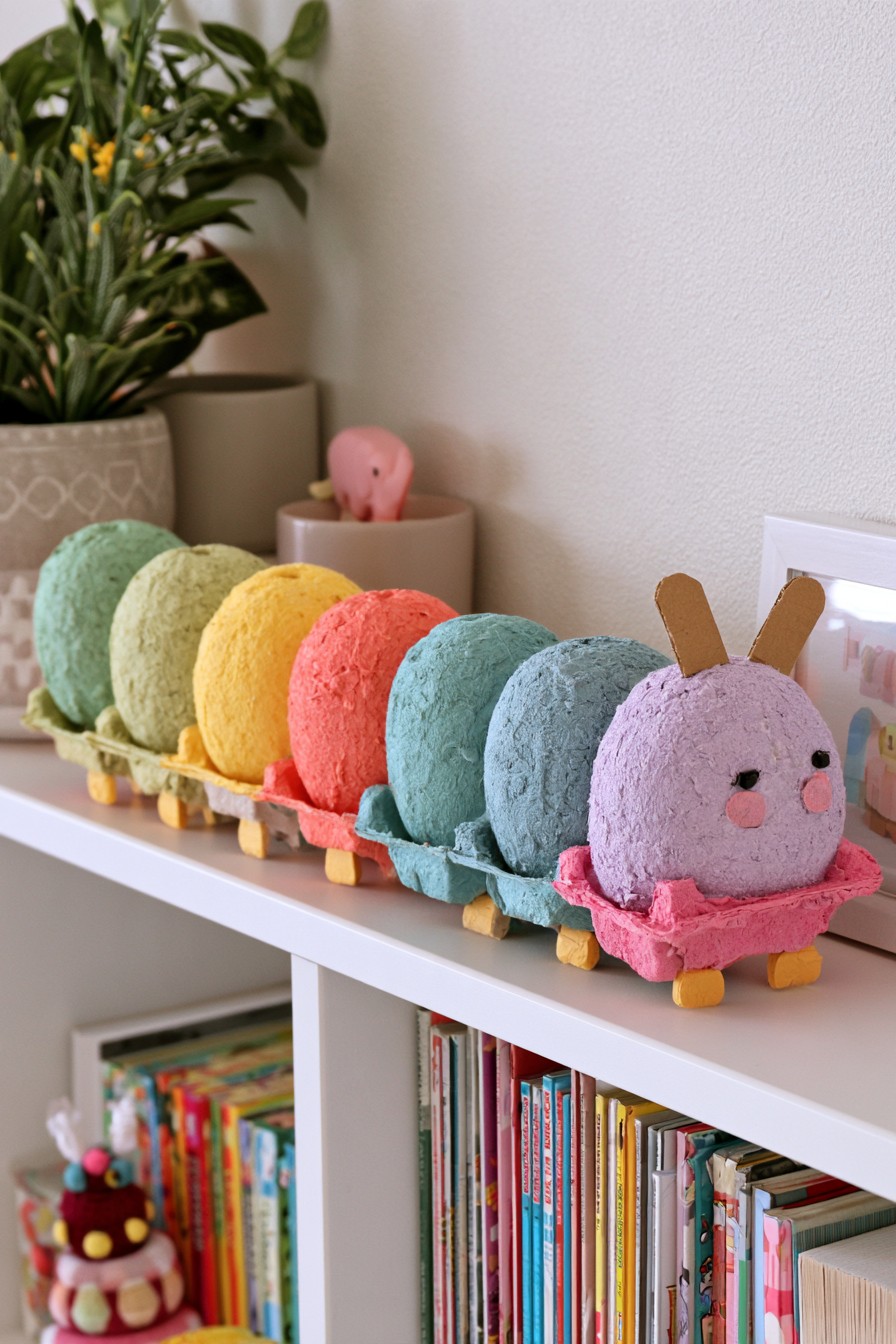
Rounded pastel body sections form a long caterpillar above individual molded carton bases. Small feet repeat beneath the colored segments, and a face with short antennae completes the front. The volume of those oval sections is not explained by cutting a standard egg cup alone, and their precise material cannot be determined from the photo. The recognizable carton pieces serve as the bases in a workable decorative adaptation.
To create the separate body forms, shape light clean paper into compact ovals and cover them with overlapping paper strips and an appropriate papier mache adhesive. Let each form dry thoroughly before painting and fixing it to its carton support. Arrange the bases evenly on a stable display surface and attach simple flat antennae and facial details. This adds a paper shaping method instead of claiming the whole body comes directly from the carton. Keep it as shelf decoration, with fragile joints and small features out of rough play.
Finish and Maintain Paper Crafts
A compatible protective coating may help a decorative finish, but it does not automatically make the carton waterproof, washable, or suitable for food contact. Test an offcut for distortion and observe the product’s drying and full curing instructions before regular handling. These stages can differ considerably, so avoid assigning one waiting period to every coating.
Keep the finished pieces dry and lift dust with a gentle brush while supporting their fragile edges. Inspect handled items such as the tissue cover and glasses organizer for loose parts and compressed fibers. Replace a worn decorative section instead of hiding damage beneath more paint. Remove separate flower vessels or other washable inserts for cleaning, and store unused paper pieces where their relief will not be crushed.



Leave a Reply