
A handmade cross pendant brings several small decisions together: the outline, the center setting, the wrapping, and the way the piece hangs. This guide starts with a tutorial video and a practical making sequence for an open wire cross with a dark center and chain details. It then introduces 19 separate designs in thread, fabric, cord, beads, and mixed materials, explaining their appearance and how to approach a similar arrangement. The tutorial provides a starting method; the inspiration designs explore different finishes and constructions.
Table of Contents
- How to Make an Open Wire Cross Pendant
- Materials and Tools for a Similar Pendant
- 1. Plan the Outline Around the Center
- 2. Form the Cross Frame and Hanging Loop
- 3. Prepare and Secure the Center Setting
- 4. Add the Two-Tone Wire Wrapping
- 5. Assemble the Chain and Black-Bead Panels
- 6. Fit the Crossed Twisted-Wire Detail
- 7. Attach the Faceted Drop and Necklace Cord
- 8. Check the Pendant Before Wearing
- 19 Cross Pendant Designs to Explore
- 1. Floral Beaded Cross with Soft Pink Thread Wrapping
- 2. Geometric Thread-Wrapped Cross with Pink Bead Accents
- 3. Color-Blocked Yarn Cross with Floral Embellishments
- 4. Ornate Two-Tone Wire Cross with Black Cabochon Center
- 5. Antique Copper Cross with a Black Stone Focal Point
- 6. Mixed-Media Cross with Fabric, Copper Wire, and Black Stone
- 7. Symbolic Cross Pendant with Heart, Moon, and Key Details
- 8. Rustic Copper Cross with Fabric, Beads, and Botanical Detail
- 9. Textile Cross Pendant with Black Crystal and Sewing-Inspired Accents
- 10. Burgundy Textile Cross with Sculptural Gold Wire Scrolls
- 11. Patchwork Fabric Cross with Copper Wire and Black Cabochon
- 12. Structured Copper Cross with Textile Inlays and Black Stone
- 13. Gothic Textile Cross with Wrapped Stone and Copper Details
- 14. Ribbon-Wrapped Cross with Copper Weaving and Black Center Stone
- 15. Botanical Cross Pendant with Framed Flower Compartments
- 16. Open-Frame Wire Cross with Chain and Black Bead Details
- 17. Knotted Cord Cross with Geometric Black Crystal Center
- 18. Mosaic-Inspired Copper Cross with Color-Block Tile Accents
- 19. Plaid Fabric Cross with Copper Frame and Black Stone Center
- Choose the Construction Before the Embellishment
How to Make an Open Wire Cross Pendant
The video develops an open cross frame, fits a diagonally placed dark center, adds bright coils and small chain panels, and finishes the lower stem with twisted wires and a faceted drop. This is the same design direction explored in idea 16. Watch the sequence for the assembly order, then use the notes below to plan the real components and connections.
Materials and Tools for a Similar Pendant
Prepare frame wire, finer copper-colored and gold-colored wrapping wire, one square focal piece with a fitted setting, small drilled black beads, short chain sections, suitable closed links or jump rings, one faceted bead drop, and one finished necklace cord. The wire lengths and chain lengths come from the paper layout and selected components. For the paired-bead layout described in step 5, allow 20 small beads plus spares; another arrangement may use a different count.
Use round-nose and smooth chain-nose pliers, suitable wire cutters, a ruler, paper, a pencil, a bead mat or tray, and a soft cloth. Wear eye protection when cutting wire and contain the cut pieces. Choose wire by composition, hardness, and how it fits the bead holes. Exact sizes are not specified in the clip. This project uses mechanical settings and links; fabric, botanical accents, and adhesives belong to the later inspiration designs and are not required for this version.
1. Plan the Outline Around the Center
Place the selected square center on paper in its diamond orientation. Draw a cross around it, leaving usable openings at the top and arms and a longer stem below. Mark the upper hanging loop, center connections, and bottom drop position. Check the outline against the necklace cord and the size you want to wear.
Use the drawing to estimate frame-wire length, leaving working tails for the hanging loop and closure. Pair a frame wire that holds the outline with finer wrapping wire, and test their handling on offcuts before shaping the full cross.
2. Form the Cross Frame and Hanging Loop
Bend the perimeter progressively along the paper outline, keeping corresponding arm corners aligned. Smooth pliers help control the bends without unnecessarily scoring the surface. Bring the ends to the upper neck, form a loop that accepts the chosen cord or connecting ring, and secure the closure with an appropriate wrapped connection.
Lay the frame flat again before adding decoration. Correct small alignment problems at this stage, without repeatedly reversing the same bend. Copper and other workable metals become harder as they are worked, and repeated flexing can weaken a concentrated bend. The suspension belongs to the structural frame, not to a later decorative coil.
3. Prepare and Secure the Center Setting
Make or select a wire basket or bezel that fits the actual square focal piece. Make a setting with support behind the center and retaining edges that prevent the insert slipping out in either direction. Work the retaining points evenly, protecting corners from excessive pressure.
Position the completed setting in the middle of the frame and secure its attachment points to the inner junctions with suitable fine-wire connections. Keep the piece supported while adjusting those connections. Check for movement over a soft tray before adding chains. Measure your chosen center piece and make a paper setting template before shaping the frame around it.
4. Add the Two-Tone Wire Wrapping
Wind the gold-colored fine wire in neighboring turns along the upper outline and arms, following the warm contrast in the video. Use copper-colored wrapping around the lower portion and the hanging connections. Secure the starts and finishes against the frame, keeping trimmed ends flat on the back.
Leave connection positions available for the chain panels and lower twisted braces. Wrapping should dress and secure the prepared structure without pulling one arm out of shape. The bright wire could be plated or another metal; choose its documented composition and suitable tools instead of assuming its color identifies it as solid gold.
5. Assemble the Chain and Black-Bead Panels
Lay out short chain sections inside the top opening and the two horizontal arms. Prepare small drilled-bead links with closed connections, then fasten the chains to those links and the available frame points. Keep corresponding sections similar in length so the panels hang neatly and retain the surrounding open space.
The finished video view uses paired dark beads at several attachment points. Plan the quantity from your chosen link layout; a version with ten paired-bead positions requires 20 beads. This is a recreation count, not a supply quantity stated by the clip. Open jump rings by twisting the sides apart, then close them with the cut ends aligned. Avoid pulling rings into a wider oval.
6. Fit the Crossed Twisted-Wire Detail
Prepare two twisted-wire elements for the lower stem, each long enough to span its diagonal plus attachment tails. Make their twists before fitting them, working evenly so they do not become kinked in one spot. Place them across the open lower section to form an X, as the video’s finished stem shows.
Secure each end to its assigned frame point and keep the diagonal lengths balanced. The crossing is a decorative assembly; it should not conceal loose ends or force the perimeter to narrow. Trim and tuck tails on the reverse, then inspect the junction with a soft cloth for catching points. Twisting and attachment methods need to match the selected wire, since metal stiffness varies.
7. Attach the Faceted Drop and Necklace Cord
Prepare a faceted gold-colored bead drop on an appropriate pin or finding, using a closed wrapped loop where the component requires it. Connect it to the lower structural eye with a suitable link, giving it enough clearance to move without striking the frame continually. A ready-made pendant drop can supply the same finish when its own mounting is suitable.
Pass the pink cord through the upper loop, or connect it with an appropriate ring when the cord’s finished ends cannot pass through. Match the loop opening to the cord before forcing anything through. The video’s final view combines the warm drop and pink cord with the open metalwork; it does not show the cord’s clasp preparation, which follows the selected cord and findings.
8. Check the Pendant Before Wearing
Examine the back, the hanging loop, the center setting, chain links, and the drop connection under good light. Pass a soft cloth over the reverse to locate catching wire ends. Check that the focal piece stays seated and that the chains move without being trapped beneath a retaining coil.
Try the pendant on the chosen cord to assess its balance and comfort before calling it finished. Make any repairs on the bench, then inspect again. Use care instructions for the actual metals, bead finishes, and center material. Store the piece separately from hooks or rough metalwork that might catch its chains.
19 Cross Pendant Designs to Explore
The following 19 designs expand the idea through soft wrapping, color blocks, sculptural curls, patchwork, botanical compartments, and open chainwork. Each begins with the arrangement visible in its image, followed by a making approach suited to those materials. Some use a textile-covered base or fabricated frame, so their construction differs from the open wire tutorial. Choose the silhouette and center first, then decide how much texture and movement the finished pendant should have.
1. Floral Beaded Cross with Soft Pink Thread Wrapping
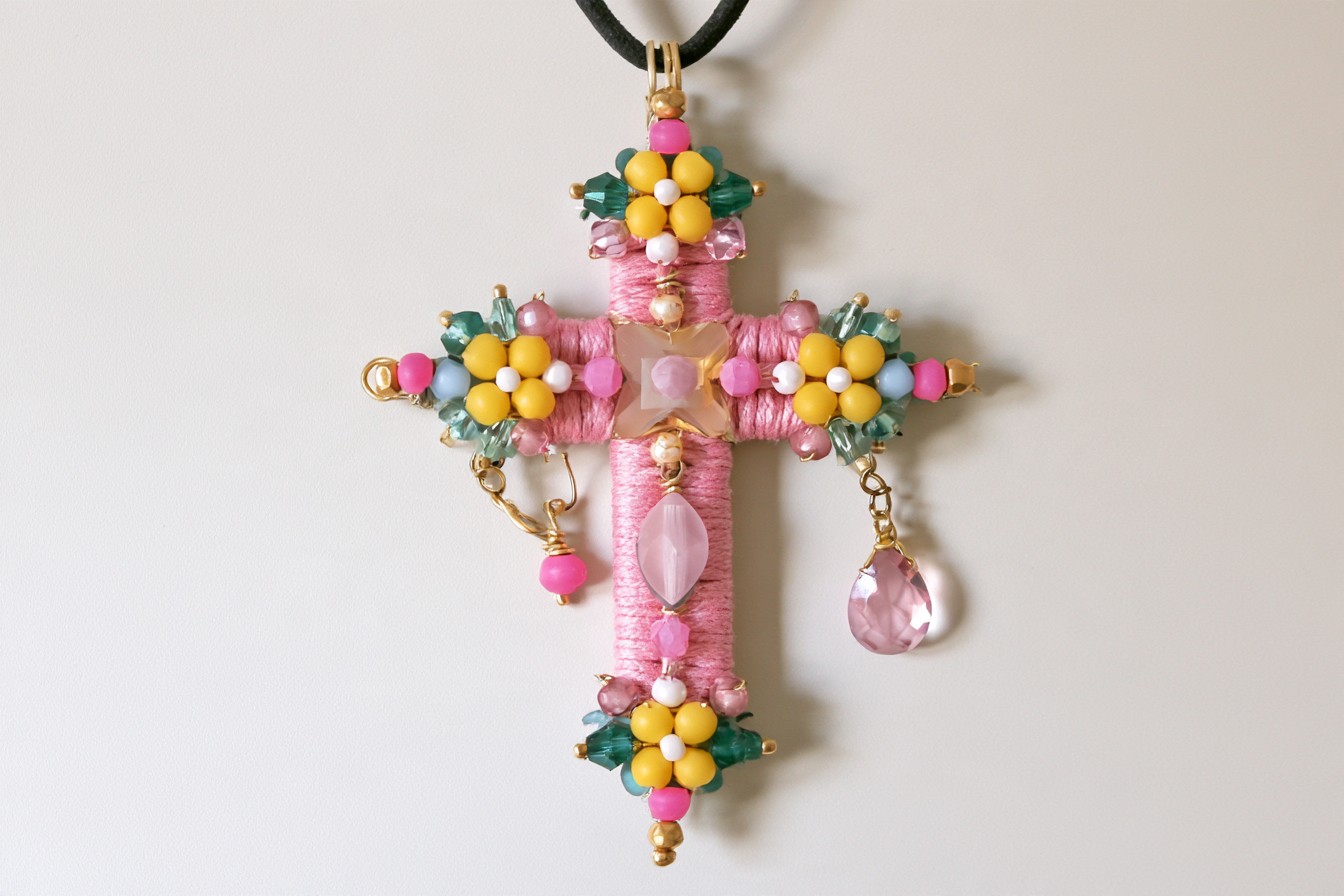
Pink wrapping gives this floral cross a soft surface, while yellow flower clusters mark the top, arm ends, and lower tip. Green and pink beads connect the clusters, and pale faceted details break up the dense texture. The small hanging drops add movement without extending every edge, making the design decorative but still recognizable as a cross.
Begin with a stable cross-shaped base and finish its suspension loop before covering it. Wind fine thread in close rows, securing the beginning and ending on the back. Build the flower clusters separately with drilled beads and fine wire or beading thread, then attach them at the four outer points. Arrange the center detail last so it sits above the wrapping. Keep loose thread away from moving links, and check the back for knots or wire ends that could catch clothing. A plain neckline gives the colorful beadwork space to stand out.
2. Geometric Thread-Wrapped Cross with Pink Bead Accents
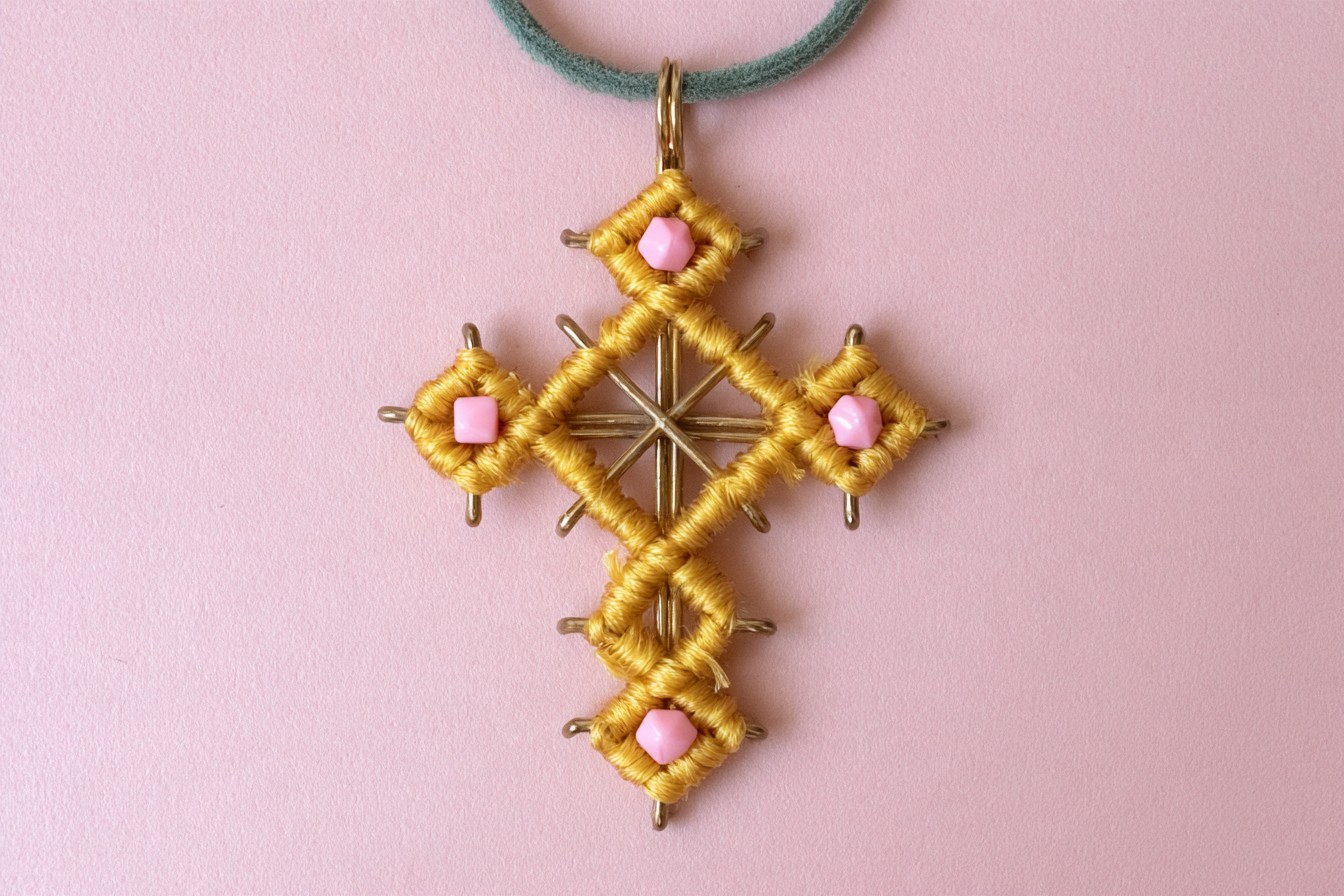
Mustard wrapping outlines a series of diamonds, with pink bead accents inside the four outer shapes. The central opening exposes fine metal spokes instead of a large stone. This geometry gives the pendant a lighter appearance than the densely decorated floral designs, and the single bead color keeps attention on the repeated outlines.
Draw the connected diamond pattern on paper before shaping a wire base, checking that corresponding arm sections have similar proportions. Form the suspension point as part of the supporting structure. Wrap one outlined section at a time, keeping the inner openings clear, then secure a drilled pink bead inside each outer diamond with an independent connection. Avoid relying on thread tension to hold the frame together. Lay the piece flat between stages to spot an uneven arm before decoration makes adjustments awkward. This design pairs well with a simple cord that repeats one of its two colors.
3. Color-Blocked Yarn Cross with Floral Embellishments
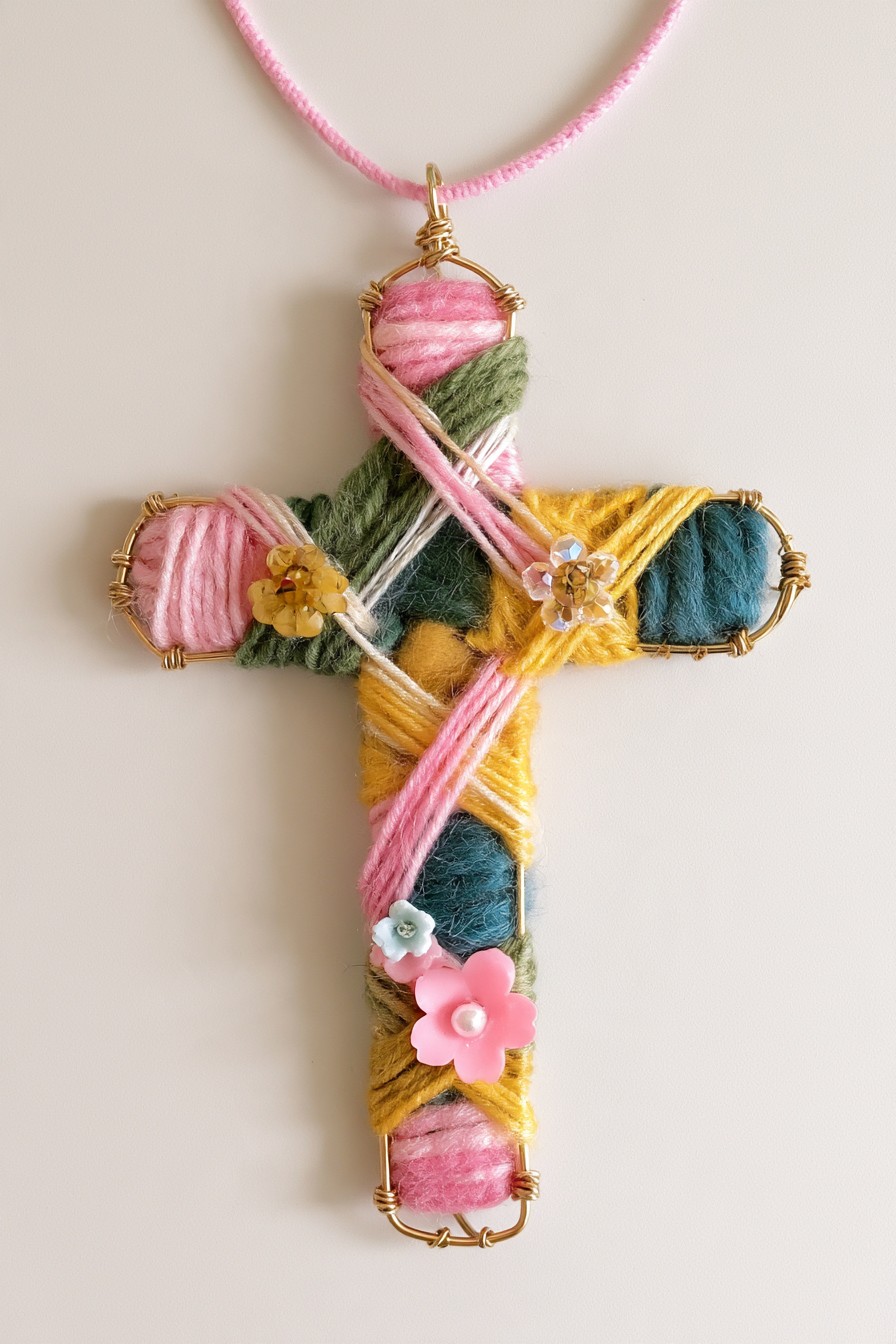
Broad bands of pink, mustard, olive, white, and teal cover a long cross, with diagonal strands crossing the center. Small floral accents sit between the bands rather than filling every section. The visible metal edging contains the soft wrapping, and the longer lower stem gives the color changes room to remain distinct.
Prepare the supporting cross and smooth its edges before adding yarn. Work the main blocks first, attaching each color’s ends on the reverse, then add the diagonal strands as a separate decorative layer. Dry-position flowers before fixing them so the center remains readable. Small stitched attachments can suit textile embellishments; rigid decorations need a connection or adhesive compatible with their materials. Select a yarn that will not shed heavily against clothing, and keep the hanging loop exposed. Store the pendant flat so the diagonals do not snag on neighboring jewelry.
4. Ornate Two-Tone Wire Cross with Black Cabochon Center
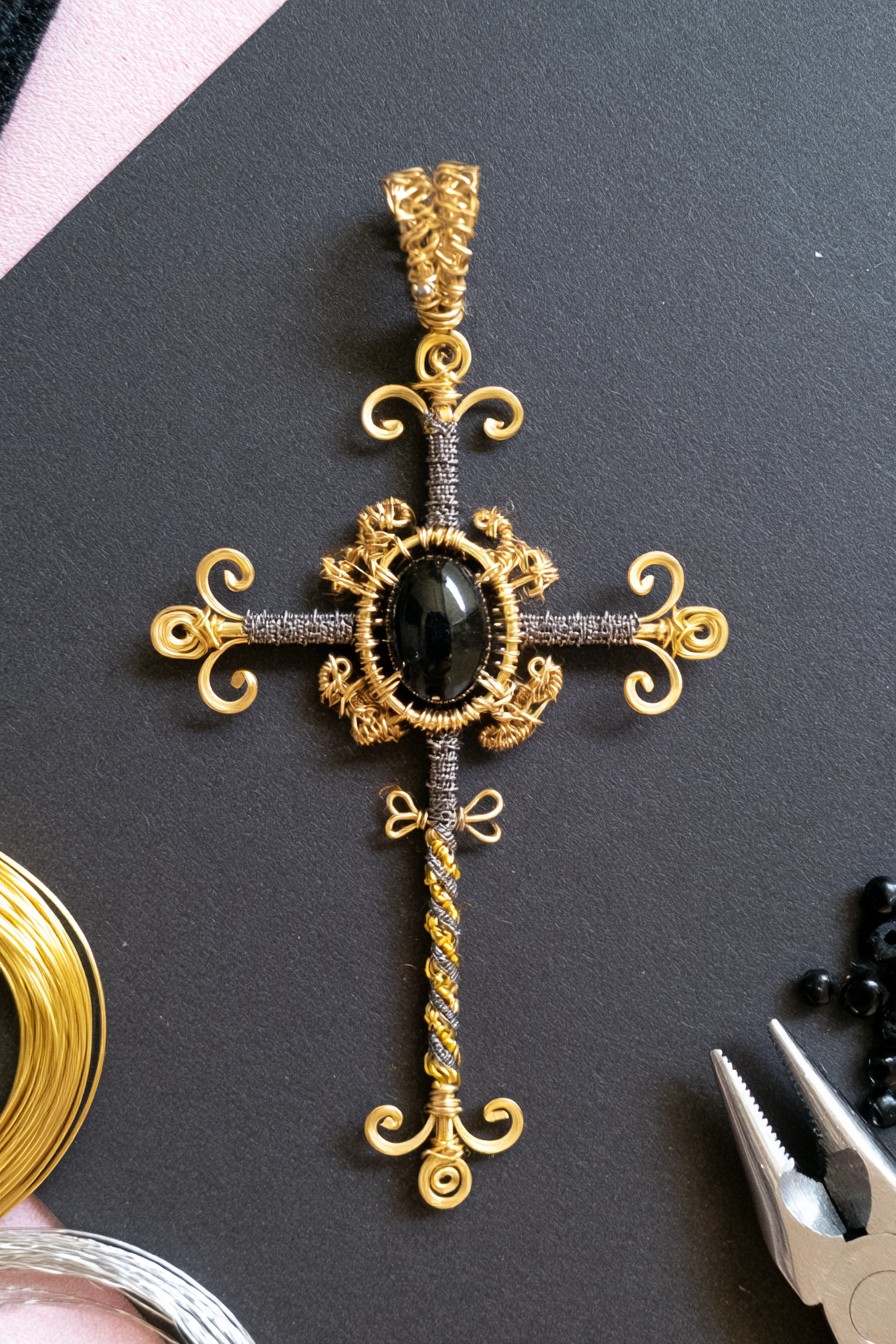
A glossy black oval center contrasts with bright scrolls and a darker tightly wrapped cross. Curls at the arm ends and below the stone repeat the decorative rhythm, while the upper bail continues the warm metallic finish. The open wirework keeps the ornament from becoming a solid border around the focal setting.
Prepare a fitted setting for the oval and attach it to a supporting cross before adding peripheral curls. Shape paired scrolls beside one another on a paper guide, using smooth pliers to limit tool marks. Wrap the darker core and connect the scrolls to the structure, keeping decorative bends separate from the stone-retaining points. The center’s mineral identity is not established by its black appearance; choose a stone or cabochon whose shape fits the planned setting. Finish clipped ends against the reverse and check the suspension before wearing. A plain dark garment emphasizes the metal contrast.
5. Antique Copper Cross with a Black Stone Focal Point
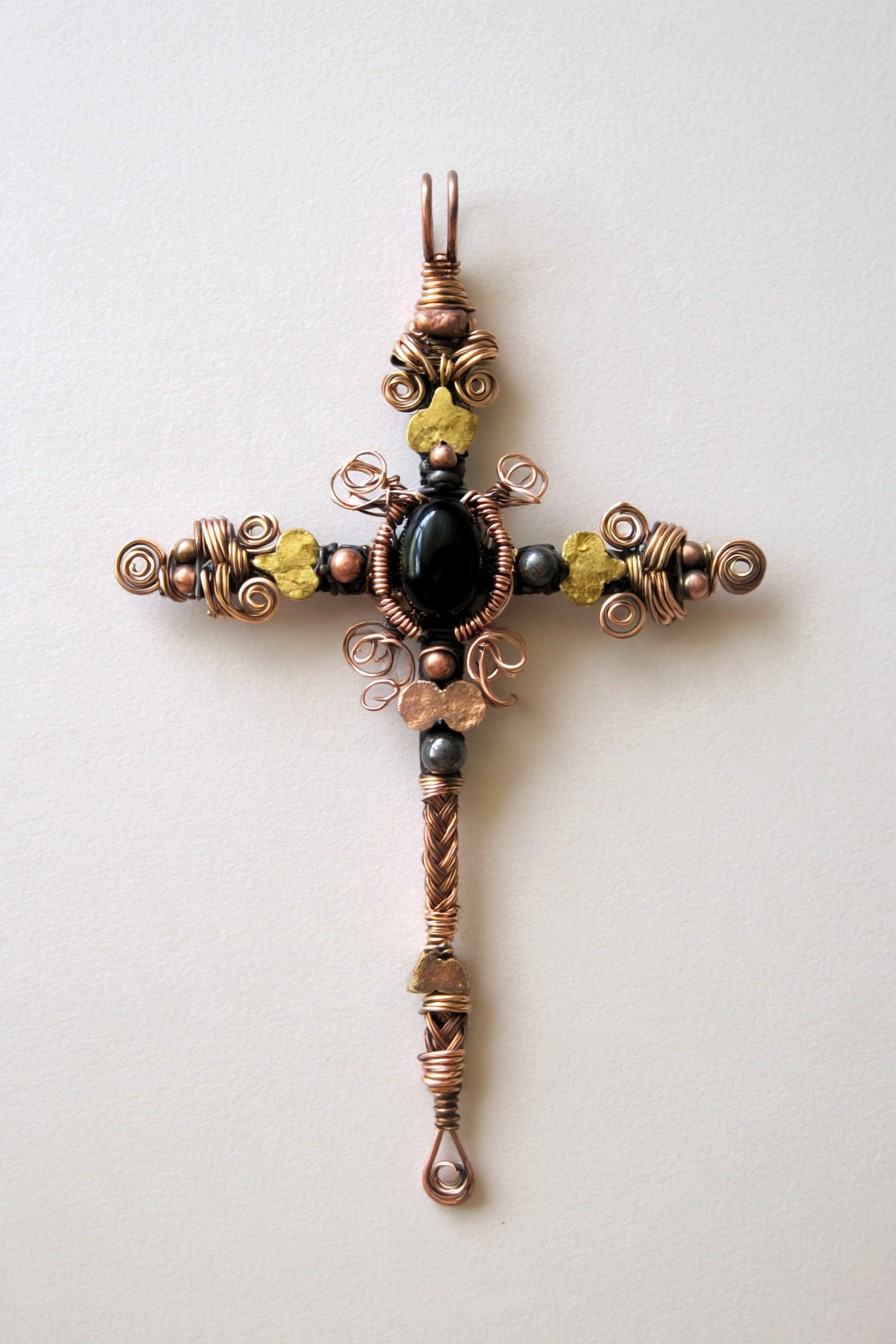
Warm copper tones, dark beads, coils, and small round accents give this slender cross an antique-style character. The oval center is more compact than the surrounding wire decoration, leaving the twisted lower stem visible. Its narrow outline suits someone who prefers texture and metal detail to a broad textile pendant.
Form the structural cross and suspension first, then make the oval’s retaining setting as a separate component. Add tight coils along the arms and a twisted detail down the stem, stopping to check alignment as the surface becomes less flexible. Repeated bending can fatigue wire, so plan the layout before working the same area back and forth. For the aged appearance, choose a documented finish or follow a patina product's instructions for the actual metal. Keep finishing chemicals away from fitted stones and beads unless their compatibility is confirmed.
6. Mixed-Media Cross with Fabric, Copper Wire, and Black Stone
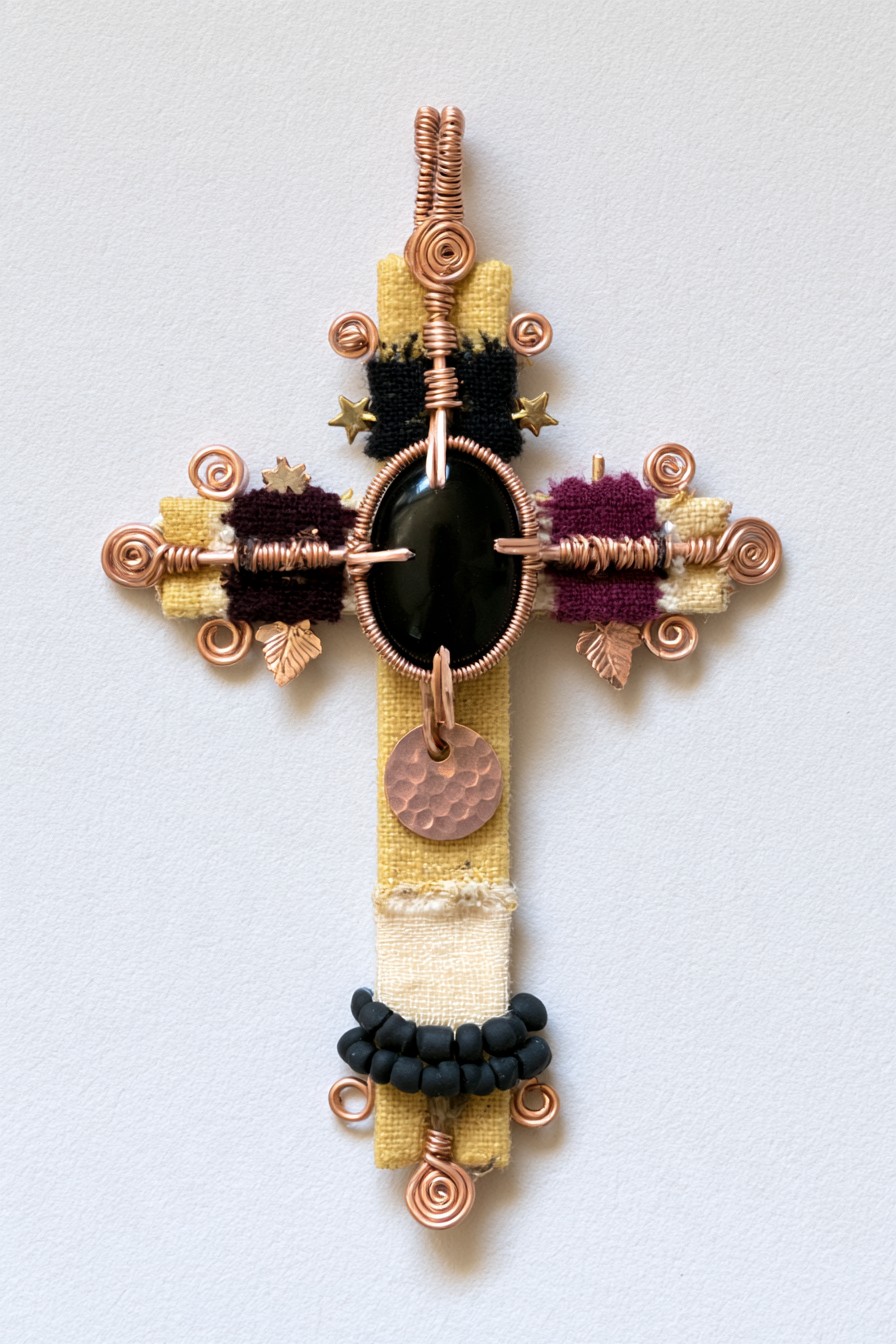
Mustard, cream, dark plum, and black textile sections soften a copper-colored frame around a large black oval. Coiled corners, small metal motifs, and a round hanging disc give the cross several textures without losing its central focus. The pale lower fabric also helps separate the dark bead row from the stone above.
Cut textile panels to fit the supporting frame, leaving enough material to turn raw edges toward the reverse. Secure each panel before fitting the center stone, so fabric is not the only support carrying its weight. Add drilled beads on independent wire links, followed by the small metal accents and hanging disc. Keep their connections accessible for inspection rather than burying them beneath thick wrapping. Use a fitted bezel or retaining basket for the center. Adhesive choice depends on the actual materials and needs its full curing period; one glue is not appropriate for every combination.
7. Symbolic Cross Pendant with Heart, Moon, and Key Details
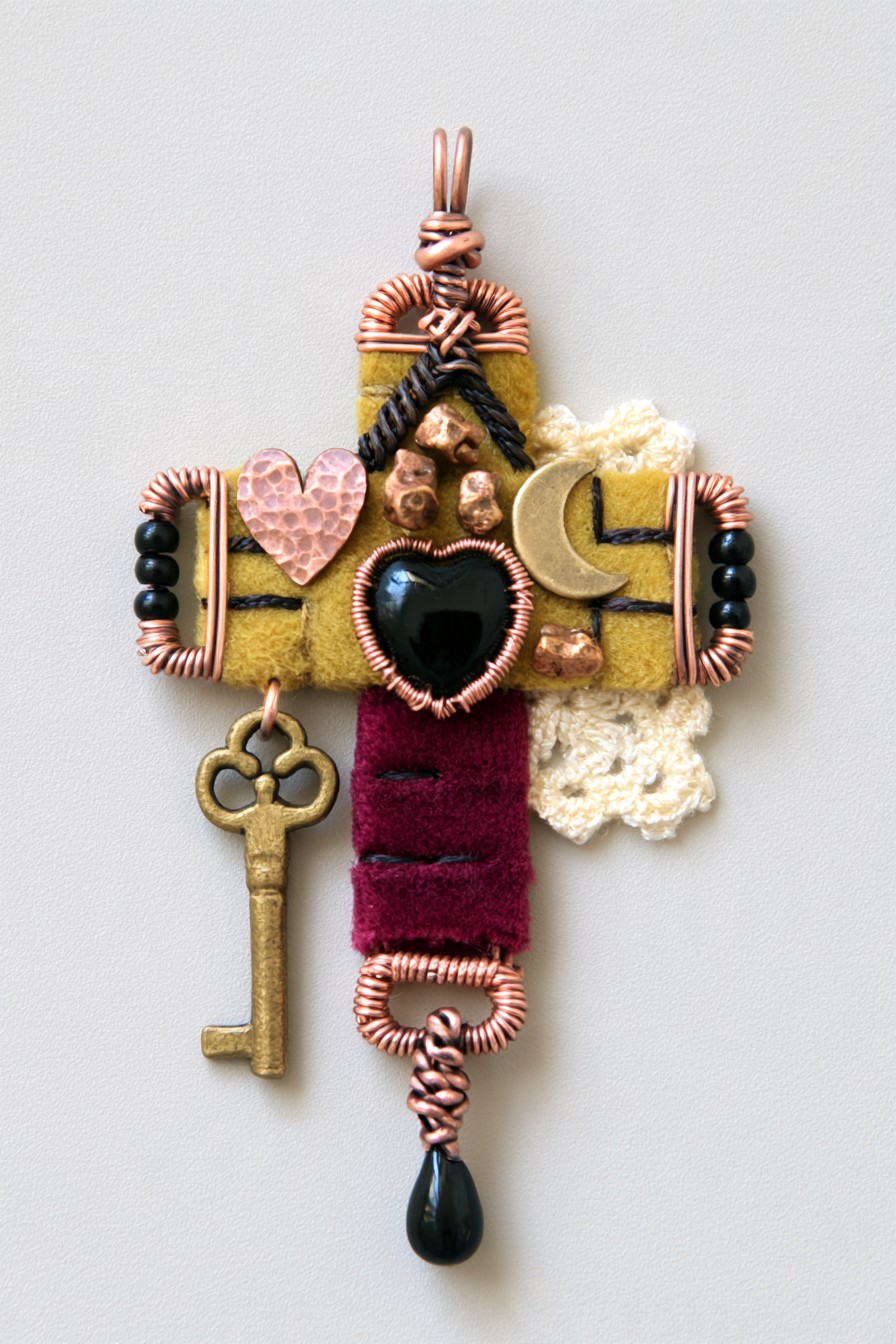
A black heart forms the center of this cross, surrounded by a pink heart detail, crescent, key, soft cream trim, and a dark drop below. Mustard and burgundy fabric create a warm backdrop to the copper-colored wrapping. The collection of motifs makes the pendant personal, with the wearer choosing what those symbols mean.
Arrange the heart setting and supporting frame before adding charms. Lay the key and other accents around the center to assess their size and hanging movement; the key needs clearance so it cannot continually strike the focal piece. Attach rigid charms through their own eyes or suitable closed links, and secure fabric separately on the frame. Place the drop on the lower structural connection rather than on a decorative fiber. A cord can simplify the busy design, but its thickness must fit the bail. Check how the assembled pendant hangs before adding more motifs.
8. Rustic Copper Cross with Fabric, Beads, and Botanical Detail
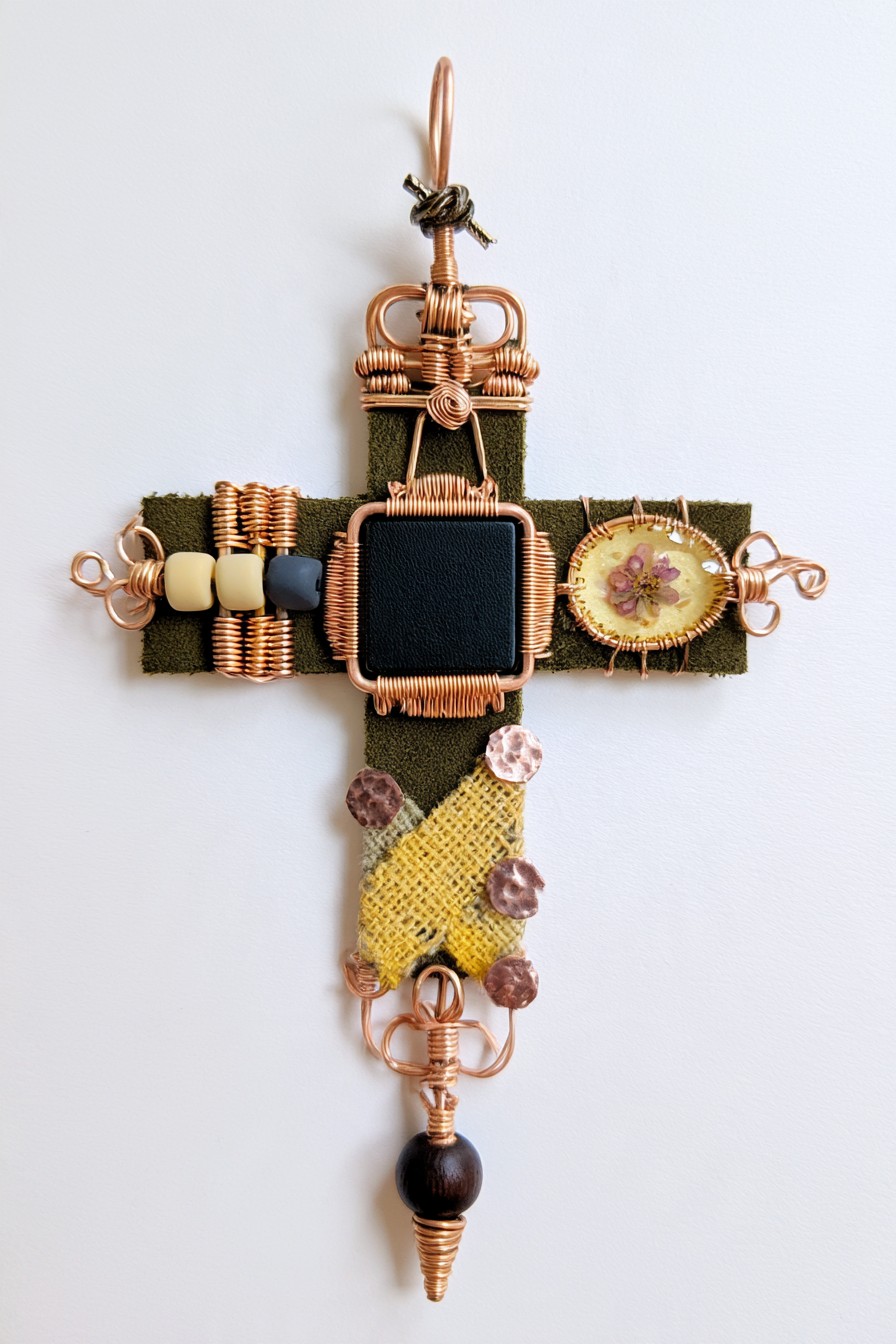
A square dark center divides an olive textile cross into clear sections. Cream and dark beads gather on one arm, while a small circular floral compartment occupies the other. The diagonal mustard fabric below and rounded hanging bead continue its earthy palette. The asymmetry gives each side a different texture without changing the overall silhouette.
Build the central square setting and frame first, then fit the fabric behind the bead group and floral component. Use a preformed, securely enclosed floral cabochon or charm, choosing its material and size from reliable supplier information. Plan the two arms’ weight as well as their appearance, because a heavier compartment can tilt the pendant. Connect the beads through drilled holes or existing findings, and keep the lower bead independently attached. Leave the back smooth where the fabric and wire meet so the irregular surfaces stay comfortable against clothing.
9. Textile Cross Pendant with Black Crystal and Sewing-Inspired Accents
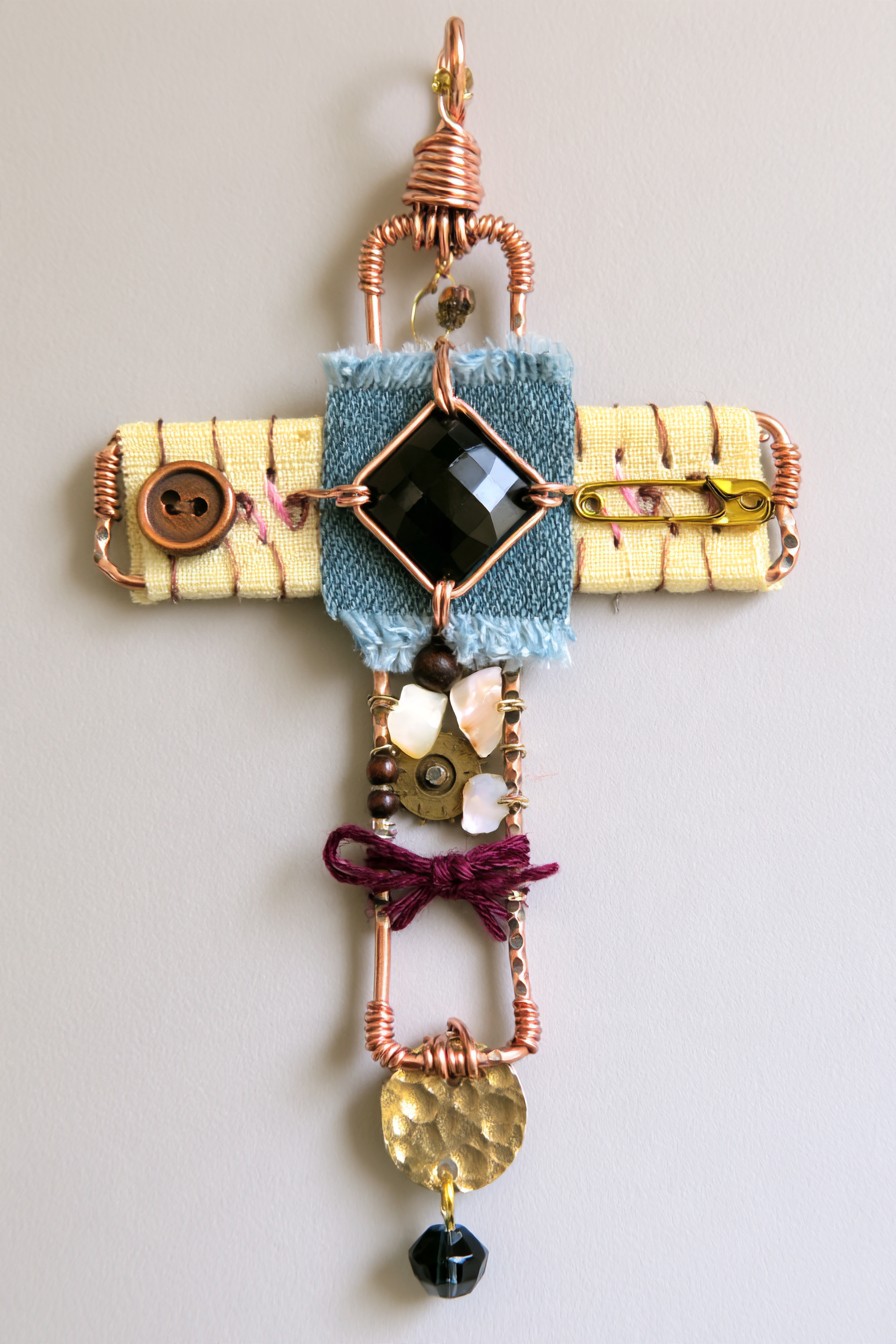
A diagonally set black focal piece sits over blue textile, with pale yellow fabric along both arms. A button, a closed pin-like accent, a burgundy tie, and small hanging components give the cross a sewing-inspired identity. The exposed lower frame supplies space between the decorated center and the final dark bead.
Prepare a secure cross frame, then fit the textile strips and diagonal center setting. Sew the button through its holes to a supported textile area, keeping the thread ends at the back. For the pin detail, use a permanently secured closed component or an ornamental finding that cannot open against the wearer. Attach lower beads and metal accents through suitable links, maintaining clearance between them. Frayed fabric can supply texture, but trim loose strands that may enter moving connections. Try the pendant on its intended cord before fixing the longest drop, checking that it does not pull the center off balance.
10. Burgundy Textile Cross with Sculptural Gold Wire Scrolls
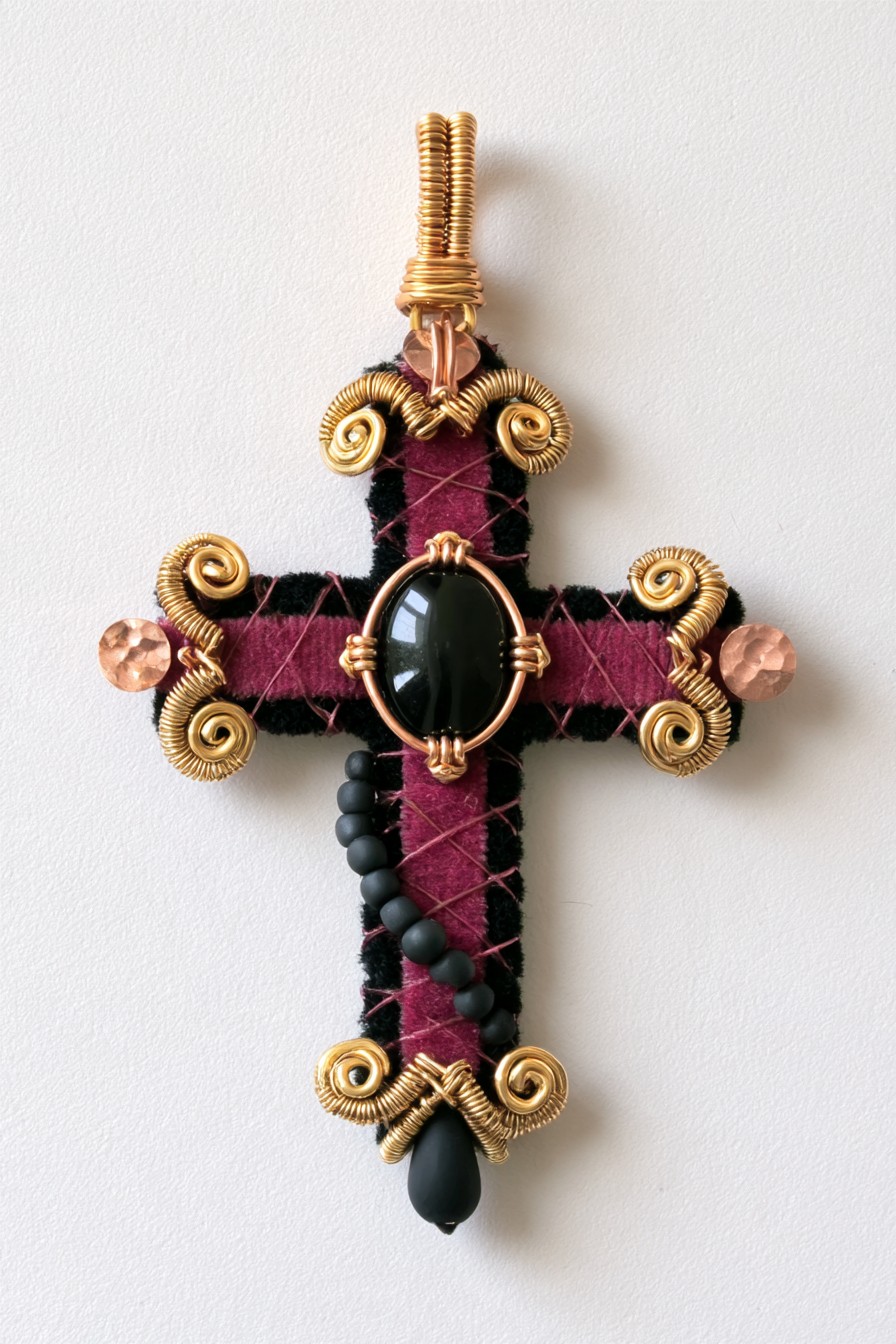
Burgundy fabric defines most of this cross, with black panels making the arm ends distinct. Bright spiral pairs frame the upper and side sections, while a curved row of dark beads descends toward the lower drop. The smooth oval center contrasts with both the stitched-looking surface and the tightly formed metal curls.
Cover the supporting cross with prepared textile pieces before attaching the oval’s fitted setting. Form repeated scroll pairs on a guide so their sizes relate without forcing perfect repetition into every section. Connect them to structural points and secure the curved bead strand through its drilled beads or appropriate links. Give that strand enough freedom to hang naturally without catching the lower drop. Keep thick knots away from the center setting’s underside. Because the fabric supplies the color, choose a finish and cord that complement it rather than adding another strong pattern.
11. Patchwork Fabric Cross with Copper Wire and Black Cabochon
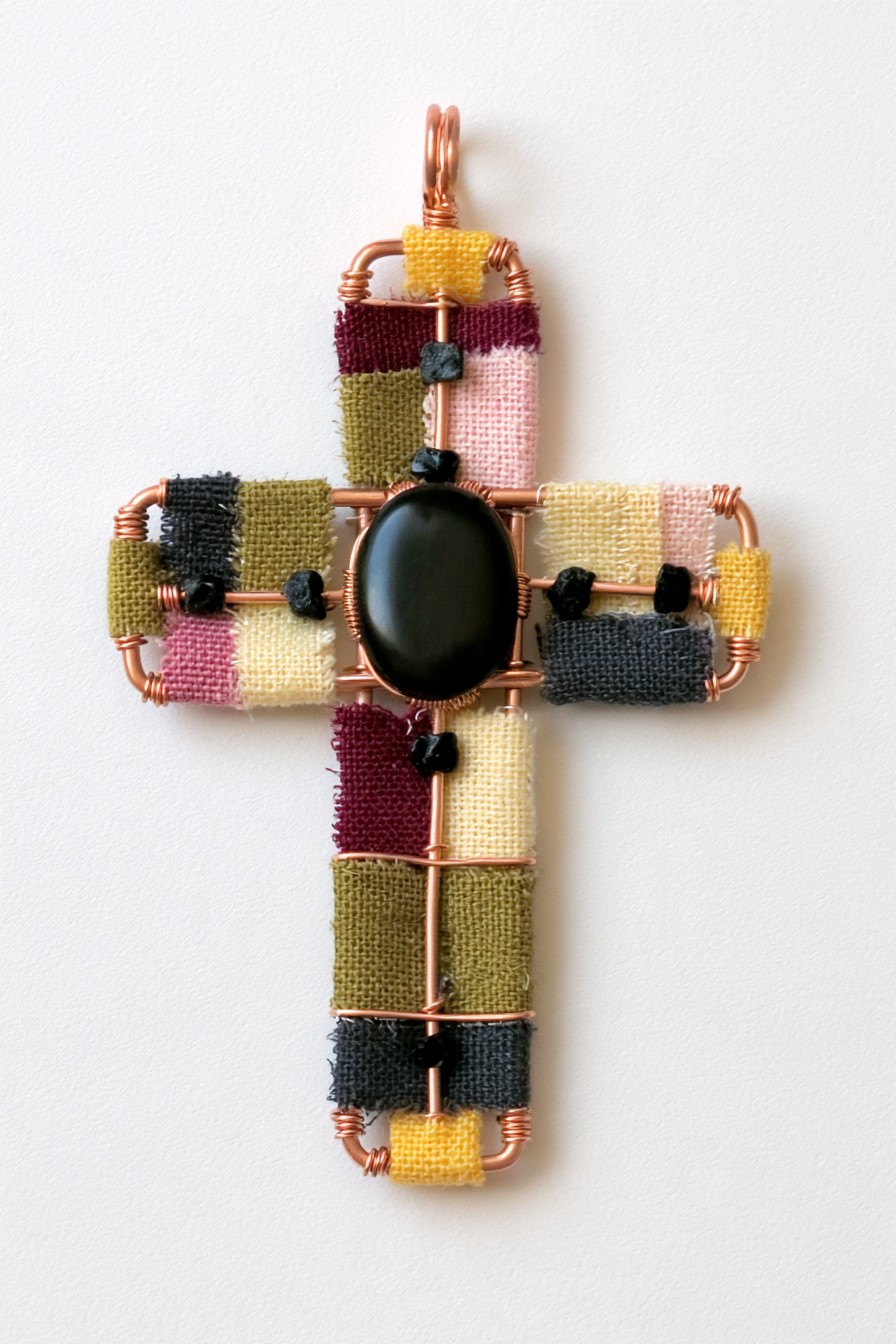
Small textile blocks create a patchwork of burgundy, olive, pink, cream, mustard, and charcoal inside a copper-colored outline. Exposed dividing wires organize the colors, while dark bead accents connect them to the large oval center. The regular compartments distinguish this pendant from designs with loose overlapping fabric wraps.
Plan the patchwork on a paper cross so each piece fits its own area and several colors recur across the arms and stem. Finish panel edges before securing them to the frame, leaving the dividing lines visible. Make the focal setting independently and fix it to the supporting structure; fabric should sit behind the center rather than carry it. Attach small beads at selected intersections using connections suited to their holes. Keep the thickness consistent across panels so one bulky patch does not lift the frame or distort the hanging angle. Store the finished piece away from loose hooks that could snag the weave.
12. Structured Copper Cross with Textile Inlays and Black Stone
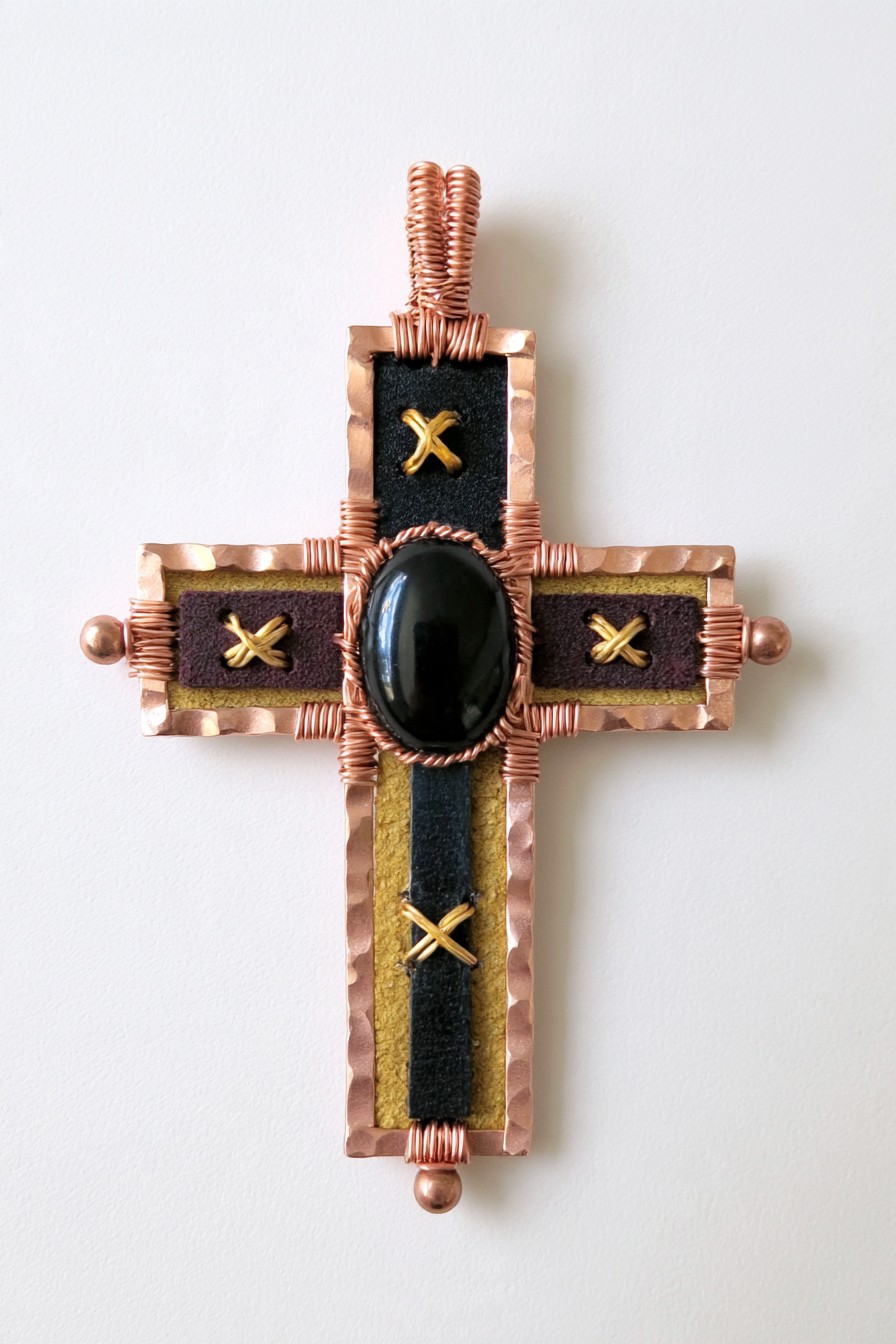
A broad copper-colored border surrounds narrow dark, burgundy, mustard, and olive textile panels. Small X-shaped accents repeat inside the sections, and rounded metal details finish the arm tips and lower end. The substantial outline gives the piece a structured appearance, with the oval center occupying the largest uninterrupted area.
Choose or fabricate a cross-shaped metal frame with finished edges and suitable attachment positions before adding textiles. Metal cutting, forming, and any soldering require methods appropriate to the selected stock; a decorative strip should not be assumed to provide a complete supporting frame. Fit the panels separately, then add the X motifs through the textile using thread or fine wire suited to the intended look. Secure their ends on the reverse. Attach the oval setting and terminal accents to metal connections. Check the overall weight with the intended chain before adding a heavy center.
13. Gothic Textile Cross with Wrapped Stone and Copper Details
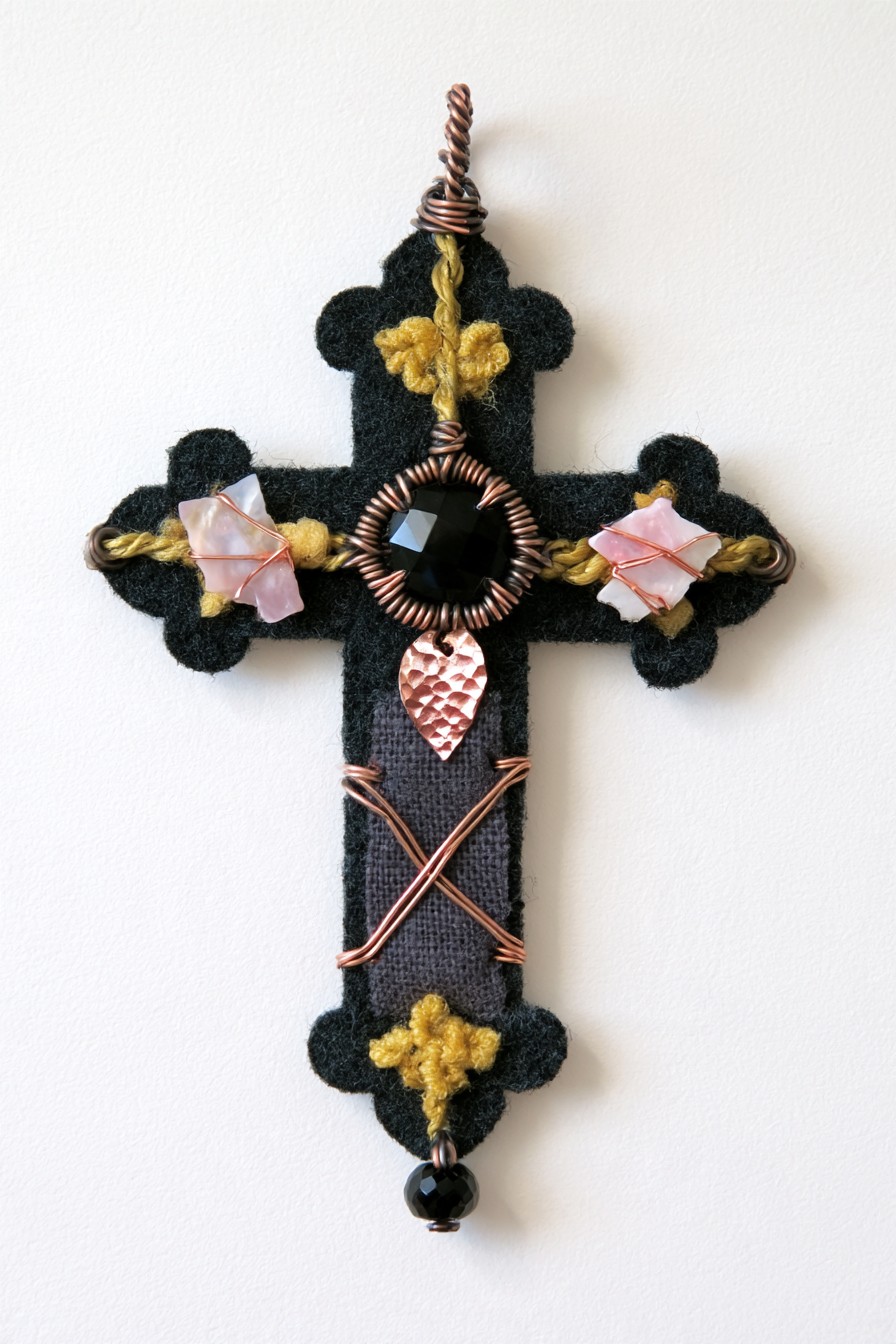
Rounded black textile ends give this cross a Gothic silhouette, with pale pink angular accents at the arms and mustard fiber knots at several outer points. A faceted black center sits inside a copper-colored wrap, and crossed wires leave a geometric detail down the stem. The contrast comes from a few distinct surfaces rather than a large color palette.
Prepare a firm cross-shaped support beneath the dark covering, finishing rounded contours before wrapping the edges. Fit the central component in a setting that retains its actual shape, then secure the pale accents through their own suitable mounting method. Their exact mineral or manufactured material is not identifiable here. Add fiber knots after the metal connections are finished, keeping them independent of the supporting suspension. Check that angular edges remain away from skin and clothing, and tuck wire ends behind the base. A plain cord makes the rounded outline and lower bead easy to read.
14. Ribbon-Wrapped Cross with Copper Weaving and Black Center Stone
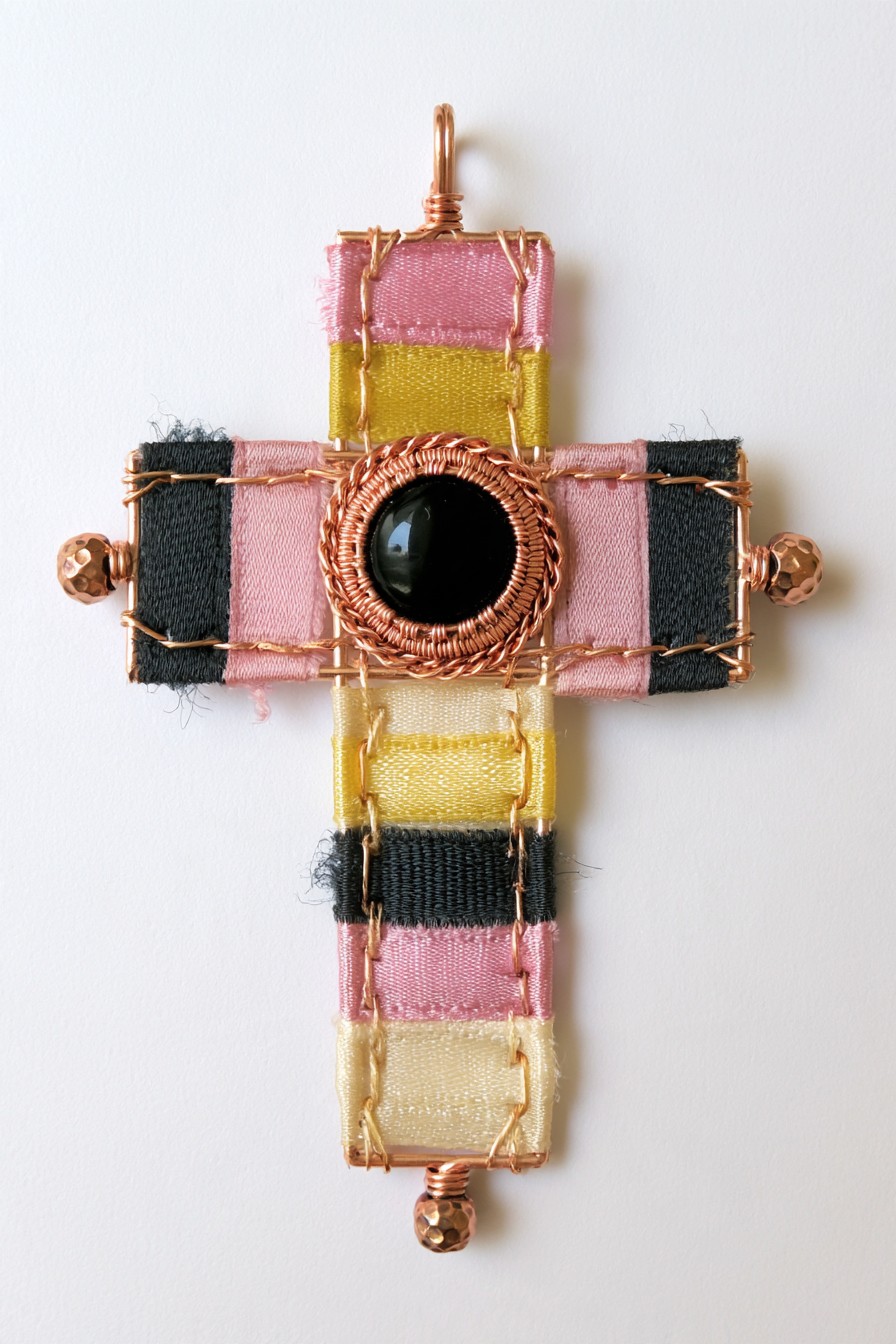
Pink, yellow, cream, and dark ribbon blocks create horizontal bands inside a straight copper-colored outline. A round glossy black center interrupts the pattern, surrounded by dense wire wrapping. Small rounded metal accents finish the arms and bottom, giving the pendant a more orderly arrangement than the patchwork and overlapping-yarn versions.
Measure the visible sections of a prepared cross base and fit the ribbon bands before adding the center setting. Turn or secure cut ribbon ends at the reverse so fraying does not develop beside the frame. Make the round retaining bezel or basket to match the chosen center, then connect it through the supporting metal. Continue the fine wrapping around its edge, keeping decorative coils distinct from the parts that hold the stone. Attach terminal accents last and assess their weight. A narrower ribbon can suit a smaller version without simply crowding all the same bands together.
15. Botanical Cross Pendant with Framed Flower Compartments
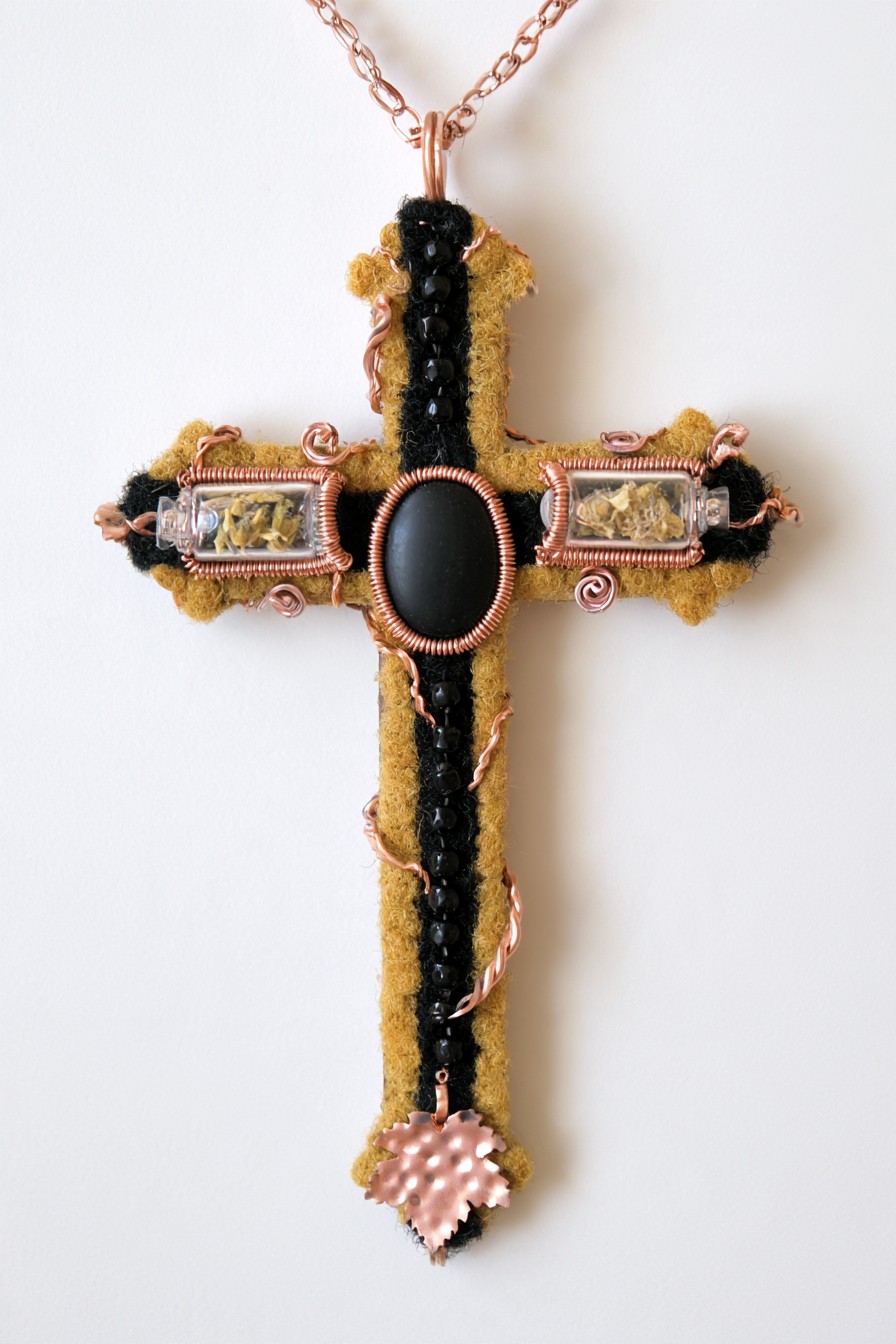
Small clear rectangular compartments bring floral detail to the horizontal arms of this pendant. Mustard textile, a dark bead strip, and a smooth black oval connect those compartments with the long stem. Copper-colored edging frames each section, while the lower hammered-looking drop adds a contrasting finish.
Choose enclosed botanical charms with sound edges and reliable attachment points, then plan their supports as part of the cross frame. These are framed compartments in the design, not clearly identifiable cylindrical vials. Fit the fabric and bead strip before securing the oval center and the two botanical components. Keep the contents dry, and avoid placing loose plant material where it can brush skin or enter chain links. The small compartments also add depth, so check how far the pendant projects when worn. Follow the actual components’ care instructions rather than assuming all clear materials tolerate the same cleaners.
16. Open-Frame Wire Cross with Chain and Black Bead Details
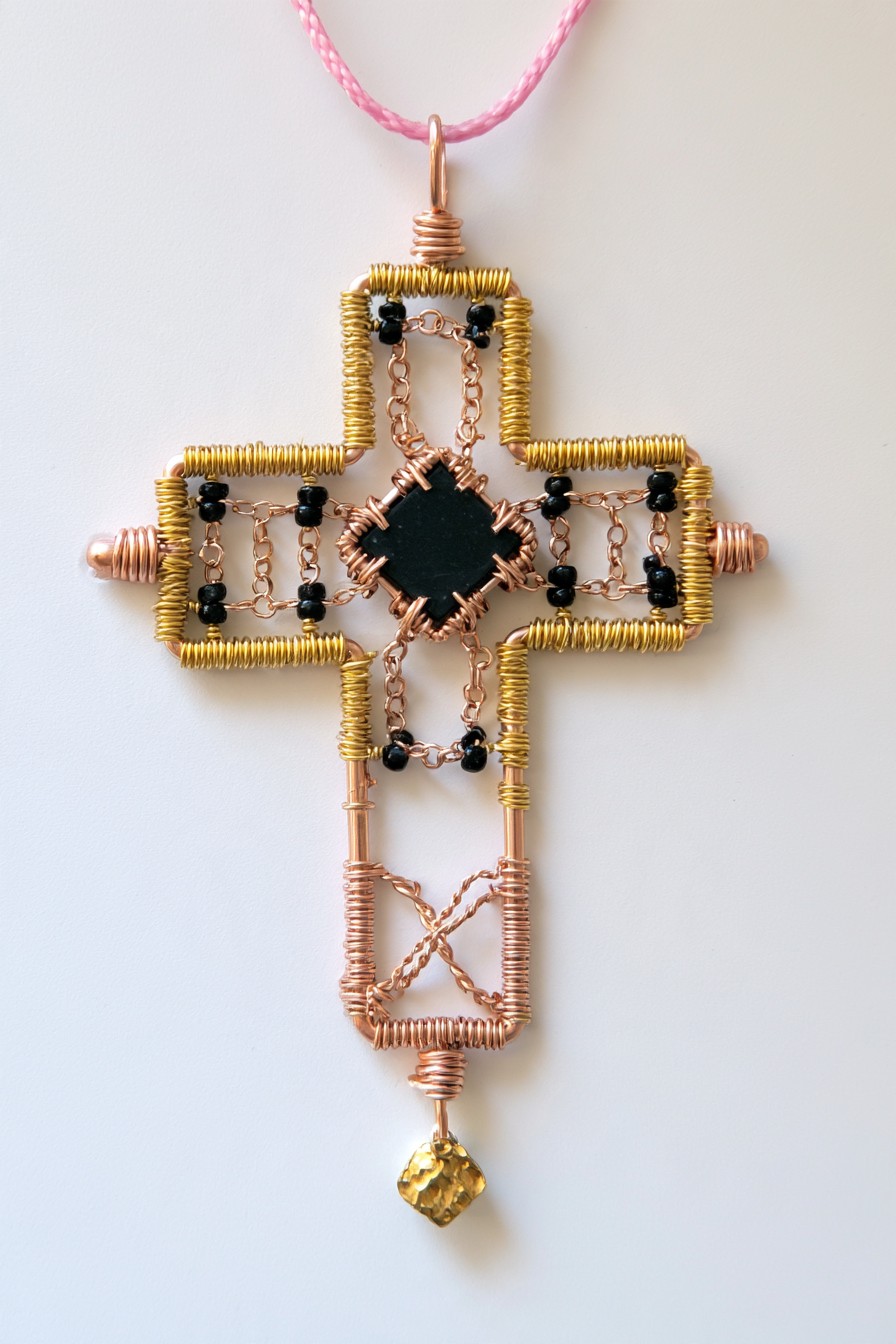
An open wire cross surrounds a dark square center set on the diagonal. Bright coils mark the outline, while short chains and paired black beads form small open panels around the focal piece. The long lower section changes to crossed twisted wires, ending with a warm faceted drop. The spaces inside the cross give the dense wirework room to remain distinct. For coordinating a handmade pendant with another personal accessory, explore these charm bracelet ideas and use a restrained selection of matching colors.
The tutorial above follows this design direction: form the perimeter and hanging loop, secure the center setting, add the wrapping, and assemble the chain-and-bead sections. This still image includes an additional small chain connection below the center, which can be planned once the main structure is stable. Select bead links with closed, smooth ends and avoid leaving chain caught beneath a retaining wire. Adjust the frame around the actual center piece before filling its openings. A simple pink cord repeats the softer contrast already present without interrupting the open sections.
17. Knotted Cord Cross with Geometric Black Crystal Center
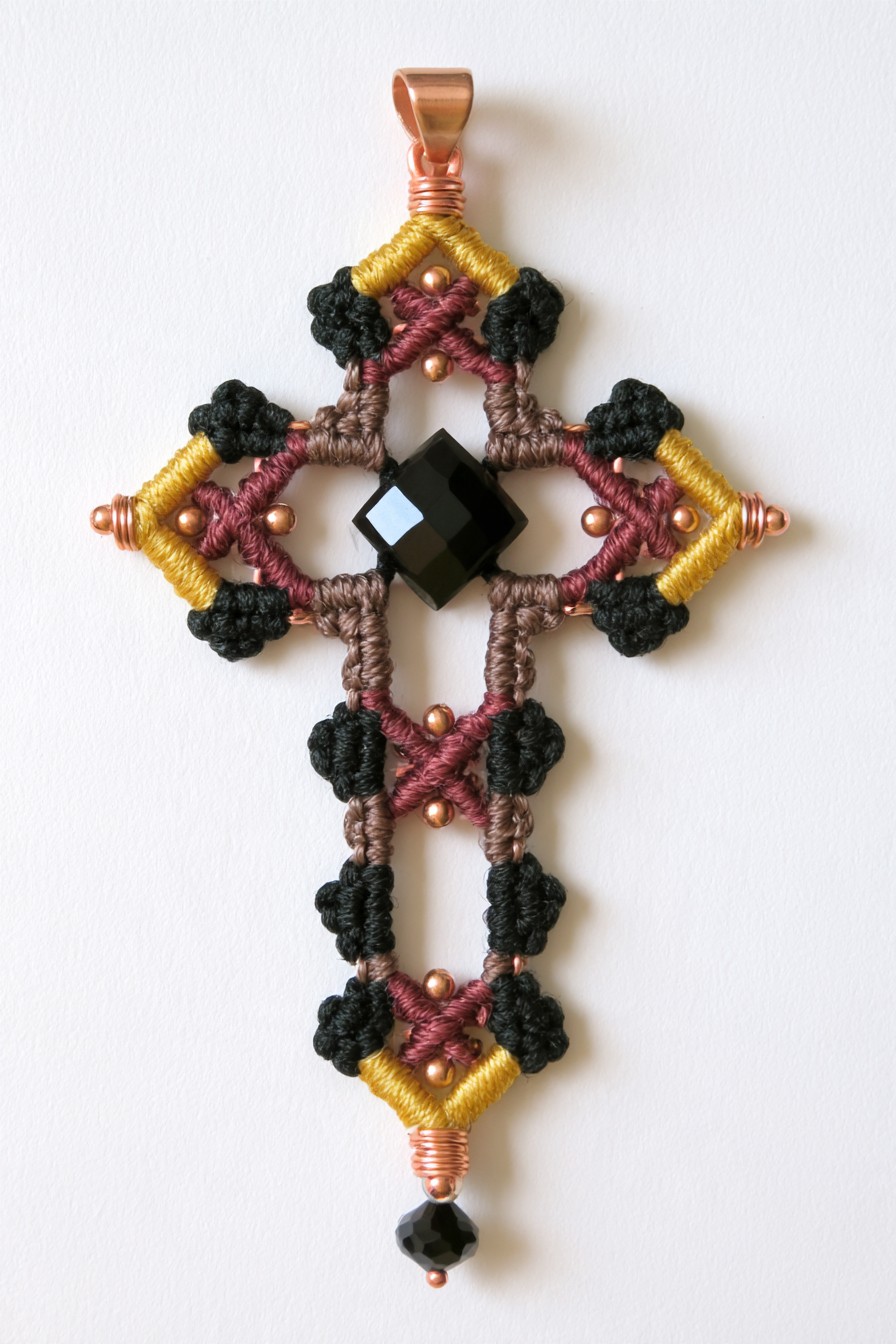
Mustard, burgundy, taupe, and black cord make an open patterned cross around a faceted dark square. Small X-shaped crossings repeat inside the outer points, with black knots concentrating texture around the edges. Copper-colored accents remain visible between the cord, so the softer work has a recognizable supporting outline.
Prepare the frame and focal setting first, then work matching cord sections in a consistent direction. Practise the knotting sequence on a small sample to assess cord thickness and spacing before filling the cross. Secure cord ends where they can be hidden without building a bulky ridge against the wearer. Place bead accents through their own holes or fittings rather than trapping them loosely within knots. The diagonal center needs a stable seat independent of the cord tension. Keep the lower bead connection clear of loose fibers and store the pendant flat so the open pattern is not stretched by other jewelry.
18. Mosaic-Inspired Copper Cross with Color-Block Tile Accents
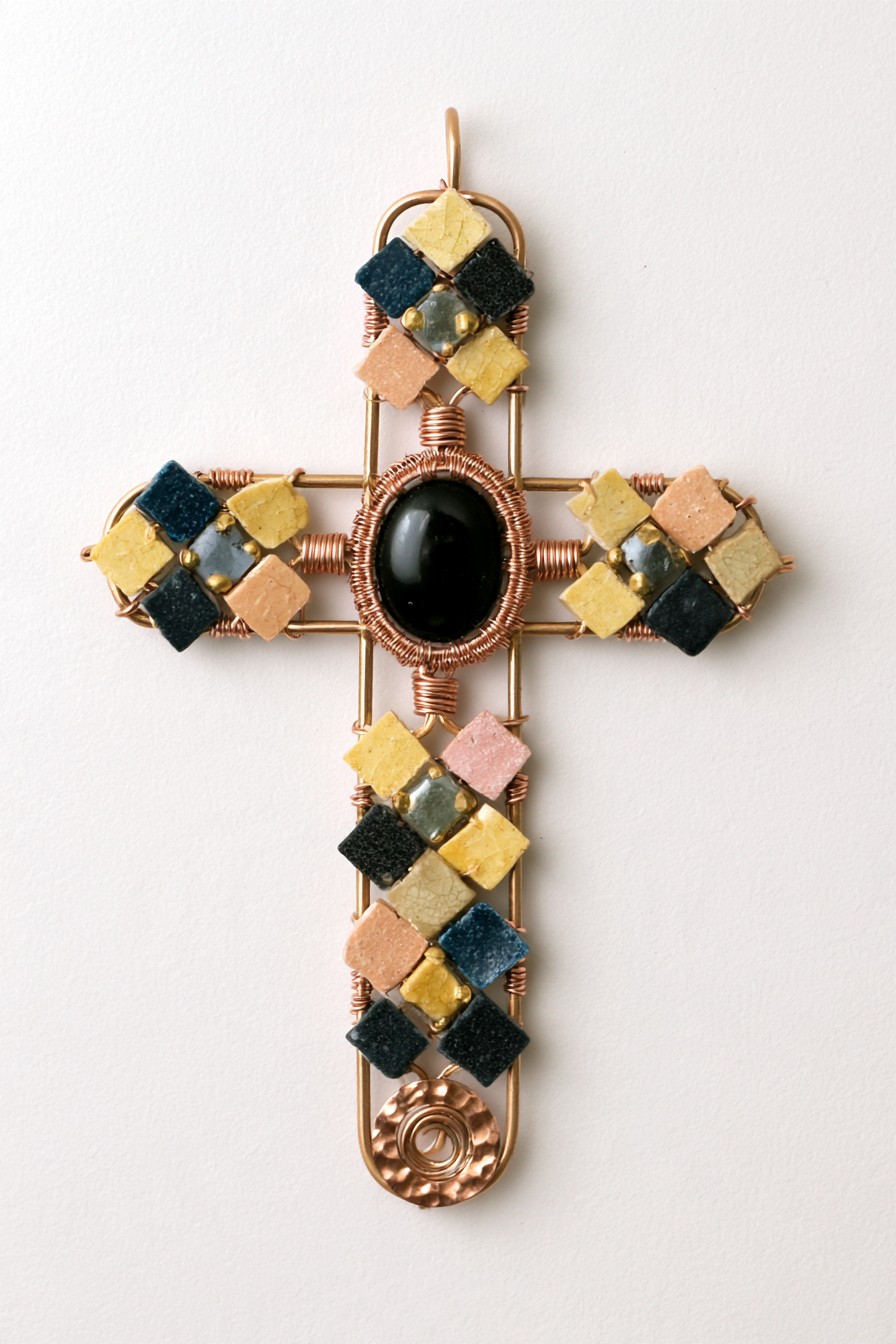
Small square accents in mustard, peach, charcoal, and blue cluster around a copper-colored frame. The squares often sit at an angle, with gaps that preserve a mosaic-like rhythm. A large oval black center and a round textured lower detail anchor the different color groups, keeping the piece more organized than an all-over tiled surface.
Select lightweight tile-like components with finished edges, checking their actual material before choosing a mounting method. Arrange the clusters around the focal setting on paper and leave room for the frame and suspension to remain accessible. Drilled pieces can use wire connections; undrilled pieces need a suitable backed setting or compatible adhesive with its full cure time. Avoid expecting a glue film to bridge a large unsupported opening. Fit the center independently, then inspect the back for projecting corners. Test the hanging angle before completing every cluster, since extra weight at one arm can change the result.
19. Plaid Fabric Cross with Copper Frame and Black Stone Center
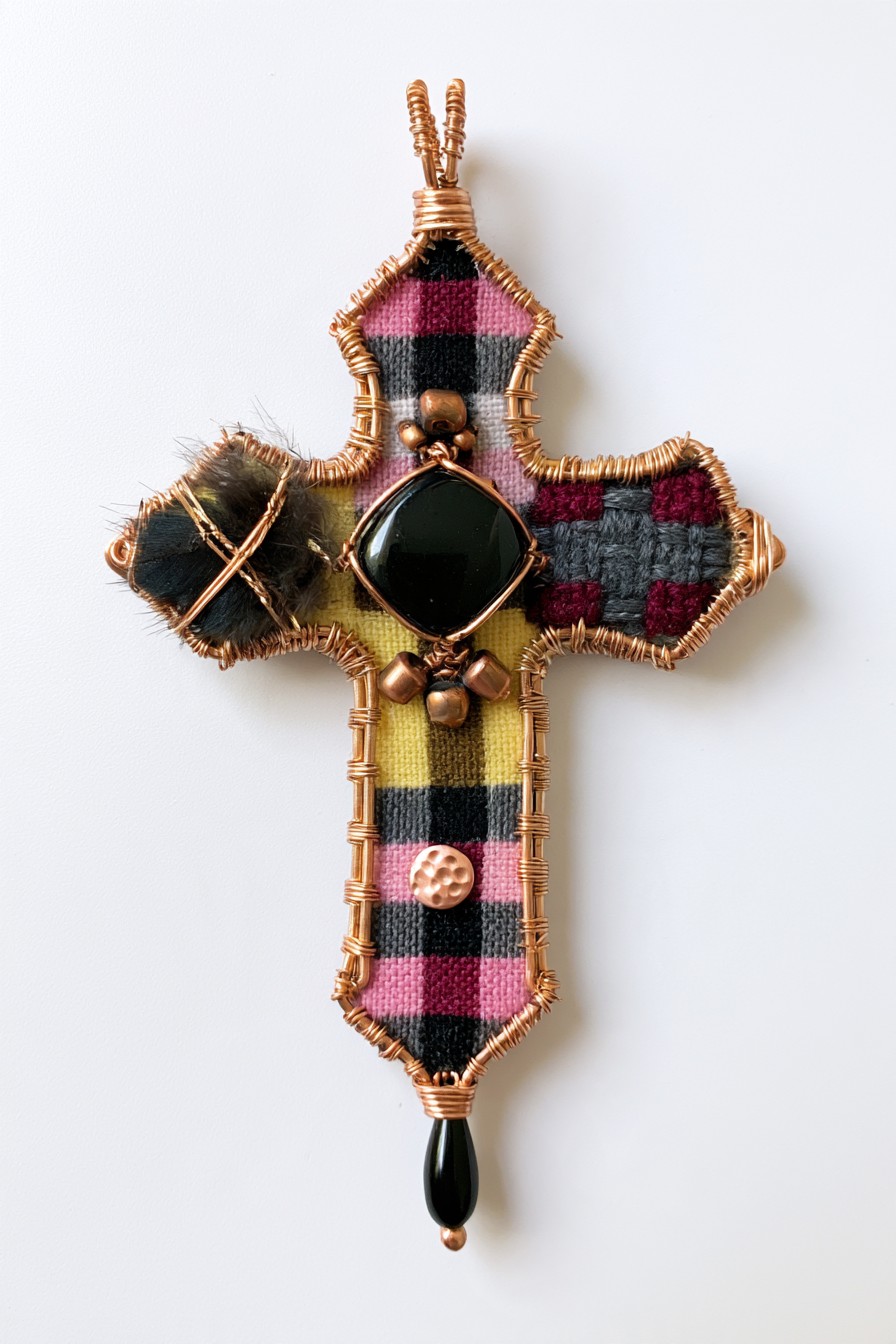
Plaid fabric gives this cross a patterned surface, with burgundy, pink, charcoal, and muted yellow repeating down the stem. A diagonally placed dark center sits inside a warm metal border. The rougher textile accent on one arm and the smooth black drop below create a contrast between deliberately soft edges and a clear central shape.
Cut the plaid so its lines relate across the arms rather than introducing an unrelated pattern at each section. Turn panel edges toward the back where the design needs a neat finish, retaining a small controlled fringe only at the textured accent. Attach the center setting to the frame before connecting the lower drop. The fabric and fringe should not bear the suspension load. Check the reverse for exposed adhesive, knots, or clipped wire, and try the piece with the chosen cord or chain. Store it in its own compartment so the frayed detail does not catch neighboring clasps.
Choose the Construction Before the Embellishment
Decide whether the pendant will have an open wire outline, a textile-covered support, or a fabricated metal frame. Make the suspension and center setting dependable before adding secondary motifs. Try the planned size and weight on the intended cord or chain, then add the details that make that particular design distinctive.
Keep finishing and care specific to the materials. Select adhesives for the actual surfaces and allow their full curing time; identify metals and stones from reliable product information before choosing finishing products. Keep textile pieces dry, follow the instructions for plated finishes, and store chains and fibers where they will not snag. A smooth reverse and balanced hanging position matter as much as the decorated front.



Leave a Reply