
A hand-turned photo wheel makes a Valentine gift from favorite memories. Build its structure from corrugated cardboard and wooden rods, add cardstock photo cards, then finish the frame in blush pink with red hearts. For another moving display, compare the photo scroll gift tutorial before choosing a format for your pictures.
This version is designed so the construction shown in the tutorial progresses logically from raw cardboard to the finished display. The wheel panels and stand are assembled first, the rotating mechanism is tested while everything is still unpainted, and only then is the full structure decorated. The final photographs are mounted on folded cardstock holders that hang from the horizontal rods and remain upright as the wheel turns.
This project does not require specialized woodworking equipment, but accurate measuring is important. If the wheel centers, axle holes, or support heights differ from one side to the other, the mechanism may rub against the stand instead of rotating smoothly.
Table of Contents
- Tutorial
- Project Overview
- Materials and Tools
- Before You Begin
- 1. Cut the Two Heart-Shaped Wheel Panels
- Check the pair before continuing.
- 2. Mark the Axle and Rod Holes
- Test the dowels
- 3. Build the Cardboard Display Stand
- Structural check
- 4. Connect the Two Wheel Panels
- 5. Install the Wheel and Central Axle
- Test the mechanism now
- 6. Paint and Decorate the Valentine Structure
- Optional heart tag
- 7. Make the Hanging Polaroid Photo Cards
- Test one holder first
- 8. Add Captions and Load the Photos
- 9. Complete the Base and Final Alignment
- Troubleshooting
- The wheel does not rotate smoothly
- The wheel wobbles
- The photo cards turn sideways
- The stand leans to one side
- The paint warps the cardboard
- Cardboard Craft Safety
- Keeping the Photo Wheel in Good Condition
- Why This Design Works as a Valentine's Day Gift
Tutorial
Project Overview
Difficulty: Intermediate
Approximate active time: 2–3 hours
Drying time: Depends on the paint and adhesive used
Main materials: Corrugated cardboard, wooden dowels, cardstock, printed photographs
Recommended wheel diameter: 21–23 cm
Recommended cardboard thickness: 4–6 mm
Finished height: Approximately 24–28 cm
The measurements below are practical starting points rather than mandatory dimensions. If you enlarge the wheel, increase the stand width and axle height proportionally.
Materials and Tools
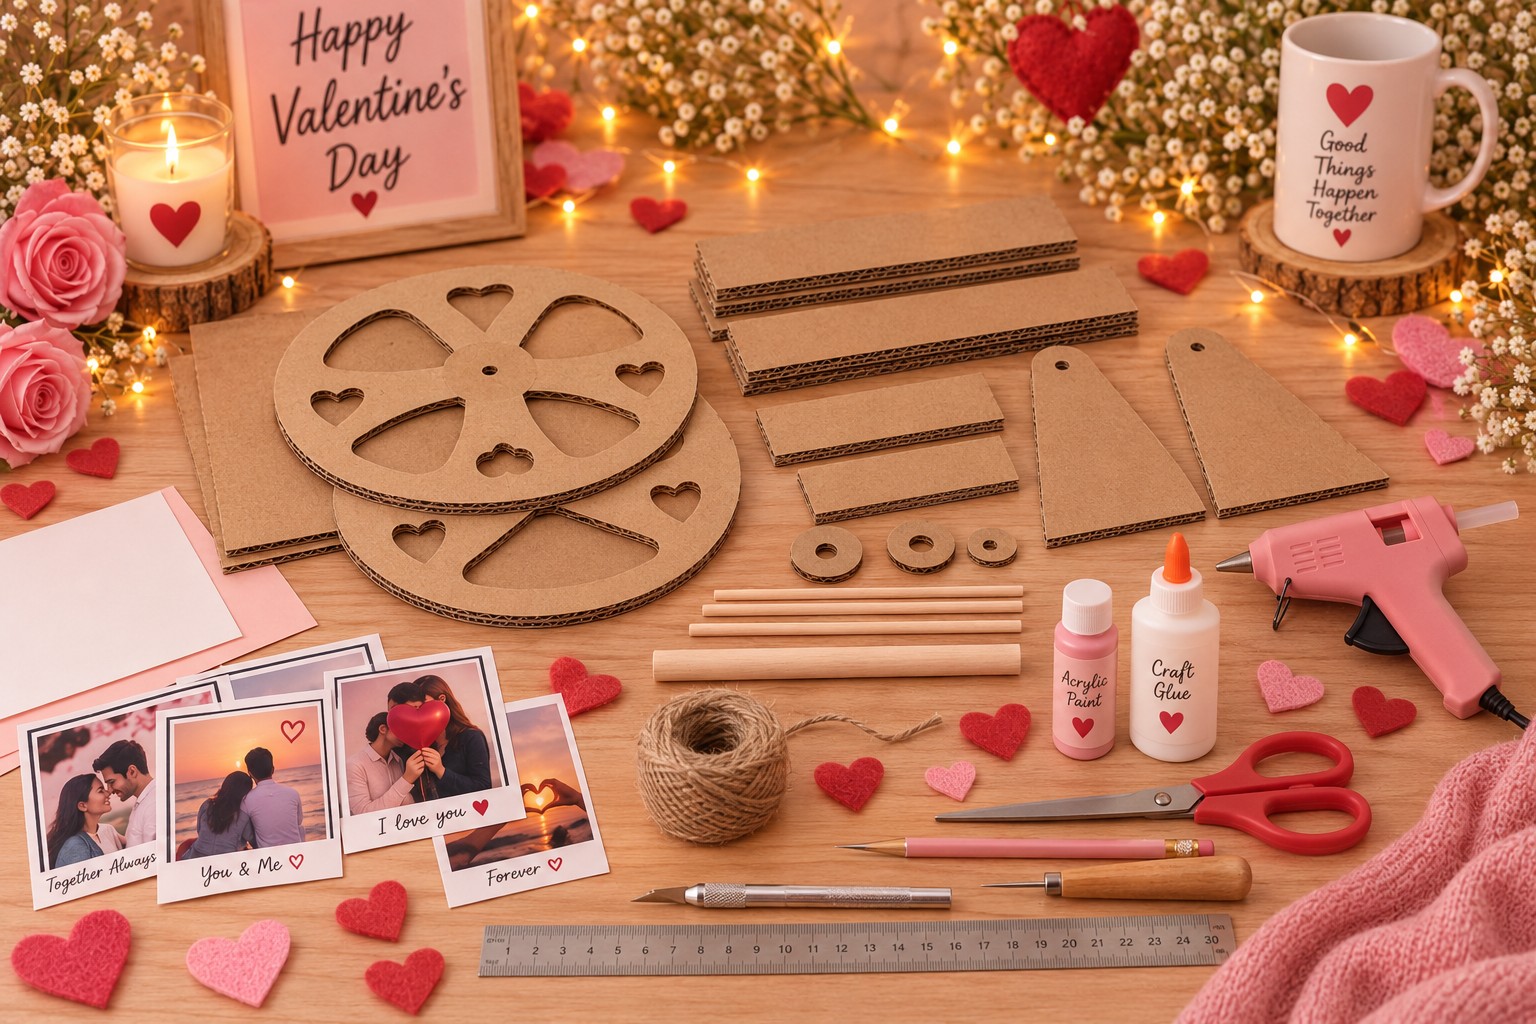
- Corrugated cardboard approximately 4–6 mm thick
- Two cardboard circles approximately 22 cm in diameter
- Cardboard approximately 18 × 23 cm for the rectangular base
- Two cardboard side supports
- One front base panel, approximately 18 × 4 cm
- Small cardboard circles for axle washers and hub details
- Four thin wooden rods for the photo supports
- A thicker wooden dowel for the central axle
- White cardstock
- Pale pink cardstock, optional
- Printed photographs of the couple
- Blush-pink acrylic paint
- Red and pale-pink cardstock or felt for the heart details
- Jute twine
- PVA or craft glue
- Hot glue
- Craft knife
- Cutting mat
- Metal ruler
- Pencil
- Awl or pointed craft tool
- Scissors
- Fine paintbrush
- Black or red fine-tip pen
Before You Begin
Before starting the full project, cut a small scrap from the same cardboard and test the paint, adhesive, and cutting method.
This sample helps answer three useful questions:
- Does the paint warp the cardboard?
- Does the adhesive bleed through the surface?
- Can the heart-shaped openings be cut cleanly without tearing the corrugated layers?
A quick material test is more useful than assuming every cardboard sheet will behave the same way.
1. Cut the Two Heart-Shaped Wheel Panels
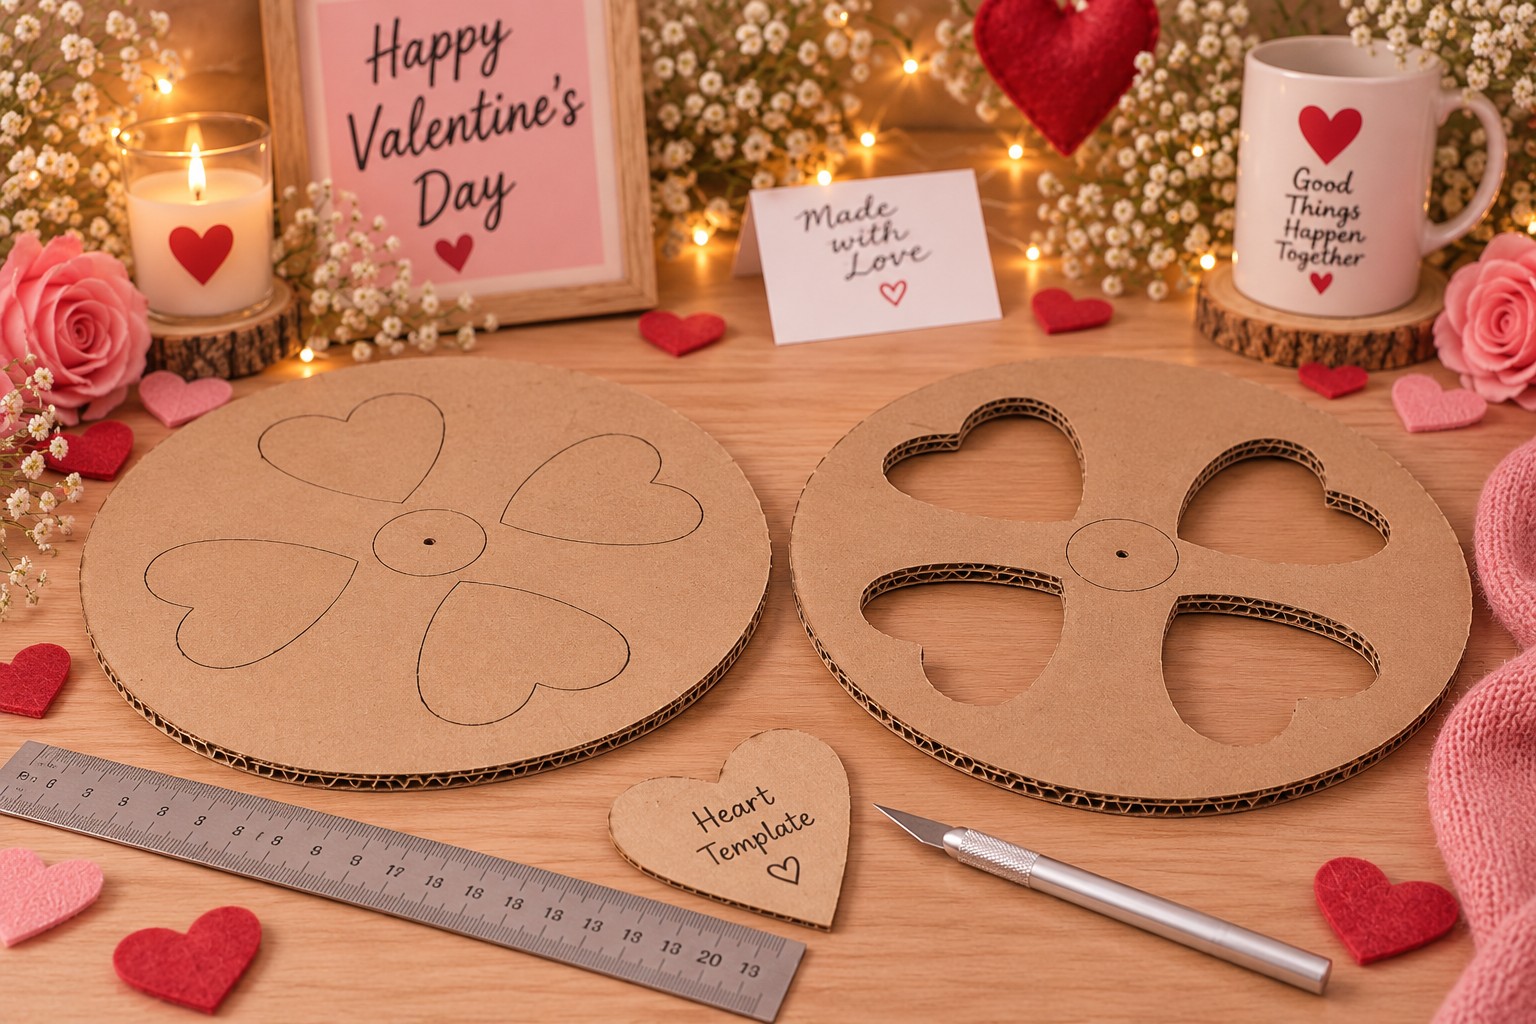
First, cut two matching circles from corrugated cardboard. A diameter of approximately 22 cm diameter provides enough room for the heart openings while keeping the finished wheel compact enough for tabletop display.
Find the exact center of the first circle and mark it lightly with a pencil.
Create a heart template approximately 5–6 cm wide . Arrange four hearts evenly around the center, leaving enough cardboard between each opening to form strong spokes.
Trace the four hearts onto the first wheel.
Cut out the openings with a sharp craft knife. Instead of trying to cut through the full thickness in one pass, make several shallow passes. This creates cleaner edges and reduces crushing along the corrugated channels.
Once the first circle is complete, place it over the second circle and trace the same opening positions.
Cut the second panel in the same way.
At this stage, both wheel panels should remain, as shown during the construction phase, raw and unpainted .
Check the pair before continuing.
Stack the two wheels directly on top of each other.
Their outside edges, heart openings, and center points should align closely. Small differences can create wobble later once the panels are connected with dowels.
2. Mark the Axle and Rod Holes
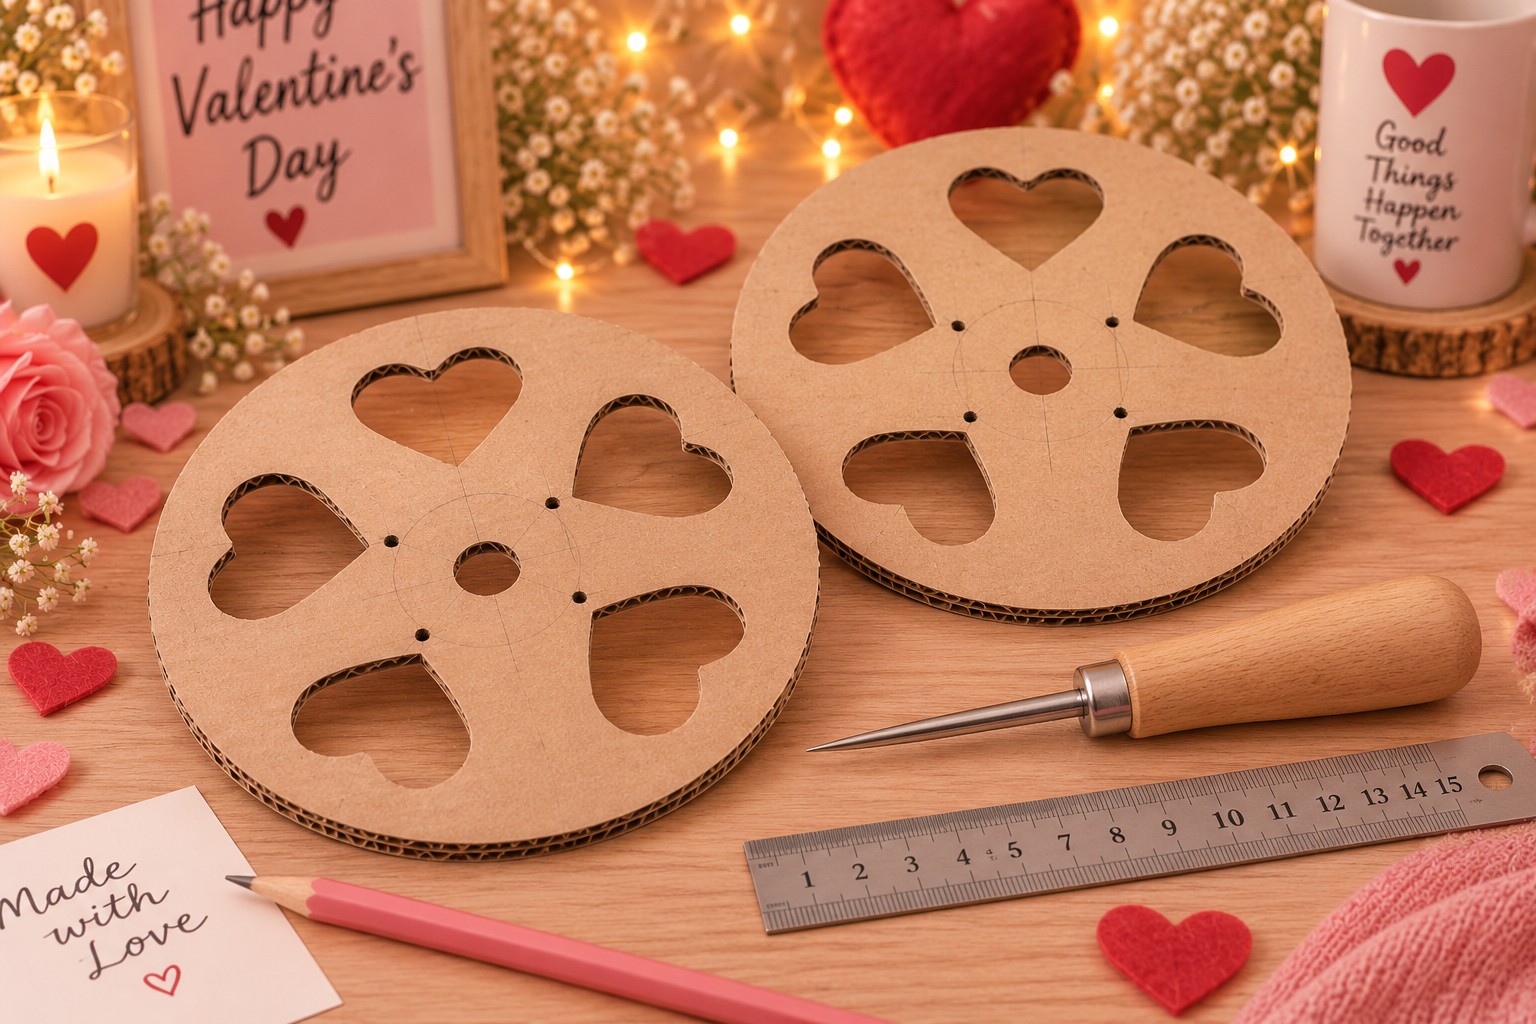
Keep the wheel panels unpainted while completing all structural holes.
Mark the central axle hole first.
The opening only needs to be slightly larger than the central dowel so the wheel can rotate without excessive resistance.
Next, mark the locations for the four horizontal photo-support rods.
The holes should:
- be equally spaced around the wheel,
- sit at the same distance from the center,
- match exactly between both panels.
Stack the two wheels together while piercing the holes whenever possible. This helps keep their positions identical.
Use an awl to open the holes gradually rather than forcing a thick dowel directly through the cardboard.
Test the dowels
Insert one of the thin rods through a pair of corresponding holes.
The fit should be secure but should not deform the surrounding cardboard.
Do the same with the center axle.
Do not apply glue yet.
3. Build the Cardboard Display Stand
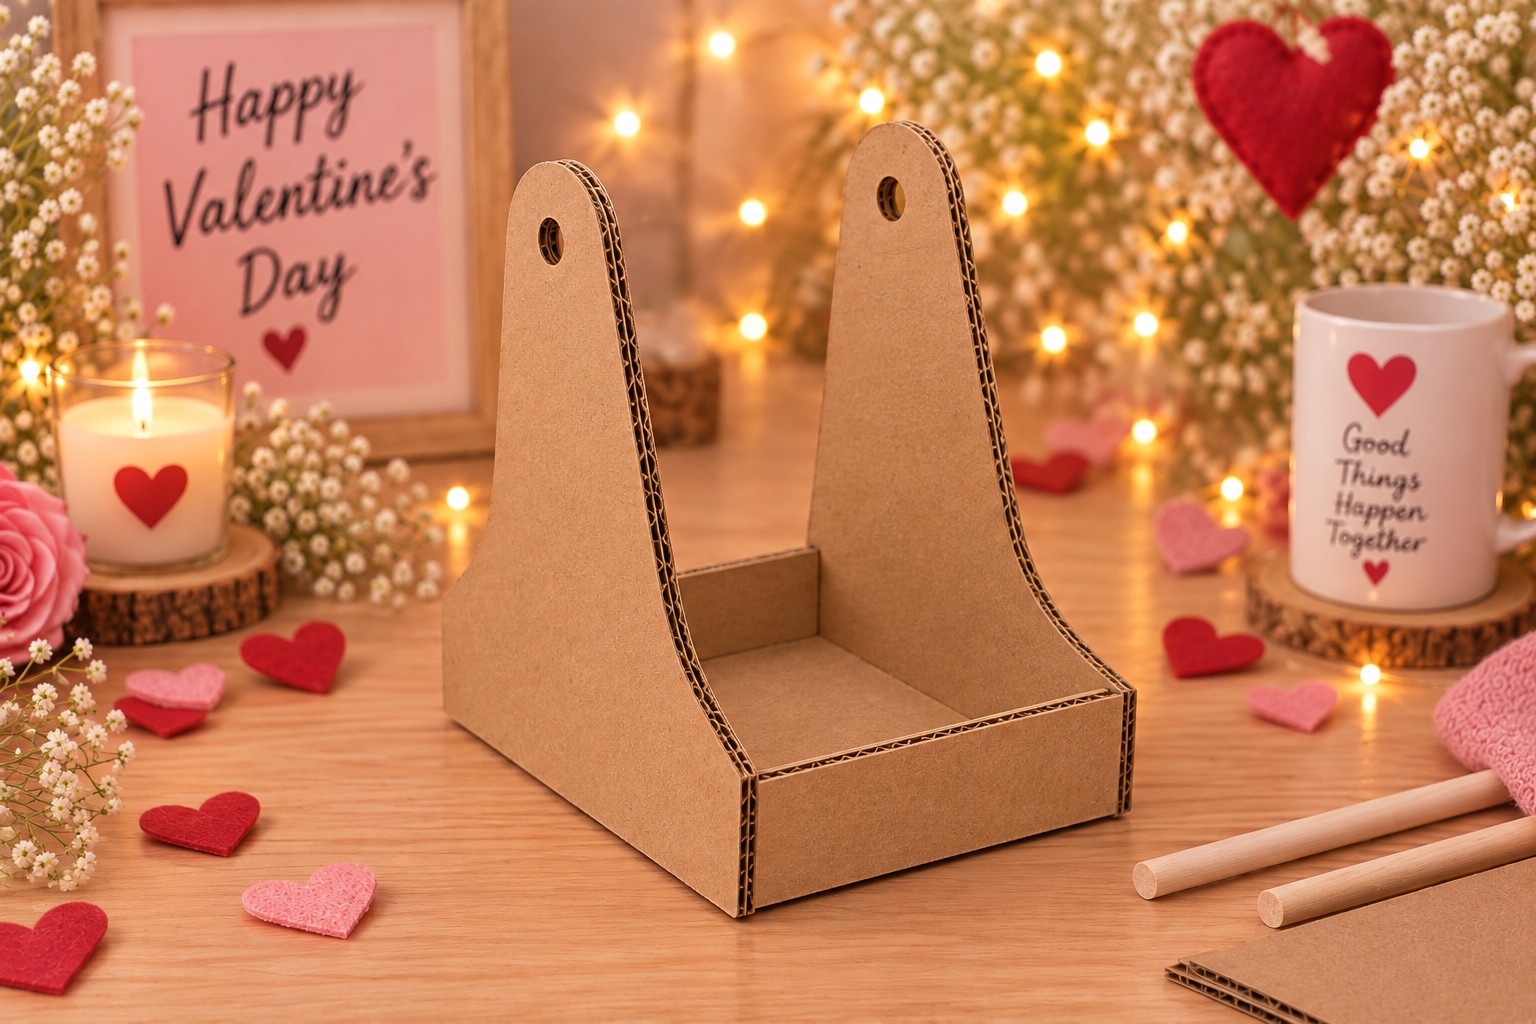
The stand consists of a rectangular tray-like base and two matching vertical side supports.
Cut a base approximately 18 × 23 cm .
The side supports should rise high enough to hold the axle above the base while leaving clearance for the hanging photo cards. For a 22 cm wheel, an axle height of approximately 14–16 cm above the base is a useful starting point.
Cut two matching support panels.
Their upper sections should include the axle holes. The lower portions can taper toward the front to create the triangular profile visible in the finished design.
Keep all pieces raw cardboard during this stage.
Attach one support to the side of the base first.
Use a metal ruler or square edge to check that it sits vertically rather than leaning inward.
Position the second support on the opposite side and confirm that both axle holes sit at the same height.
The front strip remains a separate piece until the support alignment is confirmed.
Once the two sides are correctly positioned, attach the front panel to create the shallow tray-like base.
Structural check
Place the axle temporarily through the two support holes.
Viewed from the front, it should appear horizontal.
If one end sits visibly higher, correct the support position before the glue hardens.
4. Connect the Two Wheel Panels
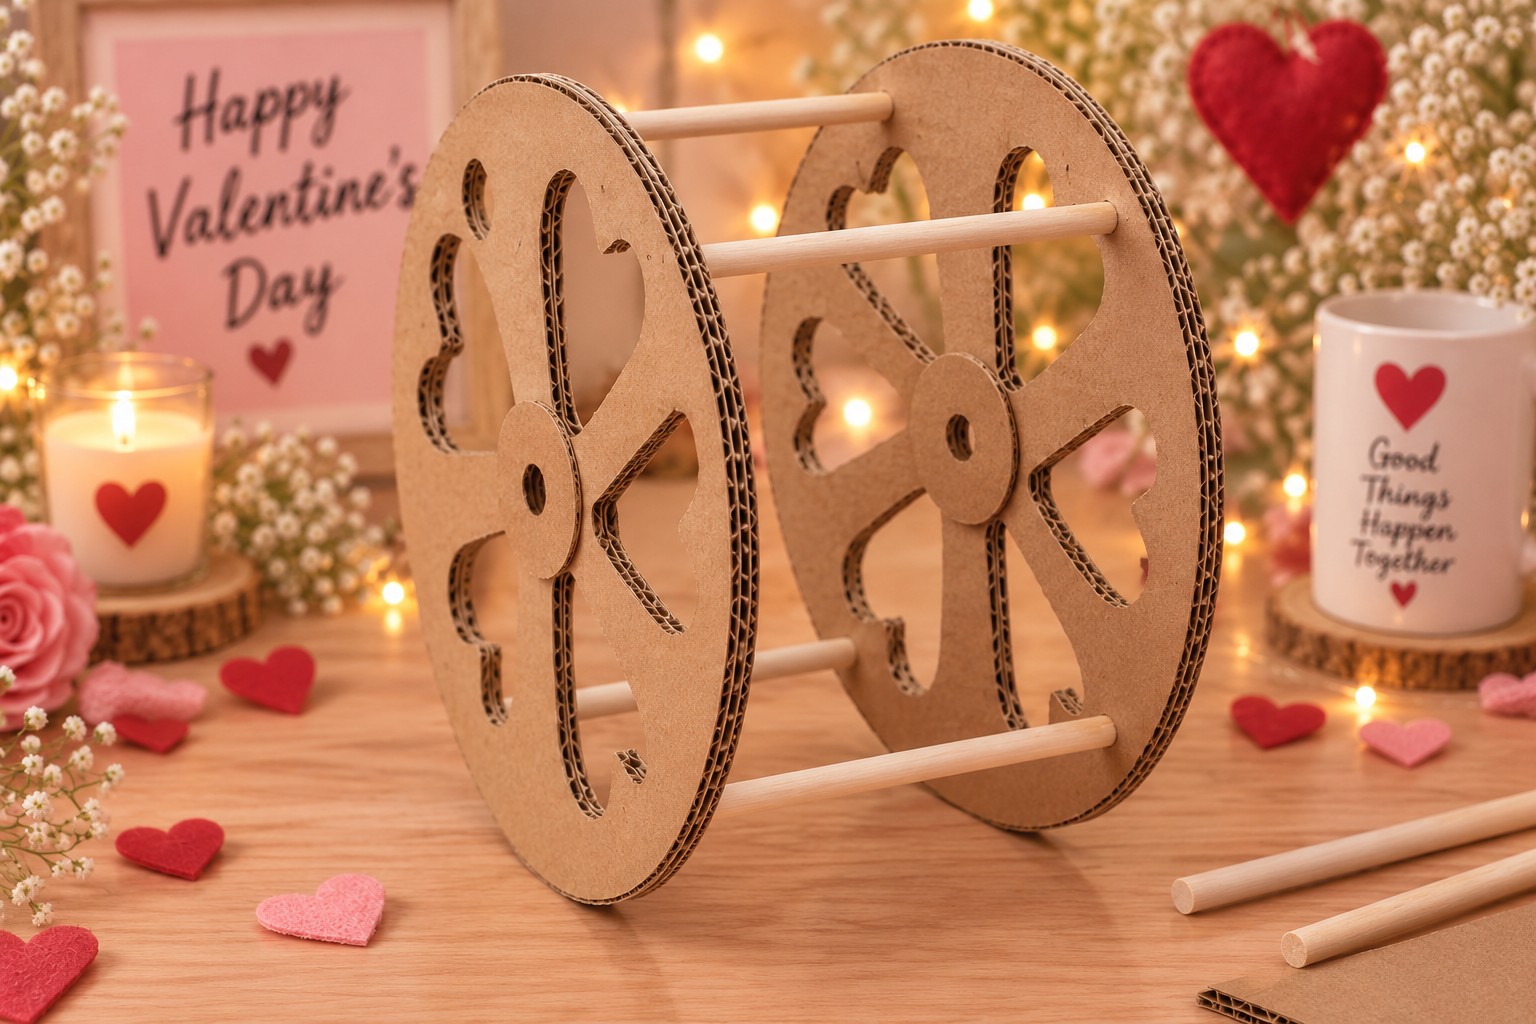
Now assemble the rotating wheel separately from the stand.
Insert the four thin wooden dowels through the holes in the first cardboard wheel.
Position the second wheel panel on the opposite ends.
The distance between the two wheels should remain consistent all the way around. Approximately 8–10 cm works well for small hanging photo cards.
Measure the spacing at the top, bottom, and both sides.
If one side is wider, the wheel will sit at an angle once installed.
Once everything is square, secure the rods with a small amount of glue.
Avoid large glue beads because excess adhesive can interfere with the later photo holders.
The completed piece should now resemble an open cardboard reel with two parallel heart-cut wheels connected by four wooden rods.
The structure is still unpainted at this stage.
5. Install the Wheel and Central Axle
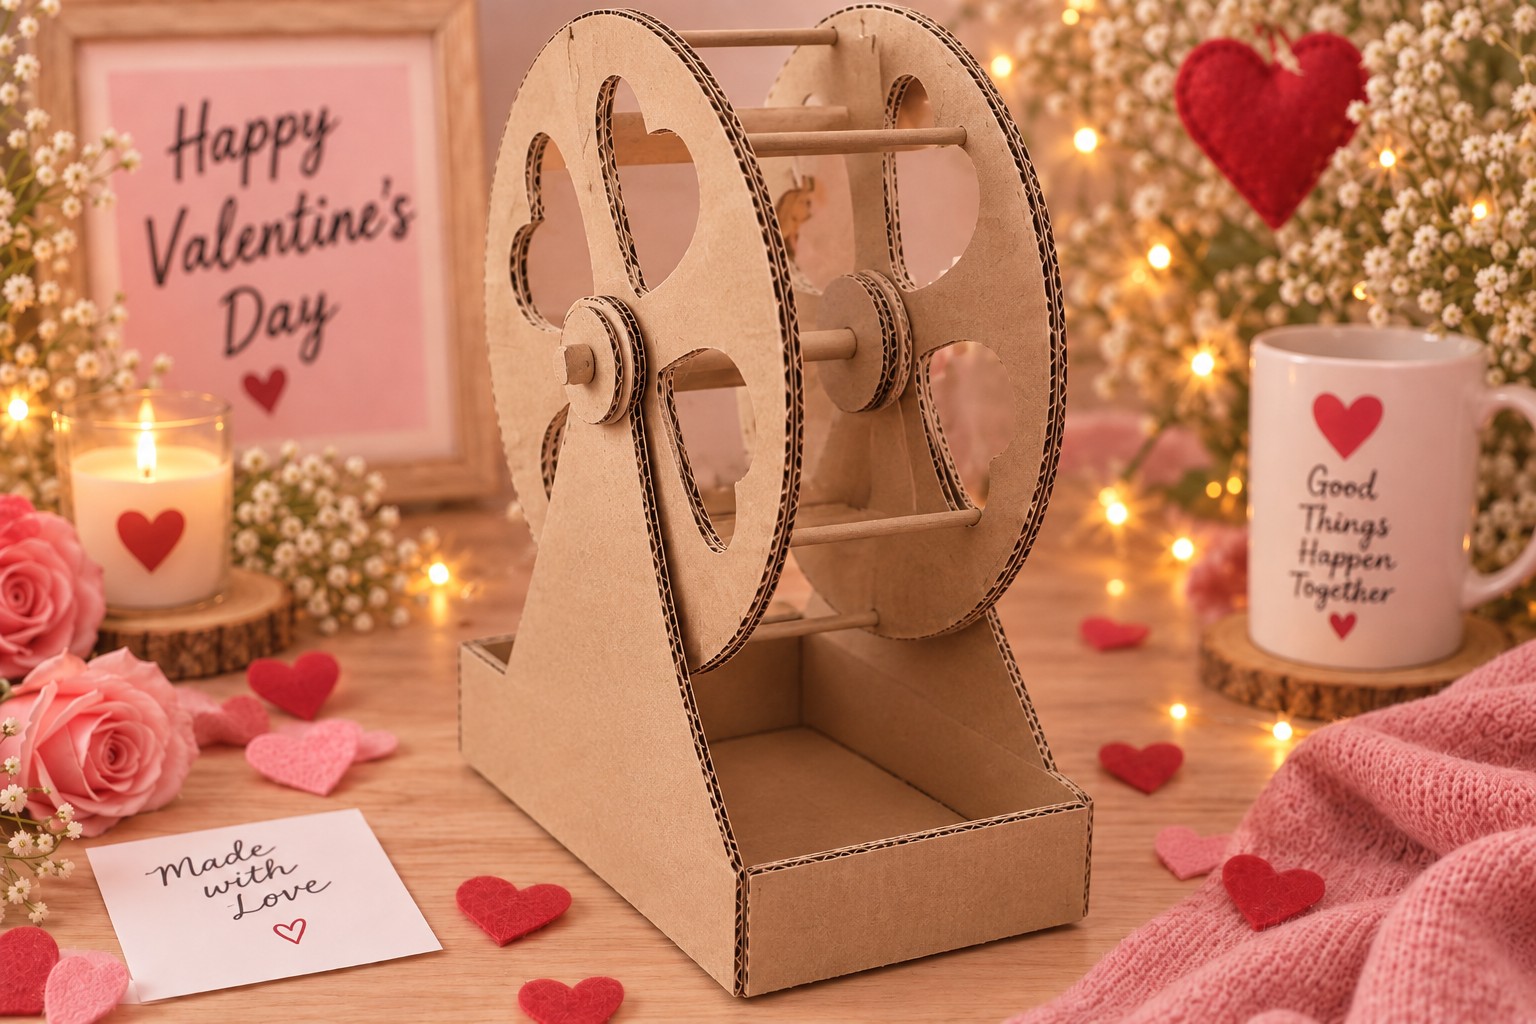
Place the completed wheel assembly between the two stand supports.
Insert the thicker wooden axle through:
- the first stand support,
- the center of the first wheel,
- the center of the second wheel,
- the opposite stand support.
Add small circular cardboard washers or hub discs outside the wheel as needed.
These discs help distribute pressure around the axle holes and provide the layered hub appearance visible in the finished design.
Do not glue the rotating wheel directly to the stand.
The wheel must remain free to turn around the axle.
Leave approximately 1–2 mm of clearance between the wheel and each side support.
Test the mechanism now
Rotate the wheel slowly through a full turn.
Check for:
- rubbing against the stand,
- uneven spacing between the wheel panels,
- loose connecting rods,
- excessive side-to-side movement,
- an axle that bends or shifts.
This is the most important mechanical test in the project because paint and decorations are added afterward.
Make any corrections while the cardboard is still unfinished.
6. Paint and Decorate the Valentine Structure

Once the wheel rotates freely, move on to the decorative finish.
Apply thin coats of blush-pink acrylic paint to:
- both wheel faces,
- the stand sides,
- the base,
- the front strip,
- the hub pieces.
Thin coats are preferable to heavy paint because corrugated cardboard can warp when it absorbs too much moisture.
Let each coat dry before applying another.
Once the base color is even, add red and pale-pink heart details.
Decorate the wheel rims and base edges with fine dashed lines to create the faux stitched effect used throughout the design.
The wooden photo rods can also be painted pale pink.
Add “I love you” to the front panel in red or dark pink.
At this point the structure should resemble the finished Valentine display, but the wheel should still be empty.
Optional heart tag
Cut a small heart from cardboard or thin craft wood.
Punch a small hole near the top and thread jute twine through it.
The tag can later be labeled “You & Me” and tied near the front hub.
7. Make the Hanging Polaroid Photo Cards

The photographs require flexible holders so they can stay relatively upright while the wheel rotates.
Cut white cardstock into rectangles approximately 6.5 × 13 cm .
Fold each rectangle in half.
The fold forms a loose sleeve that rests over a wooden rod.
Do not glue the fold tightly around the dowel. It must remain loose enough to pivot.
Create a Polaroid-style front by trimming each photograph smaller than the cardstock.
Leave a wider white margin along the bottom for the caption.
Suitable finished card sizes are approximately:
- 6–7 cm wide
- 7–9 cm tall when folded and hanging
Use the same general size for each card so the wheel remains balanced.
Test one holder first
Before preparing the entire set, place one unfinished folded card over a rod.
Rotate the wheel.
The card should swing independently and return to a vertical position under its own weight.
If it grips the dowel, loosen the fold slightly.
If it falls off too easily, reduce the fold opening.
8. Add Captions and Load the Photos
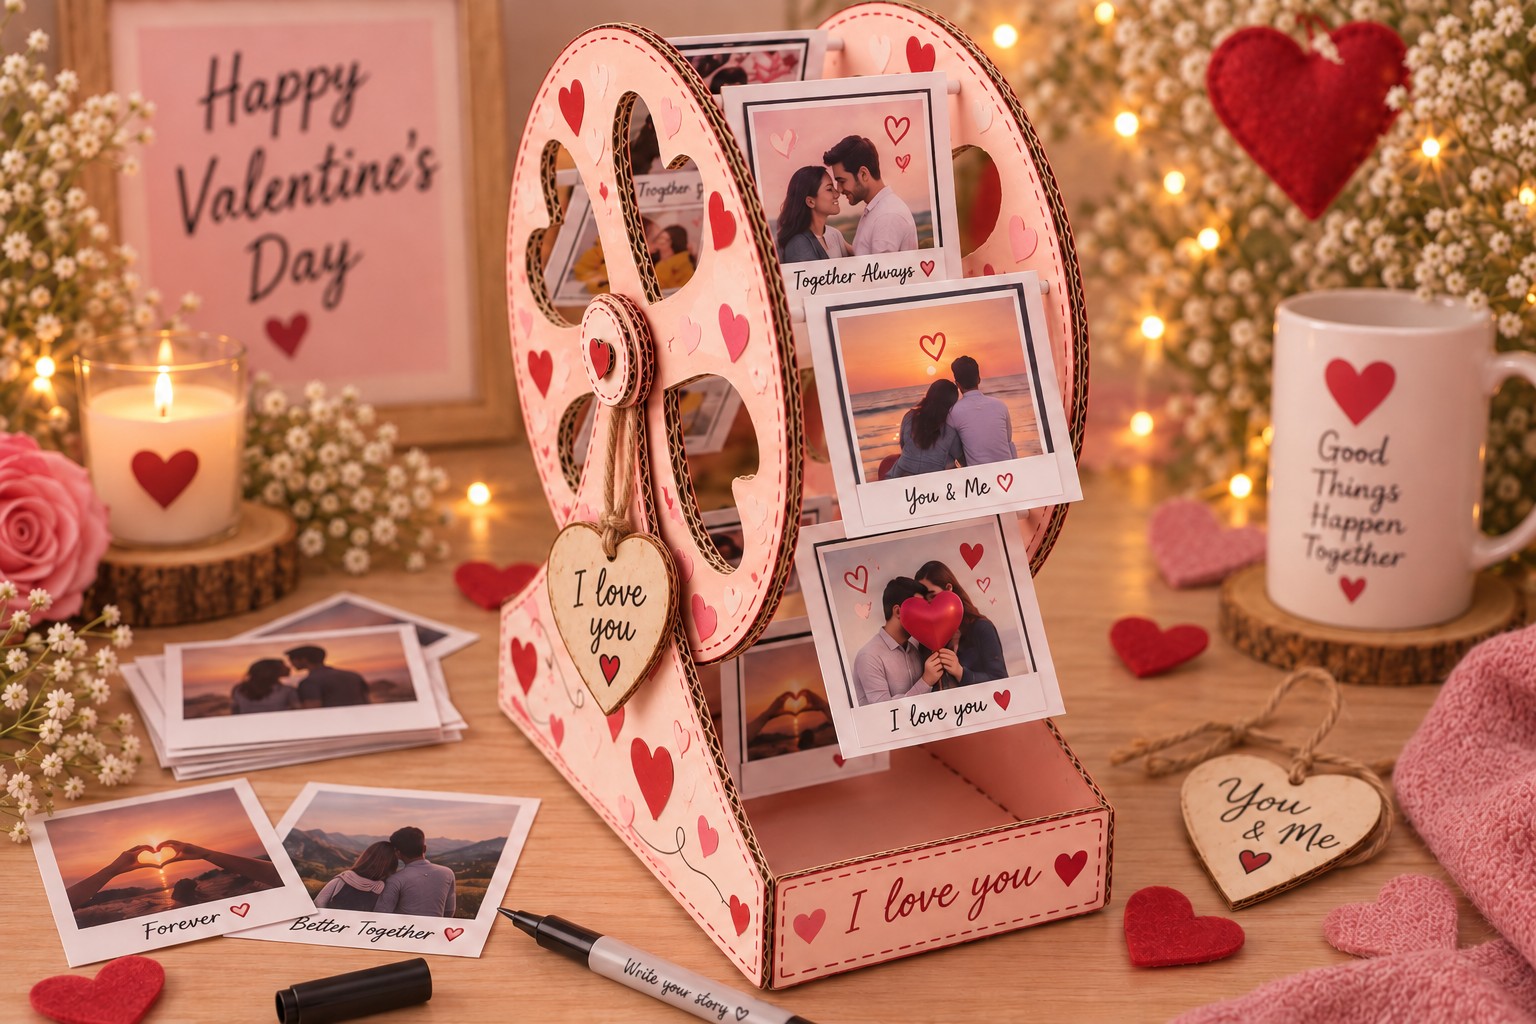
Attach the photographs to the front of the folded holders.
The Valentine design works well with short handwritten captions such as:
- Together Always
- You & Me
- I Love You
- Forever
Add small heart details around the photo borders without covering important parts of the photographs.
Begin hanging the finished photo cards over the horizontal rods.
Distribute the cards around the wheel rather than placing all of the heavier cards on one side.
Rotate the wheel after adding each group.
Check that:
- the cards do not collide,
- the lowest card clears the base,
- the cards remain relatively upright,
- the wheel still turns freely.
If one holder catches on another, shorten it slightly rather than forcing the cards closer together.
Keep the decorative heart tag off the stand until the card positions are finalized. This makes the loading stage visually and mechanically easier to adjust.
9. Complete the Base and Final Alignment

For the final stage, attach the heart-shaped tag with jute twine near the front hub or side support.
Write “You & Me” on the tag.
Check the front plaque and finish the decorative border around the “I love you” message.
Make sure the photo cards are evenly distributed.
Rotate the wheel through several complete revolutions.
The lowest card should remain at least 10–15 mm above the base .
If a card touches the stand, shorten the cardstock holder rather than raising only one side of the axle.
The finished display should now have:
- two matching blush-pink wheel panels,
- heart-shaped wheel openings,
- four horizontal photo rods,
- a centered rotating axle,
- a decorated support base,
- hanging photo cards,
- a Valentine heart tag,
- a clear front message.
Troubleshooting
The wheel does not rotate smoothly
First check whether the wheel panels are touching the side supports.
A small amount of lateral clearance is necessary.
If the axle fits too tightly through the stand holes, widen the stationary stand holes very slightly rather than cutting away large areas from the wheel centers.
The wheel wobbles
Measure the distance between the two wheel panels at several locations.
If the spacing varies, one of the connecting rods may sit deeper in the cardboard than the others.
Correct the rod depth before adding additional glue.
The photo cards turn sideways
The fold may be gripping the rod too tightly.
Open the sleeve slightly so the card can pivot freely around the dowel.
The stand leans to one side
Check whether both side supports are perpendicular to the base.
An angled support can shift the axle and cause the wheel to rub.
The paint warps the cardboard
Use thinner coats and allow the cardboard to dry flat between applications.
Avoid applying wet paint to exposed sections of the corrugated edges.
Cardboard Craft Safety
Always use a cutting mat when working with a craft knife.
Cut away from your body and make several controlled passes through thick cardboard rather than forcing the blade.
Hot glue can cause burns, so use it only where structural reinforcement is needed and allow the joints to cool before touching them.
For projects made with children, an adult should handle the craft-knife and hot-glue steps.
Keeping the Photo Wheel in Good Condition
Keep the finished display in a dry indoor location.
Corrugated cardboard can soften after prolonged exposure to moisture.
Instead of wiping the wheel with a wet cloth, gently remove dust with a soft, dry brush.
Because the photo cards can be removed individually, new photographs can be added later without rebuilding the rotating structure.
Why This Design Works as a Valentine's Day Gift
This project combines a working cardboard mechanism with personal photographs rather than relying on decoration alone. The photographs move as the wheel turns, the cards can be replaced individually, and the basic materials are inexpensive and widely available.
The construction sequence keeps the mechanical work separate from the decorative work: the wheel is cut, aligned, assembled, and tested first; painting and personalization happen only after the rotating mechanism works correctly. This reduces the chance that a detailed Valentine's Day display will need to be dismantled later for structural corrections.

Leave a Reply